Widget templates in the Admin Console
How to work with widget templates in Optimizely Configured Commerce for Classic CMS.
Use the Widgets menu option to create and manage widget templates for use in Optimizely Configured Commerce's Classic Content Management System (CMS).
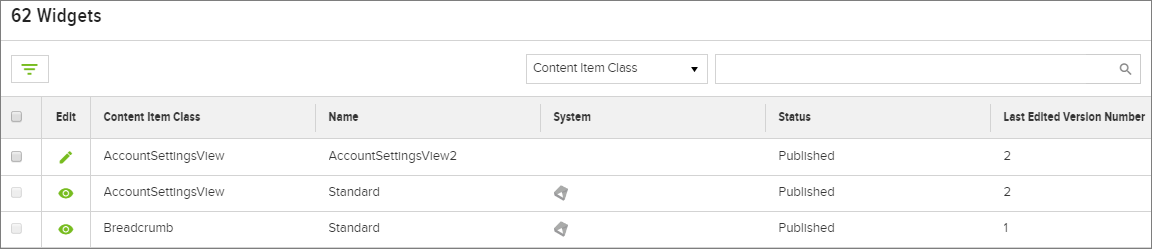
To view the widgets, go to Admin Console > Themes & Content > Widgets.
The Widgets page is set to display the following 6 columns by defalut:
| Column Name | Description |
|---|---|
| Edit | The Edit column indicates whether or not the widget template can be edited or is view only. |
| System | The System column displays the System icon if the template is a System Template. If a template is a System Template, it also displays the View Only button in the Edit column- noting that the template is View Only and cannot be edited. Editable widget templates show the Edit button in the Edit column. |
| Content Item Class | Provides the name of the Content Class, which is available in the widget drop-down when you add a widget to a site. Resulting in the templates becoming options under that content item class (Breadcrumb 2, Breadcrumb 3, and so on). |
| Name | Simply the name of the Widget Template |
| Status | Indicates whether or not the template has been published or not. |
| Last Edited Version Number | Displays the version number of the last edited template. |
This screen also displays the Content Item Class, Name, Status (either Published or Draft), and Last Edited Version Number. Search for a widget template using the Search Bar at the top of the page, or click a column header to sort the list by that column.
Click Delete at the top of the screen to delete a widget template. System templates cannot be deleted. If the widget template is linked to an active webpage, or marked as the default template for that Content Item Class, the system displays a pop-up as a reminder that the template cannot be deleted. Remove the template from the webpage, or assign another widget template as the default template, then return to the Delete screen to complete the deletion process.
Clone a widget template
Create a new widget template by cloning a system template and modifying the code.
NoteThe Zone system template cannot be cloned.
To clone a widget template:
- Go to Admin Console > Themes & Content > Widgets
- Click View Only next to a widget template.
- Click Clone.
- Assign the template a unique name on the Details tab, and click Save.
- Modify the other template tabs as needed.
A newly-cloned widget template publishes automatically as v1 of the template. Subsequent versions must be published manually.
Edit a widget template
Edit cloned widget templates to update details, change code, or restore a previous version of the template. Editable templates show an icon in the Edit column. Cloned widget templates can be edited, while System templates cannot.
- Go to Admin Console > Themes & Content > Widgets
- Click Edit next to the widget template you wish to edit.
Editing buttons
Editing buttons vary depending on the current state of the widget template (Draft or Published).
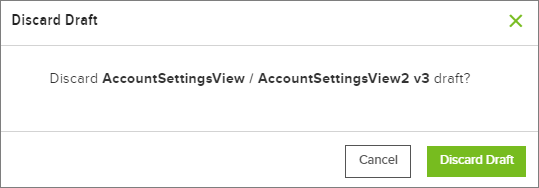
Discard Draft
-
If the selected template is in Draft mode, select Discard Draft to delete the current draft and return to the last published version of the widget template. In the pop-up window, select Discard Draft.
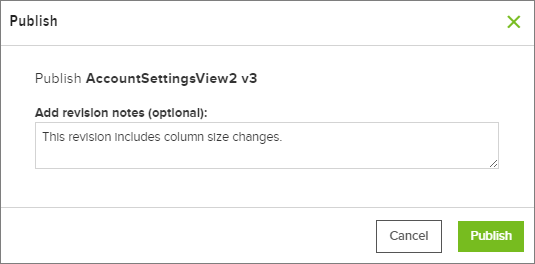
Publish
-
The Publish button appears when the widget template is in Draft mode. Add optional revision notes in the pop-up, and click Publish.
Clone
- Click Clone to clone the current widget template.
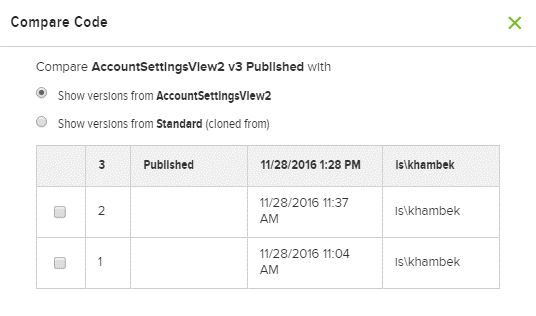
Compare
-
Click Compare to compare the current template version either with a previous version of itself, or with a version of the template it was cloned from (if applicable). Select a version type using the radio buttons at the top of the pop-up, then select a template version using the checkboxes.
 Note
NoteCompare code options are limited to a maximum of 50 versions.
-
Click Compare to open the code in a new window.

-
Any differences between the two selected versions appears in blue. In the above example, a line of code was modified in the most recent version (the version on the left).
-
Close the browser window to return to the Admin Console.
Details tab
-
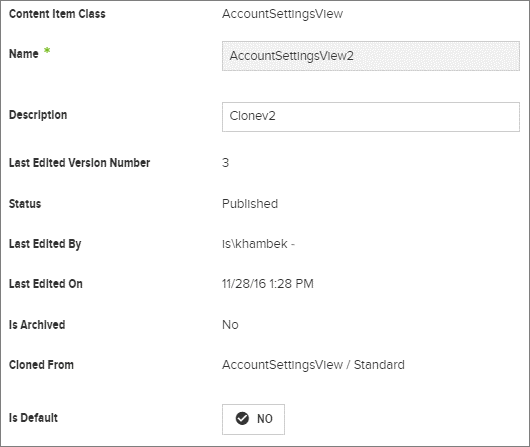
On the Details tab of a cloned template, Content Item Class, Last Edited Version Number, Status, Last Edited By, Last Edited On, Is Archived, and Cloned From are set fields and cannot be changed. The cloned template inherits the Content Item Class and Cloned From field values from the parent template.
-
Assign the template a unique name (required) and description (optional).
NoteAfter a widget template is created, it may NOT be renamed.
-
At the bottom of the screen, select Is Default to mark the widget template as the default template for that content item class. This correlates to the Use Default Template checkbox in the CMS.
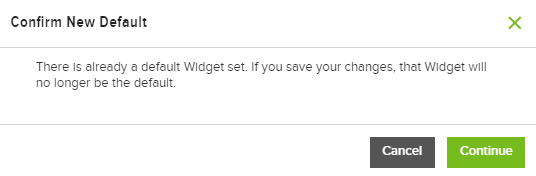
If the Is Default toggle is changed to YES, and the changes saved, a pop-up appears if a widget template already is set as the default for that particular content item class. Click Continue in the pop-up window to accept changes and confirm the present widget template as the new default.
-
Click the HTML tab to modify the template's code in the ACE editor.
NoteA system template's code cannot be modified.
-
Click into the ACE editor and begin typing to add code. As code is entered, auto-suggest options are presented. Press the Tab key to enter the selected suggestion.
-
In the upper right corner of the ACE editor, click Upload File to upload a file. The uploaded code replaces all of the current lines of code; it does not append the existing code. Click More Options to enter Vim Mode.
HTML tab
Version History tab
-
Click the Version History tab to view the widget template's current and previous versions. Select the View Only to view additional information about a particular version.
NoteVersion history is limited to a maximum of 30 versions.
-
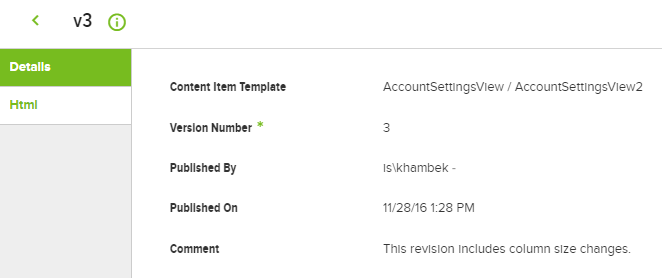
The Details tab lists the template's content item template name, version number, published by/on information, and any comments added when the version was published. All of this information is Read Only, and may not be changed.
-
Click Information next to the version number at the top of the screen to view additional version details, like Created By, Created On, Modified By, Modified On, and Id.
-
The HTML tab shows the HTML belonging to the selected version. This HTML is read only and cannot be modified.
-
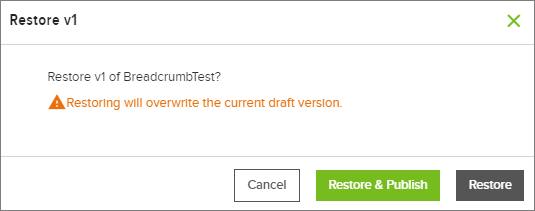
Click Restore in the upper right corner of the screen to restore a previous version of the widget template. If a Draft version currently exists, the Restore pop-up displays a warning. Click Restore & Publish to restore the version and publish the widget template, or click Restore to restore the version but leave the template in Draft mode.
 Note
NoteThe Restore option appears only if a user selects a version other than the current Draft or Published version of the template.
Updated 23 days ago