Configure the WIS
Describes how to configure the Windows Integration Service in Optimizely Configured Commerce.
The Windows Integration Service (WIS) runs integration jobs such as product refreshes and order submits on behalf of the website application. See below for info on configuring the WIS after installation.
Use of the real-time thread
Avoid using the real-time thread unless it is actually necessary. The recommended approach is to use API calls into the target system for real-time order submission rather than rely on the WIS. Instead, reserve the real-time function for those cases where there is not an externally available API and the WIS must respond with data in a near-real-time fashion. Order submit and external queries are examples of when it would still be appropriate to use.
Setup WIS
Install the WIS using the CommerceIntegrationServiceSetup.msi. Once the WIS is installed on the server, the configuration file called SiteConnections.config will need to be configured for each connection set up in the Admin Console (AC) of the website. Multiple site connections can be configured in a single installation of the WIS.
For the 64-bit version, the default path of the installation is C:\Program Files\Optimizely\Commerce Integration Service V4.2.
For the 32-bit version, the default path of the installation is C:\Program Files (x86)\Optimizely\Commerce Integration Service V4.2.
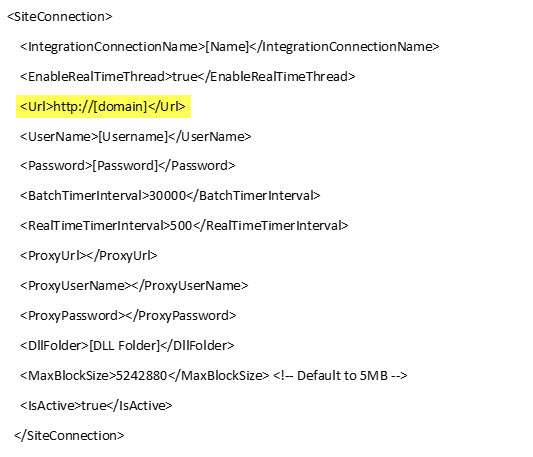
Cloud clients setting up integration for the WIS need to use the following URLs:
- Sandbox –
https://[domain-name]-integration.insitesandbox.com - Production –
https://[domain-name]-integration-cloud.insitesofthosting.com
NoteThe URLs above are also referenced in the SiteConnections.config- the reference is highlighted below
Configure the connection string
- Go to the folder where you installed the WIS
- Open SiteConnections.config in a text editor (Such as Notepad++)
- In this file you will see a block of code to configure a connection in the Admin Console. This code is shown below. Values in brackets [ ] must be replaced with actual values:
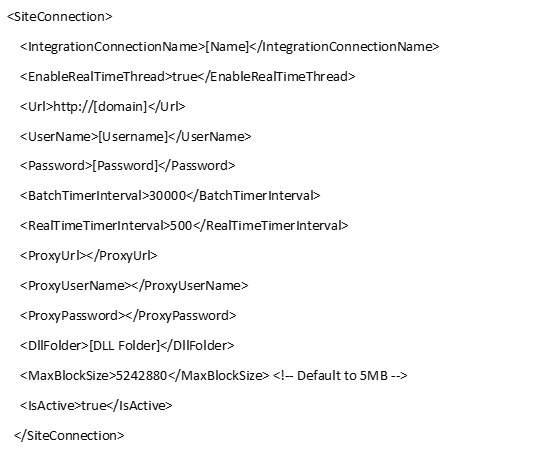
Additional details of each item in the SiteConnection shown above
- Enter a name for the connection between the <IntegrationConnectionName></IntegrationConnectionName> tags. This connection name must match the Admin Console connection name or this site connection will be ignored.
- Enter the domain for the {user["product-name"]} website between the <URL></URL> tags. Test this to make sure that this domain can be loaded from a browser on the WIS server.
- Enter the username for the integration user that has the ISC_Integration role between the <Username></Username> tags. If the integration user isn't set up, then create a new user. Without this integration user the site connection will not be able to authenticate when connecting to the website.
- Enter the password for the integration user that has the ISC_Integration role between the <Password></Password> tags.
- If you are using a proxy with your integration, enter the appropriate proxy information between the <ProxyURL></ProxyURL>, <ProxyUsername></ProxyUsername>, and <ProxyPassword></ProxyPassword> fields.
- If you are using custom integration code for any of the integration processors, then specify the DLL directory between the <DllFolder></DllFolder> tags. Then copy your custom integration .dll files to this directory.
- Once you finish configuring the SiteConnection data, save your SiteConnections.config file. Then stop/start the WIS so your changes get picked up. Then go to the folder where you installed the WIS and review the logging in the logfile.txt to address any errors. If connection information isn't set up correctly this logfile.txt will alert you of the problems encountered.
Create the connection in the Admin Console?
-
From within Admin Console, go to Administration > Jobs > Connections.
-
Click Add Integration Connection.
-
Enter the name for the new connection.
NoteThis name must exactly match the name that was entered in the connections string.
-
Choose the type of connection from the Type drop-down.
-
Enter the rest of the data as required for the specified connection.
NoteIf using a Tab delimited flat file connection, you would enter TAB for the Delimiter.
-
Click Save to save the Integration Connection
-
When finished with the connections, proceed to the article for Create Integration Jobs.
Updated 23 days ago