Rule type option for CMS variants
Describes how to create custom rule type option for Content Management System (CMS) variants in Optimizely Configured Commerce SDK.
Creating a custom Rule Type Option for CMS Variants can be useful for A/B testing. The basic idea is that some users will see one variant of a page, while other users will see a different variant of the same page. This can be helpful in determining how users use an application, whether or not a specific action is used, if page variant is more or less helpful in a workflow, and so on.
To create an A/B test for a CMS Page Variant, we will:
- Add a custom Rule Type Option in code within the Insite Commerce solution
- Add a page and a page variant in the CMS
- Apply the new Rule Type Option to the page variant
The custom Rule Type will use a percentage to determine which users see the variant of the page and which users see the default page. This percentage will be defined when we apply the new Rule Type Option within the CMS.
Prerequisite
- Visual Studio installed
- Configured CommerceSDK installed
To create a custom Rule Type Option in code:
-
In the Configured Commerce Web project in Visual Studio create a new folder called "Extensions".
-
Add a new class called "CriteriaTypeABTesting".
-
Derive from the base class CriteriaTypeBase and decorate the class with the DependencyName attribute with a name of "AbTesting".
[DependencyName("AbTesting")] public class CriteriaTypeABTesting : CriteriaTypeBase -
Override and change the DisplayName property value to "ABTesting".
public override string DisplayName => "ABTesting"; -
Override the remaining properties as follows. Most of these properties have default values because we won't need to use them.
public override string CriteriaValueLabel => string.Empty; public override bool RequiresCriteriaObject => false; public override bool RequiresCriteriaProperty => false; public override bool RequiresCriteriaValue => false; public override bool RequiresGeocode => false; public override bool RequiresValueType => false; -
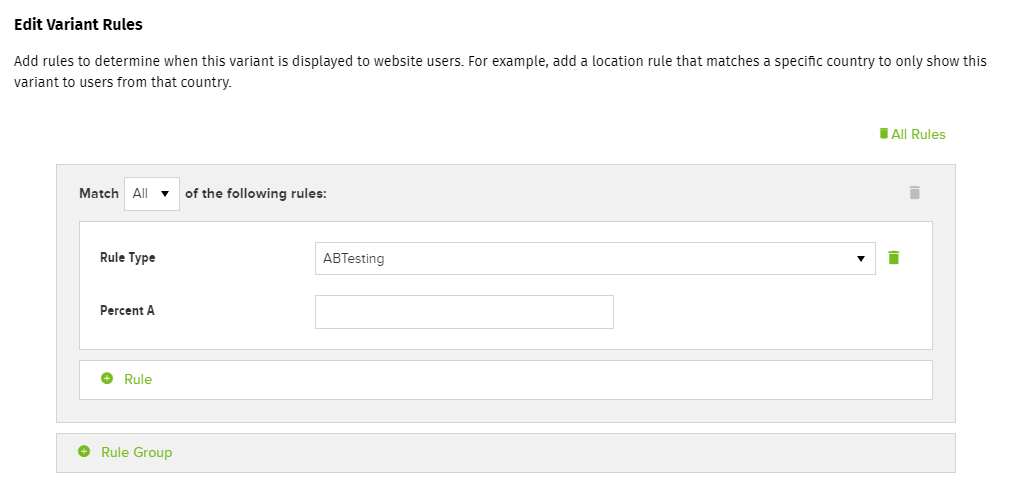
As stated previously, we will be using a percentage to determine which page variant will be displayed to a user. A field in the CMS will be used to specify this percentage, but first we need to tell the CMS about this field in order to use it. To do this, we need to override the ParameterDescriptions property with the following configuration. This configuration tells the rules dialog in the CMS how to display and capture the field value. In this case, we are using a text field that can be populated with a number.
public override Dictionary<string, CriteriaTypeParameter> ParameterDescriptions => new Dictionary<string, CriteriaTypeParameter> { { nameof(RuleClause.SimpleValue), new CriteriaTypeParameter { Label = "Percent A", ValueType = "number" } } }; -
Override the Validate method. This is the method that will actually determine which page variant a user will see while using the site. The following code will fetch the percentage value specified in the CMS. Then, it will compare that percentage to a random number to determine which Boolean value will be returned from the method. If true is returned, the user will see the page variant. If false is returned, the user will see the default page.
public override bool Validate(RuleClause ruleClause, object argument) { var percentage = this.TryParseInt(nameof(ruleClause.SimpleValue), ruleClause.SimpleValue); var result = new Random().Next(1, 100); return result <= percentage; } -
Rebuild the solution.
Next, create the CMS page and variants and apply a rule to them that uses the new Rule Type Option we created.
To create a CMS page and variants:
-
Sign into the Admin Console for your site.
-
Go to the CMS.
-
Change the CMS to Edit mode.
-
In the sidebar navigation, add a Content Page page under the Home page.
-
Name the page "ABTesting" and give it a URL of "/abtesting".
-
Find the newly created page in the sidebar and click Add Variant from the flyout menu.
-
Give the variant a name of "Variant A".
-
Click Continue. Next, we will apply the new rule.
To apply the new "ABTesting" Rule Type Option:
-
In the Rules dialog, select the new "ABTesting" rule from the Rule Type drop-down.

-
Indicate a number in the Percent A text field. For simplicity's sake, we can use a value of "50". This means that 50% of the time the user will see the page variant, otherwise the user will see the default page. This will make it easier to test and validate later that the rule is working.
-
Close the dialog.
-
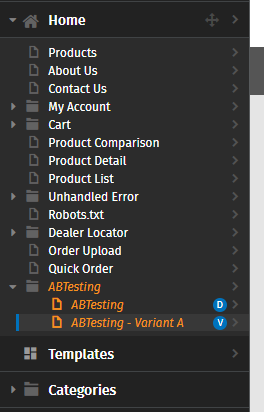
Back in the navigation, you should now see three new items: the CMS page and two child page variants named "ABTesting" and "ABTesting - Variant A". The first child page variant is the default page variant.

-
To make the test easier to execute and validate, we should add content to differentiate the page variants. Add a RichContent widget to each of the variants and type in "Default variant" for the default page variant and "Variant A" for the other page variant.
-
Publish the page and the two child page variants. The new Rule Type Option will not run unless we visit the site outside the context of the CMS and you cannot visit the page without publishing it.
Finally, we can test the new Rule Type Option. Simply go to the URL we specified for the page, "/abtesting". Depending on the random number generated within the rule, you should see one of the two variants. Refresh the page a few times. Eventually, you should see the other page variant instead.
In production, this specific setup probably does not make sense. The page can be visited directly and we are not keeping track of which page was displayed to the user. We don't really have any "trackable" data. To take this a step further, we could insert this page in a workflow so that the user only visits it once during that workflow. Additionally, we could persist some data to help track which page was displayed to the user. In this example, we will only be doing the latter step. We can use the cart and custom properties to track that information.
To keep track of which page is displayed to the user:
-
Back in Visual Studio, find the new rule class you created.
-
Create a constructor and add the ICartOrderProviderFactory as a parameter.
protected readonly ICartOrderProvider CartOrderProvider; public CriteriaTypeABTesting(ICartOrderProviderFactory cartOrderProviderFactory) { this.CartOrderProvider = cartOrderProviderFactory.GetCartOrderProvider(); } -
Down in the Validate method, before you return the boolean value, fetch the cart for the user.
public override bool Validate(RuleClause ruleClause, object argument) { var percentage = this.TryParseInt(nameof(ruleClause.SimpleValue), ruleClause.SimpleValue); var result = new Random().Next(1, 100); var cart = this.CartOrderProvider.GetOrCreateCartOrder(); return result <= percentage; } -
Expand the return statement so that you can add a custom property to the user's cart. This custom property will help us keep track of which page was displayed to the user.
public override bool Validate(RuleClause ruleClause, object argument)
{
  var percentage = this.TryParseInt(nameof(ruleClause.SimpleValue), ruleClause.SimpleValue);
  var result = new Random().Next(1, 100);
  var cart = this.CartOrderProvider.GetOrCreateCartOrder();
  if (result <= percentage)
  {
    cart.SetProperty("ABTesting", "Variant A");
    return true;
  }
  cart.SetProperty("ABTesting", "Default Variant");
  return false;
}
When a user visits this page, a custom property in the user's cart is added or updated to track which page was displayed to the user.
Updated 5 months ago
