Add product images
Describes how to upload and assign product images in Optimizely Configured Commerce.
Displaying product images provides buyers with a clear view of what they are purchasing.
About images
Optimizely Configured Commerce provides three different product image sizes: Small, Medium, and Large.
- Small - The small image is displayed on a variety of pages: Cart, Order Details, Review and Pay, Request for Quote, Quote Details, and Wishlists. The recommended size is 160x160.
- Medium - The medium image is displayed on the Product Detail page, Category page, within the Carousel widget, and in the search box. The recommended size is 300x300.
- Large - The large image is displayed when a user selects an image to view it larger. The recommended size is 900x900.
NoteIf only one image is uploaded, the generic image is then used in places where an image size has not been provided. For example, if only a small image has been uploaded, when a user clicks on the image to view it larger, the large image will display the generic image.
NoteThe Medium image is required. It is used if the Small and Large image paths are not identified. However, Configured Commerce highly recommends adding an appropriately-sized/scaled image to each field for performance reasons. Greatly oversized medium images that must be scaled to fit small/large image paths may affect performance.
Image considerations
In most circumstances, using the same image for all three sizes provides a consistent user experience. For example, if a user selects the Product image on the Product Detail page, a larger version of the image is displayed. However, using a different Large image will display an entirely different image, not providing the expected user experience. This is because the Product Detail page uses the Medium image and the bigger, "zoomed in" image uses the Large image.
A different scenario, where using different images could be advantageous, would be to use the Medium image to show the product on a model and then use the Large image to show a close up the product- not including the model.
Regardless of what images are used, it is important to thoughtfully plan out images and how they will be displayed on the website. Be sure to use the image sizes and locations listed above as a reference point when making Product image decisions.
Add images to products
Displaying multiple images to a Product provides buyers with a comprehensive view of what they are purchasing. To add images to Products, the image path for the Small, Medium, and Large images needs to be identified. This path is set at the Product level within the Admin Console. All images are stored either within the Media library, which is physically on the Configured Commerce web server, or within a Content Delivery Network. The steps below are only applicable to images stored within the Media library. To identify the path to the images, follow the steps below:
️ ImportantIf no image is uploaded, the default "image not found" image is used. Use the Small Default Product Image, Medium Default Product Image, and Large Default Product Image Settings to control which file is used for the "image not found" image.
NoteWhen upgrading a 4.x site to 4.3.1, the Small, Medium, and Large image paths for each product are migrated into a single new product image on a given product.
To add multiple images to a product:
-
Go to Admin Console > Catalog > Products.
-
Select Edit for the desired Product.
-
Select the Images finger tab.
-
Click Add Product Image.
-
Give the image a Name, and determine its Sort Order.
The image with the lowest sort order (1) is assigned as the Primary Image. It appears throughout the site and by default on the product detail page.
-
Click Browse to browse for a Small, Medium, or Large image.
NoteThe Medium image is required. If Large and Small images are not uploaded, the Medium image is resized automatically and used across the site where the Small and Large images normally appear.
-
Double-click the desired image or select Choose in the upper left corner.
-
Click Save.
Once images have been uploaded, reorder them to ensure the buyer sees the most dynamic image first. To reorder product images:
-
Go to Admin Console > Catalog > Products.
-
Select Edit for the desired Product.
-
Select the Images finger tab.
-
Select More Options, and select Reorder Images.
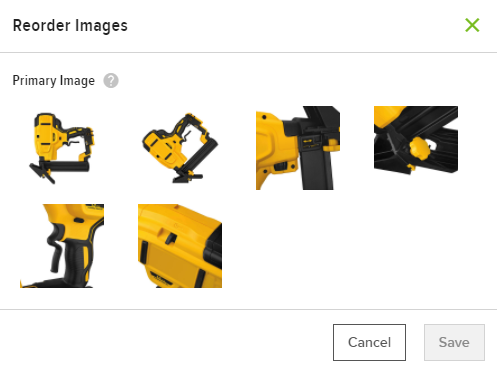
-
Select an image, then drag and drop it to a new location in the list.
NoteThe image in the upper left corner (with the Sort Order of 1) is the Primary Image, and is the image shown across the site and by default on the Product Detail page.
-
Select Save.
This is how multiple images appear on the Product Details page:
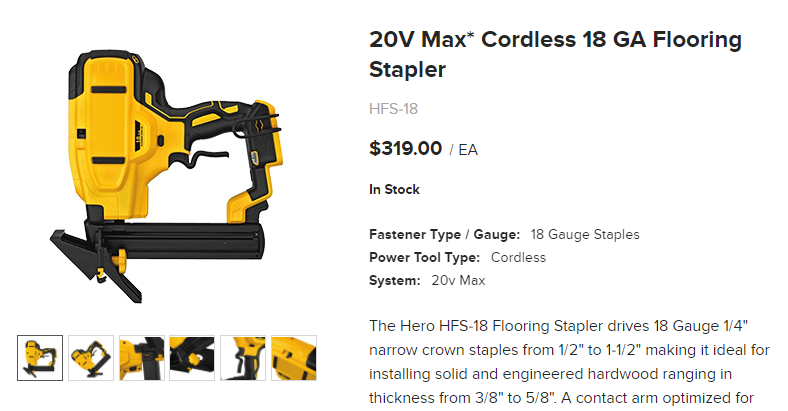
Select the thumbnails under the primary image to change the displayed image and select the primary image to zoom in and view the Large image.
Add and assign images using product import
Before proceeding with this method, all images need to exist either locally in the Media library, physically on the Configured Commerce web server, or a CDN. From there it is then necessary to add the file path or URL for each product and image size (small, medium, large) into the import spreadsheet. As you can imagine, this could be a very laborious task and is not recommended for large scale product/image assignments. This would likely be used as a one-off for small updates. Refer to the documentation on importing/exporting for more information on how to perform an import and how to use the import template.
Updated 5 months ago