Include warehouse availability on product detail page
Describes how to display inventory availability for a product based on warehouse in Optimizely Configured Commerce.
By default, inventory availability on the product detail page only displays a single message per product. You can customize Optimizely {user["product-name"]} to display inventory availability for a product based on warehouse. Displaying warehouse availability on the product detail page requires the following customizations:
- Return warehouse data on the product detail page
- Create a custom Angular directive to display availability per warehouse
- Create a custom product detail widget to use the custom Angular directive
Preconditions
- Visual Studio and SDK installed
- One or more warehouses configured
- One or more products and categories configured
- Products have inventory levels defined for one or more warehouses
Return warehouse data on product detail page
This customization requires you to create a custom ProductDetailController in TypeScript and request warehouse data for the product.
-
In Visual Studio, find your theme project.
-
Create a new directory inside the ~\Scripts directory named Custom. This directory will be used multiple times in this walk-through.
-
In the ~\Scripts\_Custom directory, create a TypeScript file named custom.product-detail.controller.ts.
-
Add a namespace named "custom".
module custom { "use strict"; } -
Add a class declaration for ProductDetailController and extend insite.catalog.ProductDetailController.
-
Add a class declaration for ProductDetailController and extend insite.catalog.ProductDetailController.
module custom { "use strict"; export class ProductDetailController extends insite.catalog.ProductDetailController { } } -
In the ~\Scripts\Catalog directory, find the insite.product-detail.controller.ts file.
-
In the insite.product-detail.controller.ts file, find the getProductData method and copy it.
-
Paste the copied method into your custom ProductDetailController.
-
In the expand array, add an additional data point called "warehouses".
export class ProductDetailController extends insite.catalog.ProductDetailController { protected getProductData(productId: string): void { const expand = [ "documents", "specifications", "styledproducts", "htmlcontent", "attributes", "crosssells", "pricing", "warehouses" ]; this.productService.getProduct(null, productId, expand).then( (productModel: ProductModel) => { this.getProductCompleted(productModel); }, (error: any) => { this.getProductFailed(error); } ); } } -
After the controller class declaration, register your new controller with Angular. You need to overwrite the registration of the insite.catalog.ProductDetailController, so your new controller is used instead of the insite controller.
export class ProductDetailController extends insite.catalog.ProductDetailController { protected getProductData(productId: string): void { // ... } } angular // The insite.catalog.ProductDetailController is registered in the "insite" module. .module("insite") .controller("ProductDetailController", ProductDetailController); -
In your theme project, find the theme.json configuration file.
-
In the BodyEndScripts property, add a reference to the "Scripts/_Custom/" directory using a wildcard. Another file will be added to this directory in later steps.
"BodyEndScripts": [ // ... "Scripts/*", "Scripts/_Custom/*" ] -
Build your solution.
-
Go to the Storefront and find a product with warehouse data.
-
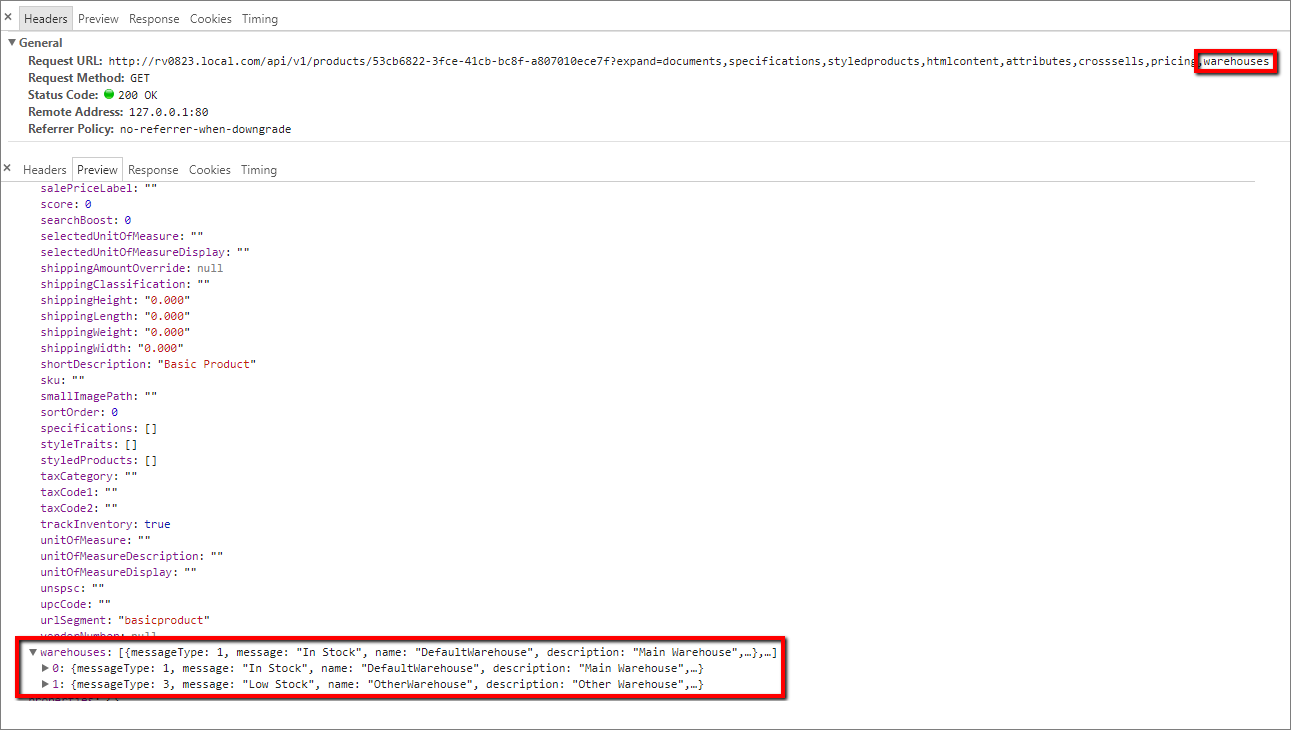
Go to the Product Detail page. If you inspect the request to /api/v1/products, you will see that the warehouse data is being requested and returned.
Next, you will create a custom Angular directive to display the warehouse data.
Create custom angular directive to display availability per warehouse
-
Back in Visual Studio, find your theme project.
-
In the ~\Scripts\_Custom directory, create a new TypeScript file named custom.warehouse-availability.ts.
-
Add a namespace named "custom".
-
Register a new directive named "customWarehouseAvailability" inside the "insite" module.
module custom { "use strict"; angular .module("insite") .directive("customWarehouseAvailability", () => ({ restrict: "E", controllerAs: "vm", template: `<div class="warehouse-availability" ng-show="product.warehouses.length > 0"> <span class="warehouse-availability__title">Availability</span> <div ng-repeat="warehouse in product.warehouses | orderBy:'description'" id="tst_product-{{product.id}}_warehouse-{{warehouse.name}}"> <span class="warehouse-availability__name">{{warehouse.description}}:</span> <span class="warehouse-availability__message">{{warehouse.message}}</span> </div> </div>`, scope: { product: "=" }, bindToController: true })); } -
Build your solution. Remember, you don't need to update the theme.json configuration file. You already added the entire ~\Scripts\_Custom directory.
Create custom product detail widget to use custom angular directive
-
Back in Visual Studio, find your theme project.
-
In the ~\Views\Widgets\ProductDetailView directory, make a copy of the Standard.cshtml file and name it "Custom.cshtml".
-
Open Custom.cshtml.
-
Find the <isc-availability-message> HTML tag.
-
Replace the tag with a tag for your new directive.
<custom-warehouse-availability product="vm.product"></custom-warehouse-availability> -
In your theme project, find the theme.json configuration file.
-
In the Widgets property, add a property named "ProductDetailView" and set the value to "Custom". This will register your custom product detail widget template as the default template anywhere the product detail widget is used on the Storefront.
"Widgets": { // override the default template used for a widget. Standard will be used unless one is specified here. // This will make a view that lives at ~/Themes/MyTheme/Views/Widgets/HeaderView/MyCustomView.cshtml be set as the default "ProductDetailView": "Custom" } -
Build your solution.
-
Go back to the Storefront to the same product as before. Just under the price, you should now see a section that displays inventory availability per warehouse.
Updated 19 days ago