Use Fiddler to interact with the API
Describes how to use Fiddler with the API in Optimizely Configured Commerce.
To make calls to the Optimizely Configured Commerce API, the client must be configured with Identity Server with a client id, secret, and scope. Although it is possible to use developer tools within the browser to harvest the access token from Configured Commerce requests, it really isn't a viable solution for production. The recommendation is to create a client within Identity Server.
Prerequisites
- Fiddler installed
- Visual Studio installed
- SDK installed
Overview of Steps
- Add client to Identity Server
- Configure client for Identity Server
- Use the client to interact with the API
Detailed steps
-
In Visual Studio, open the SDK solution.
-
In the Web project, add a reference to ~\Lib\IdentityServer3.EntityFramework.dll.
️ ImportantDo not use Nuget to install IdentityServer3.EntityFramework because there are some version dependencies that are deployed along with the SDK.
-
Open the ~\InSiteCommerce.Web\App_Start\Startup.Auth.cs file.
-
Open the ~\InSiteCommerce.Web\App_Start\Startup.cs file.
-
Add the following using statements to the top of the file.
using IdentityServer3.Core; using IdentityServer3.Core.Models; using IdentityServer3.EntityFramework; using IdentityServer3.EntityFramework.Entities; ``` -
Add the following code to the end of the "Startup" method. This code will create a connection to the database and add a new Identity Server client called "Fiddler".Add the following code to the "PostStartup" method. This code will create a connection to the database and add a new Identity Server client called "Fiddler".
ClientName – Fiddler
ClientId – fiddler
ClientSecret – secret
var efConfig = new EntityFrameworkServiceOptions { ConnectionString = "InSite.Commerce" }; using (var db = new ClientConfigurationDbContext(efConfig.ConnectionString, efConfig.Schema)) { if (!db.Clients.Any(c => c.ClientId == "fiddler")) { db.Clients.Add(new IdentityServer3.EntityFramework.Entities.Client { ClientName = "Fiddler", ClientId = "fiddler", Enabled = true, RefreshTokenUsage = TokenUsage.OneTimeOnly, EnableLocalLogin = true, PrefixClientClaims = true, IdentityTokenLifetime = 360, AccessTokenLifetime = 3600, AuthorizationCodeLifetime = 300, AbsoluteRefreshTokenLifetime = 86400, SlidingRefreshTokenLifetime = 43200, AccessTokenType = AccessTokenType.Jwt, ClientSecrets = new List<ClientSecret> { new ClientSecret { Value = "secret".Sha256(), Type = Constants.SecretTypes.SharedSecret } }, AllowedScopes = new List<ClientScope> { new ClientScope { // This is the Storefront API scope. // You can also use SecurityOptions.AdminScope to access the Admin API. Scope = SecurityOptions.Scope } }, Flow = Flows.ResourceOwner }); db.SaveChanges(); } } ``` -
Rebuild the solution.
-
Open Fiddler and go to the request Composer.
-
Change the HTTP verb to "POST" and the URL to the Identity authentication endpoint of your installed Insite Commerce application (such as
http://431sdk.local.com/identity/connect/token). -
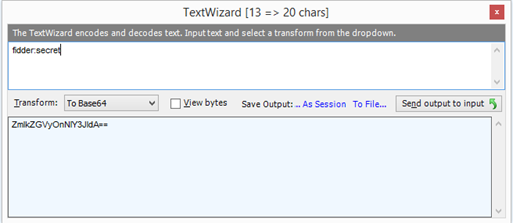
The "Authorization" header used to authenticate with Identity Server needs to be encoded using Base64. The decoded format for the header value is {clientid:clientsecret}. In this example, the decoded value is "fiddler:secret". To encode the client id and client secret in Fiddler, use the TextWizard. Be sure the transform operation is set to "To Base64".

-
Copy the following headers to the request in Fiddler. Be sure to replace the "Authorization" header value with "Basic {encoded value you created earlier}".
Accept: application/json, text/plain, */* Authorization: Basic ZmlkZGxlcjpzZWNyZXQ= Content-Type: application/x-www-form-urlencoded ``` -
In the body of the request, use a querystring to include user credentials, grant type, and scope. The user credentials need to be for a Storefront user for the Configured Commerce application. For example, grant_type=password&username=admin&password=Password1&scope=iscapi.
-
Execute the request.
-
Validate the operation by confirming a 200 status for the response. The response should include the access token needed to make authenticated calls to the API.

HTTP/1.1 200 OK Cache-Control: no-store, no-cache, max-age=0, private Pragma: no-cache Content-Length: 966 Content-Type: application/json; charset=utf-8 Server: Microsoft-IIS/8.5 X-Powered-By: ASP.NET p3p: policyref="/w3c/privacy.htm", CP="NOI DSP COR NOR UNI STA" Date: Fri, 04 Sep 2015 15:56:17 GMT {"access_token":"eyJ0eXAiOiJKV1QiLCJhbGciOiJSUzI1NiIsIng1dCI6ImEzck1VZ01Gdjl0UGNsTGE2eUYzek FrZnF1RSIsImtpZCI6ImEzck1VZ01Gdjl0UGNsTGE2eUYzekFrZnF1RSJ9.eyJjbGllbnRfaWQiOiJmaWRkbGVyIiwi c2NvcGUiOiJpc2NhcGkiLCJzdWIiOiJBNzY5QkE1Mi1DMUIxLTRFOUMtQTlEQi0xRjNERTdDNTJFQzIiLCJhbXIiOiJ wYXNzd29yZCIsImF1dGhfdGltZSI6MTQ0MTM4MjE3NywiaWRwIjoiaWRzcnYiLCJwcmVmZXJyZWRfdXNlcm5hbWUiOi JhZG1pbiIsInJvbGUiOiJJU0NfQWRtaW4iLCJpc3MiOiJodHRwOi8vaXNjNDEwMTk3MjYubG9jYWwuY29tL2lkZW50a XR5IiwiYXVkIjoiaHR0cDovL2lzYzQxMDE5NzI2LmxvY2FsLmNvbS9pZGVudGl0eS9yZXNvdXJjZXMiLCJleHAiOjE0 NDEzODU3NzcsIm5iZiI6MTQ0MTM4MjE3N30.RSp0qgF7rFxJQmNbEh3HsLSpgOPojZtzilJfLtHA5dEIqPBkgXFdzC7 phDGr6cFnaD4dKxrpYHwHtYrmugHlAlsTmViHb-r39PLO3us1nGIouYhPYkdmqlpExDD467wsNH0Oiqw2WgaJKePQNL HnwVdhfp2YAOL0VxotGG5CebMcVBbCx5cs5vLrgJM1DMLJuvavZJ3qi5nmc8SPPH40MdwVO_vKwcdcEq65BK8P08xSN -hIN40UR3YR97s66OQamCAw1_L6bUc8wtpv5sFjkpplhRLyQtGEPQljV_VACqlwqa0dv6FoI2HkcpAOjZviTq0EkP4Y _34TJj5o6xbFWA","expires_in":3600,"token_type":"Bearer"} ``` -
To make requests to the API using the access token, simply change the "Authorization" header value to "Bearer {access token from identity response}".
-
Back in Fiddler, send a request to /api/v1/sessions/current. If the bearer token is set up correctly, you should receive a 200 status and a session object in the response.
Updated 6 months ago
