Restrictions on products, groups, and behaviors
Describes various types of restrictions you can place on products, groups, behaviors and so on in Optimizely Configured Commerce.
Restrict product by group
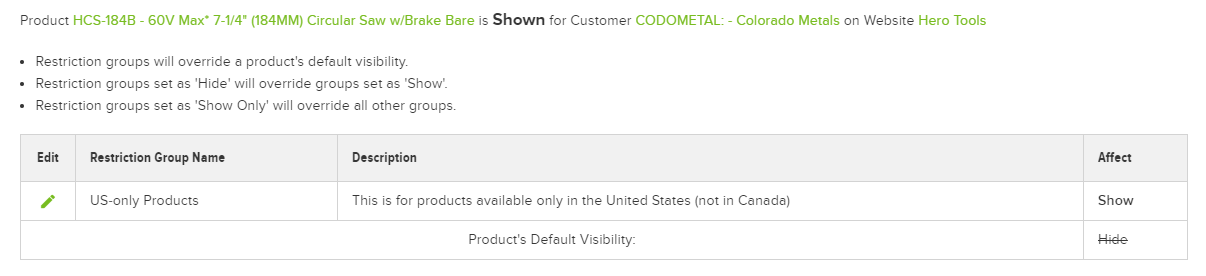
The screen displays the ultimate result for the product ("Shown" or "Hidden") at the top of the screen. A list of all applicable restriction groups displays below, demonstrating how the system arrived at the ultimate result.
- Go to Catalog > Validation Tool.
- Select a Website from the drop-down.
- Type a Customer Number or Company Name in the Customer search box to select a customer.
- Type a Product Number or Product Title in the Product search box to select a product.
- Click Validate.
Use the Validation Tool to confirm if a product is or is not visible to a customer. To determine the visibility of a specific product for a specific customer:
Validation tool
Because restriction groups are based on customer Bill To/Ship To fields, the user's cart must be revalidated every time a change is made to the user's selected Bill To/Ship To. The user's cart is revalidated if the user adds an item to their cart, then changes their Bill To/Ship To. The cart also is revalidated if the user adds an item to their cart, then changes their Bill To/Ship To so the warehouse changes and backorders are not allowed.
Cart validation
-
Go to Catalog > Restriction Groups.
-
Click Add Restriction Group.
-
Enter the Restriction Group Name (required), and an optional description.
-
Click Continue.
-
Next, select affected customers. Enter rules using the Rules Engine, and/or select specific customers.
NoteThe Customer Bill To Fields rule type only applies to customers where the Bill To toggle = YES. Similarly, the Customer Ship To Fields rule type only applies to customers where the Ship To toggle = YES.
- If using the rules engine to enter rules, select a Rule Type, then fill in the appropriate fields.
- Alternately, choose not to use the rules engine, and click Select Customers under the Specific Customers header to handpick customers affected by the restriction group. Select one or more customers, then click Assign. Click Done to save.
-
Click Select Customers under the Exclude Customers header to choose customers who fit the rules, but are excluded from the restriction group. Select one or more customers to exclude, then click Assign. Click Done to save.Note: Either rules must be entered, or specific customers selected, in order to continue. Restriction groups cannot be created with excluded customers only.
-
Click Continue.
-
Next, choose restriction options.
- Hide selected products – "Hide" overrides products with a default setting of "Show." If products are in multiple restriction groups, "Hide" overrides "Show."
- Show selected products – Restriction groups with "Show" override products with a default setting of "Hide."
- Show only selected products – If products are in multiple restriction groups, "Show Only" overrides all other groups and product default settings. This can be used to display a limited catalog.
-
Choose which websites the restriction group applies to. If the restriction group should not apply to all websites, choose Select websites, then click Assign Websites to choose a websites.
-
Click Continue.
-
Next, select the products affected by the restriction group. Enter rules using the rules engine, or select specific products.
- If using the rules engine to enter rules, select a Rule Type, then fill in the appropriate fields.
- Alternately, choose not to use the rules engine, and click Select Products under the Specific Products header to handpick products affected by the restriction group. Select one or more products, then click Assign. Click Done to save.
-
Click Select Products under the Exclude Products header to choose products that fit the rules, but are excluded from the restriction group. Select one or more customers to exclude, then click Assign. Click Done to save.
-
Click Continue.
-
Finally, click the Active toggle to activate the restriction group. Restriction groups are not live until the product index is rebuilt, either manually or with an integration job. Click Rebuild Product Index to rebuild the index manually.
-
Finally, click the Active toggle to activate the restriction group. Restriction groups are not live until the product index is rebuilt, either manually or with an integration job. Click Save and Rebuild Product Index to rebuild the index manually.
-
Click Save.
Create a restriction group
- In the Admin Console, go to Catalog > Products
- Select Edit next to a product.
- Select the Product Restrictions finger tab.
- Select either the Show or Hide radio button next to Default Visibility. Restriction groups that affect the product override this setting based on the behavior hierarchy (see above).
To modify the product restrictions setting:
NoteAll products are set to Show by default.
The Product Restrictions setting determines if individual products are set to appear or not appear on the website by default. These values can be overridden by restriction groups. Products with Hide as their default value are hidden from the website unless overridden by Show or Show Only restriction groups. Products with Show as their default value are shown on the website unless overridden by Hide restriction groups.
Import/export restriction groups
You can import and expert restriction groups by specifying the child collection through the CustomerAdditions, CustomerExceptions, ProductAdditions, and ProductExceptions fields. You can find these options under Catalog > Restriction Groups.
Use these steps to import restriction groups:
- Click the Upload icon.
- Select Restriction Groups.
- Choose your file.
- Change any Import Options, if desired.
- Validate file before importing – Set to No by default. The process imports each record individually, records any potential errors, and then removes the record. Any errors display in a downloadable file.
- Ignore blank cells – Set to Yes by default. This prevents the system from importing blank cells and overwriting existing data with null values.
- Update existing records – Set to Yes by default. If yes, any imported records that match existing records update the existing records. If no, the system records an error for any record already existing in the database. This setting is intended to allow importation of new records only.
- Ignore modified date – Set to No by default. Exported records include the ID and modified timestamp. If you re-import these records with changes, the system checks if the record was changed subsequent to the export and, if it was, records an error unless this setting is set to yes. If the modified date is not in the spreadsheet, this setting has no impact.
- Click Import.
Use these steps to export restriction groups:
- Click the Download icon.
- Set Restriction Groups as what you would like to export.
- Select the columns to export.
- Click Export.
Product Restrictions Setting
NoteIn the event where multiple show only groups apply to the same customer, the products in all "show only" groups will be displayed to the users.
- With all restriction groups active, customers in show only restriction groups only see the products in the groups (show only wins and every other product/group is hidden)
- With only show and hide groups active, customers in both restriction groups do not see products in the group (hide wins)
- With no groups active, the default product behavior determines if the product is available on the site
This is how the hierarchy looks in practice:
- Hide restriction group > Show product setting
- Show restriction group > Hide product setting
- Hide restriction group > Show restriction group
- Show Only restriction group > All settings (if product is in multiple restriction groups)
Customers and products both can belong to multiple restriction groups. Use this behavior hierarchy to determine which customer/product setting prevails.
Restriction group behavior hierarchy
Hero Heating and Cooling (HHC) carries various types of industrial coolant. Since these coolants are considered hazardous materials, HHC cannot ship them to their customers in Canada. HHC creates a restriction group hiding all products in the Industrial Coolant category from customers whose Country data field equals Canada.
Use case 2: hazardous products
NoteFor one-time ship-to addresses, the rules engine will properly assess whether location-based restrictions apply or not. This is true whether there are separate Bill-To and Ship-To addresses or when the Ship-To equals the Bill-To address.
HHC sells HVAC products in the upper Midwest region of the United States, as well as parts of Southern Canada. One of their vendors, Vendor A, has signed a distribution contract with HHC, on the contingency that Vendor A's products are sold only in the state of Minnesota. HHC marks all of Vendor A's products with a default behavior of "hide," then creates a restriction group showing those products to customers with the Customer Ship To StateId of Minnesota.
Use case 1: state-specific products
To allow products to be affected by restriction groups, ensure the Restrictions by Item Setting is set to YES.
Use Restriction Groups to prevent or allow website users to view/purchase specific products. Restriction groups can be thought of as "exception groups"; they are assigned to customers to provide an exception for the way products generally are viewed/purchased. Customers and products may belong to multiple restriction groups.
Updated 5 months ago