Import attributes
Describes how to import attributes using an import file in Optimizely Configured Commerce
Importing Attribute Types and Attribute Values is a quick way to populate the attributes necessary to improve the website user experience in Optimizely <<product-nam. For more information on the benefits of Attributes, review the Overview of Attribute Management article. This article explains how to organize and use an Excel spreadsheet to import Attribute data. Even though an Import Template is provided within the Admin Console, this template is intended for importing products and related data. Because of this, using the full Import Template to import Attributes can be cumbersome. Therefore, Insite recommends beginning with a blank Excel spreadsheet or an export of the existing Product list. There are four steps to import Attributes:
- Create or Isolate the Required Columns
- Create the Attribute Type Columns
- Populate the Attribute Values
- Assign the Attribute Types to Categories
Create or isolate the required columns
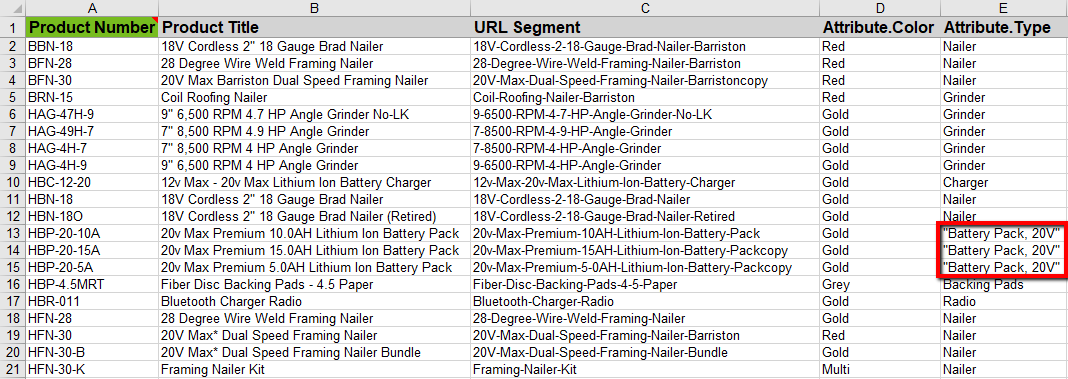
The first three columns of the template are Product Number, Product Title, and URL Segment, all of which are required. Capture this data in one of two ways: go to the Product list and copy data, then paste it into the blank spreadsheet; or export the Product list, including only the Product Number, Product Title, and the URL Segment columns. Use the following steps to create or isolate the required columns:
Start from a blank Excel file
- Open Excel and create a blank workbook
- Create the following column headings
- Column 1 – Product Number
- Column 2 – Product Title.
- Column 3 – URL Segment
Start from an exported product list
- Export the Product list using Export on the Product page.
- Select only the Product Number, Product Title, and URL Segment columns.
- Click Export, then click Download File.
- Open the exported file, and ensure the following columns exist:
- Column 1 – Product Number
- Column 2 – Product Title.
- Column 3 – URL Segment
- Delete the Modified On and Id columns.
Create the Attribute Type Columns
The next column headings are the Attribute Types. The proper syntax for these columns is Attribute.[AttributeTypeName]. For example, if selling office supplies, a column heading may be Attribute.Size or Attribute.OrganizerType.
- Attribute.[AttributeTypeName]
- Attribute.[AttributeTypeName]
- Attribute.[AttributeTypeName]
- and so on
Continue adding the necessary Attribute Types.
Populate the Attribute Values
After the column headings have been created, go back and fill in the Attribute Values for each Product record.
NoteIf the Attribute Value contains a comma, the Attribute Value and the comma must be enclosed with quotation marks. See the example below for a 20V Battery Pack.
Return to the Admin Console, and import the updated spreadsheet under Catalog > Products. Ensure Update Existing Records is checked at the bottom of the screen.
Assign the attribute types to the categories
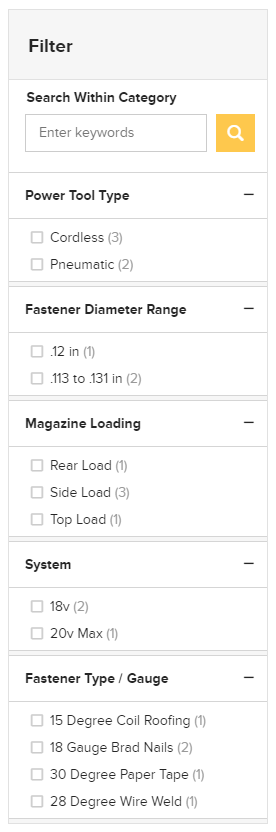
After the Attribute Types and Values have been imported successfully, they need to be assigned to the proper Categories. Assigning the Attributes to the Categories is what allows the website to display faceted filtering on the Category page.
This can be accomplished manually, but is most frequently done via an integration job.
Assign the attribute types manually
- Go to Admin Console > Catalog > Categories.
- Click Edit for the desired Category.
- Click the Attributes finger tab.
- Click Add Category Attribute.
- The correct Category should display in the drop-down.
- From the Attribute Type drop-down menu, select the desired Attribute Type.
- Use the Yes/No toggle to indicate if the Attribute Type should be Active on the site.
- In the Sort Order field, enter the value to determine the positioning of the Attribute.
- Click Save, or click Save and Add New to continue making additional assignments.
- Click Back if additional Categories need Attribute assignments.
- To see the Attributes on the website, rebuild the product search index: Admin Console > Marketing > Search > Indexing. Click Full Rebuild for Category Search Index.
Updated 5 months ago