Set up budgets
Describes the Budget Setup tab of the website's Budget Management page in Optimizely Configured Commerce and provides examples for how to set up various budget scenarios.
The Budget Setup tab defines the enforcement levels, the budget periods, and the optional cost codes. Set the budget amounts on the Budget Maintenance tab.
Administrators can set budget amounts for any user; however, only users assigned the role of Buyer 2 can see and engage in the budget process. This includes submitting a request to go over budget, or receiving a notification that the current purchase exceeds the defined budget.
To access Budget Management, enable it first. Then, sign in to the website and go to My Account > Budget Management.
Budget enforcement level
The Budget Enforcement Level controls if a budget impacts users during the shopping experience. Upon the initial page load, this option defaults to No Enforcement. Only one budget enforcement level may be active at a time.
| Budget Enforcement Levels | |
|---|---|
| No Enforcement | This option has no impact on budget validation during the logged in user's shopping experience |
| Customer Level | This option validates budgets across all ship-to's for the logged in user/customer combination |
| Customer Ship To | This option validates budgets against the combination of the selected ship-to and the user role of the logged in user |
| User | This option validates budgets against the user record |
Once the appropriate budget enforcement level has been selected, click Save.
NoteThe Setting Budgets From Online Orders Only must be set to YES in order to select the User enforcement level. Activate this setting globally or for a specific website. If this setting remains as No, ERP orders also apply to budgets.
Cost code setup (optional)
NoteCost codes are not integrated with budgets in any way and are used only to provide additional metadata on orders as a matter of convenience at the Customer level.
| Cost Code Setup | |
|---|---|
| Cost Code | This free text field is used to create an internal description for the cost code |
| Description | This free text field is used to create the description for the cost code as it will appear on the website |
| Active | This checkbox is used to mark a cost code as active or inactive |
Budget period setup
Use Budget Periods Setup to create the periods for a budget. Below are the steps for creating a 12-month calendar year budget, a quarterly budget, and a fiscal year budget that starts in April. When creating multi-period budgets, any unspent dollars from previous months roll forward to the current month. For example, if your quarterly budget is $500:
- Q1 - $500 - Spent $250 (Buyer 2 submit without approval), carrying over $250 to the next quarter
- Q2 - $500 - Spent $150 (Buyer 2 submit without approval), carrying over ($350 + $250 from previous quarter)
- Q3 - $500 - Current day
- Q4 - $500
Buyer 2 would be able to spend $1,100 in Q3 before they must submit it for approval.
Create a standard 12-month calendar budget
This example creates a monthly budget for the standard 12-month calendar year.
-
Go to website/storefront > My Account > Budget Management.
-
Select Budget Setup.
-
Select the budget year from the Budget Year drop-down.
-
If necessary, clear the Budget Year End field using the calendar window:

-
Click Assign Calendar Months.
-
Click Save.
The result is a populated list of each month for the selected calendar year.
Create a quarterly budget
This example creates a quarterly budget using the standard 12-month calendar year.
-
Go to website/storefront > My Account > Budget Management.
-
Select Budget Setup.
-
Select the budget year from the Budget Year menu.
-
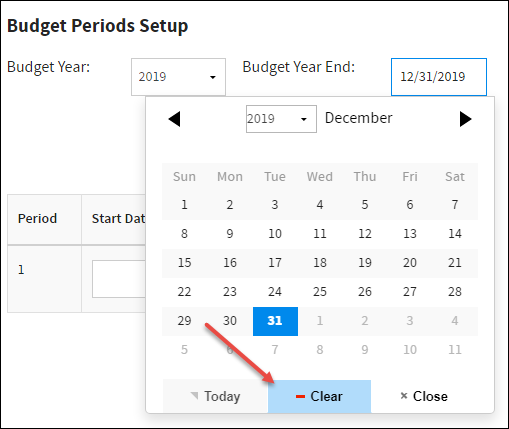
If necessary, clear the Budget Year End by clicking into the field and then clicking Clear at the bottom of the date selector:

-
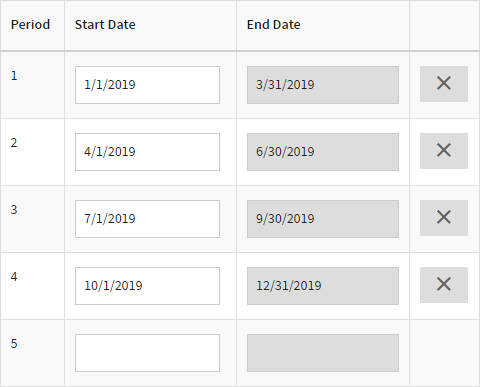
Click into the Start Date field for Period 1 and using the data selector, select Jan 1 of the desired year.
-
Click into the Start Date field for Period 2 and select April 1.
-
Continue in this manner until all four periods are populated.
-
The end result should look similar to this example:
-
Click Save.
Create a fiscal year budget
This example creates a fiscal year budget that begins in April.
-
Go to website/storefront] > My Account > Budget Management.
-
Select Budget Setup.
-
Select the budget year from the Budget Year menu.
-
Clear the Budget Year End by clicking into the field and then clicking Clear at the bottom of the date selector:
-
Click Assign Calendar Months.
-
Because the fiscal year starts on April 1, 2019, delete the first 3 budget periods so April is in the first position.
-
In the Period 10 Start Date field, select 1/1/2020. Use the right arrow in the date selector to progress to the next month.

-
Continue in this manner until all 12 periods are populated.
-
The End Date for the 12th period may be incorrect, and is not an editable field.

-
To fix this, scroll to the top of the page and enter the proper Budget Year End date. For this example, select 3/31/2020.
-
Scroll back down to ensure the date has been corrected.

-
Click Save.
Updated 5 months ago