Product attributes refresh integration job
Describes how to create a Product Attributes Refresh integration job in Optimizely Configured Commerce.
The following walk-through will help you create a Product Attributes Refresh integration job. Many refresh jobs query an ERP database directly, so it is crucial that you know where to find the required data in the ERP database. If you are unfamiliar, you should consult with somebody more familiar with the ERP data structure. Refresh jobs usually make use of the same types of processors:
- SqlQuery
- SqlQuery, OleDbQuery, or OdbcQuery
- FieldMap
The first SqlQuery processor constructs a SQL query statement. The second query processor runs the query to extract data from the ERP database. The FieldMap processor takes the data extracted from the ERP database and inserts it into the Optimizely {user["product-name"]} database through a process called field mapping. For simplicity, the walk-through uses a local SQL Server instance as the ERP database.
This job will use multiple job steps to sequence importing data for separate {user["product-name"]} objects. This helps ensure all of the appropriate data exists prior to forming the necessary relationships between the objects.
NoteIf you have completed the Product Refresh walk-through, skip to the "Create the Integration Job" section.
Preconditions
Before you start, make sure you've completed the following tasks.
- Install SQL Server on your local computer
- This walk-through creates a table, inserts data into that table, and reads data from that table.
- Install the WIS on your local computer
- Download and execute the SQL Server scripts
- These scripts assume you have already created a database named "FakeERP"
- These scripts create the table and insert seed data into that table
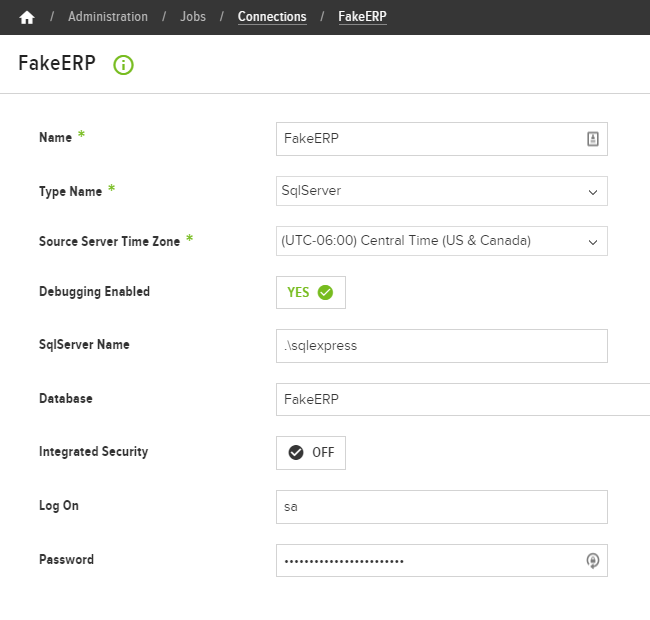
Create the integration connection
The integration connection specifies the pieces of the connection string used to connect to the SQL Server instance.
- Log into the Admin Console.
- Go to Administration > Jobs > Connections.
- Click the Add Integration Connection button.
- In the Name field, type "FakeERP". This name is important and must be the same in the WIS configuration. The WIS configuration is addressed in a later section.
- In the Type Name drop-down, select "SqlServer".
- In the Source Server Time Zone drop-down, select the appropriate time zone.
- In the SqlServer Name field, type the server name. This example uses SQL Server Express, so the value is ".\sqlexpress".
- In the Database field, type "FakeERP".
- Use the Integrated Security, Log On, and Password fields to specify the account that will be used for the integration. The account should have read access to the tables in the ERP database. For simplicity, this example uses the default server administrator account (sa). As a best practice, this account should not be used in ina production environment.
- Click Save in the top right corner.
Below is an image of the connection configuration.
Now that the connection is configured, you need to configure the WIS you installed.
Configure the WIS
Before continuing, you need to configure the WIS with the connection that you just created. This will allow you to select an integration processor for the integration job and also allow the integration job to be executed.
Next, you can create the integration job that actually does the work of refreshing the product data.
Create the integration job
This integration job uses standard processors and multiple job steps. Each of the job steps is responsible for refreshing certain pieces of the product-attributes relationship.
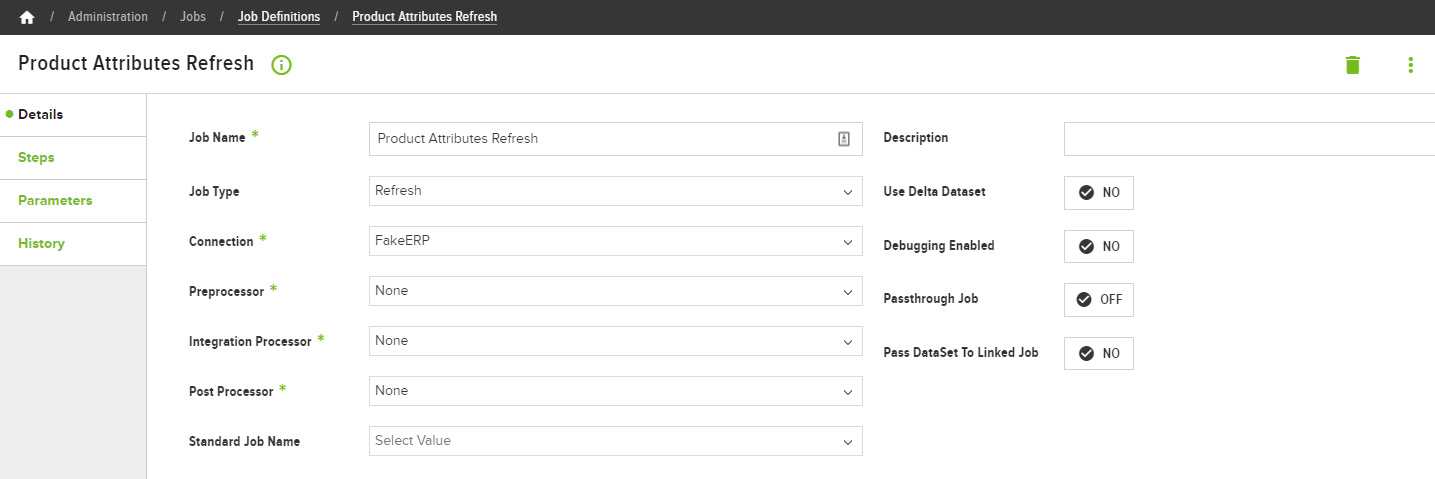
Specify the job details
In the Admin Console, go to Administration > Jobs > Job Definitions.
- Click Add Job Definition.
- Select the Details finger tab.
- In Job Name, type "Product Attributes Refresh". This name can be different, but the name "Product Attributes Refresh" helps indicate what type of job it is and which {user["product-name"]} object is being affected.
- In Job Type, select "Refresh".
- In Connection, select the "FakeERP" connection you just created. This will allow the integration processor to connect to the database specified in the integration connection.
Below is an image of the job configuration up to this point.
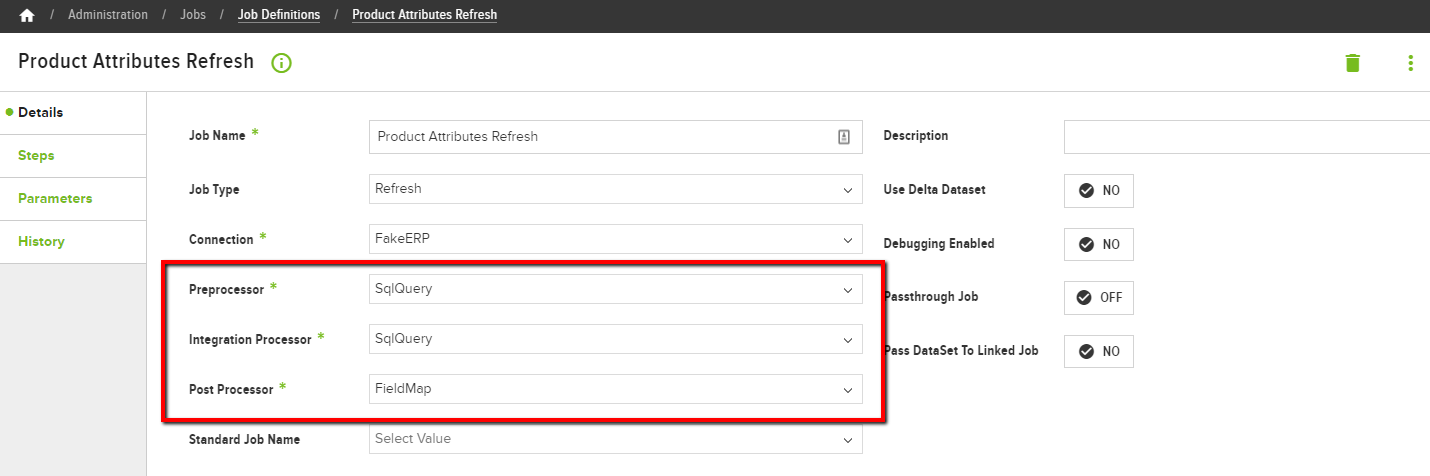
The Preprocessor, Integration Processor, and Post Processor fields are used to indicate what type of work will actually be completed by the integration job. These processors operate in the order the fields appear in the form. First, the preprocessor does any preprocessing required for the job. This can include aggregating data or constructing a query for the integration processor to use. Next, the integration processor builds on the work done by the preprocessor, usually operating on the data or objects retrieved or constructed by the preprocessor. Finally, the post processor processes the response from the integration processor. This can include consuming data retrieved from the ERP by the integration processor. You can read more about the other preprocessors, integration processors, and post processors and what purpose they serve.
- In Preprocessor, select "SqlQuery". This processor will construct a SQL query. The specific query will be configured in a later section.
- In Integration Processor, select "SqlQuery". Even though this is the same value as the Preprocessor field, this represents a completely different processor. This processor will take the query constructed by the SqlQuery preprocessor and execute it against the ERP database specified in the integration connection. The query results will be passed to the post processor.
- In Post Processor, select "FieldMap". This processor will take and execute a field mapping that maps data between the ERP data set and the {user["product-name"]} database. The ERP data set will be inserted into the {user["product-name"]} database. The field mapping will be configured in a later section.
- Click Save in the top right corner.
Below is an image of the configuration of the three processors. For now, you can ignore the Notifications, Run Options, and Recurrence sections.
Now that the processors and connection have been configured, you can create the job steps to specify what data should be extracted from the ERP database and where that data will be inserted into the {user["product-name"]} database.
Create the job steps
Integration job steps are each executed once in order according to the Job Sequence number. The Product Attributes Refresh job will use three steps to pull in the attribute types, attribute values, and product-to-attribute value relationships. This job is separated into steps to ensure the attribute types and values data is present before creating relationships between that data and the product data.
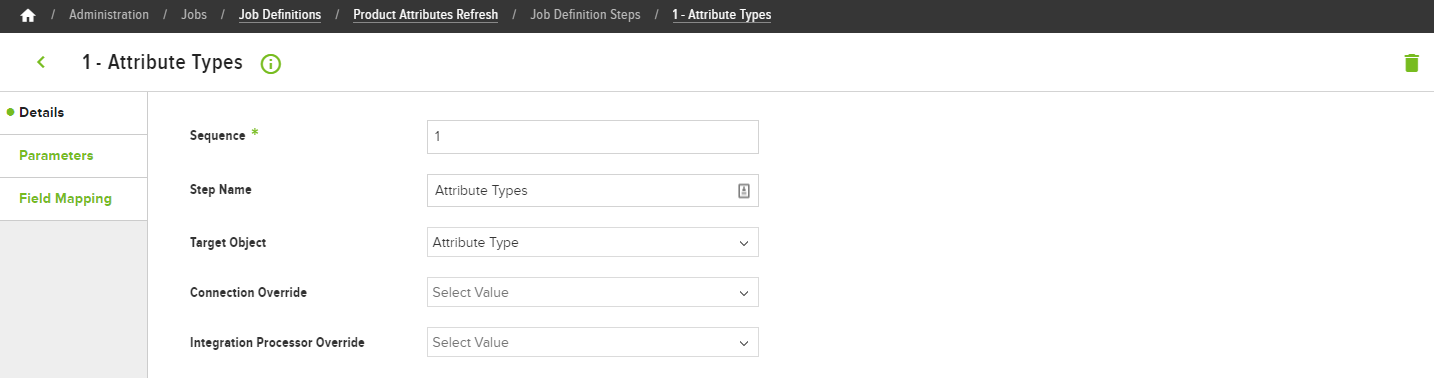
Create the attribute types job step
- Select the Steps finger tab.
- Click Add Job Definition Step.
- In Sequence, type "1". This field is used to order the execution of the job steps. Job steps are ordered in ascending order. This marks the first step in this integration job.
- In Step Name, type "Attribute Types". This is a friendly name for the step. It can help others understand the responsibility of each step.
- In Target Object, select "Attribute Type". This is the {user["product-name"]} object on the receiving end of the refresh. In other words, data from the ERP will be mapped into this object.
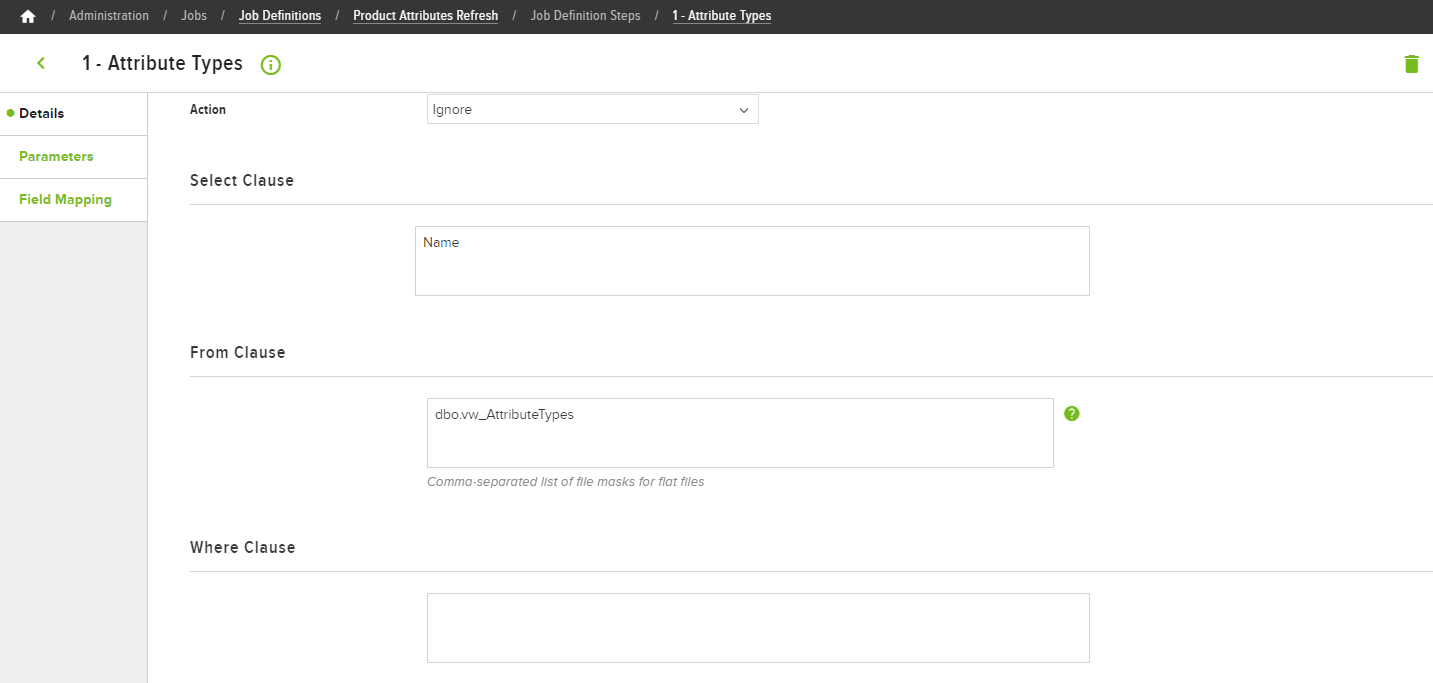
Below is an image of the step configuration up to this point.
For the Delete Behavior, select "Ignore".
The Select Clause, From Clause, and Where Clause fields form the SQL query. The values in these fields will be used by the SqlQuery preprocessor to construct a SQL statement, which will be used to query the ERP database for product data. Below is the full SQL query before splitting it apart to fill the separate clause fields in the job step.
SELECT Name
FROM dbo.vw_AttributeTypes
In Select Clause, use the SELECT portion from the above query. You don't need to include the SELECT keyword.
In From Clause, use the FROM portion from the above query. You don't need to include the FROM keyword.
NameClick Save in the top right corner.
dbo.vw_AttributeTypesBelow is an image of the clause field configuration.
Now that the Target Object and SQL query have been configured, you can configure the field mappings.
Configure the field mappings
The field mappings tell the FieldMap post processor where the ERP data should be inserted into the {user["product-name"]} database. Each of the field mappings has a "From Property" and "To Property" property. Usually, the "From" property corresponds to the data set retrieved from the ERP database, but there are exceptions to this statement. The "To" property corresponds to properties on the Target Object specified earlier, Product in this case.
- Select the Field Mapping finger tab.
- Click Add Job Step Field Mapping.
- In Field Type, select "Field".
- In From Property, select "Name". Remember, this field represents the data returned from the ERP database. Notice that it matches one of the columns specified in the Select Clause field from the earlier query.
- In To Property, select "Name". Remember, this field represents the {user["product-name"]} object property to which the ERP data will mapped. In other words, the "Name" values from the ERP data will be inserted into the "Name" values on the Attribute Type object.
- For Can Overwrite, select "No". When this toggle is set to "No", the ERP data value will be inserted in the {user["product-name"]} database on the first run of this job. However, any subsequent runs of this job will not overwrite that data if it already exists. If this toggle is set to "Yes", the {user["product-name"]} object will be updated on each run, whether or not the new value is different. A use case for this ability to not overwrite existing values on subsequent runs can be made for product descriptions. Some ERPs may have products with abbreviated descriptions (perhaps due to length limitations). Within the {user["product-name"]} platform, those abbreviations may not make sense to a user. Setting the Can Overwrite value to "No" would allow the abbreviated descriptions to be inserted into {user["product-name"]}. Then, when the integration job completes the first run, a marketing department can update the descriptions with a non-abbreviated, user-friendly version.
- For Is Dataset Key, select "Yes". This indicates that this column in the ERP data set is a unique key. If this value is "Yes", the "To Property" value will be a natural key field of the {user["product-name"]} object (such as Name is a natural key of Attribute Type).
- Click Save in the top right corner.
- Repeat steps 2-8 for the remaining field mappings below in the table. The header row in the table corresponds to the fields on the Field Mapping Detail page.
| Field Type | From Property | To Property | Lookup Error Handling | Can Overwrite | Is Dataset Key | Comments |
|---|---|---|---|---|---|---|
| StaticValue | 1 | Active | n/a | No | No | You can read tolearn more about StaticValue and other field types. |
| Field | Name | Label | n/a | Yes | No |
After you have added and configured all the field mappings, you need to create the step that pulls in the attribute values for each of the attribute types.
Before continuing, you should run the Product Attributes Refresh job manually to verify it is working correctly. You can read through the "Run the Integration Job" section to learn how to run the job and troubleshoot failures. At this point, the job should be importing only the attribute types.
Create the attribute values job step
- Select the Steps finger tab.
- Click Add Job Definition Step.
- In Sequence, type "2". This marks the second step in this integration job.
- In Step Name, type "Attribute Values".
- In Target Object, select "Attribute Value". This is the {user["product-name"]} object on the receiving end of the refresh. In other words, data from the ERP will be mapped into this object.
For the Delete Behavior, select "Ignore".
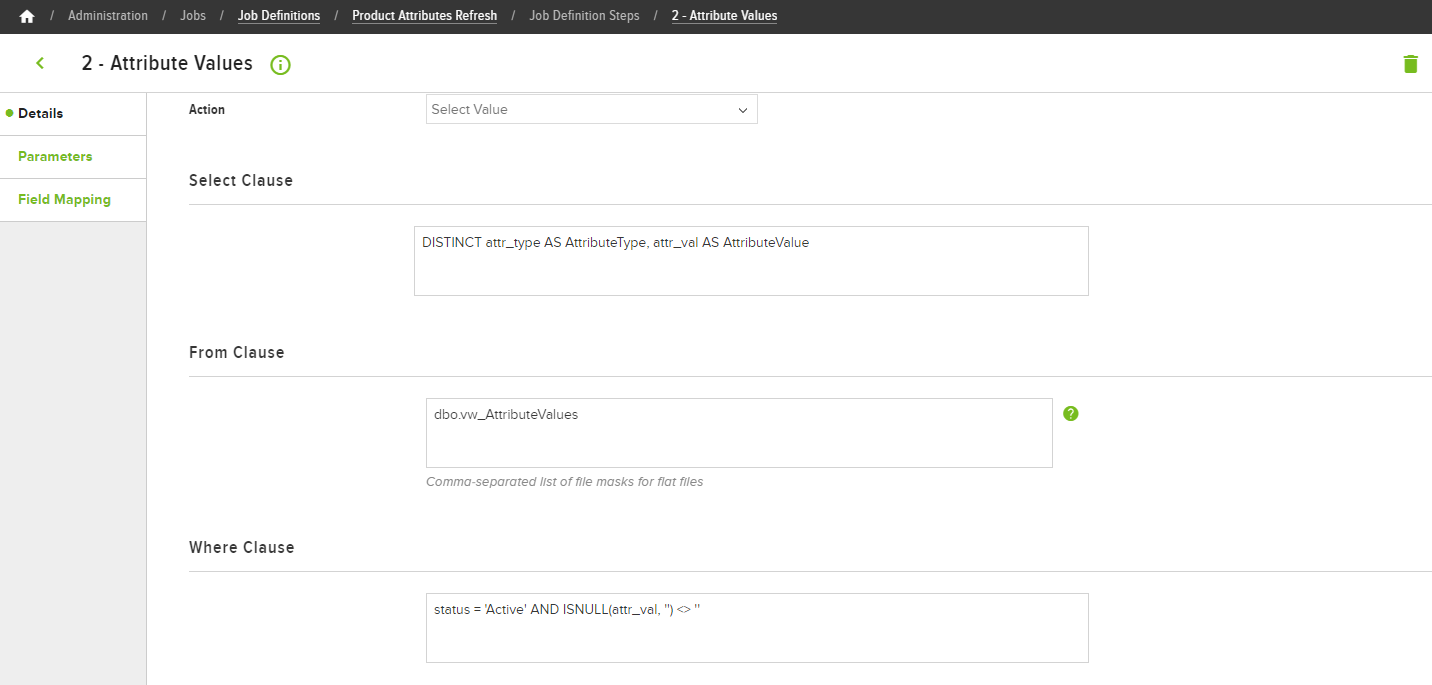
Use the clause fields to construct the query. Below is the full SQL query before splitting it apart to fill the separate clause fields in the job step.
SELECT DISTINCT attr_type AS AttributeType, attr_val AS AttributeValue
FROM dbo.vw_AttributeValues
WHERE status = 'Active' AND ISNULL(attr_val, '') <> ''-
In the Select Clause field, use the SELECT portion from the above query. You don't need to include the SELECT keyword.
DISTINCT attr_type AS AttributeType, attr_val AS AttributeValue -
In the From Clause field, use the FROM portion from the above query. You don't need to include the FROM keyword.
dbo.vw_AttributeValues -
In the Where Clause field, use the WHERE portion from the above query. You don't need to include the WHERE keyword.
status = 'Active' AND ISNULL(attr_val, '') <> '' -
Click Save in the top right corner.
Below is an image of the clause field configuration.
Now that the Target Object and SQL query have been configured, you can configure the field mappings.
Configure the field mappings
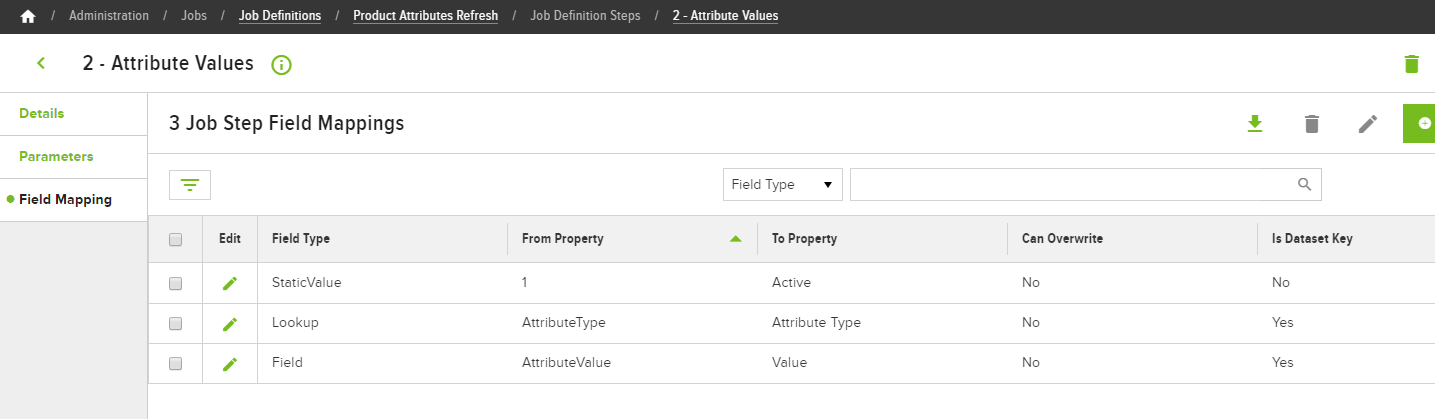
Select the Field Mapping finger tab. Use the table below to configure the field mappings. If you need help with the steps, reference the same section Attribute Types step above.
| Field Type | From Property | To Property | Lookup Error Handling | Can Overwrite | Is Dataset Key | Comments |
|---|---|---|---|---|---|---|
| StaticValue | 1 | Active | n/a | No | No | You can read to learn more about StaticValue and other field types. |
| Field | AttributeValue | Value | n/a | No | Yes | |
| Lookup | AttributeType | Attribute Type | Warning | No | Yes | A Lookup field type handles mapping a many-to-one relationship, where the Target Object is on the many side of the relationship and the Lookup object is on the one side of the relationship. In this case, anAttribute Value has an Attribute Type. The Attribute Type name is returned in this property, so the mapping can occur based on name. You can read to learn more about Lookup and other field types. |
Below is an image of all the field mappings displayed in the grid.
After you have added and configured all the field mappings, you need to create the step that maps attribute values to products.
Before continuing, you should run the Product Attributes Refresh job manually to verify it is working correctly. You can read through the "Run the Integration Job" section to learn how to run the job and troubleshoot failures. At this point, the job should be importing the attribute types and values and should assign the attribute values to the appropriate attribute types.
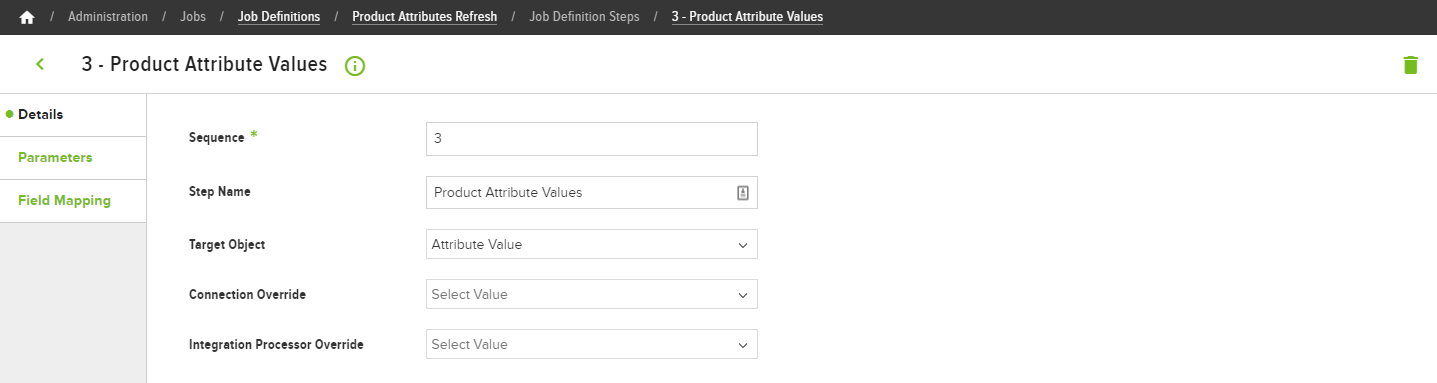
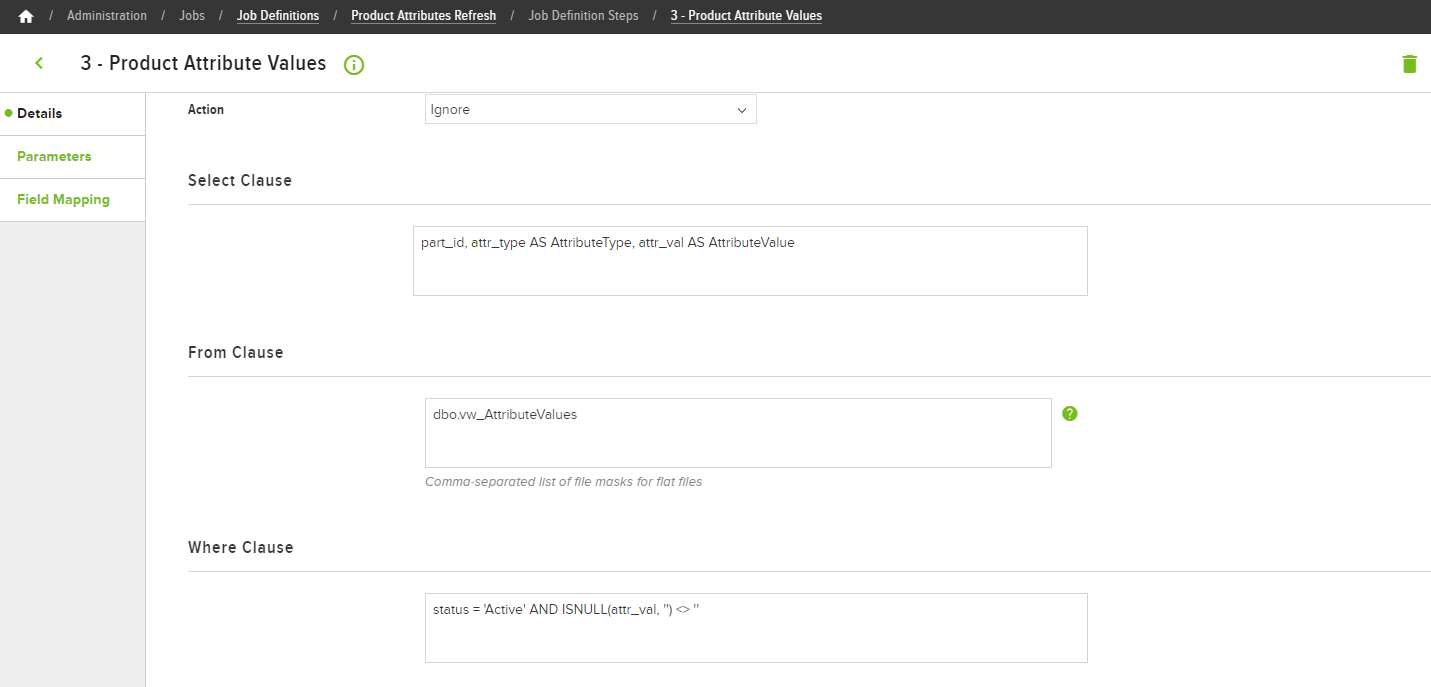
Create the product attribute values job step
- Select the Steps finger tab.
- Click Add Job Definition Step.
- In Sequence, type "3". This marks the second step in this integration job.
- In Step Name, type "Product Attribute Values".
- In Target Object, select "Attribute Value". This is the {user["product-name"]} object on the receiving end of the refresh. In other words, data from the ERP will be mapped into this object.
Below is an image of the step configuration up to this point.
For the Delete Behavior, select "Ignore".
Use the clause fields to construct the query. Below is the full SQL query before splitting it apart to fill the separate clause fields in the job step. This query is nearly the same as the query in the Attribute Values step. However, this query includes in the "part_id" so you can map the attribute values to the products.
SELECT part_id, attr_type AS AttributeType, attr_val AS AttributeValue
FROM dbo.vw_AttributeValues
WHERE status = 'Active' AND ISNULL(attr_val, '') <> ''-
In the Select Clause field, use the SELECT portion from the above query. You don't need to include the SELECT keyword.
part_id, attr_type AS AttributeType, attr_val AS AttributeValue -
In the From Clause field, use the FROM portion from the above query. You don't need to include the FROM keyword.
dbo.vw_AttributeValues -
In the Where Clause field, use the WHERE portion from the above query. You don't need to include the WHERE keyword.
status = 'Active' AND ISNULL(attr_val, '') <> '' -
Click Save in the top right corner.
Below is an image of the clause field configuration.
Now that the Target Object and SQL query have been configured, you can configure the field mappings.
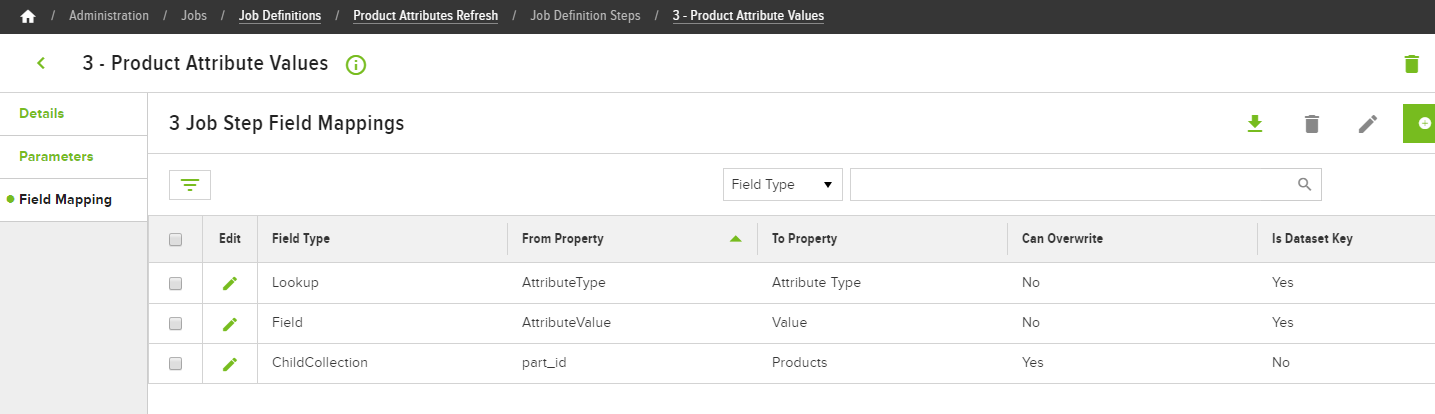
Configure the field mappings
Select the Field Mapping finger tab. Use the table below to configure the field mappings. If you need help with the steps, reference the same section Attribute Types step above.
| Field Type | From Property | To Property | Lookup Error Handling | Can Overwrite | Is Dataset Key | Comments |
|---|---|---|---|---|---|---|
| ChildCollection | part_id | Products | Warning | Yes | No | A ChildCollection field type is used when populating a property that is a foreign key to a "child" object of the target object. A child collection requires a "From Property" with a natural key value of the Target Object in the "To Property". In this case, "part_id" is the natural key of Product, which is the relationship defined here (Attribute Value to Product). You can read to learn more about ChildCollection and other field types. |
| Field | AttributeValue | Value | n/a | No | Yes | This is the same mapping used for the Attribute Types step. |
| Lookup | AttributeType | Attribute Type | Warning | No | Yes | This is the same mapping used for the Attribute Types step. |
Below is an image of all the field mappings displayed in the grid.
Now that you have added and configured all the job steps, the integration job should be completely configured and ready to execute.
As one final testing step, you should run the Product Attributes Refresh job manually to verify it is working correctly. You can read through the "Run the Integration Job" section to learn how to run the job and troubleshoot failures. At this point, the job should be importing all of the data required to define attribute types and values and to define relationships with products.
Run the integration job
You should manually run the Product Attributes Refresh job to make sure it works correctly. If the job fails, you can view the log that was created during the execution to track down any errors.
- Go back to the Product Attributes Job Definition.
- Select the History finger tab. Here you can see a list of the past executions of this job.
- Find the most recent execution and click View. Here you can see the status of the execution, the parameters used by the job, and the job logs.
- Select the Job Logs finger tab. Here you can see the various logs that were recorded. If you notice an error log, you can click the View button again to view the error description.
If the job is still failing, walk back through the steps to make sure you configured the job correctly. If the job is configured correctly, but still fails, you can read about advanced troubleshooting steps to diagnose the problem.
If the job succeeds, you should verify that the product attribute data has been imported correctly.
- To verify the attribute types and attribute values, go to Catalog> Attribute Types.
- To verify the product to attribute value relationships, go to Catalog> Products. Each product has an Attributes finger tab.
This product attributes refresh job should only execute if the products refresh job was already successfully executed. You can ensure this by linking the two jobs.
Link to the product refresh job
Linking two jobs ensures the execution order and also lets you stagger the workload for external systems, like an ERP. Linked jobs will only run one at a time and only under the conditions you specify. The steps below show you how to link the product attributes refresh job to the products refresh job.
- Go back to the Product Refresh job at Administration > Jobs > Job Definitions > Product Refresh.
- Under Notifications, use Linked Job to select "Product Attributes Refresh".
- For Link Condition, select "Success Only".
- Click Save in the top right corner.
With this set up, the Product Attributes Refresh job will not run unless the Product Refresh job is executed and the resulting status is "Success". If that happens, the Product Attributes Refresh job will be scheduled automatically. All you need to do is schedule the Product Refresh job and the other scheduling will be handled.
Resources
Updated 23 days ago