Will call and store pickup
Describes how to empower your customers to choose nearby warehouses to pickup their orders, verify inventory at selected locations and indicate pickup dates in Optimizely Configured Commerce.
Use will-call and store pickup functionality on your Optimizely Configured Commerce website to empower your customers to choose nearby warehouses to pickup their orders, verify inventory at selected locations, and indicate pickup dates. Enabling this functionality increases customer self-service, improves handling of time-sensitive orders and gives your customers the flexibility to choose the fulfillment method that best meets their current needs.
NoteYou also need to update your theme and do some storefront work in addition to enabling this functionality.
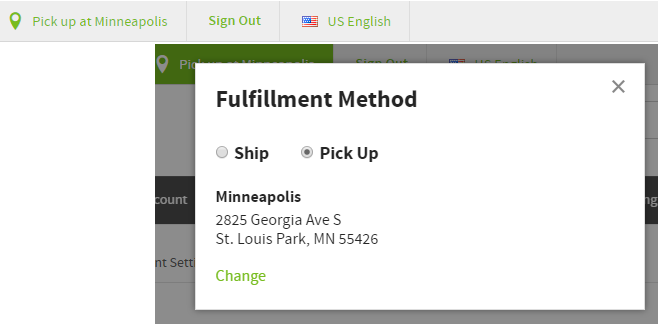
Customers will see an option to select their fulfillment method and location in the header, both before and after signing-in. They can save or update their default fulfillment method through My Account > Settings.
They can select their pickup location through a window that shows nearby warehouses and their service hours.
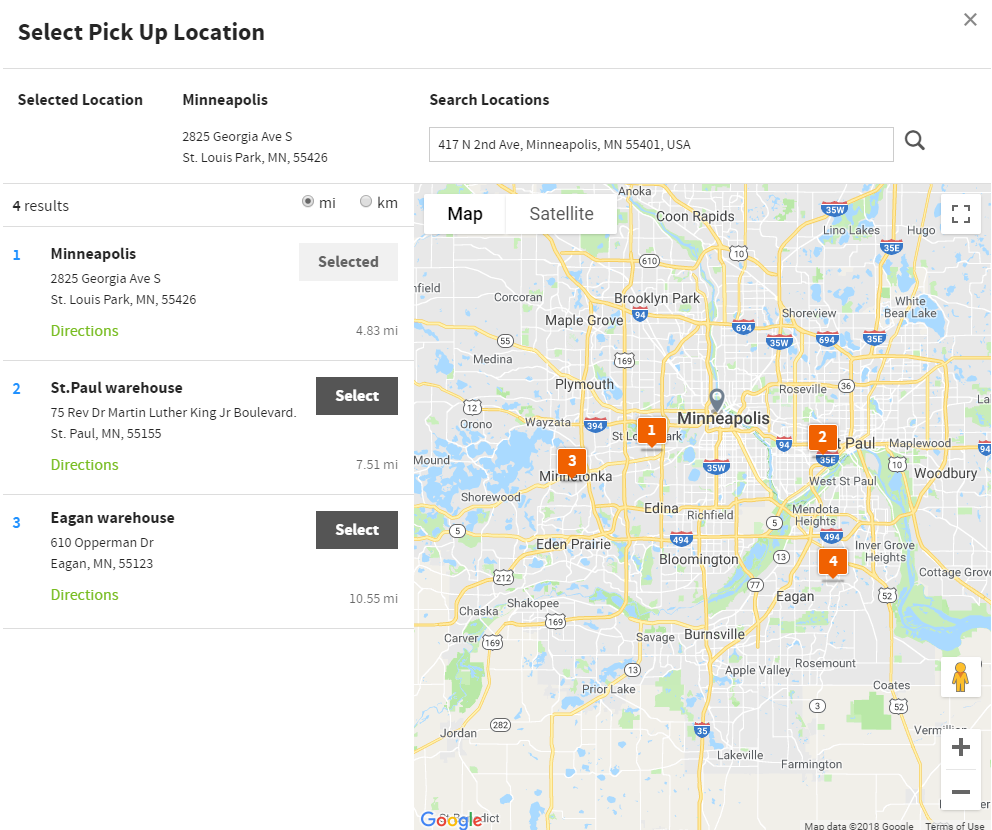
The header shows the fulfillment selection and pickup location.
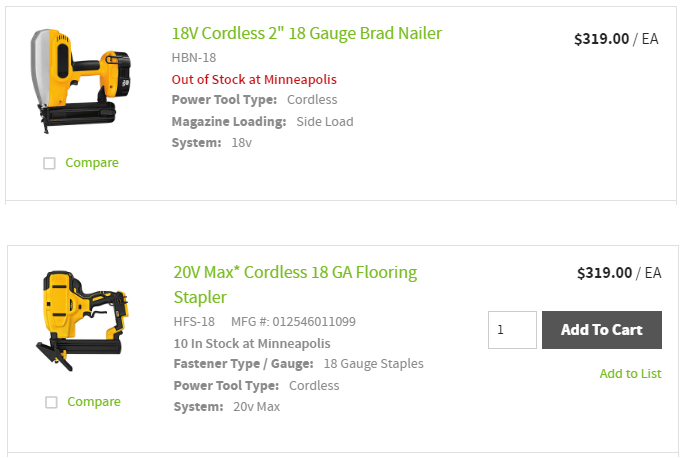
When customers select Pickup as their fulfillment method and designate a warehouse, the inventory availability messaging throughout the site indicates stock for that warehouse only. Additionally, they system calculates taxes based on the pickup location and any location-based restriction group rules continue to apply.
NoteRestriction groups are based on the customer records, not the actual addresses. If a customer selects Pickup as their fulfillment method, the restriction will be based on the Ship-To customer in context of the order, which may appear confusing since the selected Ship-To is not displayed.
Enable warehouse pickup
You first need to enable this functionality in the Admin Console. You also need to update your theme and do some storefront work in addition to enabling this functionality to display the additional Pick Up option in various pages and windows where your customers can select a Fulfillment Method, like the website header, during checkout and in My Account.
- Go to Administration> System > Settings and search for Enable Warehouse Pickup.
- Set the Enable Warehouse Pickup setting to YES. If Yes, a selected warehouse on the storefront will be set as the pickup location for the order. Default value is No.
- Set the Enable Request Pick Up Date setting to YES, if desired. If Yes, a selected warehouse on the storefront will be set as the pickup location for the order. Default value is No.
- Scroll down to the Pickup section, still under the Shipping settings.
- Set or update the Number of Warehouses Shown Per Page setting . This is the number of pickup locations to show per page. The default is 5.
- Set or update the Search Radius setting. This is the radius in miles to look for pickup locations. The default is 50.
Allow backorders for pickup
Enable the setting to allow backorders for pickups, if you want this to be an option for your customers.
- Go to Administration> System > Settings and search for Allow Backorders for Pickup.
- Set Allow Backorders for Pickup to YES. If Yes, users can purchase products with no inventory in stock for orders being picked up at a warehouse. Default value is No.
- Click Save.
Create will-call or pickup carrier
You first need to create a Carrier to handle your will-call or pickup services, which you then select on your Warehouse records.
- Go to Shipping & Fulfillment> Carriers.
- Click Edit next to an existing will-call or pickup carrier, or create a new will-call or pickup carrier.
- Enter a name and be sure to select YES for Enabled, then click Save.
- Click the Services finger tab.
- Click Add Shipping Service to add services, or click the Edit icon to update services, for your will call or pickup warehouses or other locations.
- Set Warehouse Pickup to Yes for each service you add or update. This populates the Shipping Service for Pickup at this Warehouse drop-down menu that appears on Warehouse records.
- Click Save and Back.
Update warehouse to allow pickup
You need to indicate which warehouses are available for pick up, so these appear to your customers in the Select Pick Up Location window.
- Go to Shipping & Fulfillment> Warehouses.
- Click Edit next to an existing warehouse, or create a new warehouse.
- Set the Allow Warehouse Pickup option to YES under General Information on the Details finger tab. If Yes, users will be able to select this warehouse as a pickup location. The warehouse must have address information that is geolocated in order for the pickup location to display properly.
- Enter the times the warehouse is open for pickup in the Hours field. This content will display in a tooltip on the pickup locations page.
- Select a Shipping Service for this warehouse, which come from the will call Carrier you created previously, from the Shipping Service for Pickup at this Warehouse drop-down menu.
- Verify the fields under Address Information are filled-in and correct.
- Click Geolocate under Geolocation to populate the Latitude and Longitude values for the warehouse. Geolocation is used to display pickup locations on map in the Select Pick Up Location window.
- Click Save.
- Select the Websites finger tab. You must assign a warehouse to a website for it to appear on the Select a Pick Up Location window.
- Click the Assign Websites button. The Websites window appears.
- Select the check box next to the sites where you want this Warehouse to appear for selection.
- Click Done and Save. Click Back to create or edit additional Warehouses.
Updated 5 months ago