Configure the price matrix
Describes how to configure the price matrix to create a data structure that can perform the calculations with minimal latency in Optimizely Configured Commerce.
The Price Matrix in Optimizely Configured Commerce creates a generic construct used for storing complex pricing information across various ERP systems. It intentionally is non-normalized data to create a data structure that can perform the calculations with minimal latency. It does have its limitations, such as a maximum of 10 price breaks.
Each ERP or custom application of the matrix can use different data in specific fields as needed to accommodate pricing functions.
Configuration settings
Configure the appropriate settings to use the Price Matrix. Remember to correctly target the desired website using the Configuring menu on the left side of the screen.
| Website Settings | Description |
|---|---|
| PricingService | The service used for pricing. Case sensitive. Values can be set to Generic, Sx, Legacy or <Custom> (any third-party pricing service). Update to Generic to use Price Matrix. Note: Developers can create custom pricing services for client-specific situations |
Note: PricingService is set to Legacy by default, which requires the use of UseBasicPricing and ERP_PricingStoredProcedure. If PricingService is set to Generic or Sx, no other settings are required. Pricing automatically defaults to the product record when Price Matrix data does not exist for the product. | |
| Setting | Description |
|---|---|
Pricing Service | This sets the pricing service to use for the targeted website. Use the Configuring menu on the left side of the screen to select either global or a specific website. There are four default Pricing Service options:
The default value is Generic. |
| ERP Pricing Stored Procedure | This field only displays if the Pricing Service is set to StoredProcedure. Enter the name of the stored procedure to run to calculate pricing. Default value: PriceCalculator_Generic |
| If RealTime is selected, the following fields are displayed: | |
| Real-time Pricing Service | The real-time pricing service name. |
| Real-time Service Timeout Seconds | Time to wait for real-time pricing service to return. Default value: 10 |
| Real-time Service Cache Minutes | Number of minutes that prices from an real-time service will be cached. Default value: 60 |
| Real-time Service Unavailable Retry Minutes | Number of minutes to wait if the real-time service timed out. Default value: 5 |
| Real-time Service Delay Seconds | Number of seconds to delay the real-time pricing. This is used for testing and should be set to 0 in a production environment. Default value: 0 |
Set up a price matrix record
Set up a Price Matrix record to create pricing information for a product, a customer, or both.
Price matrix details section
-
Within the Admin Console, go to Catalog > Price Matrix.
-
Click Add Price Matrix.
-
Select a Record Type from the drop-down [beginning of 4.3, 4.4, 4.5.]Record types are listed in evaluation order from most specific to most general:
- Customer/Product
- Customer/Product Price Code
- Customer Price Code/Product
- Customer Price Code/Product Price Code
- Customer
- Customer Price Code
- Product
- Product Price Code
- Product Sale
-
Then, select one or multiple options from the corresponding fields.
Record Type Option Description Corresponding Fields Product Correlates to a Product record. Product select drop-down Product Sale Correlates to a Product record. When used, puts the product on sale and includes any possible price breaks. Product select drop-down Product Price Code Correlates to a Product Price Code. Functions like record type Product, but allows the user to select a wider array of products by assigning them price codes. Product Price Code select drop-down Customer Correlates to a Customer record. Customer select drop-down Customer/Product Assign both a Customer record and a Product record. Product select drop-down
Customer select drop-down
Customer/Product Price Code Assign both a Customer record and a Product Price Code. Customer select drop-down
Product Price Code select drop-down
Customer Price Code Correlates to a Customer Price Code. Customer Price Code select drop-down Customer Price Code/Product Assign both a Customer Price Code and a Product. Customer Price Code select drop-down
Product select drop-down
Customer Price Code/Product Price Code Assign both a Customer Price Code and a Product Price Code. Customer Price Code select drop-down
Product Price Code select drop-down
-
Use the Activate On and/or Deactivate On fields to select the date and time (or span of time) the Price Matrix is active. Leave Deactivate On blank if the Price Matrix record is active indefinitely.
-
For the Currency Code field, enter the appropriate currency.
-
The Unit of Measure and Warehouse fields are optional.
If the Warehouse field is populated, the Price Matrix only displays pricing for products available from the warehouse identified in the Warehouse field.
The Unit of Measure field is optional; however, if it is filled with a unit of measure that differs from the unit of measure listed on the product's Detail page, the Price Matrix record will not execute.
Pricing details section
-
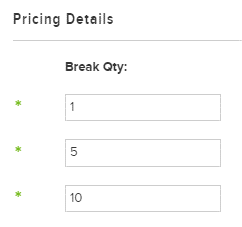
Modify the quantities in the Break Qty column. The first quantity always is 1. The second break level is the price or percentage to select for the break quantity (such as the second break quantity of 5 equates the first break level to purchases between 1 and 4 items, while the second break level equates to purchases of 5 items or more). Continue this process for each break quantity, up to ten fields.
-
Select a value from the Price Basis drop-down.
NoteThis table is the same regardless of the selected Record Type.
Price Basis Menu Option Description List Base list price of product +/- number entered in Amount field. Use - in front of the integer to apply a discount amount or percentage. Override Uses the Amount to override the product list price.
Enter what the price should be in the Amount column to override all cost information for that specific product.
Cost Multiplies unit cost of product (determined in Warehouse) by the Amount. Margin +/- adjustment from unit cost. This option only works with Amount adjustment type, not Percent adjustment type Mark up Unit cost of product + Amount. Base Reserved for ERP-specific pricing Price 1 Reserved for ERP-specific pricing Price 2 Reserved for ERP-specific pricing Price 3 Reserved for ERP-specific pricing Price 4 Reserved for ERP-specific pricing Price 5 Reserved for ERP-specific pricing Price 6 Reserved for ERP-specific pricing Customer Level/Discount Reserved for ERP-specific pricing; works with SX Price Calculator Customer Level/List Reserved for ERP-specific pricing; works with SX Price Calculator Customer Level/Cost Reserved for ERP-specific pricing; works with SX Price Calculator Customer Level/Base Reserved for ERP-specific pricing; works with SX Price Calculator Customer Level/Margin Reserved for ERP-specific pricing; works with SX Price Calculator Customer Level/Override Reserved for ERP-specific pricing; works with SX Price Calculator Customer Level Discount/List Reserved for ERP-specific pricing; works with SX Price Calculator Customer Level Discount/Cost Reserved for ERP-specific pricing; works with SX Price Calculator Customer Level Discount/Base Reserved for ERP-specific pricing; works with SX Price Calculator Customer Level Discount/Margin Reserved for ERP-specific pricing; works with SX Price Calculator -
Select a value from the Adjustment Type drop-down.
NoteThis table is the same regardless of the selected Record Type.
Adjustment Type Menu Option Description Amount Recognizes the value in the Amount field as a whole number. Percent Recognizes the value in the Amount field as a percentage. -
Enter an amount in the Amount field.
-
Repeat steps 1-4 for each Price Matrix break quantity.
-
Click Save.
️ ImportantUpon completion of configuring the Price Matrix, rebuild the Product Search Index. Go to Admin Console > Marketing > Search > Indexing, and click Rebuild All or rebuild just the Product Index.
Set up a price matrix record for a product
Set up a Price Matrix record to create pricing information for a product.
Use a product's basic list price
Use the Product's Basic List Price as a basis for the Price Matrix record. In this example, the User selects a product with a Basic List Price of $37.00.
Price matrix details section
-
Within the Admin Console, go to Catalog > Price Matrix.
-
Click Add Price Matrix.
-
Select Product from Record Type.
-
Select a Product from Product.
-
Use the Activate On and/or Deactivate On fields to select the date and time (or span of time) the Price Matrix is active. Leave Deactivate On blank if the Price Matrix record is active indefinitely.
-
For Currency Code, enter the appropriate currency.
-
The Unit of Measure and Warehouse fields are optional.
If the Warehouse field is populated, the Price Matrix only displays pricing for products available from the warehouse identified in the Warehouse field.
The Unit of Measure field is optional; however, if it is filled with a unit of measure that differs from the unit of measure listed on the product's detail page, the Price Matrix record does not execute.
Pricing details section
-
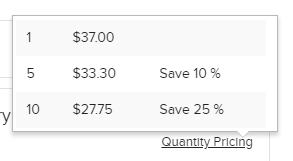
Modify the quantities in the Break Qty column. The first quantity always is 1. The second break level is the price or percentage to select for the break quantity (such as the second break quantity of 5 equates the first break level to purchases between 1 and 4 items, while the second break level equates to purchases of 5 items or more). This user chooses to set break quantities at 1, 5, and 10.
-
Select List from Price Basis. List calculates the price of the item +/- the value entered in the Amount field.
-
Select Percentage from Adjustment Type. This recognizes the value entered in the Amount field as a percentage.
-
Enter an amount in the Amount field. This user chooses to enter 0 for break quantity 1, -10 for break quantity 5, and -25 for break quantity 10.
-
Click Save.
-
Rebuild the Product Search Index by going to Admin Console > Marketing > Search > Indexing.
-
View the results on the commerce site.
-
Click View Website in the upper right corner of the Admin Console, and select the applicable website.
-
Browse or search for the product assigned in Step 4.
-
Click Quantity Pricing to view the Price Matrix pricing.
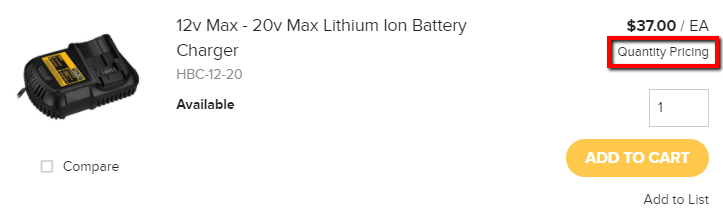
This is the result of the exercise listed above. Since the user entered 0 for break quantity 1, the list price of the item was not altered. Entering -10 reduced the break quantity 5 cost by 10%, and -25 reduced the break quantity 10 cost by 25%.
Use a product's unit price
Use the Product's Unit Price as a basis for the Price Matrix record. In this example, the user uses a product with a Unit Price of $1.00.
Set Unit Price
-
Start by assigning a Unit Price to a Product. Within the Admin Console, go to Catalog > Products.
-
Click Edit for the desired Product.
-
Click the Warehouses finger tab.
-
Click Add Product Warehouse.
-
Assign the appropriate Warehouse, ERP Qty Available, Qty On Order, Safety Stock, and Unit Price to the product.
-
Click Save.
Price Matrix Details Section
- Go to Catalog > Price Matrix.
- Click Add Price Matrix.
- Select Product from Record Type.
- Select a Product from Product.
- Use Activate On and/or Deactivate On to select the date and time (or span of time) the Price Matrix is active. Leave Deactivate On blank if the Price Matrix record is active indefinitely.
- Select the same Warehouse as was assigned to the Product in step 5.
- For Currency Code, enter the appropriate currency.
- The Unit of Measure field is optional. However, if it is filled with a unit of measure that differs from the unit of measure listed on the product's detail page, the Price Matrix record does not execute.
Pricing details section
-
Modify the quantities in the Break Qty column. The first quantity always is 1. The second break level is the price or percentage to select for the break quantity (such as the second break quantity of 5 equates the first break level to purchases between 1 and 4 items, while the second break level equates to purchases of 5 items or more). This user chooses to set break quantities at 1, 5, and 10.
-
Select Cost from Price Basis. Cost calculates the price of the item by either multiplying the unit cost by the value entered in the Amount field (if Adjustment Type = Percent), or adding the unit cost to the value entered in the Amount field (if Adjustment Type = Amount).
-
Select Amount from Adjustment Type. This recognizes the value entered in the Amount field as a whole number.
-
Enter an amount in Amount . This User chooses to enter 15 for break quantity 1, 13 for break quantity 5, and 11 for break quantity 10.
-
Click Save.
-
Rebuild the Product Search Index by going to Admin Console > Marketing > Search > Indexing.
-
View the results on the commerce site.
-
Click View Website in the upper right corner of the Admin Console, and select the applicable website.
-
Browse or search for the product assigned in Step 4.
-
Click Quantity Pricing to view the Price Matrix pricing.
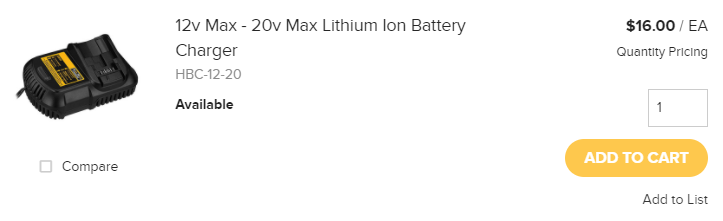
This is the result of the exercise listed above. Since the user entered 15 for break quantity 1, 15 + 1.00 = 16.00. Entering 13 for break quantity 5 added 13 + 1.00 = $14.00, and 11 for break quantity 10 added 11 + 1.00 = $12.00.
Use a product's price code
Use the Product's Price Code as a basis for the Price Matrix record. Set a Price Code for multiple items to apply one Price Matrix record to multiple items. In this example, the user has marked several accessory items with the Price Code of ACC.
Set price code
- Start by assigning a Price Code to a product. Within the Admin Console, go to Catalog > Products.
- Click Edit for the desired Product.
- On the Details tab, scroll down to the Pricing subsection.
- Enter a code in the Price Code text box.
- Click Save.
Price matrix details section
-
Go to Catalog > Price Matrix.
-
Click Add Price Matrix.
-
Select Product Price Code fromRecord Type.
-
Select a Product Price Code from Product Price Code.
-
Use Activate On and Deactivate On to select the date and time (or span of time) the Price Matrix record is active. Leave Deactivate On blank if the Price Matrix record is active indefinitely.
-
For Currency Code, enter the appropriate currency.
-
Warehouse and Unit of Measure are optional.
If Warehouse is populated, the Price Matrix only displays pricing for Products available from the Warehouse identified in the Warehouse field.
Unit of Measure is optional; however, if it is filled with a unit of measure that differs from the unit of measure listed on the product's Detail page, the Price Matrix record will not execute.
Pricing details section
-
Modify the quantities in the Break Qty column. The first quantity always is 1. The second break level is the price or percentage to select for the break quantity (such as the second break quantity of 5 equates the first break level to purchases between 1 and 4 items, while the second break level equates to purchases of 5 items or more). This user chooses to set break quantities at 1, 5, and 10.

-
Select Margin from the Price Basis drop-down. Margin calculates the price of the item by adding the unit cost to the value entered in the Amount field.
NoteThe Margin option does not work with the Adjustment Type Percent.
-
Select Amount from the Adjustment Type drop-down. This recognizes the value entered in the Amount field as a whole number.
-
Enter an amount in the Amount field. This user chooses to enter 20 for break quantity 1, 16 for break quantity 5, and 12 for break quantity 10.
-
Click Save.
-
Rebuild the Product Search Index by going to Admin Console > Marketing > Search > Indexing.
-
View the results on the commerce site.
-
Click View Website in the upper right corner of the Admin Console, and select the applicable website.
-
Browse or search for a Product with the applicable Product Price Code.
-
Click Quantity Pricing to view the Price Matrix pricing.
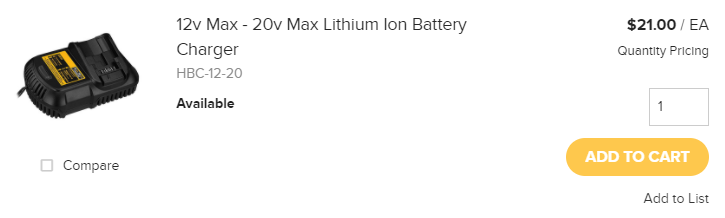
This is the result of the exercise listed above, for a product with a unit price of $1.00. Since the user entered 20 for break quantity 1, 20 + 1.00 = 21.00. Entering 16 for break quantity 5 added 16 + 1.00 = $17.00, and 12 for break quantity 10 added 12 + 2.00 = $13.00.
Updated 5 months ago