URL directs
Describes how to redirect a URL to another URL in Optimizely Configured Commerce.
The URL Redirects Module is designed to take single, specific pages and redirect users attempting to access those pages to a different URL. (This is how you register 301 redirects, or permanent redirects.) The URL Redirects table allows each page of an old website to be mapped to an equivalent page in a new site, ensuring previous customers using bookmarks or old indexing will be directed to the current website. This data can be maintained manually in the Admin Console or through an Excel import.
There are times when it is necessary to redirect traffic from one URL to another URL within your domain. Such as when a product has been discontinued and the URL was deleted as a result. The problem here is that buyers of this product may have bookmarked the URL or may rely on their browsing history to return to the product in the future. To solve for this, the URL Redirects module in the Admin Console provides a table to redirect the old or deleted URLs to new or related URLs.
The URL Redirects table can be found in Admin Console > Administration > System > URL Redirects.
There are two fields: Old URL and New URL. As would be assumed, enter in the old URL into the Old URL field and the new URL into the New URL field. There are a few considerations to make when entering the URLs into the Old and New URL fields.
Correct URL construction best practices and cautions
New URL redirects may take a few minutes to become active after their initial creation.
Best practices
- Old URLs should be specified completely, including the http:// or https:// prefix. Naked domain redirects are not supported.
- New URLs can use a relative path, for example: /Catalog/Sale.
- Multiple old URLs can redirect to the same new URL, but old URLs cannot be duplicated. For example, you could have many discontinued products with old URLs and redirect customers to a new URL informing them that the products are discontinued and to update any bookmarks.
- Old URLs don't accept the encoded values, for example %2C, which is a comma.
- Some special characters work, but others will result in an unhandled error, so you need to test if your redirect URLs include special characters.
Cautions
- The Admin Console allows the same URL to be saved in both the new and old column, but this creates a URL loop on the actual site.
- Upon saving changes to the Redirect table, wait a few minutes before testing the redirects, as it can take a few minutes for the redirects to take effect.
- When entering in the URLs, it is important to verify the URL address and type it as it actually appears. If the site is using https://, then https:// must be used. If http:// was entered for an https:// URL, the redirect will not take effect.
- Duplicate Old URLs will not be accepted; however, duplicate New URLs are allowed. If entering URLs manually into the Admin Console and a duplicate is entered, a validation error will occur. If importing an Excel file that contains duplicates, the import will fail.
- Imports will fail if more one than worksheet in the workbook being imported.
- Functionality for wildcard redirection is not available via the URL Redirects table, meaning that each individual page of an old site has to be set up in the URL Redirects module.
- We don't support cross-domain redirects - for example, companyname.ca to companyname.com.
- We don't support redirecting multiple domains nor do we have a way for customers to manage these types of redirects. If your DNS provider supports HTTPS redirects, that is one possible option to achieve this. You can also set up a redirect server.
Characters allowed in URLs
Valid characters allowed in URLs are:
- A - Z
- a - z
- 0 - 9
- Special characters, like $ -_ . + ! * ' ( ) ,
- Reserved characters used for their reserved purposes may be used unencoded within a URL, but others will result in an unhandled error, like / & ? = : %
NoteCurrently the + is not supported within the URL segment and is only supported in the URL redirects.
Configure URL Redirects
Setup
The URL Redirects module requires configuration of three components: Internet Information Services (IIS), Hosts File/DNS, and the URL Redirects module in the Admin Console. Directions for configuring these components are found below.
For a list of best practices and cautions, refer to the Overview of URL redirects article.
IIS
To enable the redirection of websites, IIS needs to be configured.
Configure IIS to use the HTML redirect
-
Go to the IIS Manager.
-
Expand the Sites Folder in the left navigation column.
-
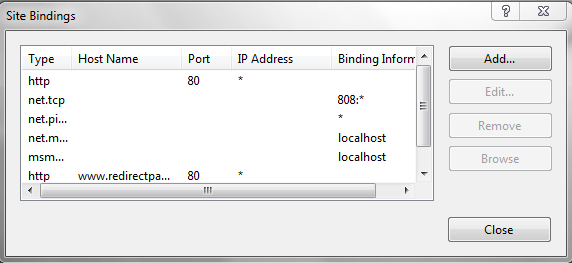
Choose the website that will have traffic redirected from it. Right-Click the chosen site and choose Edit Bindings. This will open a new window titled Site Bindings.
-
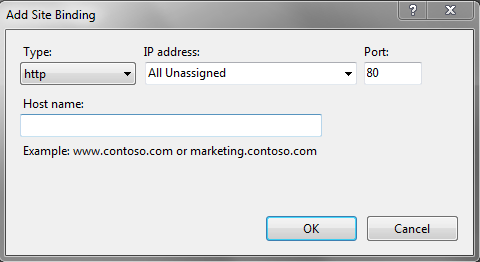
Click Add. This opens a new window titled Add Site Binding.
-
Choose the type that is applicable for the website.
-
Enter the new website name in the Host name field.
-
Click OK.
Hosts file/DNS
For the website binding that was added in IIS to take effect, the Hosts File (on a local machine) or DNS server needs to have the site name used in the site binding added to it. For assistance in this configuration, contact the system administrator.
Admin console
To enable the redirection of websites, the HTML Redirects module needs to be configured in the Admin Console.
Configure the URL redirects module
For a list of best practices and cautions, refer to the HTML overview article.
- Go to Admin Console > Administration > System > URL Redirects.
- Click Edit for the URL that is to be configured.
- In the Old URL Column, enter the URL of the old site that is being redirect
- In the New URL Column, enter the URL of the new site where traffic should be redirected.
- Click Save.
NoteHTML redirects create a permanent 301 redirect.
Updated 5 months ago