Pipelines
Describes pipelines in Optimizely Configured Commerce, which are constructed from individual objects called pipes that contain reusable business logic.
Pipelines are similar to handler chains. They are made up of one or more classes, called pipes. Pipelines are reusable portions of business logic that are not transactional. In previous versions of Optimizely {user["product-name"]}, the logic now in pipelines used to exist in handler helpers and utilities. However, the helpers and utilities did not offer an easy way to modify the logic without affecting backward compatibility. Future service packs and releases could more break any custom logic you had managed to inject.
A pipe is responsible for completing a single, specific task. All pipes in a pipeline work together to complete a bigger, more complex task.
Pipes
All pipes must implement the IPipe<> interface, specifying the parameter and result object type according to the related pipeline.
Code Sample: IPipe<> Example
public interface IPipe<TIn, TOut> : IMultiInstanceDependency, IExtension
{
    int Order { get; }

    TOut Execute(IUnitOfWork unitOfWork, TIn parameter, TOut result);
}
Typically, a pipe will operate on data within the result object or add data to the result object.
-
Each pipe MUST return the result object when it has completed its work. The result object will determine whether or not execution of the pipeline is continued.
-
Pipes are ordered within a pipeline and are executed in that order.
-
The order of a pipe within a pipeline is configured in code using a class property.
-
When adding a pipe to an existing pipeline, be aware of the order of existing pipes.
-
The first pipe in any pipeline will have an order of 100. From there, the order of subsequent pipes will be higher than that number. The pipes provided by {user["product-name"]} will typically increment the order by 100 for each subsequent pipe. For example, the CreateGetCartLineResult pipeline has four pipes, whose order is displayed below.
-
Pipes in the same pipeline will implement the IPipe interface, specifying the same object type for the parameter and result. The example below explains it further.
Code Sample: IPipe Interface Example
// The GetInventory and CreateGetCartLineResult pipes will execute in the same pipeline.
public sealed class GetInventory : IPipe<CreateGetCartLineResultParameter, CreateGetCartLineResultResult>
public sealed class CreateGetCartLineResult : IPipe<CreateGetCartLineResultParameter, CreateGetCartLineResultResult>
  // The CalculatePrice pipe will execute in a separate pipeline from the two pipes above.
public sealed class CalculatePrice : IPipe<GetProductPricingParameter, GetProductPricingResult>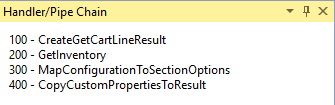
-
Pipes are ordered and executed in ascending order.
-
You cannot inherit from an existing pipe. If you need to modify the data created by a pipe, instead insert a new pipe after that pipe.
-
To insert a new pipe into a pipeline, create a class that implements IPipe with the appropriate parameter and result types. Then, indicate an order that is appropriate and different from any of the existing pipes. The custom pipe below will be executed after the standard CreateGetCartLineResult pipe, which is in order 100 (as seen above).
Code Sample: Pipe Ordering Example
public class CustomPipe : IPipe<CreateGetCartLineResultParameter, CreateGetCartLineResultResult> { // Depending on the specific pipeline, this will place the pipe in a specific position. public int Order => 110; public CreateGetCartLineResultResult Execute(IUnitOfWork unitOfWork, CreateGetCartLineResultParameter parameter, CreateGetCartLineResultResult result) { // ... } } -
To override an existing pipe in a pipeline, you simply name the custom pipe with the same pipe that should be replaced. The custom pipe below will be executed instead of the standard CreateGetCartLineResult pipe. The order does not necessarily need to be the same as the standard pipe.
Code Sample: Stop the Execution of a Pipeline Example
public class CustomPipe : IPipe<CreateGetCartLineResultParameter, CreateGetCartLineResultResult>
{
    public CreateGetCartLineResultResult Execute(IUnitOfWork unitOfWork, CreateGetCartLineResultParameter parameter, CreateGetCartLineResultResult result)
    {
        // Oops... something happened, let's stop execution of this pipeline.
        // To do so, you can either return an error code in the result.
        result.ResultCode = ResultCode.Error;
          // Or you can set this flag.
        result.ExitPipeline = true;
          // The rest of the method with still execute, but any pipes
        // that follow will not be executed.
        return new CreateGetCartLineResultResult();
    }
}
Code Sample: Override Existing Pipe Example
public class CreateGetCartLineResult : IPipe<CreateGetCartLineResultParameter, CreateGetCartLineResultResult> { // This pipe replaces the CreateGetCartLineResult pipe because the same order is configured. public int Order => 100; public CreateGetCartLineResultResult Execute(IUnitOfWork unitOfWork, CreateGetCartLineResultParameter parameter, CreateGetCartLineResultResult result) { // ... } } -
During the lifetime of the pipeline, an individual pipe may stop the execution of a pipeline. To do this, the pipe must either assign an error code to the result object or set the exit flag on the result object.
Code Sample
-
Below is an excerpt from a pipeline that retrieves product pricing. This pipeline contains only one pipe.
Code Sample: Retrieve Product Pricing Pipeline Excerpt
public sealed class CalculatePrice : IPipe<GetProductPricingParameter, GetProductPricingResult>
{
    private readonly IPricingServiceFactory pricingServiceFactory;
      private readonly Lazy<ITranslationLocalizer> translationLocalizer;
      public CalculatePrice(IPricingServiceFactory pricingServiceFactory, Lazy<ITranslationLocalizer> translationLocalizer)
    {
        this.pricingServiceFactory = pricingServiceFactory;
        this.translationLocalizer = translationLocalizer;
    }
      public int Order => 100;
      public GetProductPricingResult Execute(IUnitOfWork unitOfWork, GetProductPricingParameter parameter, GetProductPricingResult result)
    {
        foreach (var pricingServiceParameter in parameter.PricingServiceParameters)
        {
            var parameterWithOrderLine = pricingServiceParameter.Value as PricingServiceParameterWithOrderLine;
            var pricingService = this.pricingServiceFactory.GetPricingService(parameterWithOrderLine?.CustomerOrderId);
              var pricingServiceResult = pricingService.CalculatePrice(pricingServiceParameter.Value);
            var saveText = SiteContext.Current.LanguageDto != null
                ? this.translationLocalizer.Value.TranslateLabel("Save")
                : string.Empty;
            var productPriceDto = new ProductPriceDto(pricingServiceResult, saveText);
            result.ProductPriceDtos.Add(pricingServiceParameter.Key, productPriceDto);
        }
          return result;
    }
}
Pipes Order
- {user["product-name"]} provides a Visual Studio extension that will visually show the order of the pipes within a pipeline.
View Pipes Order in Visual Studio
- Right-click the custom pipe.
- Select the Show Pipes Order menu item. A window will pop open that shows each the custom pipes in the order they execute.
Use in Code
-
To use a pipeline in code, simply have an instance injected into the class constructor like most other objects.
Code Sample: Using a Pipeline in Code Example
public class CustomHandler : HandlerBase<AddCartLineCollectionParameter, AddCartLineCollectionResult>
{
    private readonly IPricingPipeline pricingPipeline;
      public RecalculateCart(IPricingPipeline pricingPipeline)
    {
        this.pricingPipeline = pricingPipeline;
    }
      public override AddCartLineCollectionResult Execute(IUnitOfWork unitOfWork, AddCartLineCollectionParameter parameter, AddCartLineCollectionResult result)
    {
        var getCartPricingResult = this.pricingPipeline.GetCartPricing(new GetCartPricingParameter(result.GetCartResult.Cart));
          // Do any processing here.
          return result;
    }
}
Add pipes to pipelines
Pipelines are a better answer to this problem. Some handler chains need to use the same logic, so pipelines accommodate that need. For example, the catalog pipeline named "CreateProductDtos" is responsible for creating ProductDto objects from a collection of Product data objects. The pipes within a pipeline are executed in order and execution automatically proceeds to the next pipe. Unlike handler chains, pipelines can be executed wherever the logic is needed. Individual pipes within a pipeline can choose to halt execution of the rest of the pipeline by returning an error code or exiting the pipeline. Just like handler chains, the design of pipelines lets you inject your own logic into the pipeline.
Add a new pipe to an existing pipeline
For a pipe to be used within a pipeline, it must do the following:
- Implement the
IPipe<TIn, TOut>interface - Return a result from the "Execute" method
- Specify an order via the "Order" property
The IPipe<TIn, TOut> interface requires the pipe to implement the "Execute" method, specify pipe order using the "Order" property, and associate the pipe with a pipeline. The "Execute" method is the sole entry point into a pipe. This method also contains all of the business logic used by the pipe to complete its work. The "Order" property is used to specify the ordering of the pipe within the pipeline.
Pipes are ordered in ascending order within a pipeline using the values specified by each pipe in the "Order" property. Pipes within pipelines start with the pipe with the lowest order value. By default, all pipelines have at least one pipe with an order value of 100. From there, additional pipes usually increment the order by 100. For example, if a pipeline has three pipes, the order values would be 100, 200, and 300. This ordering scheme lets you both insert a new pipe in between existing pipes or add a new pipe to the start or end of a pipeline. To insert a new pipe into the second position in the pipeline, the pipe could be given an order value between 101 and 199. To add the pipe to the start or end of the pipeline, the pipe should be given an order less than 100 or greater than 300, respectively.
// A pipe is associated with a pipeline according to the parameter and result object types (TIn and TOut).
// All pipes with the same object types will be executed within the same pipeline.
// Below is a code sample explaining the association further.
// These two pipes are part of the same pipeline because they
// both declare the same parameter and result object types.
public class CalculateOrderLines : IPipe<GetCartPricingParameter, GetCartPricingResult>
public class CalculateOrderTotal : IPipe<GetCartPricingParameter, GetCartPricingResult>
 // This pipe is part of a different pipeline because
// it declares different parameter and result object types
// than the two pipes above.
public class GetRoles : IPipe<GetRolesParameter, GetRolesResult>
Once you have configured the new pipe, you can build the solution and run the application. The next time the pipeline executes, your new pipe should be included in the pipeline. To help explain the pipeline further, the following section walks through adding a new pipe to a pipeline.
Add a new pipe to the FormatLabel pipeline
The following section adds a new pipe to the FormatLabel customer pipeline. This new pipe will add the customer's zip code to the label.
Preconditions
- {user["product-name"]} SDK installed
Steps
-
In your Extensions project, create a new pipe class named "AddCustomerZipCode".
public class AddCustomerZipCode { } -
Implement the IPipe<TIn, TOut> interface. For the TIn and TOut parameter and result object types, specify FormatLabelParameter and FormatLabelResult, respectively. Remember, this is how a pipe is associated with a pipeline. It is important to specify the correct types.
public class AddCustomerZipCode : IPipe\<FormatLabelParameter, FormatLabelResult> { } -
Specify a value for the "Order" property. Remember, all pipelines start with a pipe that has an order of 100. Within the pipeline, all pipes provided by {user["product-name"]} increment the order by 100. The FormatLabel pipeline has only one pipe with an order value of 100. Specifying an order of 3000 for the new pipe is overkill, but it ensures that this new pipe comes after all of the original pipes.
public int Order => 3000; -
Implement the "Execute" method. Remember, this is the sole entry point to the pipe. Additionally, this method must either continue the pipeline or exit it. These methods are explained in the sample below.
public FormatLabelResult Execute(IUnitOfWork unitOfWork, FormatLabelParameter parameter, FormatLabelResult result)
{
    if (parameter.Customer == null)
    {
        // If you set the ResultCode to the ResultCode.Error value,
        // the pipeline will exit. You should also specify a more accurate
        // SubCode and error message. The pipe should immediately return
        // to avoid performing unnecessary work.
        result.ResultCode = ResultCode.Error;
        result.SubCode = SubCode.NotFound;
        result.Messages.Add(new ResultMessage { Message = "A customer is required to format the label." });
        return result;
    }
       if (!parameter.Customer.PostalCode.IsEmpty())
    {
        result.Label += parameter.Customer.PostalCode;
    }
       // If you want to exit the pipeline, but there is no
    // need to indicate an error, you can set the result.ExitPipeline
    // flag to true. The pipe should immediately return to
    // avoid performing unnecessary work.
    //result.ExitPipeline = true;
       // Returning the result without flagging the ExitPipeline property
    // or indicating an error continues execution of the pipeline.
    // Control is handed over to the next pipe.
    return result;
}
For reference, below is the completed pipe class.
public class AddCustomerZipCode : IPipe\<FormatLabelParameter, FormatLabelResult>
{
    public int Order => 3000;
          public FormatLabelResult Execute(IUnitOfWork unitOfWork, FormatLabelParameter parameter, FormatLabelResult result)
    {
        if (parameter.Customer == null)
        {
            // If you set the ResultCode to the ResultCode.Error value,
            // the pipeline will exit. You should also specify a more accurate
            // SubCode and error message. The pipe should immediately return
            // to avoid performing unnecessary work.
            result.ResultCode = ResultCode.Error;
            result.SubCode = SubCode.NotFound;
            result.Messages.Add(new ResultMessage { Message = "A customer is required to format the label." });
            return result;
        }
           if (!parameter.Customer.PostalCode.IsEmpty())
        {
            result.Label += parameter.Customer.PostalCode;
        }
           // If you want to exit the pipeline, but there is no
        // need to indicate an error, you can set the result.ExitPipeline
        // flag to true. The pipe should immediately return to
        // avoid performing unnecessary work.
        //result.ExitPipeline = true;
           // Returning the result without flagging the ExitPipeline property
        // or indicating an error continues execution of the pipeline.
        // Control is handed over to the next pipe.
        return result;
    }
}- Build your solution.
If the rest of your application is set up correctly, the next time you select a customer, you should see that the postal code was added to the customer label. The customer label can be viewed in the customer drop-down when selecting a customer or in the header after you log in if you click your username. While adding a new pipe may work for most use cases, you may find a time where you need to replace an existing pipe.
Replace a pipe in an existing pipeline
If you find a pipeline that requires additional business logic and inserting a pipe before or after an existing pipe is not sufficient, you may choose to replace the existing pipe. To do this, you must configure the new pipe correctly. To replace an existing pipe, the new pipe must:
- Implement the
IPipe<TIn, TOut>interface - Return a result from the "Execute" method
- Specify an order via the "Order" property
- Be named the same as the pipe being replaced. This is an additional requirement compared to adding a new pipe.
Using the FormatLabel customer pipeline as an example again, the following pipe will replace the existing FormatLabel pipe.
        public class FormatLabel : IPipe<FormatLabelParameter, FormatLabelResult>


{
    // The order value does not need to match the pipe
    // that is being replaced, but it is best practice
    // to match the order value. In this configuration,
    // the pipe has been completely replaced and more
    // pipes can be added to the pipeline.
    public int Order => 100;

public FormatLabelResult Execute(IUnitOfWork unitOfWork, FormatLabelParameter parameter, FormatLabelResult result)
{
    result.Label = "new format";
  return result;
  }

}
When this pipe is implemented, the application will display the text "new format" instead of the customer's name, address, city, and state.
Updated 19 days ago