
Create and assign countries and states
Describes how to create a country and state, and assign those to a website in the Optimizely Configured Commerce SDK.
Create a country
Creating and assigning a country in the Admin Console allows users to edit basic country information and allows the system to use that country for shipping orders. The user can also create new countries if necessary. Below are the steps for creating a new country and populating the corresponding fields to make it active. In this scenario, the user has just started to operate business in Australia.
- Go to Admin Console > Administration > Localization > Countries.
- Click Add Country.
- Enter the Country's name in the Name field.
- Enter the Country's abbreviation in the Abbreviation field. This abbreviation should be the same as the ISO alpha-2 Code, which is used in the next field.
- Enter the two letter code in the ISO alpha-2 Code field.
- Enter the two letter code in the ISO alpha-3 Code field.
- Enter the three digit ISO number in the ISO Number field.
- Chose the correct measurement system in the Distance Unit of Measure field drop-down menu.
- Click the Active toggle to indicate whether this country is active or not.
- Set the Block Anonymous Traffic toggle to YES to identify traffic by IP address from this country and then redirect it to the login page, if not authenticated. Using this setting helps prevent people (or bad actors) from countries you don't sell in from accessing your site, for example to scrape product and pricing information for their own purposes.
Now that the country has been created, it needs to be applied to a corresponding website. If the country is already active and only modifications to the country were made, saving the content by accepting changes is sufficient. Below are the steps to assigning a country to a website.
Assign a country to a website
- Go to Admin Console > Websites.
- Click Edit for the desired country.
- Click the Country finger tab.
- Click Assign Countries.
- Search for the desired country, select it and click Assign, and click Done.
- Click Save.
Create a state
Creating and assigning states in the Admin Console allows users to modify tax and handling information for each state. The user can also create new states if necessary. Below are the steps for creating a new state and populating the corresponding fields to make it active. In this scenario, the user has just started to operate business in Queensland, Australia.
As a point of reference, States are created within the Countries entity and then assigned within the Website entity.
- Go to Admin Console > Administration > Localization > Countries.
- Click Edit for the desired Country.
- Click the States finger tab.
- Click Add States.
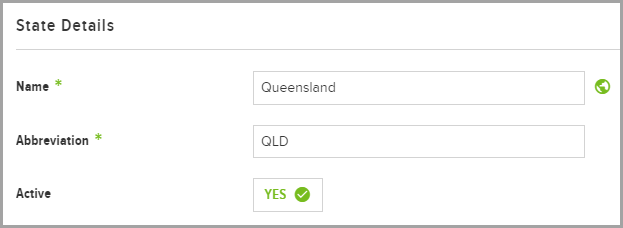
State details
-
In the Name field, enter the state's name.
-
Enter the Abbreviation for the state. The abbreviation should be the alpha postal code.
-
Click Active to indicate Yes or No.
Tax information
-
Click Taxable to have the tax information go active.
-
Enter the Tax Code for the state. The tax code entered needs to correspond with the initial setup in the ERP. Generally, the tax code will be the same as the abbreviation code.
-
Enter the Tax Rate for the state.
The state tax rate does not include local taxes. The tax rate will apply to all products in this state.
Click Tax Freight to tax freight from this state.
-
Enter a Handling Amount if needed. The handling amount is a global amount that would be collected from each customer in the state.
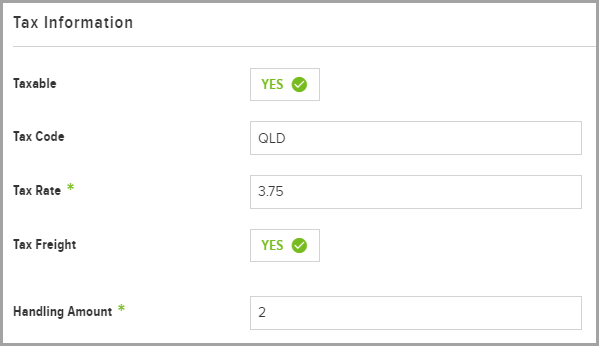
-
Click Save.
Now that the state has been created, it needs to be applied to a corresponding website, even if there is only one website. Below are the steps to assigning a state to a website.
Assign a state to a website
- Go to Admin Console > Websites .
- Click Edit for the desired Website.
- Click the States finger tab.
- Click Assign States.
- Search for and select the desired state.
- Click Assign and then click Done.
- Click Save.
Updated about 2 years ago