Wishlists (purchase lists)
Describes how to create, add and manage wishlists (purchase lists) in Optimizely Configured Commerce.
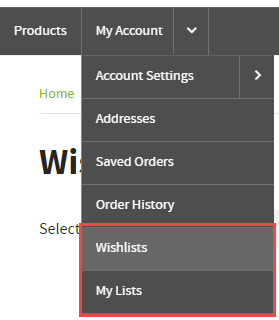
Wishlists, also commonly referred to as Purchase Lists, allow users of a website to save and manage products they plan to purchase in the future or keep a static list of products they purchase on a regular basis. These lists can be accessed in the My Account menu or via the Dashboard on the My Account page.
Add item to a wishlist and create a wishlist
The following steps result in the creation of a Wishlist and adding a product to the newly created wishlist.
- Log into the website as a User.
- Find a product to add to a Wishlist.
- Click Add to Wishlist.
- Select an existing Wishlist or create a new Wishlist.
- Click Add to Wishlist.
- Click the X in the top right corner of the Add to WIshlist window.
Manage and delete a wishlist
- Log into the website as a User
- From the My Account menu, click Wishlists
From this screen it is possible to change the product quantity, add a singular item or all items to the cart, delete an item by clicking the X or delete the entire list by clicking the Delete List button.
Upgrade wishlists
Configured Commerce v4.4 introduced the Lists feature, which is a more robust replacement for Wishlists. The Lists feature behaves much in the same way as Wishlists, but provides additional benefits, which are covered in more detail in the List Management section.
After upgrading to v4.4, the My Lists pages are not available by default and are only created after running the Content Creators tool. This was done intentionally to both maintain backwards compatibility and to allow for testing of the new page designs. Once the Content Creators tool has run, Wishlists and My Lists will coexist on the storefront.
All storefront links dynamically update as needed, so when only Wishlists exist, links will work; if Wishlists exist alongside My Lists, links to both will work; and when Wishlists are ultimately removed, all links will point to My Lists. Therefore, if any hard-coded links exist, they will need to be updated.
It is strongly recommended that My Lists be tested in your sandbox environment first. This allows internal users to test for any unexpected issues and validate any custom CSS. Once you are ready to test the new list pages, follow the steps below:
IMPORTANTThese steps should be run within your Sandbox environment prior to upgrading in Production:
Create the new My Lists pages
-
Go to Admin Console.
-
From the primary toolbar, select Debug Tools. Only users with the ISC_Implementer and/or ISC_System roles have access to the Debug Tools.
-
Select the Content Creators menu item.
-
The Content Creators page is displayed with a list of available ContentCreators.
NoteCloud customers do not have the option to create custom ContentCreators; only those provided by Insite are displayed.
-
Select the Run button for Insite.WishLists.Content.MyListDetailPageCreator, Insite.WishLists (this also runs the Insite.WishLists.Content.MyListsPageCreator, Insite.WishLists creator - if you select MyListsPageCreator first, you will then need to manually run the MyListDetailPageCreator separately.)
Review new My Lists pages
- Go to the storefront and select the My Account menu to see and test out the new My Lists pages.
- Once the new My Lists pages have been validated, the Wishlist pages can be deleted.
Delete the wishlist pages
-
Go to the CMS (See the Content Management category for more details on working with the CMS).
-
Select Content Tree and then Edit.
-
Find the Wishlist pages and delete them.
-
Remember, all links update dynamically unless they were hard-coded.
Multiple websites
The Content Creator tool specifically targets only the website the Admin Console is pointed at. So, if you are running more than one website, you will need to repeat the steps for each website.
Set up wishlists
Configured Commerce allows users to create and save wishlists. This functionality simplifies the task of repeatedly ordering the same set of products or creating a list of products that a user would potentially like to purchase in the future. Wishlists can be tied to a single user or shared by multiple users who are tied to the same Customer (Bill To).
To allow for shared wishlists, the Wishlists by Customer Setting must be set to YES, which then makes wishlists attached to the Customer Bill To, rather than to the individual User. The default value is set to No.
Updated 5 months ago