
Add CSS to the CMS
Describes how HTML elements (color, layout, font, and so on) are displayed on a webpage in Optimizely Configured Commerce.
Cascading Style Sheets (CSS) is a style sheet language used to describe how HTML elements (color, layout, font, and so on) are displayed on a webpage.
CSS can be used in Optimizely Configured Commerce to modify the design of the website without making changes to the base code. CSS may be entered at the page or the widget level.
Page level
Modify the CSS at the page level to change the page design and store references for style/class changes made to widgets.
Modify page level CSS
-
Click Edit in the upper left corner.
-
Using the left hand navigation, select a page to modify.
-
Click Edit Page.
-
Add the CSS to the CSS field- it may be necessary to scroll down.

-
Click Save.
Widget level
Modify CSS at the widget level to differentiate two of the same widgets from each other, change the style of widgets, add styling across multiple pages, and add hardcoded images.
Header
When designing the site header, learn what CSS rules currently exist for that element. Use the Inspector tool in any web browser to copy any appropriate Class IDs into the header's CSS section, then use those IDs to edit and modify the header.
NoteThe header element is consistent across all site pages. If there is CSS that should exist on multiple pages, include it in the header; the system pulls the CSS from the header first, regardless of which site page you are on.
Many of the CMS' CSS rules are duplicated multiple times within the base CSS file. If the rule is changed in one place, it will not change other places. Additionally, if !important is added to a CSS rule in one location, it still may not execute first if the rule exists in other locations. The Insite Support Team is aware of this issue.
Differentiate widgets using CSS class rules
A user adds two of the same Carousel widgets to a page, but wants one of the widgets to be styled differently. Use CSS Class rules to differentiate one widget's style from the other.
-
Edit the widget that should be styled differently. Add a custom CSS Class (ex. cssrule).
-
Click Save.
NoteConfigured Commerce automatically adds a "." (period) before any CSS Classes, so there is no need to include one in the rule name.
-
Next, edit the page the widget is on, and add the custom Class to the CSS, plus any changes (height, width, and so on).
-
Click Save.
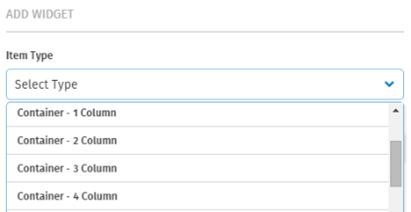
Add a Container widget
Use the Container widget to add equal columns to a webpage, create a sidebar, or create an interesting webpage layout.
Follow these steps to add a Container widget:
-
Hover over the CMS button in the upper left corner and click Show CMS.
-
Click Edit CMS in the upper left corner.
-
Click Add Content to add a widget.
-
Using the left hand navigation, click the page that will host the widget.
-
Select the desired Container widget from the Item Type drop down menu, and select the Standard template.
-
Choose the CSS class, or use the default by leaving the CSS class field blank and then choose the width for each column.
The total of all columns must equal 12, in accordance with the basic grid system.
-
Click Save.
The following images show Two and Three Column widgets added using the process above:


Add a hardcoded image to the Commerce site
Use CSS to add a hardcoded background image to the Commerce site.
First, upload a file to the Admin Console's File Manager:
- Go to Admin Console > Library > Media.
- In the Folders Pane of the File Manager, select the upload destination folder.
- In the top toolbar, click Upload.
- Select the desired files and click Open.
Second, copy the image address:
- Double-click the image in the File Manager, or right-click the image and select View.
- Right-click the image, and select Copy Image Address.
Third, add the image address to a widget on the CMS:
-
Click View Website in the Primary Toolbar and select a website.
-
Hover over the CMS button in the upper left corner of the site and select Show CMS.
-
Click Edit CMS in the upper left corner.
-
Using the left navigation, choose the page that will host the widget.
-
Click Edit Page to add a widget.
-
Select the CSS field.
-
Add the correct CSS to the CSS field. Below is a sample of the CSS
<style> [role="panel-wrap"] { background-image: url('http://kurld.com/images/wine-wallpaper/wine-wallpaper-11.jpg'); background=repeat: 1-repeat; width: 100%; } </style> -
Click Save
Updated 4 months ago