
Customer segments
Describes customer segments, which are rule-based constructs that define groups of customers and/or users in Optimizely Configured Commerce.
Customer segments can be used to dynamically tailor site content, improve product recommendations, and boost relevant products. A user can be assigned to multiple segments.
To activate customer segment-specific content, the Has Customer Segment Specific Content option on a website's default language must be toggled to YES.
Default customer segments
For new implementations of Optimizely <<product-name>>, the following segments are added automatically upon site start-up if no customer segments exist in the database:
- Default (Sequence 100, no rules)
- Guests (Sequence 99, rule type Authenticated = False)
- Registered Customers (Sequence 98, rule type Authenticated = True)
NoteAfter the initial start-up, if a segment was deleted, it will not auto-generate if/when the site is restarted.
Customer segment setup wizard
Customer segments are created through the use of a New Customer Segment wizard, which assists the user in creating customer segments, defining the rules, and determining if products should be boosted for matching users.
Use the following steps to add a customer segment:
-
Go to Admin Console > Marketing > Customer Segments.
-
Select Add Customer Segment to add a segment.
-
Enter a unique customer segment Name and Description. To activate the customer segment at a later date, modify the Activate On date and time.
-
Enter a Sequence Number. If a user belongs to multiple customer segments, and different versions of a widget exist for each of those segments, the content for the lowest-ranked segment displays.
-
Determine if the customer segment is the Default. The default customer segment is assigned to all users regardless of rules, and is always evaluated last in sequence. Only one customer segment can be set as default.
-
Select Continue
-
Next, use the rules engine to add rules. Select a Rule Type, then populate the rest of the fields as needed.
-
Add one or more rules, and if necessary, rule groups.
-
Select Continue.
-
Finally, determine if product recommendations and product search should favor specific categories for these customers/users. This allows product recommendation carousels and search results to display the most relevant products to the user. Switch the toggle to YES to turn on product recommendations.
-
If YES, complete the following:
-
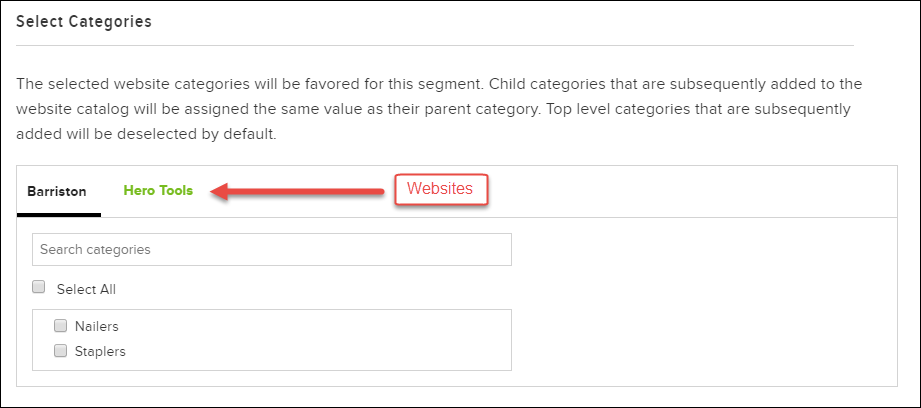
Under the Select Categories heading, the user can select the website (if more than one exists) and whichever website categories are favored for this customer segment.
-
If necessary, select the website.
-
Select one or multiple categories using the checkboxes.
Any child categories added later are assigned the same value as their parent category. Top-level categories added later are deselected by default.
-
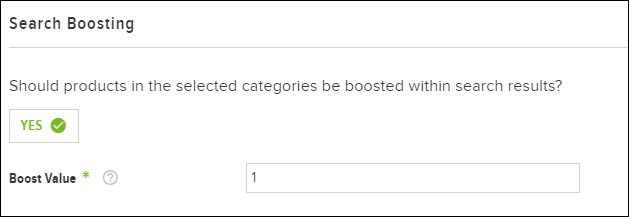
Under the Search Boosting heading, the user can switch the toggle to YES to boost products in the selected categories in search results, and choose a Boost Value (default = 1). Boost Value is a multiplier that boosts search scores of products in the selected categories. The higher the value, the higher position products in these categories have in search and autocomplete results. This value functions the same as the "Product Search Boost" within the Admin Console > Marketing > Category Boosting.
-
Under the Customers By Behavior heading, the user can switch the toggle to YES to add unauthenticated users to this segment automatically, and select a Minimum Actions Before Auto-Assignment value (default = 5). When an unauthenticated user filters search results by category, visits a category page, or visits a product detail page, this action counts towards segment assignment. When the minimum is reached, the user is assigned to this customer segment, and can see segment-specific content, product recommendations, and search boosting.
-
When all options have been configured, select Save.
After creating a customer segment, the user can view which segments a category belongs to by going to Admin Console > Catalog > Categories, editing the category, and selecting the Customer Segments finger tab.
Multiple segments
If a user meets the rules for multiple customer segments, the process is as follows:
- User accesses website.
- User is evaluated and found as a match for multiple customer segments (B, C, and D).
- The first widget on the webpage is evaluated. The widget looks at segment A, which has the lowest sequence number of all segments. As the user is not a match for segment A, the widget looks at segment B. The user is a match for segment B, but segment B does not have segment-specific content. The segment with the next-lowest sequence number is segment C. The user is a match for segment C, and segment C has segment-specific content, so that content is displayed for the user.
- Each subsequent widget on the page repeats step 3.
Select the rule types to include in a persona customer segment rule
A persona/customer segment is built on the user and customer characteristics that you add to a persona/customer segment rule. You select these characteristics from groups of similar characteristics like the data fields on the Customer screen. You can also use characteristics outside of the Admin Console like the shopper's location. The groups of similar characteristics appear in the Rule Type drop down field in the Rules Tab. When you choose a Rule Type the remaining fields in the Rule Tab are updated to display only the fields you need to complete for that Rule Type. The following tables list each Rule Type and the data fields that must be completed to build the persona/customer segment rule.
| User Custom Properties | |
|---|---|
| Custom Property Name | This text box is used to determine the User Custom Property that the rule will attempt to compare using the Comparison Operator and Value |
| Comparison Operator | This drop-down is used to select the comparison criteria. The options are: Equals, Not Equals, Less Than, Less Than or Equals, Greater Than, Greater Than or Equals, Matches, Range, List |
| Value | This text box will hold a value that the Comparison Operator will attempt to resolve against |
| Condition | An And/Or option that is used to determine if the rule is intended to resolve in addition to other rules, or if it is supposed to resolve true in an either/or case |
| Customer Fields | |
|---|---|
| Criteria Property | This drop-down is used to determine the Criteria Property that the rule will attempt to compare using the Comparison Operator and Value |
| Comparison Operator | This drop-down is used to select the comparison criteria. The options are: Equals, Not Equals, Less Than, Less Than or Equals, Greater Than, Greater Than or Equals, Matches, Range, List |
| Value | This text box will hold a value that the Comparison Operator will attempt to resolve against |
| Condition | An And/Or Option that is used to determine if the rule is intended to resolve in addition to other rules, or if it is supposed to resolve true in an either/or case |
| Distance from a Point | |
|---|---|
| Location Phrase | This text box is used to enter an address that will be translated into a specific Latitude and Longitude by Google Maps |
| Latitude | This text box is used to determine the Latitude for the origination point of this rule |
| Longitude | This text box is used to determine the Longitude for the origination point of this rule |
| Within/Outside | This selector is used to determine if the distance is intended to be within the area originating from the geographic location, or outside of that area |
| Distance | This text box and selector is used to determine the numerical distance from the origination point this rule will resolve true for, and if that distance is in Kilometers or Miles |
| Condition | An And/Or Option that is used to determine if the rule is intended to resolve in addition to other rules, or if it is supposed to resolve true in an either/or case |
| Customer Custom Properties | |
|---|---|
| Custom Property Name | This text box is used to determine the Customer Custom Property that the rule will attempt to compare using the Comparison Operator and Value |
| Comparison Operator | This drop-down is used to select the comparison criteria. The options are: Equals, Not Equals, Less Than, Less Than or Equals, Greater Than, Greater Than or Equals, Matches, Range, List |
| Value | This text box will hold a value that the Comparison Operator will attempt to resolve against |
| Condition | An And/Or option that is used to determine if the rule is intended to resolve in addition to other rules, or if it is supposed to resolve true in an either/or case |
| Current Location | |
|---|---|
| Criteria Property | This drop-down is used to determine the property type for the Location Criteria. The options available are: City, Country/Abbreviation, IDString, Latitude, Longitude, PostalCode, StateAbbreviation. |
| Comparison Operator | This drop-down is used to select the comparison criteria. The options are: Equals, Not Equals, Less Than, Less Than or Equals, Greater Than, Greater Than or Equals, Matches, Range, List |
| Value | This text box will hold a value that the Comparison Operator will attempt to resolve against |
| Condition | An And/Or option that is used to determine if the rule is intended to resolve in addition to other rules, or if it is supposed to resolve true in an either/or case |
| Authenticated | |
|---|---|
| Value | This checkbox is used to check and see if the user has been authenticated. |
| Condition | An And/Or option that is used to determine if the rule is intended to resolve in addition to other rules, or if it is supposed to resolve true in an either/or case |
Updated 4 months ago