Set access rights without Opti ID
Control content access in Optimizely CMS 13. Manage user groups, set permissions for pages and assets, and define access rights for languages and audiences.
Access rights in Optimizely CMS 13 control who reads, edits, publishes, or administers each piece of content. Administrators assign rights through built-in user groups or custom groups so editors reach only the content they own. Add users and create groups to assign varying types of access. For example, create a Marketing Department group, add marketing users to it, and all members share the same access rights.
ImportantIf your organization uses Opti ID with CMS 13, see Access rights with Opti ID.
Access rights in Optimizely Content Management System (CMS) determine what visitors see, what editors can do, and where they can do it in the content structure. For example:
- Give members of the marketing department access to edit website marketing material that other company users cannot edit.
- Set access rights for many types of content (pages, blocks, images, and documents) including items in the navigation and assets panels.
- Combine access rights with audiences to grant a specific audience (for example, visitors within a 10-mile radius) access to an advertisement page.
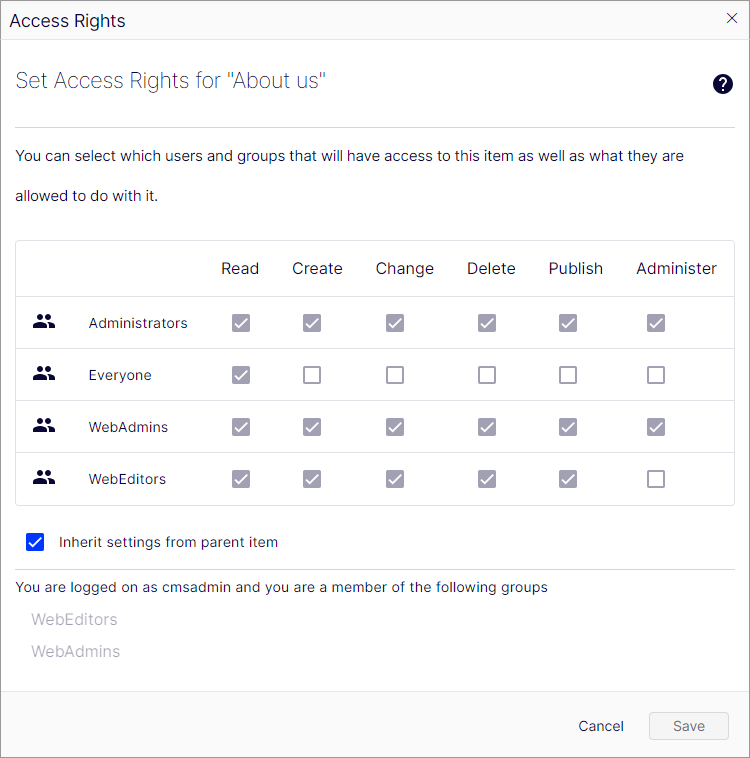
Administrators manage access rights from the administration view in CMS. Editors with administrator rights can also manage access rights for a single page from the edit view.
Built-in user groups
By default, Optimizely CMS includes built-in user groups that align with user roles. Extend predefined groups and roles. See Administer users and Administer groups.
During development, configure the membership and role providers to use the built-in groups and roles in Optimizely.
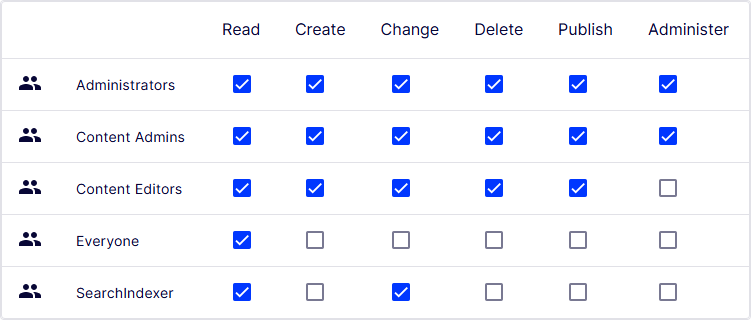
- Administrators – Windows defines this group when the application is created. An administrator can access all parts of the system and can edit all application content. Often, administrators are developers who configure or maintain the application.
- Content Admins – Optimizely defines this group to access admin and edit views. Membership in this group does not provide editing access to the content structure. In most cases, only a few system administrators or super users belong to this group.
- Content Editors – Optimizely defines this group to access the editing view. Add users to this group who need access to the edit view. Then, add the users to other groups to give them specific editing rights to content. On large websites, editors are often organized in groups according to content structure or language.
- Everyone – Windows defines this group to give visitors read access to website content. Unregistered visitors to a public website are anonymous, meaning the system cannot identify them. To remove the Everyone group from content (for example, to change access rights for a web page), users must log in to access content, even when it is published.
Types of access
Access types determine the scope of what each user or group sees and can change in CMS 13. Administrators choose the right types so editors, visitors, and audiences receive permissions matched to their work.
Access types for users and groups
Control which parts of the application content structure are available to business users, such as content editors and site administrators, and what is available with restricted access to visitors. Let visitors post comments on the application through access rights.
- Read – The user or group can access the content as a reader; otherwise, the content is invisible.
- Create – The user or group can create content under the item on which this right is set.
- Change – The user or group can access the content to modify it. Typically, Create and Change are set together, but in some cases, granting only Change access (without Create) restricts a user to modifying existing content but not creating content.
- Delete – The user or group can delete the content.
- Publish – The user or group can publish the content.
- Administer – The user or group can create and edit approval sequences and set access rights and language properties on individual content items from edit view for content given this access. This access type does not provide access to the admin view. To access the admin view, you must be a member of the CmsAdmins group.
Access to assets and media
Access to assets and media controls who uploads, edits, or publishes shared blocks, files, and images. Administrators set rights at the folder level so editors manage only the assets relevant to their site or page. Apply access rights to assets in the content structure, including folders, blocks, and media. Define specific access rights from the Root level down, including the Recycle bin (Trash) and For All Sites (or For All Applications), which store blocks and media. Shared blocks and media share the same folder structure.
Editors must have Create access rights to the relevant global or site-specific folder under For All Sites/Applications or For This Site/Application to upload an image or create a block. When adding assets to a local For This Page folder, editors must have Create access rights to the current page instead.
To automatically publish media on upload, editors must have Publish access rights to the target folder (global, site-specific, or application-specific) or to the current page when uploading to a local folder.
NoteMedia are never automatically published if an approval sequence is set on the folder to which the media are uploaded.
Access to languages
If your application has content in multiple languages, define access rights for each language so editors can create content only in the languages to which they have access. Go to Settings > Languages, select an enabled language, and open the Permissions tab to view which groups and users have access to that language. Only users with access rights to a language can create and edit content in that language. See Manage languages.
Access to the CMS platform
For access rights for other parts of Optimizely Content Management System (CMS), see Permissions for functions.
Set access rights
The Set Access Rights view assigns user groups and individual users to a node in the content tree. Administrators use this view to control inheritance and apply permissions across whole branches at once.
-
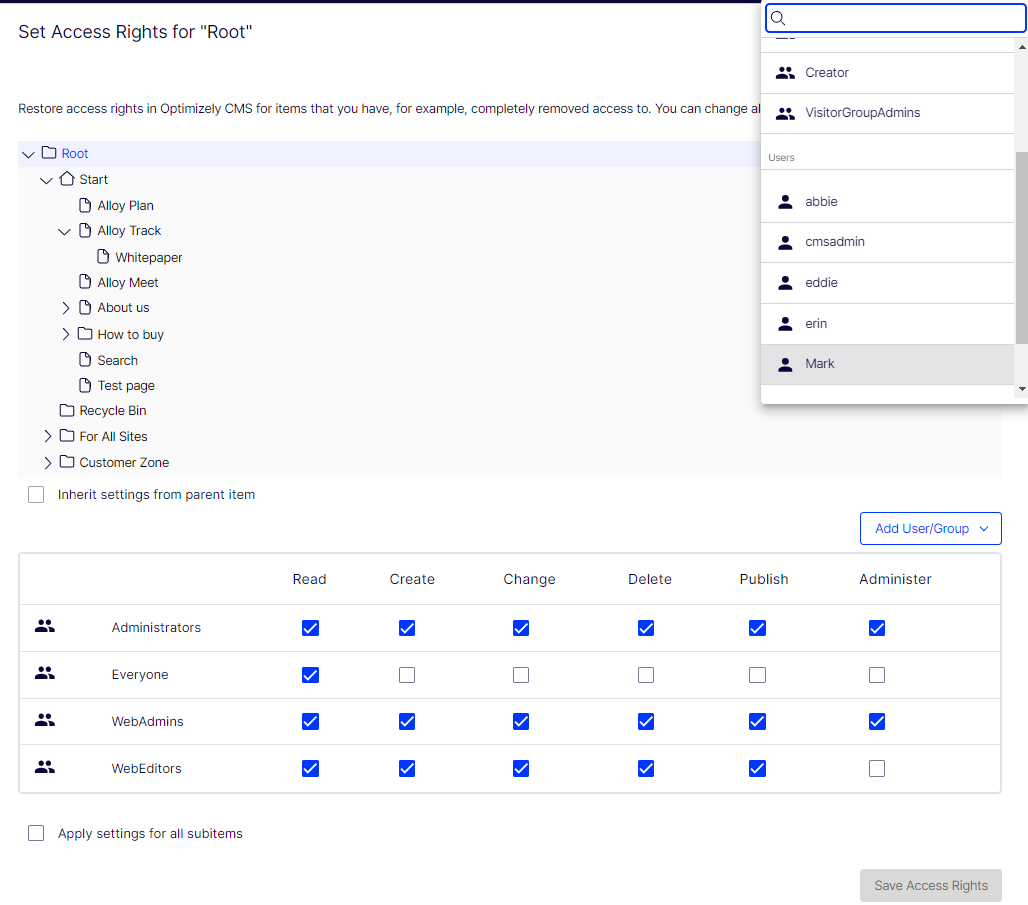
Go to Settings > Set Access Rights. The Set Access Rights view displays the website content tree.
-
Click a node in the content tree (for example, Alloy Track). Typically, a content item shows Administrators (with all access rights) and Everyone (with Read-only access rights). Change these rights or add users or groups.
- If the users or groups are inactive (grayed out) for a content item, the content item inherits the access rights of its parent content item. To set access rights for this content item, clear the Inherit settings from parent item checkbox.
- To add settings to the selected node's subitems without affecting their existing settings, select Apply settings for all subitems.
-
Select Add Users/Groups. A list of available users and groups displays.
-
Modify the access rights settings and click Save Access Rights. The users or groups display in the Set Access Rights view for the selected content tree item.

If you set conflicting access rights to content, selected access rights prevail over cleared access rights. For example, Abbie is a member of the Marketing and Support user groups, each with different access rights set on the same content; Marketing has Publish rights, but Support does not. Abbie, who is in both groups, has Publish rights to the content, but Erin, who is only part of the Support group, does not have Publish rights.
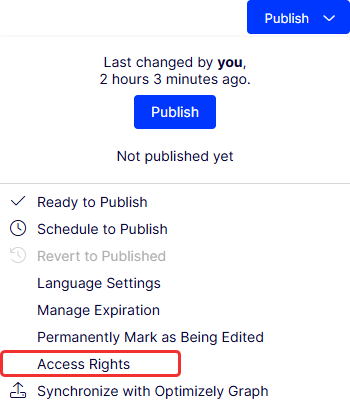
Set access rights from the Publish/Options menu
Administrators manage website access rights from Settings. To set access rights for a single page or block from the Publish or Options menu, you must have administrator rights. This approach is useful when you need to verify a published item without making it publicly visible.
Sub-items set to Inherit settings from parent item are also affected.
In the Access Rights window, change the settings:
If access rights are inherited from the parent page, clear Inherit access rights from parent item and click Add Users/Groups to define new access rights. Add the access rights and click Save Access Rights.
For example, removing read access for Everyone (as in the previous example) hides the published page from the public but keeps it visible and editable for the Site_Editors group and Administrators.
NoteYou must belong to a group with Administer access rights to define access rights from the edit view. This setting does not provide access to other administration options in Optimizely Content Management System (CMS).
Access rights inheritance and subitems
Set inheritance for content subitems
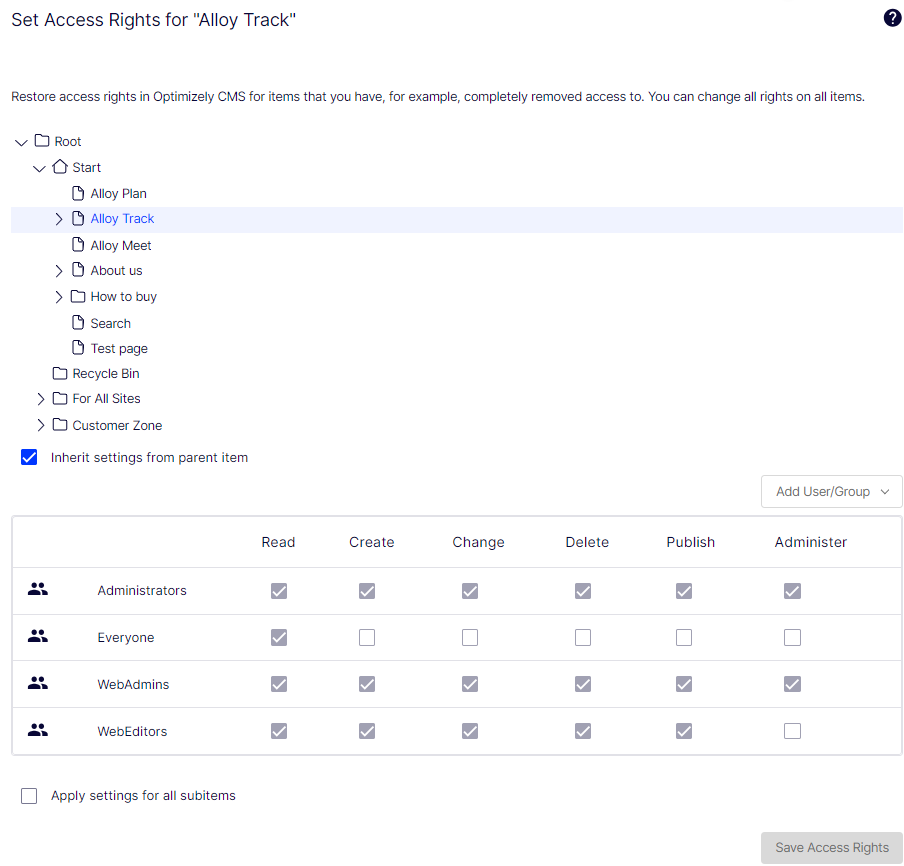
Content inherits access rights from its closest parent item by default. When you set access rights for a content item, the rights apply to it and to subitems with Inherit settings from parent item selected. Subitems with this option cleared are not affected. For example, Alloy Plan, Alloy Track, and Alloy Meet have the same access rights because they inherit the access rights from the Start page.
- If you break the inheritance for Alloy Meet and change its access rights, the access rights become different from the parent (Start) and its two siblings (Alloy Plan and Alloy Track).
- If you add a Marketing group to Start, Alloy Plan, and Alloy Track, those items inherit the Marketing group because inheritance is selected. Alloy Meet does not inherit the group because its inheritance is cleared.
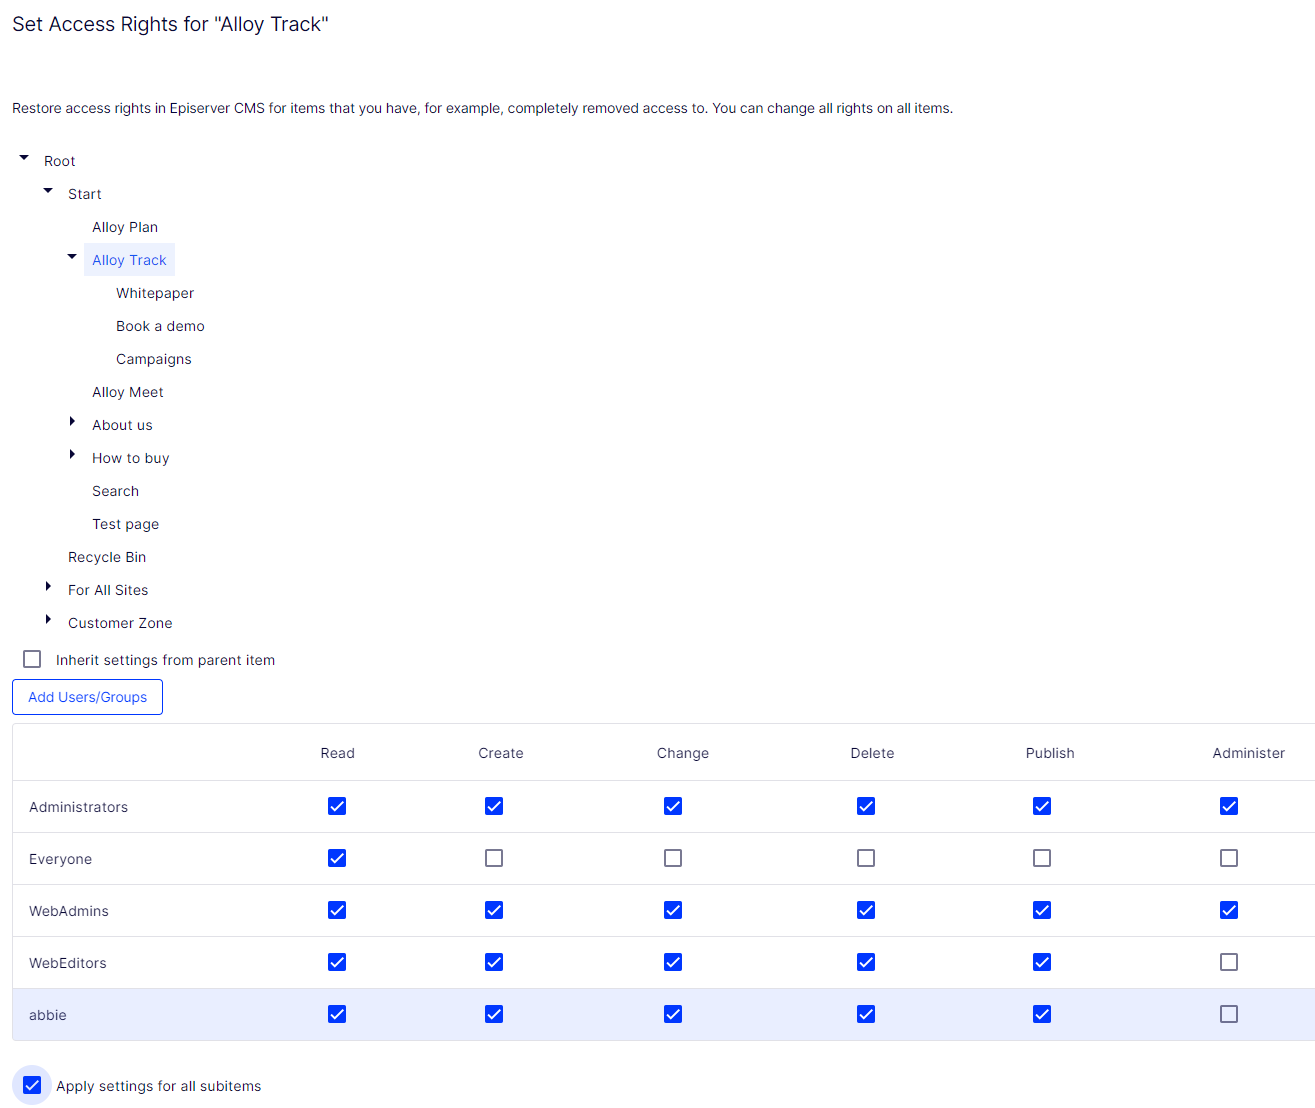
The following image shows the access rights for Alloy Track content with inheritance cleared. Access rights changes on Marketing are not pushed to subitems unless they have Inherit settings from parent item selected.
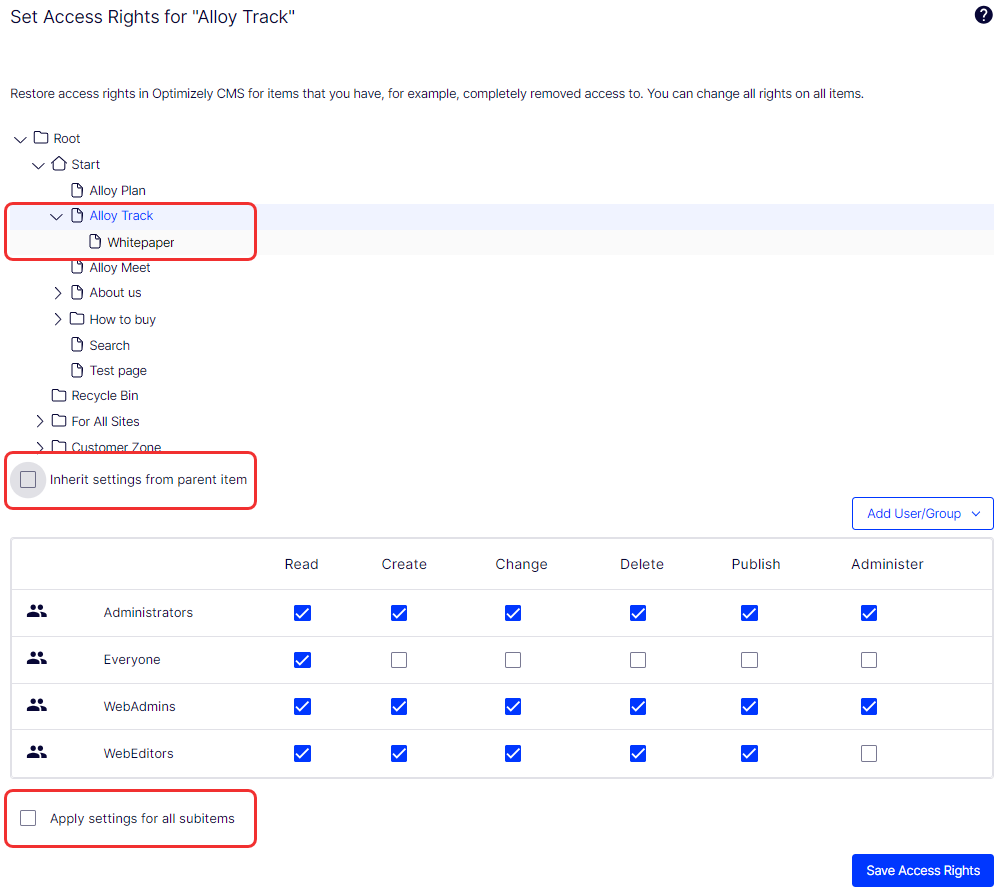
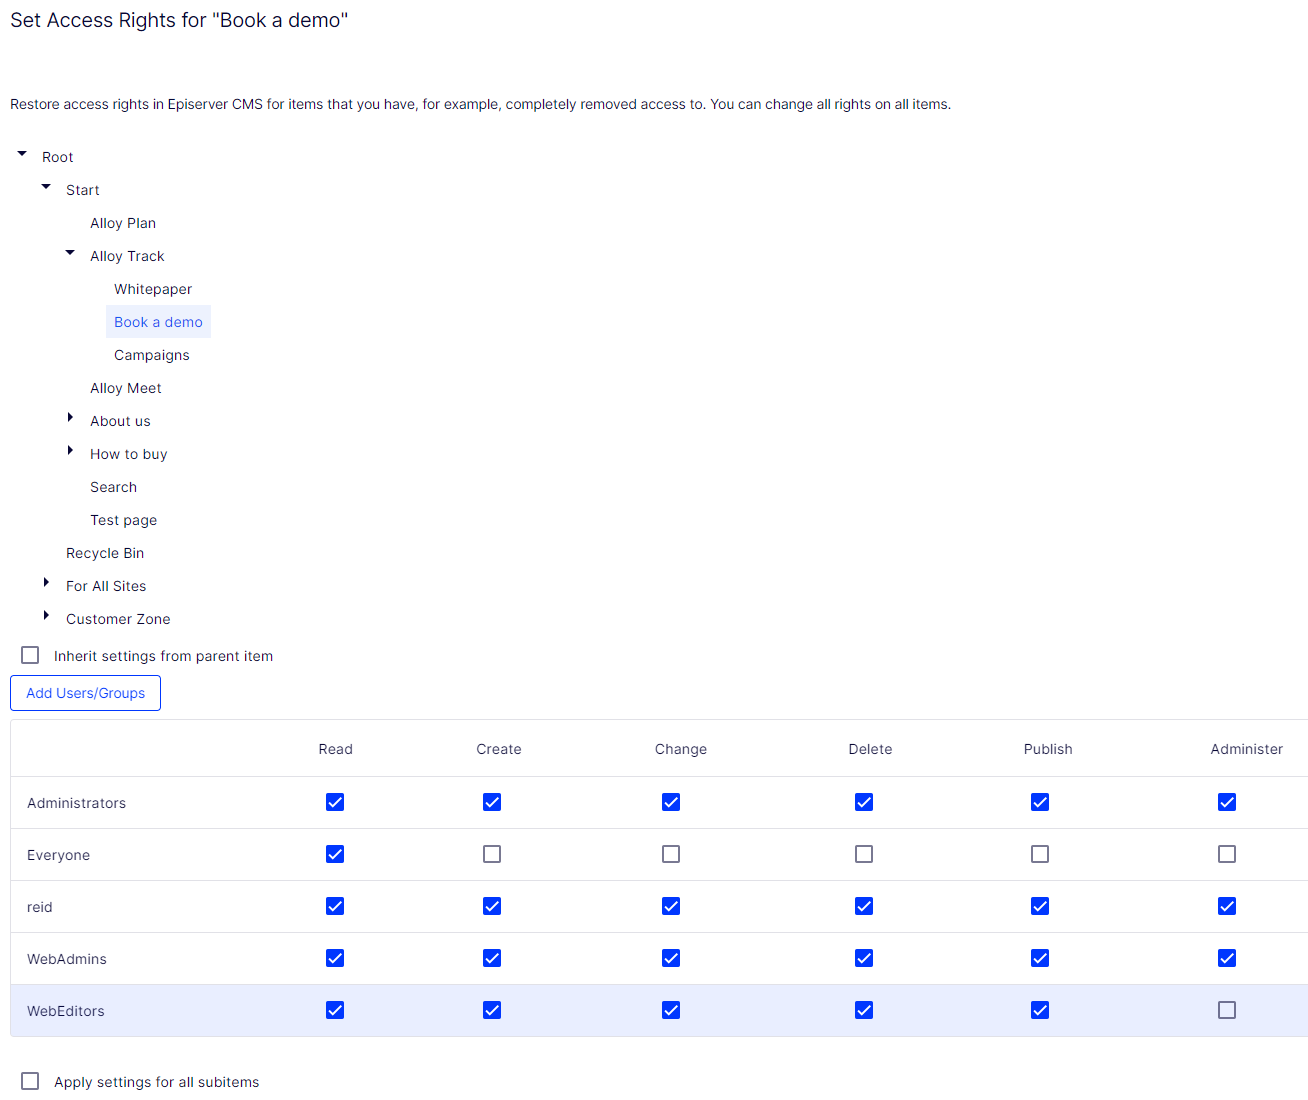
Campaigns is a subitem of Alloy Track. It has Inherit settings from parent item selected, so the access rights are identical to that of the Alloy Track content item.
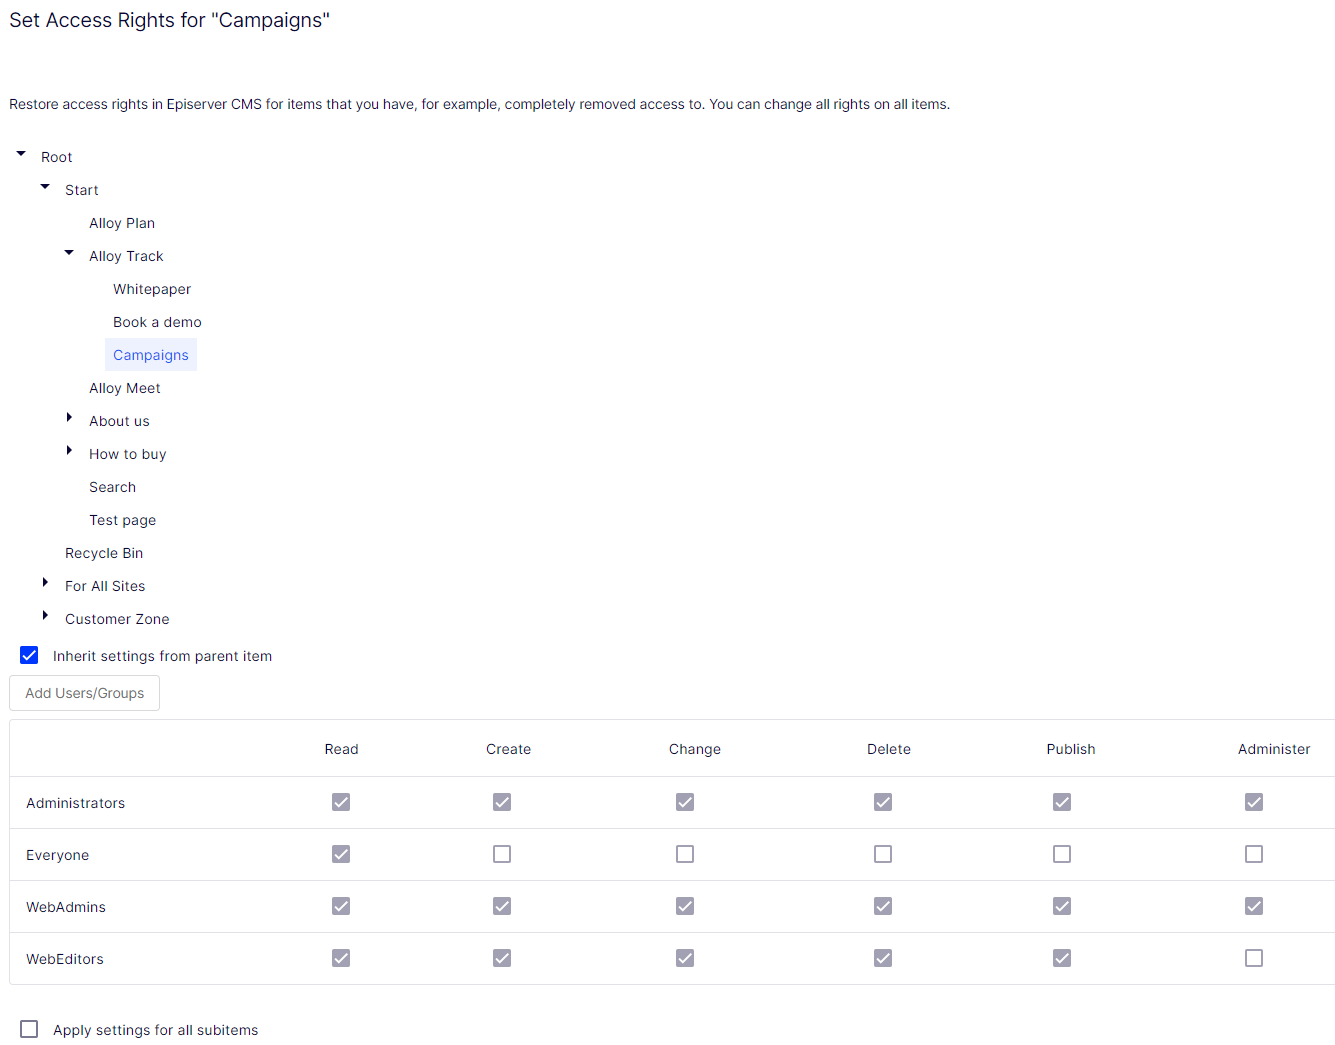
Book a demo is also a subitem of Alloy Track, but contrary to Campaigns, it has Inherit settings from parent item cleared, so its access rights are not the same as the parent content item.
Set access rights for subitems
Selecting Apply settings for all subitems applies the access rights of the parent item to its subitems, even if a subitem has inheritance cleared. The option adds settings to a subitem it did not have before and does not change or remove any existing settings.
For example, the Alloy Track content item has Abbie as a user with access rights.
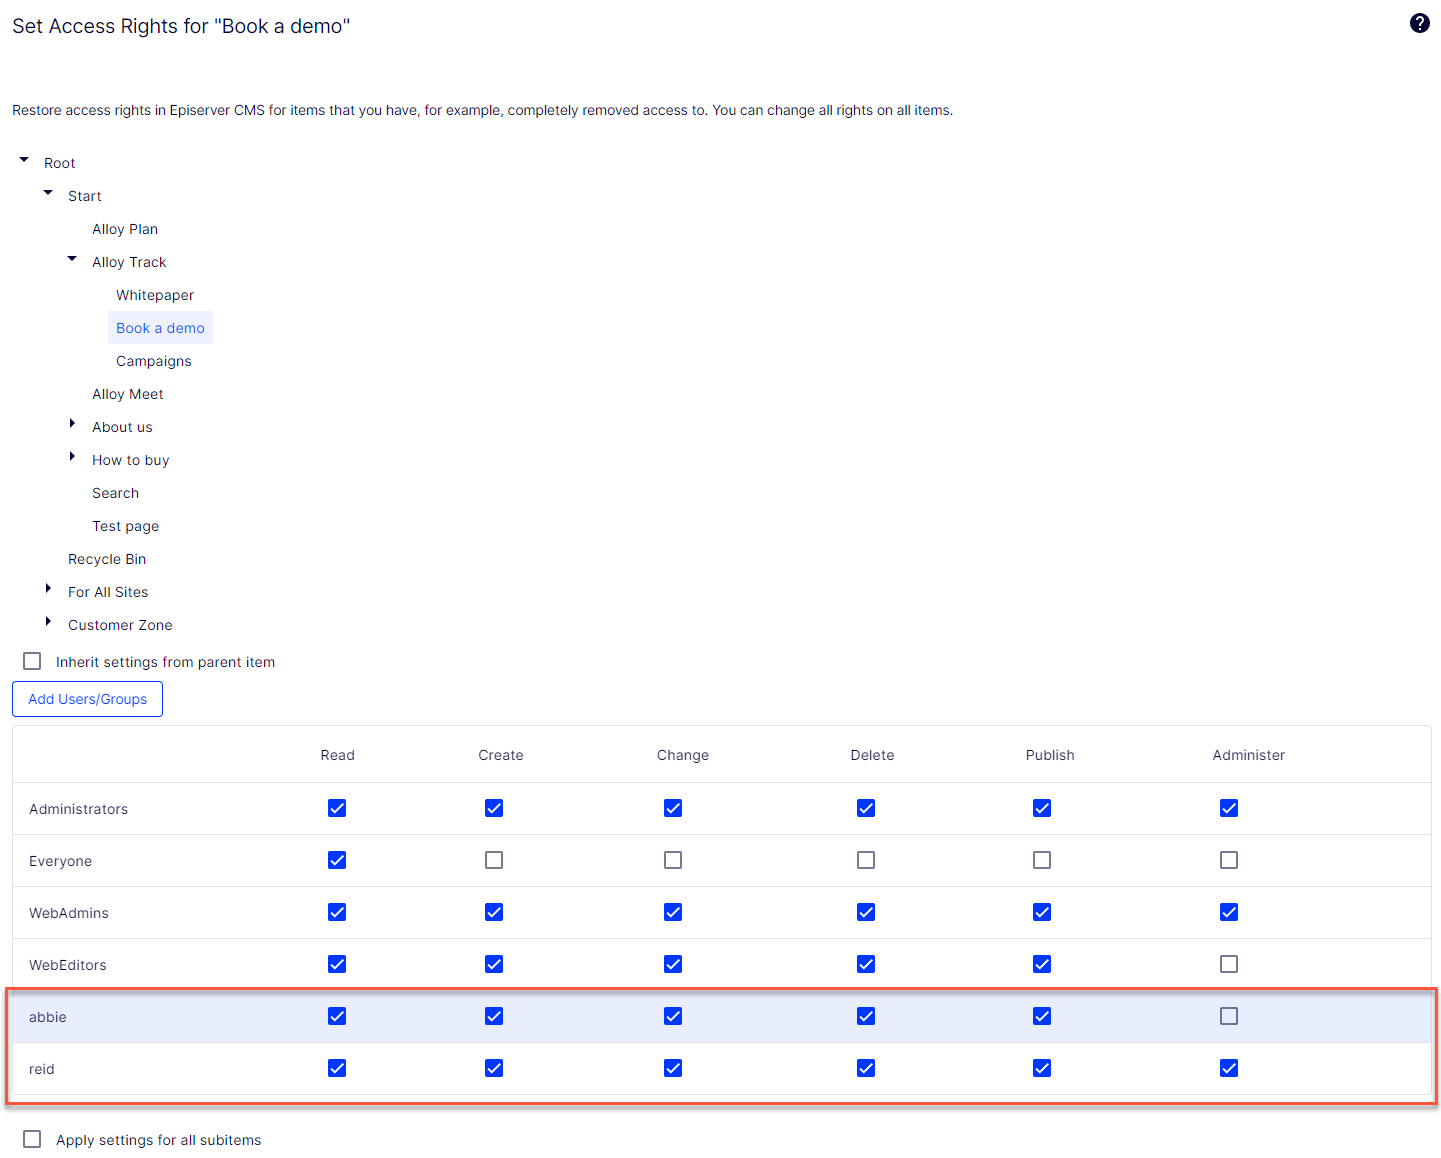
When you select Apply settings for all subitems, Abbie is added as a user with access rights to Book a demo because Abbie is part of the Alloy Track content item's access rights. Reid, who already had access rights to Book a demo, remains unchanged on the list of access rights.
When a parent item and a non-inheriting subitem share the same user or group but with different access rights, selecting Apply settings for all subitems applies the parent's settings. For example:
- If the Alloy Track parent item has user Abbie with only Read access set, and Book a Demo has user Abbie with all access rights set, then Apply settings for all subitems resets Abbie's access rights on Book a Demo to Read access only.
- If Alloy Track has user Abbie with all access rights, and the subitem has user Abbie with only Read access, then Apply settings for all subitems gives user Abbie all access rights on the subitem.
Use an audience in an access rights list
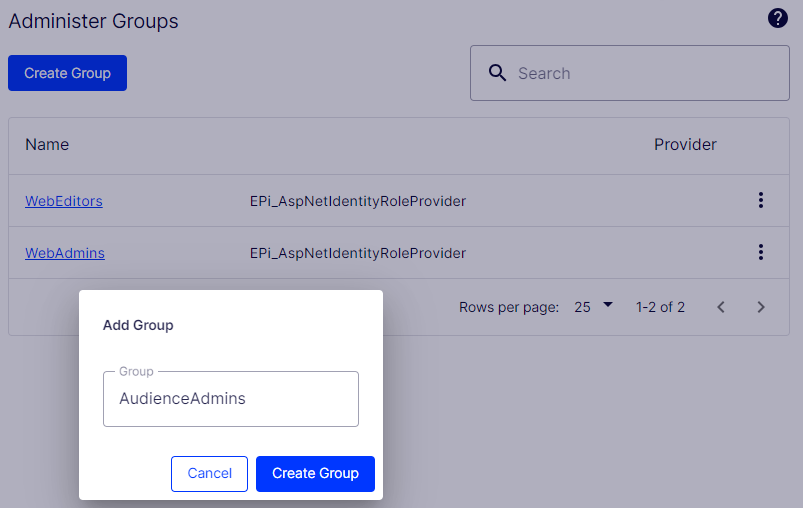
The Optimizely Recommendations feature uses audiences, which are groups of visitors defined by shared attributes such as location or behavior. Administration access rights are required to manage audiences. To let an editor manage audiences without providing access to the entire admin view, make the editor a member of AudienceAdmins. This group provides access only to the Audience option in the top menu. AudienceAdmins comes with Optimizely, but you must add it through Settings > Access Rights > Administer Groups > Create Group > AudienceAdmins.
Set specific access rights for audiences to let them view hidden content that is not publicly available. For example, grant only members of the Visitors from London audience access to a Family day at the zoo page with a discount coupon.
Use this feature to create a customer area for registered customers on your website. Being an audience member requires registration and login to access the content.
- Go to Settings > Access Rights > Set Access Rights.
- Select a node in the content tree.
- Click Add Users/Groups.
- Select Audiences to view available audiences.
- Select an audience and click OK.
NoteAudiences can only have read access.
Single-user versus group access rights
Set access rights for a single user. For example, set the access rights so only Abbie (and system administrators) can edit the Book a Demo page. Add Abbie to any number of content items and set different access rights for each one.
If you have several users who need common access to content, managing access rights on a user-by-user basis can be complex. Create user groups for users with similar access needs, add users to each group, and use the groups to manage access rights. This approach lets you update access for all group members at once. Add a user to one or more groups as needed.
For example, add Abbie, Erin, and Reid to a Marketing user group and give access rights to any number of pages and content to the Marketing group instead of each individual. Modify the Marketing user group to add Eddie to all of the Marketing content (or remove Abbie). Updating the group removes the need to visit each page or content item to update users' access rights.
Remove a user or group from the access rights list
Removing a user or group revokes their access to the selected content item without affecting other content. Administrators use this to retire stale roles or correct permissions assigned in error. To remove a user or group from the access list, clear all of the access rights for that user or group and click Save.