Applications
Information on the Applications tab in the Optimizely CMS 13 Settings.
In Optimizely Content Management System (CMS), an application represents any website or frontend that runs on the CMS instance. Examples include a website, a headless frontend, and a campaign microsite. Use Applications to configure and manage one or more applications, including preview settings, hostnames, and routing roots.
Unlike tightly coupled front- and back-end architectures, CMS does not impose routing conventions. Routes are paths that determine how an application responds to a client request for a particular endpoint. This approach gives headless frontends full control over URL patterns and lets teams migrating from other platforms preserve existing URL structures. Design routes to suit your use case. For details on configuring URL routing, see URL routing.
When to create an application
Applications keep CMS organized, scalable, and aligned with your business needs by providing isolated management, flexible architecture, and a better editing experience. Create an application in the following scenarios:
- Launch an application – Create a separate application to manage independently from other applications.
- Multi-application management – Manage multiple applications under a single CMS instance by configuring each as a separate application. This provides dedicated settings and easier content management per application.
- Headless CMS implementation – Create an application to manage front-end applications that consume content from CMS in a headless configuration, where the front end is decoupled from the back end.
- Marketing and campaign applications – Create a dedicated application for marketing campaigns to isolate configurations, content, and tracking from other applications.
- Internationalization – Create a separate application to manage localization settings and content for different regions or languages.
- Development and preview environments – Create a separate application to configure development or preview environments and maintain a clean separation from production.
Create an application
Create an application to give a website or front end its own start page, settings, and routing within CMS. Each application keeps content, hostnames, and previews isolated from other sites in the same instance.
-
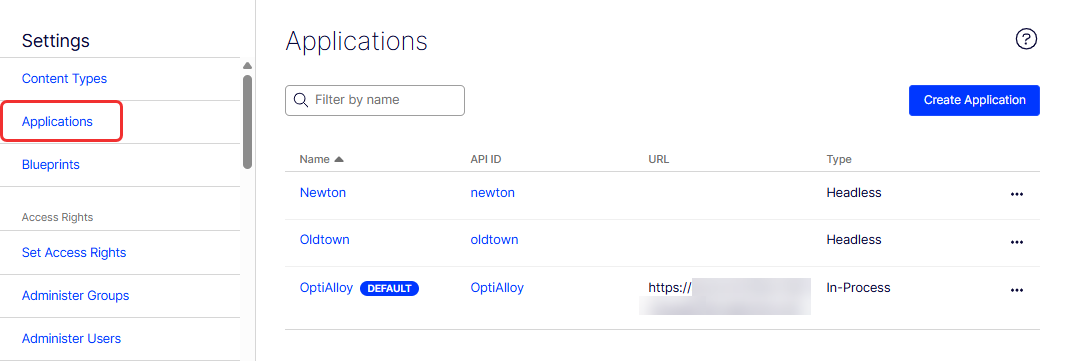
Go to Settings > Applications.
-
Click Create Application.
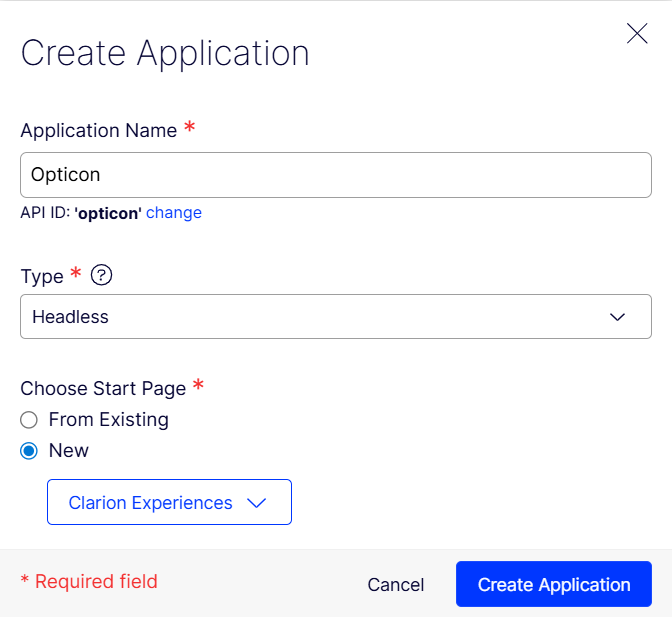
- Application Name – Enter the application name. The name must begin with a letter and contain only alphanumeric characters. Click Change to modify the automatically generated API ID.
- Type – Select the type you want to use.
- Select Headless for this application if you want to manage content in Optimizely but build and host your own custom frontend using APIs.
- Select In Process for this application if you want Optimizely to manage both your content and directly render your application's frontend.
- Choose Start Page – Select the start page from the content tree.
- From Existing – Select a start page from the page tree that displays.
- New – Select a start page from a list of Experiences and Page Types.
-
Click Create Application. The application is added to the Applications list.
Configure an application
Configure an application to set its hostnames, start page, asset scope, and live preview behavior. These settings control how visitors reach the site and how editors preview unpublished content.
Configure general settings
General settings define the application's identity. Configure the name, default status, asset scope, API identifier, and start page. CMS and APIs use these values to reference the application.
-
Click the application name in the Application list (or select More (...) > Edit). The Settings window displays.
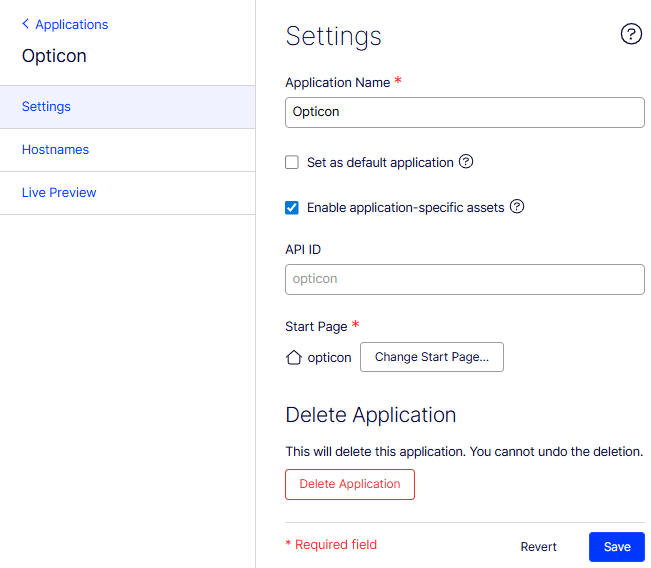
- Application name – Enter the application name or the application's start page.
- Set as default application – Designate this application as the one CMS routes users to when no specific application is specified.
- Enable application-specific assets – Select to ensure that this site's assets, such as blocks and media, are not available for use on other sites in the installation. This option affects the folder structure editors see in the assets panel.
- API ID – Specify a unique identifier for the application, used in API calls to reference the application programmatically. In the screenshot, the API ID is set to remote, indicating that this is the identifier for the application named "Remote website."
- Change Start Page – Select the page to which the visitor is sent if only a hostname is specified.
- Delete Application – Click to delete the application and remove it from the Application list.
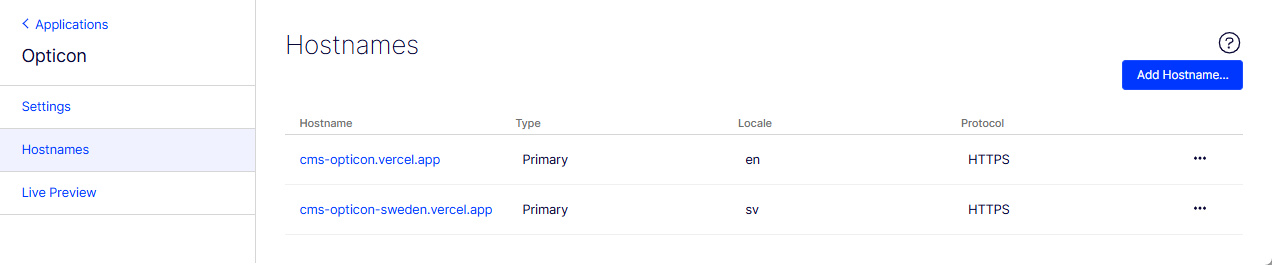
Configure hostnames
Hostnames map URLs to the application so visitors reach the right content. Each application supports multiple hostnames for live, preview, media, redirect, and edit scenarios.
-
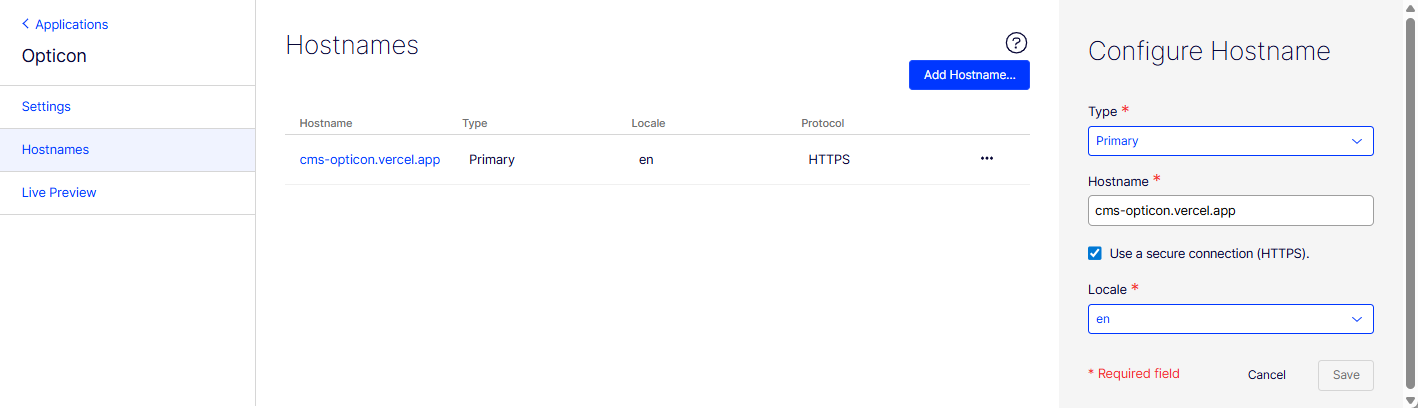
Open the application's Settings window, then select the Hostnames tab.
-
Click Add Hostname to open the Add Hostname pane.
-
Type – Select the type of hostname.
- Headless applications support the following hostname types:
- Primary – Designate the main hostname for the site. It serves as the canonical URL or is used for specific internal routing logic. Select this type for the live, public-facing URL where published content is accessible to end users.
- Preview – Use for content previewing. CMS editors use this hostname to view unpublished content, drafts, or content in specific contexts before publishing. It requires special routing and security mechanisms, such as preview tokens. Select this type for a staging or development URL used for reviewing changes before they go live.
- Media – Serve media files (images, videos, and documents). Configure caching, CDN integration, or optimized delivery of digital assets as needed.
- Traditional (in-process) applications support the following hostname types:
- Default – A generic hostname with no special behavior. Default acts as a fallback in URL generation when no Primary host matches. Use it during initial setup or to route additional hostnames before assigning a Primary host.
- Primary – The canonical hostname for the application. Primary has the highest URL generation priority and serves as the redirect target for Redirected (permanent) and Redirected (temporary) hosts. Each application supports one Primary host per locale. For a detailed comparison, see Application framework.
- Preview – The Preview type behaves the same as in headless applications.
- Media – The Media type behaves the same as in headless applications.
- Edit – Provide access to the Optimizely CMS editing interface. It is the URL where content editors log in and manage content.
- Redirected (permanent) – Configures a permanent HTTP 301 redirect from one URL to another. Use this type when a page URL has permanently changed so that search engines and browsers go to the new location.
- Redirected (temporary) – Configures a temporary HTTP 302 redirect from one URL to another. Use this type when a URL change is temporary, indicating to search engines that the original URL may return.
NoteThe Media, Edit, and Preview host types are configured as language-agnostic and are restricted to a single instance per application.
- Headless applications support the following hostname types:
-
Hostname – Enter a unique name of between 2 and 225 characters (letters, numbers, periods, underscores, hyphens, and an optional port number such as
hostname:8080) for a new primary host. Do not includehttp://orhttps://in the name; use the Use a Secure connection (HTTPS) checkbox for that.Hostnames are resolved in the following order of precedence:
- Media
- Primary (language match)
- Default (language match)
- Primary (no language specified)
- Default (no language specified)
- Current or Default (fallback)
-
Use a Secure connection – Select for HTTPS. Clear for HTTP.
-
Locale – Select a locale. Displays only if you selected Type > Primary.
- Only one hostname can be primary per locale. If the selected locale already exists for another hostname, you are asked to confirm that you want to change the primary hostname for the selected locale. For example, if Oldtown has a locale of English (
en) and you add a Newton hostname with locale English (en), you are asked to confirm changing the primary hostname from Oldtown to Newton. - To have URLs indexed without a language segment (transforming
example.com/en/my-pagetoexample.com/my-page), map the hostname to the desired language. For example, mapexampleinexample.comto the languageen.
- Only one hostname can be primary per locale. If the selected locale already exists for another hostname, you are asked to confirm that you want to change the primary hostname for the selected locale. For example, if Oldtown has a locale of English (
-
-
Click Add. The hostname is added to the list.
 Note
NoteIf you change hostnames, go to Settings > Scheduled Jobs and run the Optimizely Graph Full Synchronization job to update links for all content items.
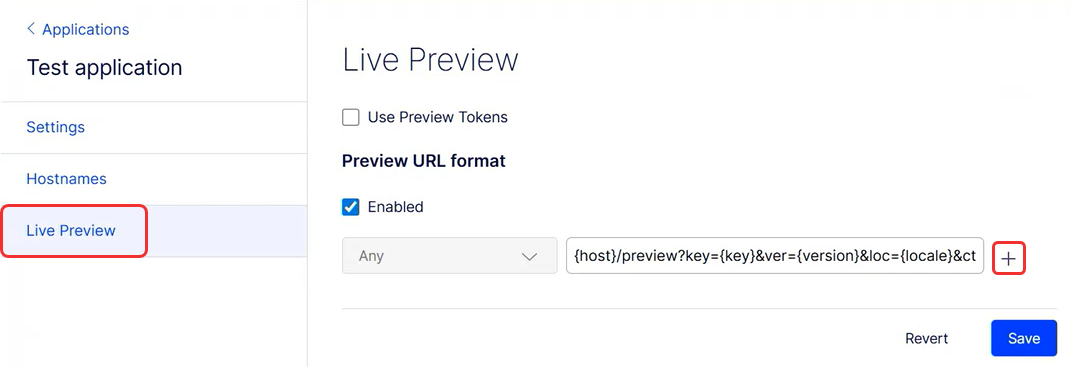
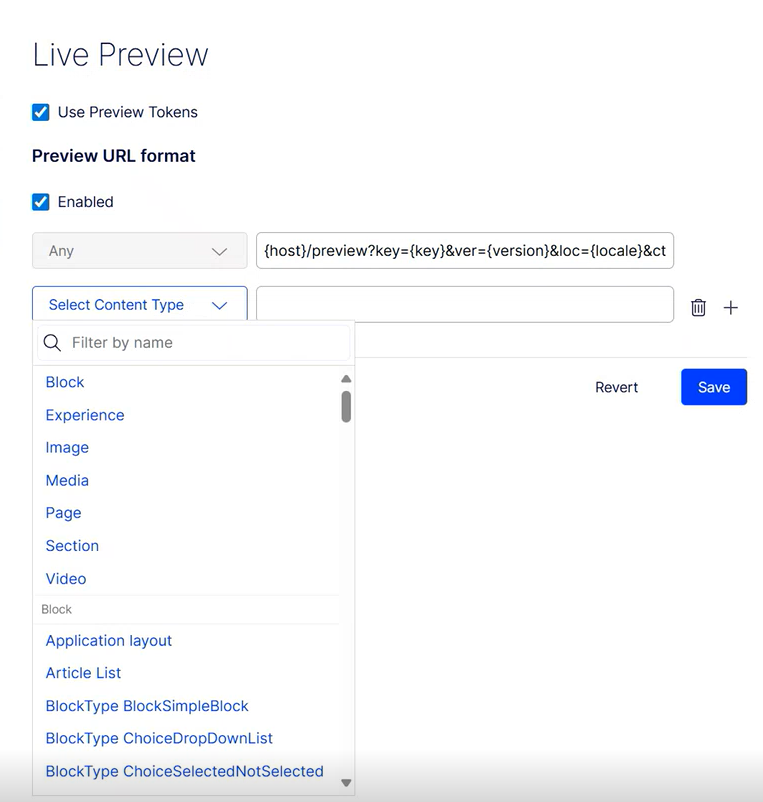
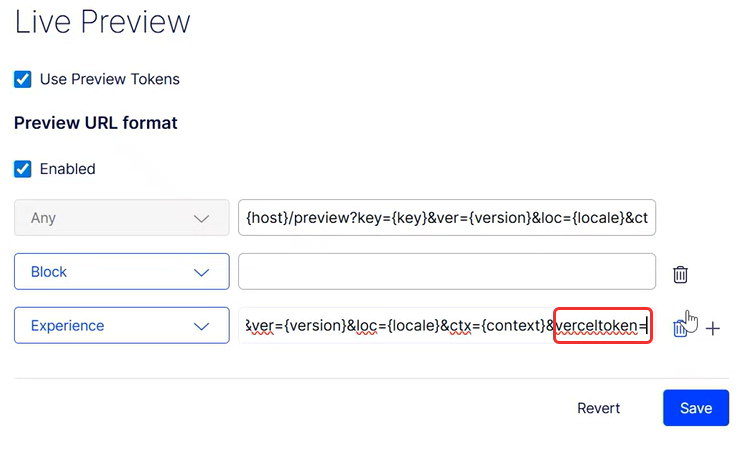
Configure live preview
Live preview lets editors view unpublished content in the rendered application before publishing. Configure preview tokens and content type rules to control how the preview behaves.
-
Open the application's Settings window, then click Live Preview. The Live Preview panel displays.
-
Use Preview Tokens – Automatically append preview tokens to the preview URL you use. Preview tokens are reusable and validated against user permissions rather than specific content references. For configuration examples, go to the "Modify the default token to create a custom preview" section.
NotePreviously, preview tokens were issued for specific content references. Instead of validating the preview token's content reference with the currently routed content reference, you can now validate the preview token principal's permissions to the routed content.
-
Enabled – Select Enabled to activate the preview. The field defaults to Any, which disables customization. Select Enabled to unlock the content type rows below.
-
Add – Click to add a Content Type row with a custom URL. Any is the default. If you remove the URL, you can preview only the items you specify.
-
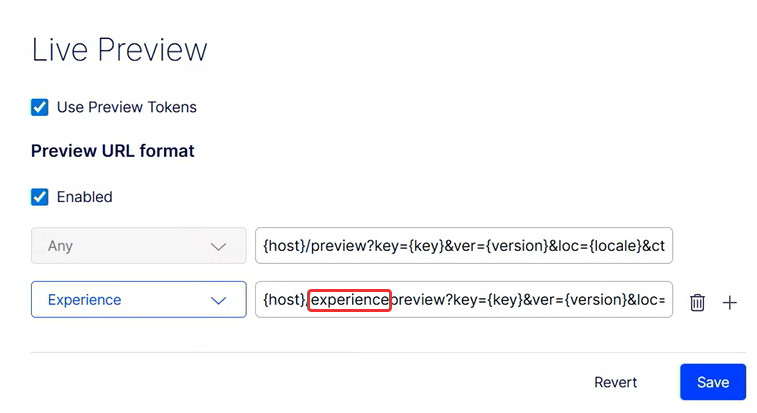
Modify the default token to create a custom preview
When an editor previews content, CMS generates a preview token and appends it to the URL of the front-end application (for example, yourdomain.com/preview?preview_token=eyJ...). The front-end application detects the preview_token in the URL and includes it in the Authorization: Bearer TOKEN header when making GraphQL requests to Optimizely Graph. Optimizely Graph uses this token to return the appropriate content, including unpublished drafts, based on the editor's access rights.
The following examples show custom preview token configurations:
- Add a custom preview by modifying the default token (adding
experienceto the token).
- Leave the token field blank to disable preview (for blocks, for example).
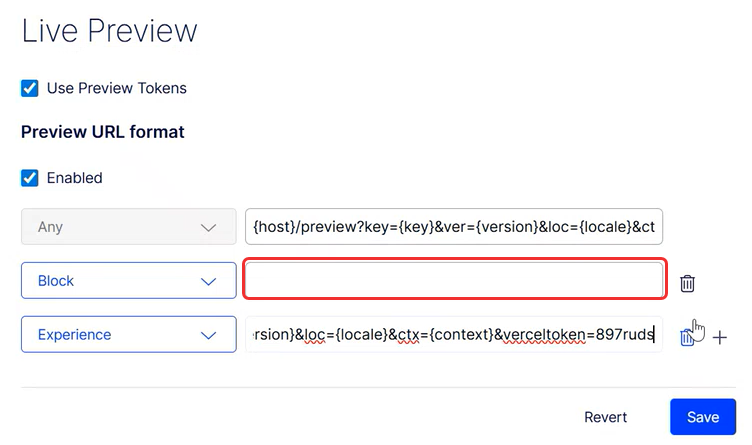
- Add a
verceltokenparameter to integrate with Vercel's preview environment.
Delete an application
Delete an application to retire a site and remove its routing, hostnames, and configuration from CMS. Removing unused applications keeps the Application list focused on active properties.
- Click the name of an application in the Application list (or select More (...) > Edit) to configure the application. The Settings window displays.
- Click Delete Application.
- Confirm the deletion. CMS removes the application from the Application list.