Deploy to Azure Web Apps
Describes how to set up an Optimizely Content Management System (CMS) site to run on Azure Web Apps.
Deploy an Optimizely Content Management System (CMS) 13 site to Azure Web Apps using SQL Database, Azure BLOB storage, and Azure Service Bus. The example creates an Alloy sample site in Visual Studio, but most steps apply to sites created another way.
For developers and operations engineers deploying CMS 13 to Azure Web Apps.
NoteSee also the Install the Optimizely Alloy sample site video for information about cloud installation.
Cloud requirements
- You need a cloud-enabled license from the Optimizely License Center.
- Microsoft Azure Portal requires an account with login details.
- When you install a database on Microsoft Azure SQL Database, verify that Azure SQL Database supports each product and add-on the site uses.
- Ensure that each deployed application and module is designed for the cloud.
Set up a cloud website
The following image illustrates an Optimizely Content Management System (CMS) website running in an Azure Web Apps environment with multiple instances. The website instances share the same SQL database and BLOB storage that stores binary file data in the cloud environment. The sites are load-balanced, and a Service Bus manages events between the CMS websites.

Use App Service plans to scale the number of CMS sites up or down from the Azure portal. See Scale up an app in Azure App Service.
The following steps create a CMS website running in an Azure website environment.
Create a site
- Create a CMS site from the .NET Core template. See Install Optimizely (ASP.NET Core).
- Install the NuGet package
EPiServer.Azureto the project. - Save your license file under the site root, at the same level as the
/binfolder. CMS uses and activates the license when you deploy the website to Azure.
Create Azure resources
Log in to the Azure portal to create the necessary Azure components:
-
Create an Azure web app.
a. In the Azure portal, click Create a resource in the top left corner, and select Web App.
b. Choose whether to create a resource group or use an existing group. (A resource group is a logical container into which web apps, databases, and so on are deployed.)

c. Enter a name for your web app. The name must be unique for web apps in Azure.
d. Select Publish: Code, your Operating System, and Region.
e. Select or create an App Service plan.
f. Application Insights is enabled by default. To turn it off, go to Monitoring and select No under Enable Application Insights.
g. Click Review + create at the bottom of the panel and then Create again after you have reviewed your settings.
TipSelect Pin to dashboard to make it easier to find your web app later.
-
Create a SQL database.
a. Select Create a resource in the top left corner, and select SQL Database.
b. Select an existing server or create one, and provide a login user and password.
c. Under Networking, select Connectivity method: Public endpoint and enable Allow Azure services and resources to access this server and Add current client IP address.
-
Create a SQL database. See Create a single database in Azure SQL Database for detailed steps. Under Networking, ensure you enable Allow Azure services and resources to access this server and Add current client IP address.
-
Create Azure BLOB storage. When you run on Azure, store media (such as images) in Azure BLOB storage to enable scaling. See Create a storage account for detailed steps. The storage container name must be lowercase (for example,
mysitemedia) for DNS compatibility.TipCreate two BLOB storage accounts: one for development and one for production, and switch between them using just the connection string.
-
Create a service bus. To scale the site to run on several instances, set up a Service Bus in Azure to handle messages among the site instances. See Create a Service Bus namespace for detailed steps.
Update the configuration
Change some configurations for the website to work with Azure.
WarningDo not skip this step. If you do, CMS stores assets locally and does not deploy them to Azure BLOB storage.
Two NuGet packages configure Azure resources: EPiServer.Azure for direct use and EPiServer.CloudPlatform.Cms for Digital Experience Platform (DXP) deployments that use the deployment API.
-
Install the
EPiServer.AzureNuGet package and register the Azure BLOB and event providers in yourStartup.csorProgram.cs:services.AddAzureBlobProvider(options => { options.ConnectionString = "AZURE_STORAGE_CONNECTION_STRING"; }); services.AddAzureEventProvider(options => { options.ConnectionString = "SERVICE_BUS_CONNECTION_STRING"; }); -
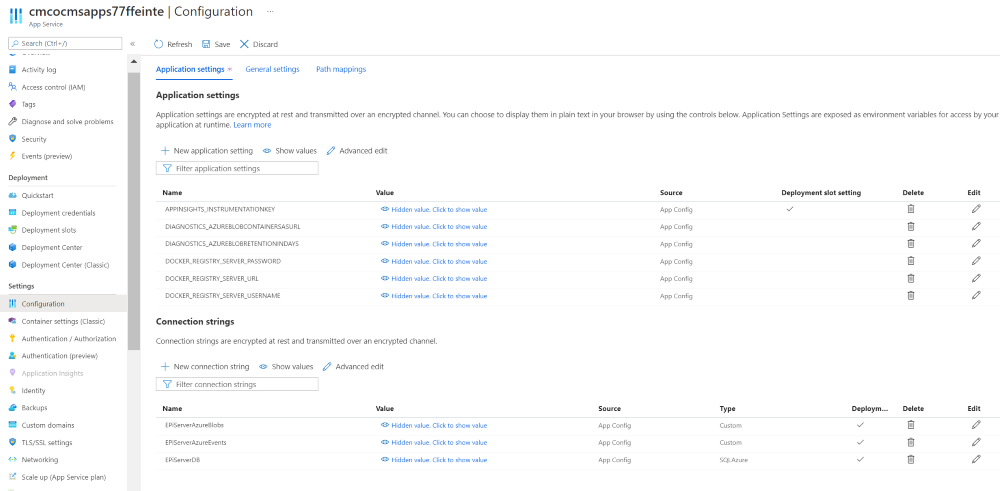
Add the connection strings to
appsettings.json:{ "ConnectionStrings": { "EPiServerDB": "Server=tcp:abcdefgh.database.windows.net,1433;Database=mySiteDB;User ID=dbadmin@abcdefgh;Password={password};Trusted_Connection=False;Encrypt=True;Connection Timeout=30;", "EPiServerAzureBlobs": "DefaultEndpointsProtocol=https;AccountName=mystorageaccount;AccountKey=STORAGE_ACCOUNT_KEY", "EPiServerAzureEvents": "SERVICE_BUS_CONNECTION_STRING" } }-
EPiServerDB– Found in the Azure portal under your SQL database > Overview > Show database connection strings. EnsureMultipleActiveResultSets=Trueis included. -
EPiServerAzureBlobs– Found under your storage account > Settings > Access keys. -
EPiServerAzureEvents– Found under your service bus > Settings > Shared access policies. For production, create a dedicated policy with only the required permissions instead of using the default root key.
NoteThe
EPiServerAzureBlobsandEPiServerAzureEventsconnection strings are optional if you already configured the connection strings directly in the service registration in step 1. OnlyEPiServerDBis always required. If set, these connection strings override the values configured in the service registration methods. -
Deploy to Azure
Push the application or site to a container registry, Azure provider, or similar resource. Visual Studio is one option: see Microsoft's Container Tools in Visual Studio.
CMS 7.7 introduced a content bootstrap feature. When an export package exists at [SolutionDir]\App_Data\DefaultSiteContent.episerverdata, CMS imports the package during initialization and creates a site. The bootstrap runs only if the site has no existing content. For cloud deployments, publish the project to the cloud environment before starting a local site that points at the cloud database. The bootstrap then runs in the cloud environment, which is faster because the site and database share a data center, and sets SiteUrl to the cloud URL for the new site.
You can also transfer data to an Optimizely site running on Azure Web Apps using the Optimizely CMS export/import functionality. Export the start page from your local site and database and import on the site running in Azure before continuing to the next step.
Create an admin or edit user
To log in to the site on Azure, create a user with access to the edit or admin view, start the local site while connected to the SQL Database, and perform the following steps. You must let the source IP address access the Azure database server. You can enable this in the Azure Portal on the specific SQL Database server (select the SQL server > Firewall/Virtual Networks > Add client IP).
- Start the site (Debug/F5).
- You are redirected to a register page to register the first user in the WebAdmins group.
- Go to the CMS admin view > Administer Groups.
- Create another group named WebEditors. WebAdmins and WebEditors are the default Optimizely groups that grant access to the edit and admin views.
- Go to Create User and create a user who belongs to WebAdmins and WebEditors. Use this user to log in to the Azure website after deployment.
Activate the license
Go to the CMS admin view and activate your cloud license on test and production environments. The running instances will count towards the total number of instances the license allows. See also Manage cloud licenses.
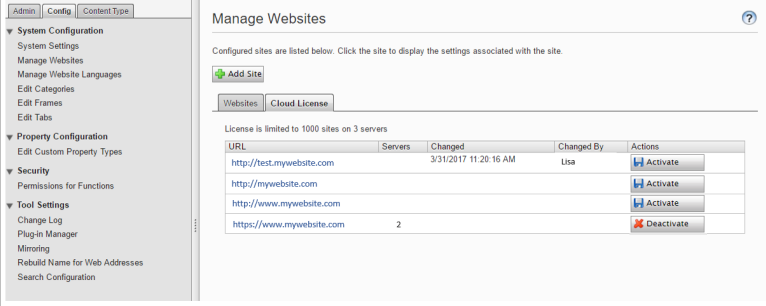
Change the site URL
Depending on how you created the site (see Deploying content), you might need to update the site definition for the CMS website after deployment. If so, log in to the website and go to the CMS admin view > Config > Manage Websites, then change the Site URL to the URL in Azure. This step also maps a host name to the correct site in CMS. Find the Azure URL in the Azure portal under your web app > Overview (right column).
Activate logging
Configure diagnostic logging for your App Service to send application logs to Azure Monitor, Log Analytics, or a storage account.
- Open your App Service in the Azure portal and go to Diagnostic settings.
- Click Add diagnostic setting.
- Select the desired log categories and destination, then click Save.
See Enable diagnostics logging for apps in Azure App Service for detailed steps.
SQL database automatic tuning
Azure SQL Database Automatic tuning uses AI and machine learning to monitor query performance and adjust the database automatically. Leave the settings at their defaults. In particular, leave CREATE INDEX set to Off: enabling it can produce sub-optimal indexes and conflict with the Optimizely Dynamic Data Store (DDS).
See Automatic tuning in Azure SQL Database for details.
Staged deployment
Azure Web Apps supports deployment slots, so you can deploy code into a staging environment before promoting it to production. To prevent deployment slots from interfering with the production environment, mark the EPiServerDB, EPiServerAzureEvents, and EPiServerAzureBlobs connection strings in the Azure portal as sticky (session-affinity) to each slot. If a deployment slot re-uses the production connection strings, it is treated as a load-balanced server, part of the production environment, including licensing restrictions. See Set up staging environments in Azure App Service for details about using deployment slots.
NoteDefining the
EPiServerDB,EPiServerAzureEvents, andEPiServerAzureBlobsas connection strings in the Azure Portal requires at leastEPiServer.CMS.Core8.3.0.
The core parts of CMS do not use session state, but some functionality does (for example, certain audience criteria). Enable session state in one of two ways: rely on the sticky-session (session affinity) feature in Azure App Service, which keeps a user on the same server and works with the default in-memory provider, or configure a distributed provider.
For better scaling, use a session provider optimized for Azure, such as the session provider for Azure Web Apps.