Configure properties
Administrators and developers manage content type properties in Optimizely CMS 13. Define built-in and custom properties, configure settings, and control language-specific values.
Configure properties to control the fields editors see when authoring content. Properties determine what data a content type stores and how editors interact with it.
Content type properties store and present data, such as page types and block types, and they are fields where editors enter information into a page type. A property can be the page name, an image placeholder, or the editor area for text. For example, the XHTML editor is a property of the type XHTML String (>255), which results in an editorial area in the page type when used. For property content to be visible to visitors, link it to a content type with the corresponding rendering. See also Develop properties.
ImportantDynamic Properties were removed in CMS 13. If your implementation references
DynamicProperty,DynamicPropertyCollection, or any related APIs, remove those references before upgrading. No replacement feature is available. Use standard content type properties or custom data stores instead.
Property types
Property types determine the data each field stores and how editors interact with it. Choose the right type to match the editorial experience and the rendered output.
CMS uses the following property types:
- Built-in properties – The system sets these automatically. They are available for all pages and blocks regardless of type. For example, PageName (name of the web page) and PageStartPublish (start publish date for the page).
- User-defined properties – Add these to the page or block type definition in code or from the admin view. Typical examples are Heading and MainBody.
Define properties in code or from Settings > Content Types > {select content type} > Properties. Override settings for properties defined in code by creating non-breaking changes in the Settings view. CMS displays a notice when a property is defined in code and cannot be changed in Settings. To reset a property defined in code to its code-defined values, select Reset after making changes.
Create page properties
Create page properties to define the editable fields on a page type. Page properties give editors the inputs required to author content for a specific template.
-
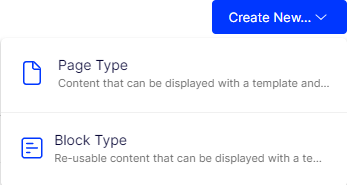
Select Create New > Page Type (or Block Type) from the Content Type tab in the Settings view.
-
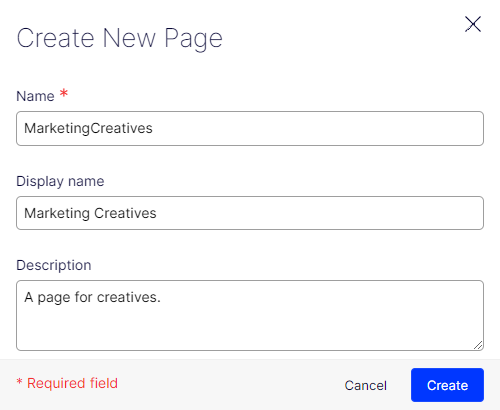
Enter the page information.
-
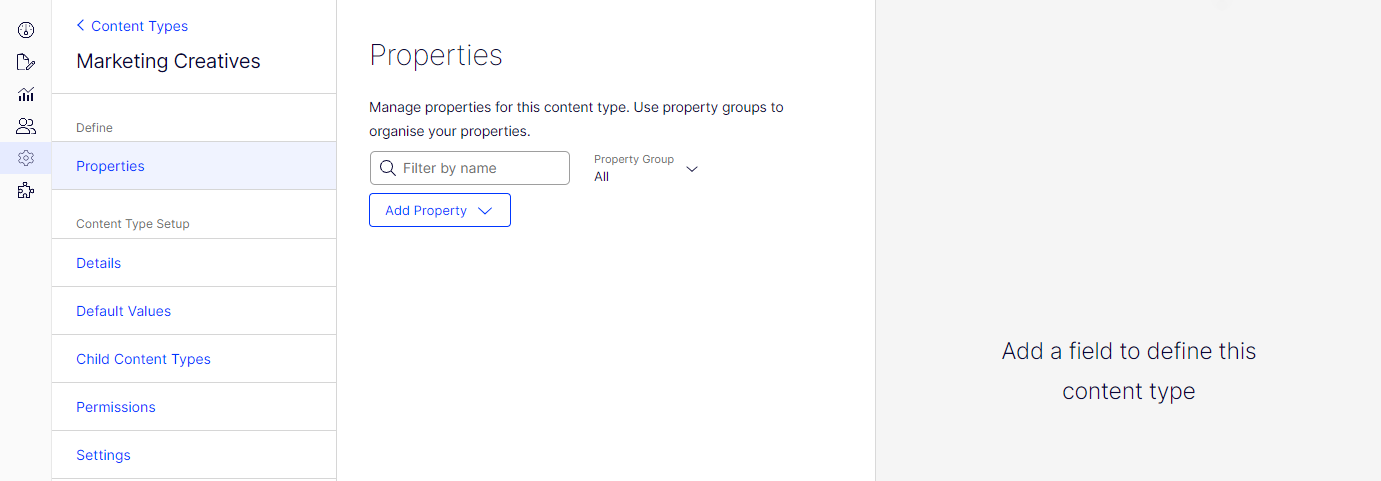
Select Add Property to define the properties for the page type. See the following section for more details about adding a property.
Add a property
Add a property to extend a content type with the fields editors need to capture data. Adding properties shapes the authoring experience and the structured data published through the CMS.
-
Select a content type from the list.
-
Click Add Property on the Content Type tab in Settings.
-
Select the property type you want.
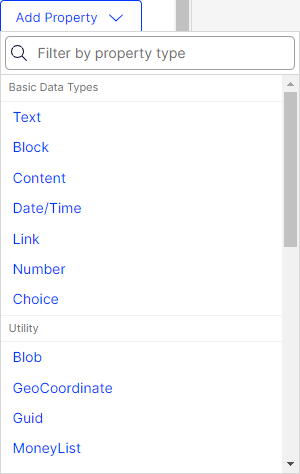
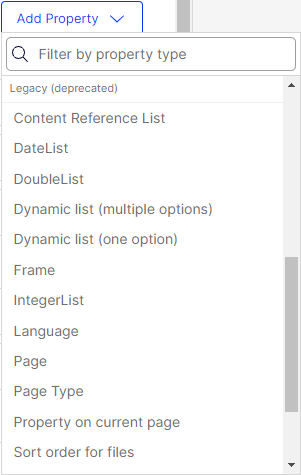
Legacy content types are not available in CMS 13. Use the primary content types. Legacy content types will be removed in a future release.
Change the type in the Configure Property panel.

-
Fill in the fields in the Configure Property panel.
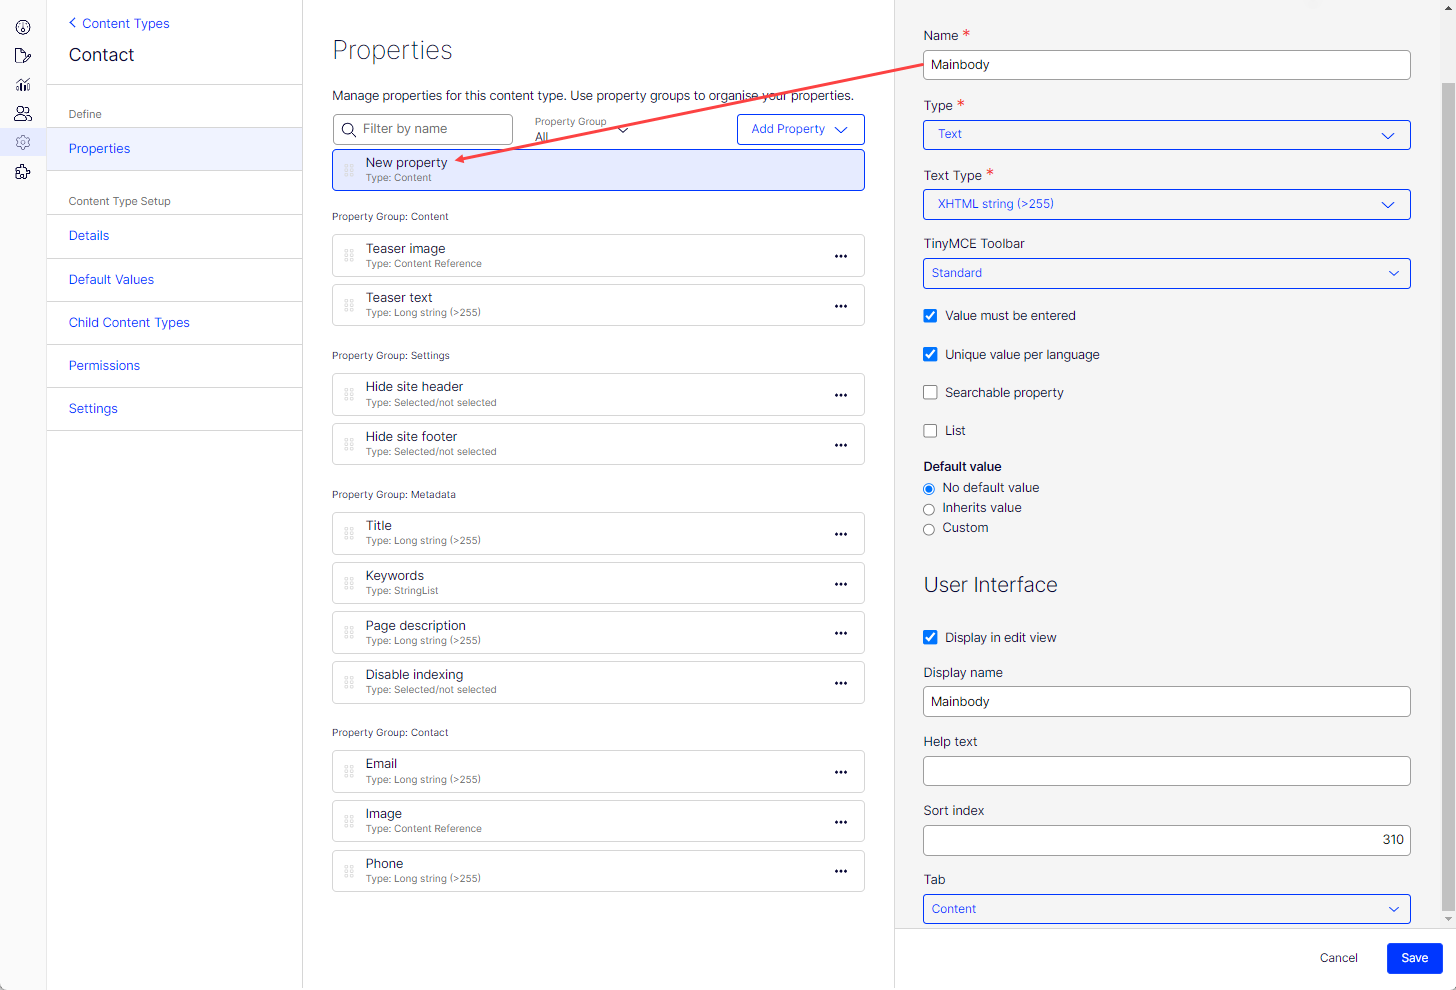
Each type displays different validation fields. The following fields belong to the Content type.
-
Name – Name the property. CMS uses this value in programming and language settings.
NoteCMS 13 enforces strict naming conventions for property identifiers. Names must match the pattern
^[A-Za-z][_0-9A-Za-z]+$. That is, they must start with a letter, contain only letters, digits, and underscores, and be at least 2 characters in length. Spaces, hyphens, and other special characters are not permitted. Use the Display name field to provide a human-readable label for editors. -
Type – Select a property type. Available types include integer, string, page, and date. Create a custom property type if the built-in types do not meet your needs.
When you select a basic data Type, you also select its subtype. For example, if you select Content, you also select the Content Type (Content Area, Content Area Item, or Content Reference); if you select Text, you also select the Text Type (Long string (>255), String (<=255), or XHTML string (>255)), and so on.
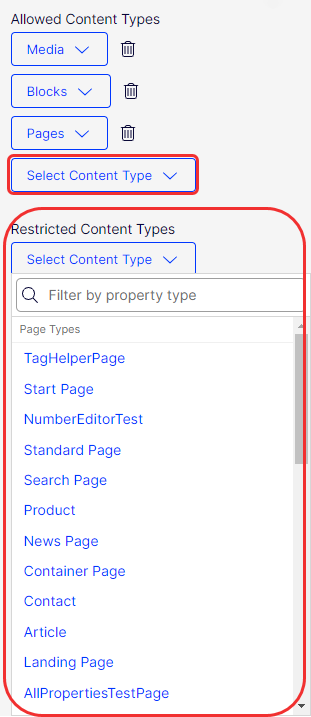
When you select Content Type, also specify Allowed Content Types or Restricted Content Types that an editor can see for this property.
-
Value must be entered – Select the checkbox to make it mandatory to enter a value for the property before saving. The setting is configured per property and content type.
-
Unique value per language – Select this option to make the property unique per language. Use this setting only when the website supports globalization.
-
Searchable property – Controls whether the property's value is included in the search index.
NoteIn CMS 13, the
Searchableattribute on property definitions is replaced by theIndexingTypeattribute. Use[IndexingType(IndexingType.Included)]to include a property in the index, or[IndexingType(IndexingType.Excluded)]to exclude it. The legacy[Searchable(false)]attribute is no longer supported. Clear this checkbox in the admin view (or setIndexingType.Excludedin code) to exclude a property from the search index. For example, this prevents undesired property values from appearing in search results. -
List – Select to make the property a list property. This displays only for some properties.
-
Default value – Select a value for the property: No default value, Inherits value, or Custom properties.
NoteDefault values can be defined in code using the
[DefaultValue(...)]attribute on a property, in addition to the admin view. The[DefaultValue]attribute sets the value used when a new content instance is created. Admin view default value settings take priority over code-defined defaults where both are present. -
Display in edit view – Select whether the property is visible. By default, all properties are visible in the editorial interface. The setting is configured per property and page type.
-
Display name – Specify a heading for the property. This text displays in the All Properties view unless a translation exists in the language resources.
-
Help text – Specify text to guide the editor on how to use this property. This text displays in the All Properties view when the editor hovers over the property name.
-
Sort index – Select a relative number to sort this property among other properties.
-
Tab – Select the tab from the Tab drop-down list.
-
-
Click Save.
The Custom Settings tab displays custom information for the selected property type.
Typed content references
Configure a Content Reference property to restrict it to a specific content type. Set the Reference Type in the admin view to control which types editors can select and how Optimizely Graph returns the referenced content.
When you set the Reference Type to a specific content type (other than Any):
- The content picker in the editor is limited to content matching the declared type.
- Optimizely Graph returns the full typed object with all fields of that content type, rather than only
contentLink. - When Reference Type is set to Any with allowed content types, Graph returns only
contentLink.
Configure a typed reference from the admin view
Configure typed references in the admin view to constrain a Content Reference property to a specific type without redeploying code. This keeps the editor picker focused and ensures Optimizely Graph returns the full typed object.
- Go to Settings > Content Types and select the content type.
- Select the property, then open its Configure Property panel.
- Set Reference Type to Specific Content Type and select the target type or contract from the list.
- Click Save.
NoteContent type contracts are filtered out of the type picker by default. To type a reference against a contract, explicitly select the contract as the Reference Type.
Graph behavior by reference type configuration
| Reference type | Optimizely Graph returns |
|---|---|
Specific concrete type (for example, ContactBlock) | Full typed object with all fields |
| Content type contract | Full object for all implementing types |
| Any + Allowed Content Types | contentLink only |
Property type mapping for external content
When integrating external content sources (such as Shopify, Bynder, or other GraphQL-connected sources), the CMS applies less strict type-compatibility rules during property mapping than it does for internal CMS-to-CMS property mapping. This allows a source field of one type to map to a broader set of target CMS property types.
| Source type (external) | Compatible CMS target property types |
|---|---|
ShortString | ShortString, LongString, XHTMLString, LinkItem, URL |
LongString | LongString, XHTMLString, LinkItem, URL |
Integer | Integer, Decimal, ShortString, LongString, XHTMLString |
Decimal | ShortString, LongString, XHTMLString |
Boolean | Boolean, ShortString |
DateTime | DateTime, ShortString, LongString |
URL | URL, ShortString, LongString, LinkItem |
ContentReference | LinkItem, URL |
ContentReference<T> | ContentReference, LinkItem, URL |
NoteThese relaxed mappings apply only to properties sourced from connected external content types. Standard CMS-to-CMS property mappings enforce stricter type compatibility. When mapping
ShortStringtoXHTMLString, the CMS does not HTML-encode the source value. Validate that the external source does not supply HTML-unsafe strings before using this mapping in production. These rules also apply to list types of the specified property types.
Mapped properties behave in the following ways:
- Read-only – Properties included in a mapping become read-only in the CMS Edit UI and reflect the external source value directly.
- Editable – Properties excluded from the mapping remain fully editable in the CMS.
- Late additions – If a mapping is updated to include additional properties, those properties automatically become read-only.
- Depth – Mappings support scalar properties inside a block at one level of depth.
Define language-specific properties
When working with globalization, you define which fields in every template vary depending on the language. To do this, set the property for that field to "locked" or "open" for globalization using the Unique value per language setting in the admin view.
Properties with unique values per language are editable in all activated languages. Properties without language-specific values are editable only in the original page language. CMS deactivates these properties in edit view and marks them with an icon indicating the original language.
For example, if the Unique value per language checkbox is cleared for the sort order field, editors can set the sort order only in the original page language. Pages in other languages inherit the same sort order and cannot change it. To allow independent sort order per language, select the Unique value per language checkbox.
WarningExisting values are deleted if a property is changed to not having a unique value. So if the property for the editor area is changed not to have a unique language, text entered in the editor area for all languages on the website is permanently deleted.
Set a property to be language-specific
Mark a property as language-specific so editors maintain a distinct value for each activated language. Use this for fields such as headings or body copy that must vary per market.
- Select the page type that contains the property to be set on the Content Types tab.
- Click the property name you want to change.
- Select the Localized option.
- Click Save.
Place a property on a tab
Group properties under a tab to organize the edit view and help editors find related fields quickly. Tab placement improves the authoring layout for content types with many properties.
- Select the page type on the Content Types tab.
- Click the property name you want to modify.
- Select the tab from the Tab drop-down list.
- Click Save.
Configure customized property settings
Customized property settings let administrators tailor property behavior beyond the built-in defaults. Use them to apply consistent validation, defaults, and presentation across content types.
Priorities and configuration
The property settings have the following priority:
- A specific setting for a property is defined in the admin view. This can be custom settings for this property or pointing to a specific global setting.
- A specific setting for a property is defined for the model in code.
- A global setting defined in admin is marked as the Default setting for the property type.
- A global setting is defined in code.
Create custom property types
The list of available custom property types includes the following columns:
- Name – The name of the content type created by a developer, of which some are selectable in the editorial interface.
- Base type – Shows the built-in types that a developer can extend.
- Class name – Shows the full name of the class. The class is defined in the assembly.
- Assembly name – Shows the class reference. A blank column indicates a built-in property.
Developers create property data types by inheriting from existing types.
Boolean(Selected or not selected) – True or false.Number(Integer) – An integer.FloatNumber(Floating point number) – Number with decimals, for example, 3.14.PageType(Page Type) – Optimizely CMS page type defined in admin view.PageReference(Page) – Link to an Optimizely page on the current site.Date(Date or Time) – Date and time.String(String <=255) – Short text, fewer than 256 characters in length.LongString(Long String >255) – Used for text exceeding 255 characters, such as the main editor area in edit view.Category(Category selection) – List of categories.LinkCollection(Link collection) – A collection of links that can be added and edited in edit view.
List property examples
All list types follow the same pattern: click the Add button (or a type-specific variant such as Add Link or Select Content) to add an item, and select More > Delete to remove it.
The following examples show representative list types.
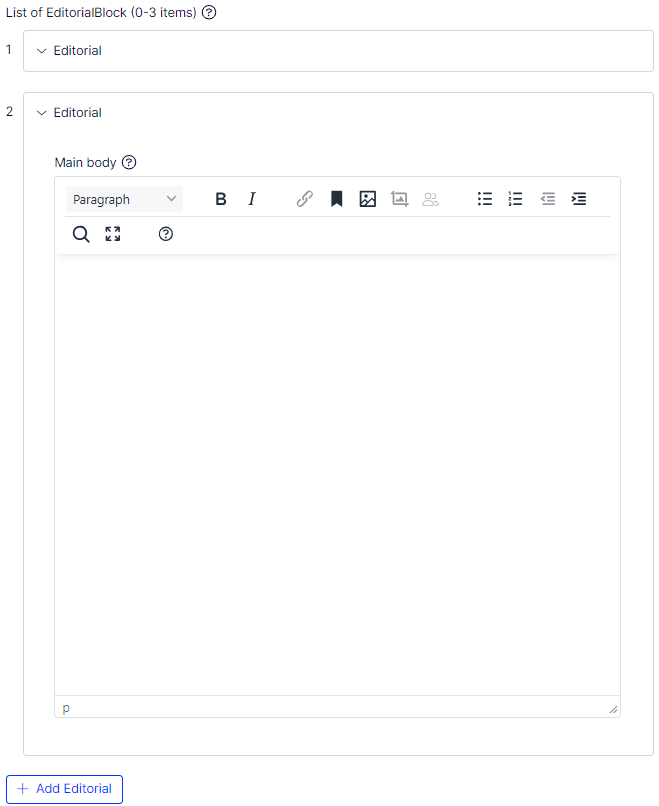
EditorialBlock List type
Click Add Editorial to add an item; select More > Delete to remove the item.
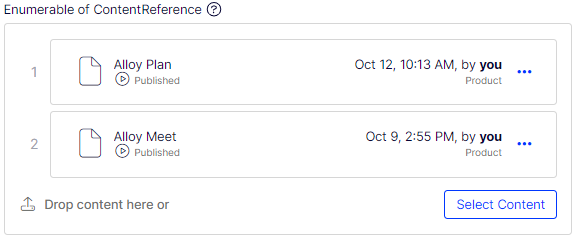
Enumerable of ContentReference List type
Click Select Content to add an item; select More > Delete to remove the item.
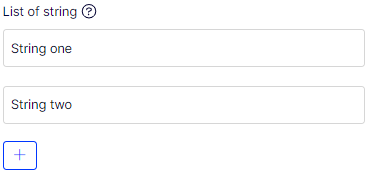
String List type
Click Add to add an item; select More > Delete to remove the item.