Publish content
Manage content publishing in Optimizely CMS 13. Create drafts, publish, schedule, approve, compare, and manage versions for pages, blocks, and media.
Optimizely Content Management System (CMS) provides support for content creation and publishing management involving multiple editors. The draft concept is central, ensuring that work-in-progress is never externally exposed until it is actively published. Your publishing options depend on the content status and access rights. Available actions, content status, and notifications are indicated in the status bar.
Publishing involves creating a draft, publishing the final version, and managing versions. The steps apply to different types of content, such as pages, blocks, media, or products (if you have Optimizely Commerce Connect installed on your website).
See also: Control the publishing process.
Publish actions
When you create or update content, you can perform actions such as creating drafts, undoing changes, setting content to ready for review, publishing directly, or scheduling publishing for a later time.
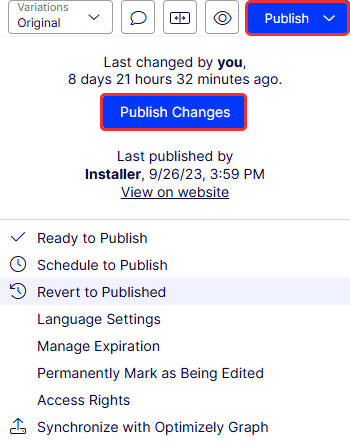
Publish
When done editing, select Publish and then Publish (or Publish Changes if you are editing previously published content). The content is immediately published and publicly available on the website, provided that no access restrictions apply. Select View on website to view the content as it displays on the website.
Publish for different time zones
The time to publish is determined by the local time zone of the editor who publishes or schedules a page. This means that if you are working as an editor in London, UK, and you want to publish page A at 8 AM New York time and page B at 8 AM Tokyo time, you need to find out what the corresponding time is in London. In this example, you would have to publish page A at 1 PM and page B at midnight UK time.
Set Ready to Publish
If you do not have publishing access rights, or if you want your changes to be approved by someone else before publishing, use the Ready to Publish option to mark the content as ready for approval and publishing. Withdraw and Edit lets you take back content for further editing after sent for approval.
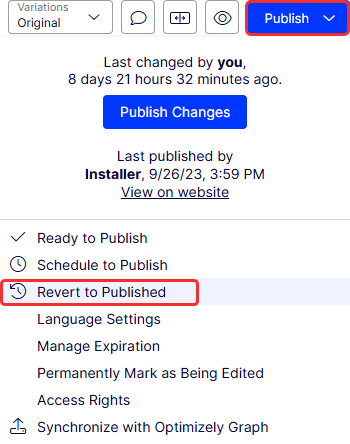
Revert to Published
-
Select Revert to Published from the Publish or Option menus to go back to the latest published version if the content was previously published. This action deletes your current draft and requires Delete access rights.
Schedule to publish
If you have publishing access rights, you can schedule publishing for a later time. Select the Schedule to Publish option and set the date and time when you want the content (new or updated) to be published. This applies to both newly created content and changes to existing content.
Remove scheduling and create drafts
Content that is scheduled for publishing is locked for editing. Select the Remove Scheduling and Edit option to interrupt the scheduled publishing and continue editing the selected version.
Selecting New Draft from Here creates a new draft based on the scheduled version, which is still published at the scheduled time. You can continue working on the new draft and apply publishing actions for it, as desired. An advanced scenario would be to apply multiple publishing occasions for different versions of a campaign page, having them replace each other in a desired order.
Autosaved drafts
Whenever you create content or edit existing content, a draft version is automatically created.
New content is not publicly available on the website until you publish it. Changes to content properties are immediately autosaved by the system. Versioning is not used for drafts, which means that you and other editors can work on the same draft over time, but you will still have only one version of the draft.
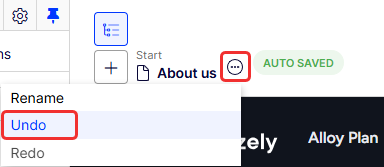
Undo and redo
While editing, you can select Undo in the page information area to undo changes to content that was previously autosaved.
-
Select Undo to discard the changes done since the last autosave.
NoteYou can only undo changes you have made during the current editing session. When you move to another page, close the browser, log out, and so on, the history of actions that can be undone is emptied.
-
Select Redo if you discarded your changes through Undo and want to take them back again.
Preview and compare
You can preview content appearance using the Preview mode option in the top toolbar. You can also preview content by language, audience, or display channel if your website uses these features; see Preview Visual Builder content.
You can also compare different content versions by using the Compare version option in the top toolbar; see Manage versions of content.
Set Ready for Review
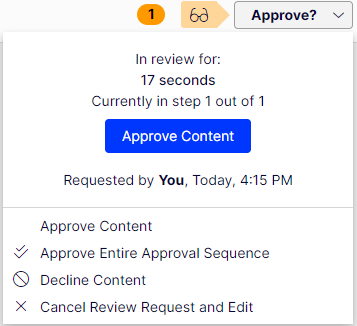
If your site is configured to use content approvals, your content may have to be approved by one or more approvers before it can be published. In that case, you do not have the Publish option, and you have to set the content to Ready for Review when you are done. Doing this starts the approval sequence. When all approvers have approved the content, you are notified, and you can publish the content or schedule it for late publishing. See Approve content.
Approve content
If you are an appointed reviewer for a content item, you can approve changes for the content item when it is in status Ready for Review and at the approval step where you have been set as reviewer. You can also decide to decline the changes, in which case the content version status is set to Rejected. This does not mean that the latest changes disappear, only that the content needs to be edited and reviewed again before it can be approved and published. You can monitor content status and related tasks under Tasks in edit view.
If you have Admin rights to the content item, you can also approve the entire approval sequence and also cancel the review request.
See Approve content for more information.