Personalize a digital experience with audiences
Personalize website content in Optimizely CMS 13 using audiences. Apply personalized content to rich-text editors, content areas, and target discounts with fallback options.
Audiences let you show different content variants to different visitor segments on the same page. Criteria such as visit count, location, role, or referrer define each segment. CMS evaluates the criteria for every visitor and renders the matching content from a content area. See Create audience criteria for the full criteria list.
NoteAudiences work only on traditional (in-process) sites, where CMS manages both content authoring and frontend rendering. Audiences do not work on headless sites, where the frontend is an independent application that consumes content through APIs.
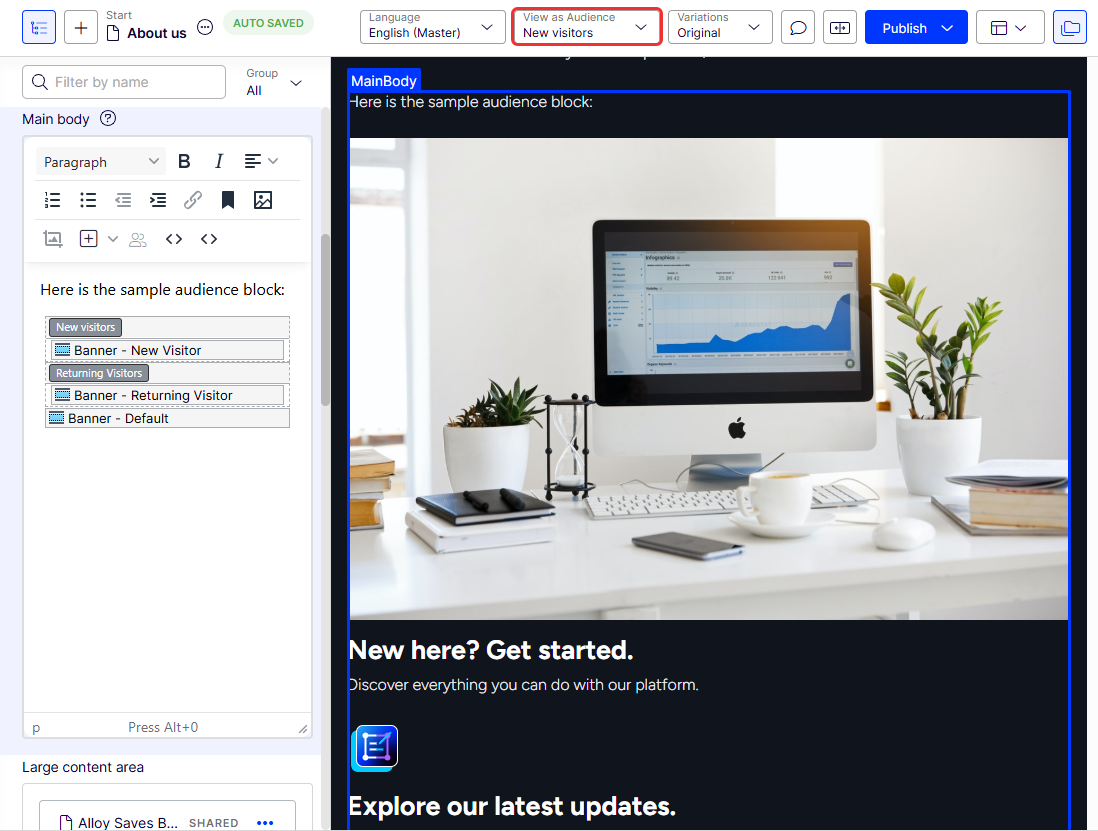
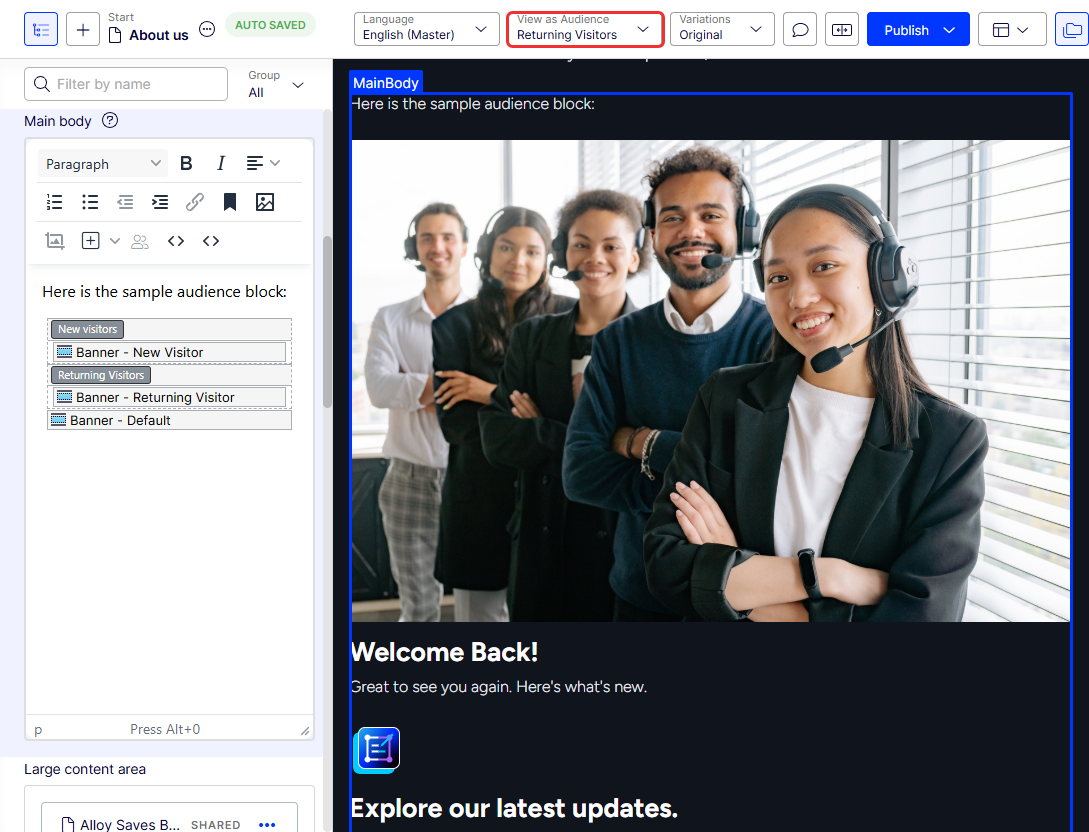
The following example builds a page with three banner variants. Returning visitors see Welcome back! First-time visitors see New here? Get started. Visitors who match neither audience see a default fallback banner.
The example introduces the block-level personalization pattern used across CMS. Audience-specific blocks sit in a content area, each bound to an audience definition. The same pattern applies to other use cases, such as geographic targeting, campaign-driven offers, or role-based content access.
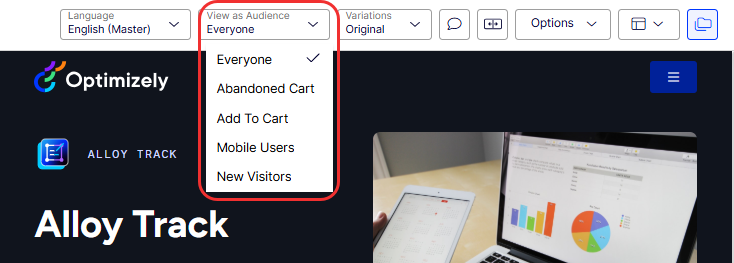
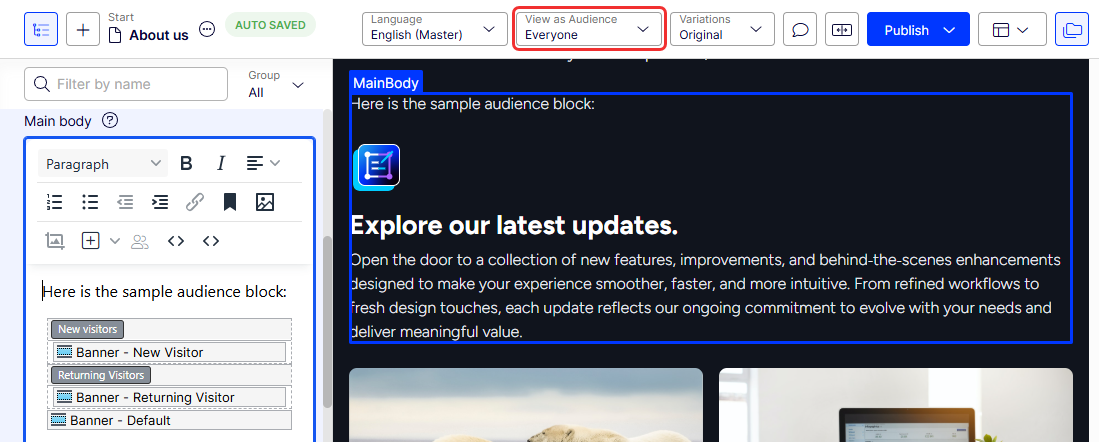
Select View as Audience to preview content as it displays for each audience without publishing.
Example: create audience views
This walkthrough builds the audiences, blocks, and personalization assignments end to end.
Prerequisites
- You have administration or editor access to CMS 13.
- You have the VisitorGroupAdmins role (required to access the Audiences tab and apply personalization).
- Your page has a content area that supports blocks.
Create the audiences
For complete information, see Manage audiences and Create audience criteria.
-
Select the Audiences tab in the CMS editor.
-
Select Create Audience and enter the name Returning Visitors.
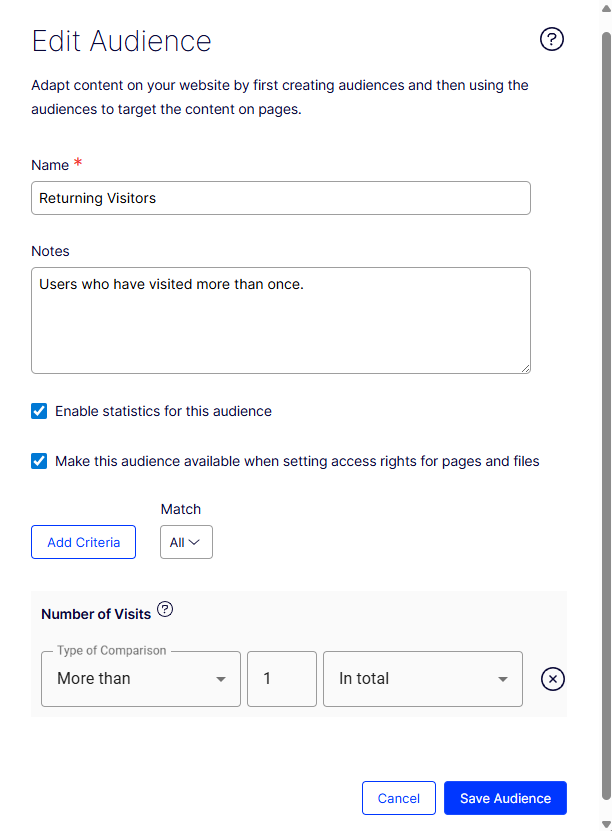
- Select Add Criteria, then select Number of Visits > More than >
1. - Select Create Audience to save. (Select Save Audience when editing an existing audience.)
- Select Add Criteria, then select Number of Visits > More than >
-
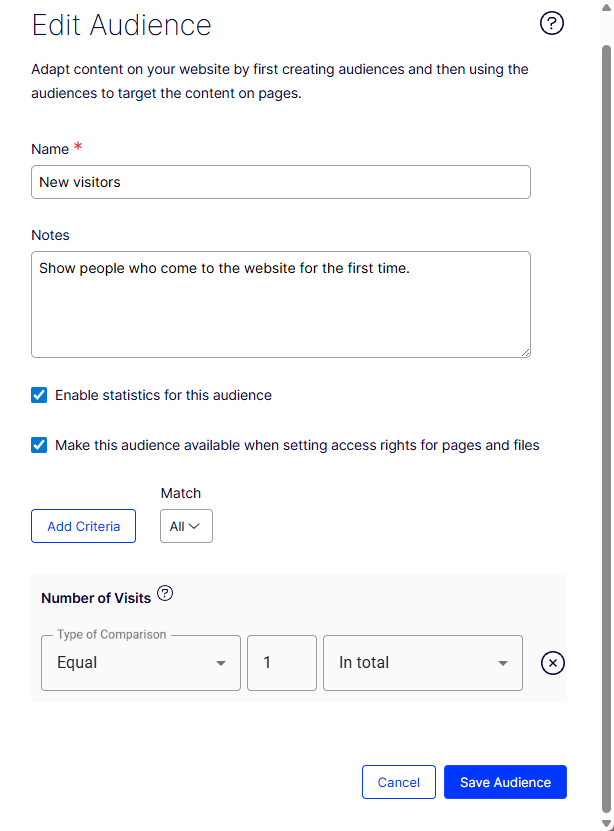
Repeat to create a second audience, New Visitors, with criteria Number of Visits > Equal >
1.
Create the blocks
Create three blocks: one for each audience variant (New Visitor and Returning Visitor) and one default fallback. Create the default block first. It displays to all audiences.
-
Select the Shared Blocks tab in the assets panel.
-
Select Create New Block and choose a block type, such as a teaser block.

- Name – Banner – Default.
- Heading – Explore our latest updates.
- Body – Open the door to ... meaningful value.
- Image – Select an image from your media assets.
-
Click Create.
-
Click Publish.
-
Repeat these steps for the Banner – New Visitor block. This block displays only when a visitor matches the New Visitor audience.
- Name – Banner – New Visitor.
- Heading – New here? Get started.
- Body – Discover everything you can do with our platform.
- Image – Select an image from your media assets.
-
Repeat these steps for the Banner – Returning Visitor block. This block displays only when a visitor matches the Returning Visitor audience.
- Name – Banner – Returning Visitor.
- Heading – Welcome back!
- Body – Great to see you again. Here's what's new.
- Image – Select an image from your media assets.
NoteSave blocks under For All Applications or For This Block to reuse them elsewhere. Blocks saved under For This Page are available only on the current page. Drag blocks between folders to reorganize.
Add the blocks to the content area
- Open the page you want to personalize in the CMS editor.
- Select All Properties view.
Note
Personalized blocks do not display in the standard edit view. Use View as Audience to preview how each audience sees the page.
- Locate the content area where the banner should display.
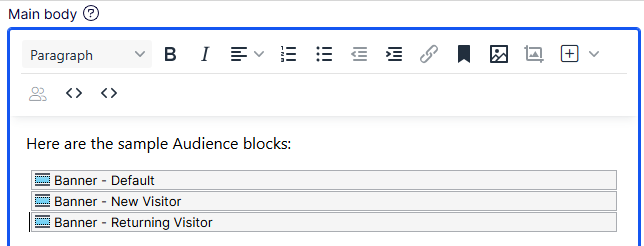
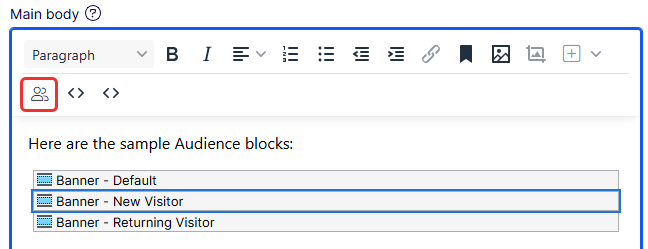
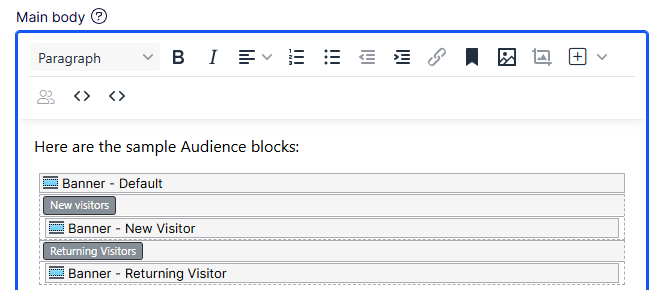
- Find Banner – Default, Banner – New Visitor, and Banner – Returning Visitor in the assets panel. Drag the three blocks into the content area. All three blocks display in the content area.
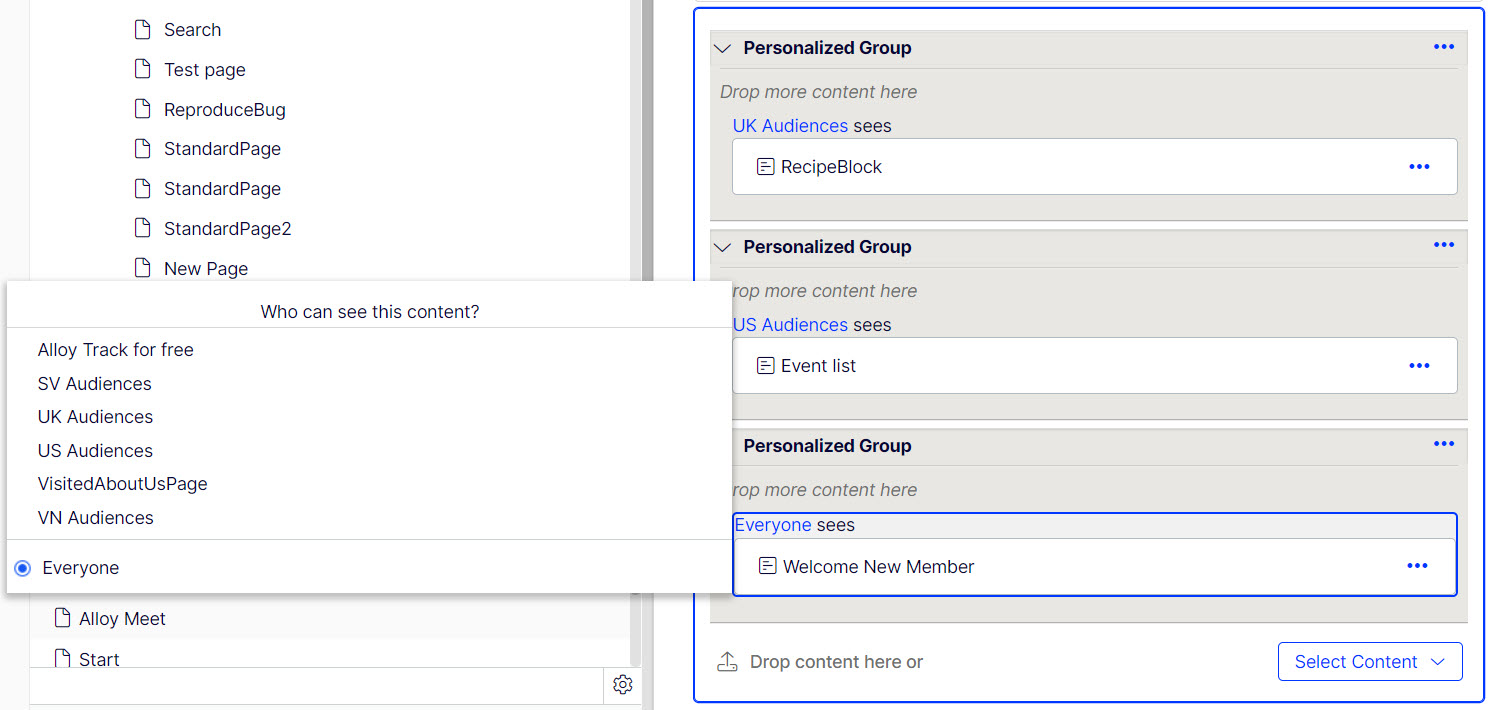
Apply audience personalization
-
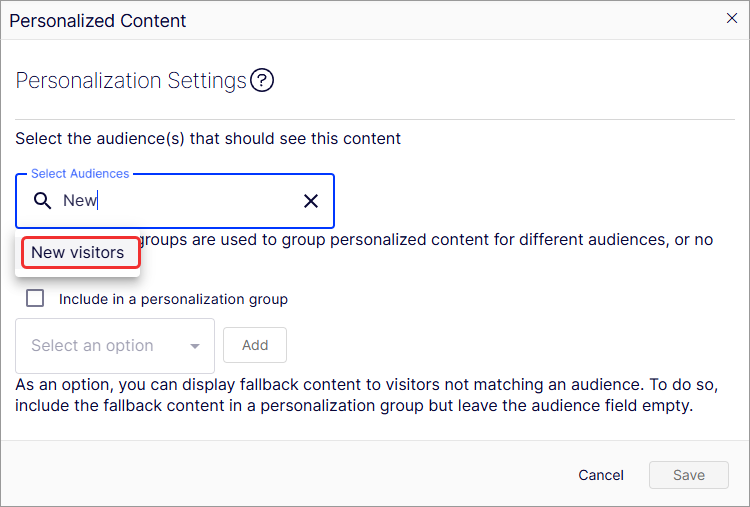
Select a shared block in the content area (such as Banner – New Visitor).
-
Click Audiences.
-
Start typing the audience name in the Select Audiences field of the Personalization Content window. Select the audience (for example, New Visitors). Repeat to add more audiences.
 Note
NoteLeave
Banner – Defaultwith no audience applied. This makes it the fallback for all other visitors. -
Click Save.
-
Repeat for the other block (Banner – Returning Visitor).
Preview each audience view
-
In Visual Builder, select View as Audience > Everyone to see the default.
-
Select New Visitors to view the new-visitor variant. The default block displays after the new-visitor block in the order placed on the page.
-
Select Returning Visitors to view the returning-visitor variant. The default block displays after the returning-visitor block in the order placed on the page.
Publish the page when you are satisfied with the personalization preview.
Key points to remember
- Personalization is block-level, not field-level – Individual text properties on a page are not personalized directly. Use blocks within a content area instead.
- Block order matters – CMS evaluates blocks top to bottom. Place audience-specific blocks before the default fallback block.
- One audience per block – Assign each block in a content area to one audience only.
- Shared blocks update everywhere – Editing a shared block applies the change to every page that uses the block. Create page-specific blocks when you need isolated content.
Search engine index and audiences
Search engines crawl your website to index content. CMS evaluates the crawler against audiences like any other visitor.
For an audience named Visitors from the UK, the crawler indexes personalized content only when the crawler's IP resolves to the United Kingdom. Otherwise, the content is not indexed. For a weekend-only audience, the crawler indexes content only when the crawl occurs on a weekend.
Use Everyone content in a group when an area of the page must display for all visitors, including crawlers.
Restrict content access with audiences
Administrators grant access to specific content with audiences. For example, an administrator restricts a page or block to audiences from the UK. See Access rights.