
Google Analytics for Optimizely
Describes integrating Google Analytics with Optimizely Content Management System and Optimizely Commerce Connect.
Optimizely CMS and Optimizely Commerce Connect
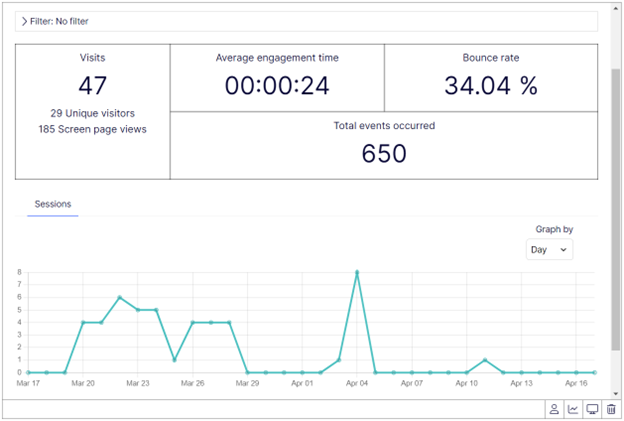
Google Analytics for Optimizely gives you instant access to analytics and trends within your working website context, letting you take immediate action to improve conversions and optimize traffic.
Requirements
- No additional license fee.
- An Optimizely Content Management System (CMS) or Optimizely Commerce Connect installation.
- Google Analytics license and account.
- See Apps platform compatibility for package and version information.
Optimizely Campaign
Requirements
- Google Analytics license and account.
- An Optimizely Campaign client.
- Contact Optimizely to set up the integration in Optimizely Campaign.
Configure Google Analytics for Optimizely
This section describes how to set up Google Analytics for Optimizely to connect to tracked data. The add-on also lets editors and marketers follow statistics on the dashboard for the entire website and in edit view for each page.
Choose Google Analytics 4 when configuring the add-on. You can also add a custom script to support Google Tag Manager instead.
Configure Google Analytics for Optimizely using the following options:
- On the Google Analytics website, by configuring your Google Analytics account.
- In Optimizely admin view by configuring the Configure Tracking and Configure Analytics Gadget tabs and adding the gadget to the dashboard.
NoteCustom tracking scripts need to be tested in advance to verify that they work as intended.
Get started with Google Analytics for Optimizely
To get started with Google Analytics for Optimizely:
- Access Google Analytics for Optimizely from the top menu by selecting Addons > Google Analytics > Admin. The summary shows the status of your current tracking and gadget settings.
- Set up tracking through the Google account and Measurement ID for your organization.
- Already have an existing Google account. Use the Measurement ID for configuration in Optimizely CMS admin view.
- Have no Google account. Create a Google account by registering your website at the Google Analytics website. Follow the instructions on the website to generate the tracking code containing a Measurement ID. Use the Measurement ID for configuration in Optimizely CMS admin view.
Configure tracking
Configure roles
The virtual roles GoogleAnalyticsGadget and GoogleAnalyticsAdministrators to authorize editors to the gadget and administrators to the admin view are added to the website context (in the InitializationModules). These roles are mapped as follows:
context.Services.Configure<MappedRolesOptions>(o => {
  var map = new MappedRoleOptions();
  map.MappedRoles.Add("Administrators");
  map.MappedRoles.Add("CmsAdmins");
  o.Items.Add("GoogleAnalyticsAdministrators", map);
});
Exclude a group from the map of these roles by changing the options in EPiServer > Cms > MappedRoles > Items.
"EPiServer": {
  "Cms": {
    "MappedRoles": {
      "Items": {
        " GoogleAnalyticsAdministrators ": {
          "MappedRoles": ["Administrators", "CmsAdmins"]
        }
      }
    }
  }
}
NoteYou must manually declare these required roles and assign them to the appropriate accounts for websites (such as QuickSilver) with a claims security provider (such as Federated Identity or AspNet Identity).
Add tracking on your website
The Configure Tracking tab controls which visitor tracking data is sent to Google Analytics.
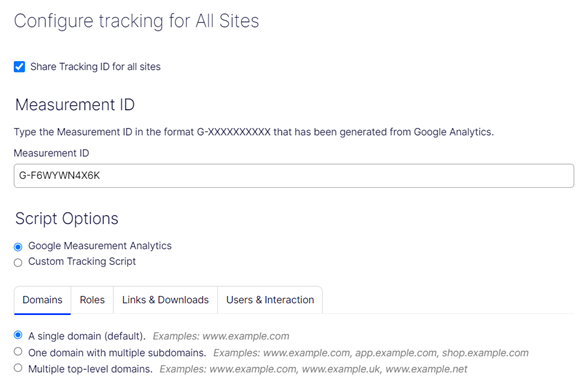
Configure the tracking of your website as follows and save the settings:
- Select the Configure Tracking tab.
- Select one of the following about what you want to track:
- All Sites – track websites using the same Measurement ID. All websites in an enterprise installation will use the same Measurement ID.
- The others – track each website specifically by using a unique Measurement ID for each website in an enterprise installation. You must configure the Measurement ID and settings on each site's tab.
- In Measurement ID, connect your Measurement ID to your website (you can find it under your Google Analytics admin page > Data Streams). The Measurement ID has the format G-#####.
- In Script options, select one of the following tracking methods:
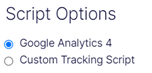
- Google Analytics 4 – generate snippets that uses the GA4 syntax corresponds to the gtag library. With this option, you cannot modify the generated tracking script added to the page's footer.
- Custom Tracking Script – generate a custom tracking script code. This option opens a text area to enter the custom tracking script code. The custom script can include an {id} "Measurement ID placeholder" to be replaced by the value entered in the Measurement ID option.
<script async src="https://www.googletagmanager.com/gtag/js?id={id}"></script>
adds the custom script to pages footer, for example,
<script async src="https://www.googletagmanager.com/gtag/js?id=G-F6WYWN4X6K"></script>.
- On the Domains tab, select one of the following options (to see how these options are generated in code, refer to Customize tracking and ecommerce):
- A single domain – Track a single domain with the Measurement ID.
- One domain with multiple subdomains – Track one domain with multiple subdomains with the Measurement ID.
- Multiple top-level domains – Track multiple domains with the same Measurement ID.
- On the Roles tab, select one of the following options:
- Track selected roles – Renders tracking only for users in the selected roles.
- Track everything except for selected roles – Renders tracking for all visits except for visits by users with the selected roles.
- On the Links & Downloads tab, select one or several of the following options:
- Track clicks on external links – Tracks clicks on external links. Links with a link "http" or "https" that is not the same domain are considered to be external links. By selecting Track clicks on external links as page views you can track external links and convert them to virtual links as page views on the site, starting with "/external/".
- Track clicks on e-mail links – Tracks clicks on e-mail links (containing mailto tags).
- Track clicks on download links – Tracks clicks on file download links with the extensions defined in the pipe-separated list (|). The list of extensions is not case-sensitive.
- On the Users & Interaction tab, select one or several of the following options:
- Track logins – Tracks logins on the website as an event.
- Track visitor groups – Tracks users who match a visitor group as an event. To make this work, the Statistics check box must be selected for your website's visitor groups.
- Track form postings – Tracks form postings as an event (XForms).
- Track authors – Tracks a user creating a page as a custom property.
Connect the gadget to Google Analytics
Connect the gadget to Google Analytics to view analytics on the dashboard:
- Select the Configure Analytics Gadget tab.
- Connect the Optimizely website with Google Analytics by clicking Log in.
- Select which user groups are allowed to access the analytics.
- In Google Analytics Authentication, log in to the Google Analytics account with valid login credentials for your organization.
- Save the settings.
- Add the gadget to the dashboard or in the CMS edit view.
Customize tracking
Extend Google Analytics for Optimizely with custom metrics and tracking scripts to capture data specific to your implementation.
Google Analytics for Optimizely contains built-in metrics. Develop custom metrics through attributes and code. This topic describes how to extend Google Analytics for Optimizely and track data integrated with Optimizely CMS and Commerce Connect using Google Measure ecommerce.
NoteTo extend the app through the APIs, install it from the NuGet feed into Visual Studio.
Technical overview
Google Analytics for Optimizely queries the Google Analytics REST API to present data in the dashboard and page-specific gadget in edit view, and renders tracking JavaScript to pages on the site.
- The metric factory aggregates metrics and defines lists and graphs in the gadget.
- The gadget data repository combines metrics to build Google queries.
- The Optimizely query helper provides access to Google API authenticated with Optimizely.
Google data is built up through a tracking script on the website. The GData API is the Google C# client API to query analytics data. Google data can be queried directly using Google API. Optimizely is reusing authentication data.
Code generated from admin view
When configuring the domains to track in admin view, the following code is generated:
- A single domain – Track a single domain with the Tracking ID. No setDomainName command is rendered to the tracking code.
- One domain with multiple subdomains – Track one domain with multiple subdomains with the Tracking ID. The setDomainName command is rendered with stripped-first-domain-segment of the current Request.Url.Authority, if the remaining part after it was stripped is still a valid domain authority.
- A page view (to a.epi.com, b.epi.com, c.epi.com) is set up as shown in the following example:
gtag('set', 'linker', {'domains': ['epi.com']}); - A page view (to a.epi.com:8080, b.epi.com:8080, c.epi.com:8080) is set up as shown in the following example:
gtag('set', 'linker', {'domains': ['epi.com:8080']}); - A page view (to a.demo.epi.com, b.demo.epi.com, c.demo.epi.com) is set up as shown in the following example:
gtag('set', 'linker', {'domains': ['demo.epi.com']}); - An unchanged page view (to epi.com) is set up as shown in the following example:
gtag('set', 'linker', {'domains': ['epi.com']});
- A page view (to a.epi.com, b.epi.com, c.epi.com) is set up as shown in the following example:
- Multiple top-level domains – Track multiple domains with the same Tracking ID.
- A page view (to epi.com, epi.net, epi.org) is set up accordingly, as shown in the following example:
gtag('set', 'linker', {'domains': ['epi.com']});
gtag('set', 'linker', {'domains': ['epi.net']});
gtag('set', 'linker', {'domains': ['epi.org']});
- A page view (to epi.com, epi.net, epi.org) is set up accordingly, as shown in the following example:
Add tracking script on the master page
To add a tracking script on the root layout for MVC, see Client resources.
Remove existing tracking scripts on your website to avoid duplicated tracking scripts running on your website, for example, from the layout _Root.cshtml. Google Analytics for Optimizely adds a tracking script to the page when a Measurement ID is configured in the administrative interface of Optimizely CMS.
Customize tracking with ClientResourceRegister
The Optimizely Google Analytics add-on uses a TagHelperComponent class to add the necessary Google Analytics JavaScript to the page's footer.
If you use MVC, make sure you have the following code somewhere in your body tag:
@Html.RequiredClientResources("Footer")
If you do not use the RequiredClientResources registration, render the script yourself. See Rendering the script manually.
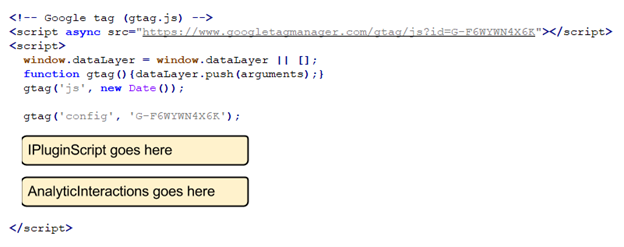
Extend the generated script by adding AnalyticsInteraction objects or using a class that implements IPluginScript, registered with the service locator.
AnalyticsInteraction is a class that lets you register Google Analytics events and actions. The interactions are typically page-specific, and there are Extension methods on the HttpContext class to help you add them. Example:
HttpContext.AddAnalyticsEvent(new Dictionary<string, object>() {
  {
    Constant.EventAction, "click"
  }, {
    Constant.EventCategory,
    "button"
  }, {
    Constant.EventLabel,
    "nav buttons"
  }, {
    Constant.EventValue,
    4
  }
}, clearWhenContextChanged: true);
This renders the following script:
gtag('event', 'click', {
      'event_category': 'button',
      'event_label': 'nav buttons',
      'event_value': 4
With an IPluginScript class, you can also add custom JavaScript to all pages from one place. See the example in Setting the currency later in this article.
In summary, the add-on renders something like this (for Google Analytics 4 Tracking):
Override the script generation with custom tracking
The class responsible for rendering the script to the page is the GASyntax class, which has support for the following:
- Google Analytics 4 tracking mode
- A completely custom mode
If you are starting to implement tracking from the beginning, select the Google Analytics 4 mode. If you have an existing Google Analytics account, migrate it to Google Analytics 4.
Add your script using AnalyticsInteractions. If the selected renderer does not fulfill the need, but the mode does, register your implementation using the service locator:
services.Replace(ServiceDescriptor.Transient(typeof(MeasurementSyntax), typeof(MyCustomMeasurementSyntax)));
Render the script manually
If you need more control over the script rendering, get the script code directly using one of the extension methods in the EPiServer.GoogleAnalytics.Helpers.Extensions class.
For MVC, use public static MvcHtmlString AnalyticsTrackingScript(this System.Web.Mvc.HtmlHelper html, PageData currentPage)
This method returns the Google Analytics script based on the configured syntax (Google Analytics 4).
You can also build the following script:
var scriptBuilder = new ScriptBuilder(EPiServer.Web.SiteDefinition.Current, () => {

  return new SiteTrackerSettings {
    // specify syntax you want to generate tracking script
    TrackingScriptOption = TrackingScriptOption.Measurement,
      TrackingId = " G-XXXXXXXXXX"
  };
});

var requiresScriptReference = false;
var context = new HttpContextWrapper(HttpContext.Current);
var script = scriptBuilder.BuildTrackingScript(out requiresScriptReference, context, CurrentPage);
// The script variable now contains tracking script with GA4 syntax
// You can modify it or render it directly
NoteIf you render the script manually, and still have the
RequiredClientResourceregistration forFooter, use the "Custom Tracking Script" setting for the add-on, or you will get two tracking scripts on your page.
Customize ecommerce tracking
Track product views, checkout events, and transactions in your Commerce Connect storefront by adding ecommerce tracking scripts.
With Google Analytics 4 Tracking, you can Measure ecommerce for tracking ecommerce actions and data.
In contrast to tracking page views, ecommerce tracking requires more data to be sent. Because Optimizely Commerce Connect implementations vary, and there is no standard cart or checkout page, Google Analytics for Optimizely cannot add ecommerce tracking script automatically to the page. It helps you generate the correct script, but you must add it to the relevant pages in your solution.
Track a product detail view
The Google Analytics documentation shows in the following example how the script should look:
gtag("event", "view_item", {
  currency: "USD",
  value: 7.77,
  items: [{
    item_id: "SKU_12345",
    item_name: "Stan and Friends Tee",
    affiliation: "Google Merchandise Store",
    coupon: "SUMMER_FUN",
    discount: 2.22,
    index: 0,
    item_brand: "Google",
    item_category: "Apparel",
    item_category2: "Adult",
    item_category3: "Shirts",
    item_category4: "Crew",
    item_category5: "Short sleeve",
    item_list_id: "related_products",
    item_list_name: "Related Products",
    item_variant: "green",
    location_id: "ChIJIQBpAG2ahYAR_6128GcTUEo",
    price: 9.99,
    quantity: 1
  }]
});
With the Google Analytics add-on, each script line is an AnalyticsInteraction, and you can add these using HttpContext extension methods. In the following code, the view_item activity is populated using a dictionary that holds the required values and added using the AddAnalyticsCustom extension method.
public void TrackProductDetail(HttpContext context, string code, string name, string category = null, string brand = null, string variant = null, double price = 0, string currency = "USD") {
  var dict = new Dictionary<string, object>();
  var item = new Dictionary<string, object>();

  if (currency != null) dict.Add("currency", currency);
  if (price > 0) dict.Add("value", price.ToString());

  if (code != null) item.Add("item_id", code);
  if (name != null) item.Add("item_name", name);
  if (category != null) item.Add("item_category", category);
  if (brand != null) item.Add("item_brand", brand);
  if (variant != null) item.Add("item_variant", variant);
  if (price > 0) item.Add("price", price.ToString());

  dict.Add("items", new List<Dictionary<string, object>> () {
    item
  });

  context.AddAnalyticsCustom("view_item", true, dict);
}
Call it from your controller as follows:
TrackProductDetail(HttpContext, "P12345", "Android Warhol T-Shirt", "Apparel", "Google", "black", 0, "USD");
The "true" parameter in the call to AddAnalyticsCustom tells the script generator to remove the interaction after the script is generated for the request. If you set it to false, the interaction is added to the session, and rendered on subsequent requests to all pages. Put global settings into an IPluginScript class instead, because the order of interactions is hard to predict across page requests.
Track the checkout
A checkout process typically ends with a "Thank you" page. This is a good place to track purchases with Google Analytics. If the checkout ends with a redirect to that page, it can retrieve the order number and track it using an extension method on theHttpContext as shown in the example below.
These examples are referring to the Optimizely Commerce Connect Sample templates.
In the Optimizely Commerce Connect sample website, anonymous customers are redirected to the OrderConfirmation page after the checkout is done.
The following example is for the anonymous use case, which is redirected to the OrderConfirmation page.
Example of tracking using server code:
-
Edit the
CheckoutConfirmationStep.aspx.csfile. -
Add the following string directive on the top of file:
using EPiServer.GoogleAnalytics.Commerce.Helpers;Add the following code to action Index:
// Registers the order to be tracked by the Google Analytics tracking script added by the module, and generate tracking script on current page only: [HttpGet] public async Task<ActionResult> Index(OrderConfirmationPage currentPage, string notificationMessage, int ? orderNumber) { IPurchaseOrder order = null; if (_contextModeResolver.CurrentMode == ContextMode.Edit) { order = ConfirmationService.CreateFakePurchaseOrder(); } else if (orderNumber.HasValue) { order = ConfirmationService.GetOrder(orderNumber.Value); if (order != null) { await _recommendationService.TrackOrderAsync(HttpContext, order); } } if (order != null && order.CustomerId == CustomerContext.CurrentContactId) { var viewModel = CreateViewModel(currentPage, order); viewModel.NotificationMessage = notificationMessage; HttpContext.AddAnalyticsTransaction((PurchaseOrder) order); return View(viewModel); } return Redirect(Url.ContentUrl(ContentReference.StartPage)); } -
Build the project, perform a purchase, and you should start seeing transaction data in Google Analytics reports.
-
The
AddAnalyticsTransactionmethod detects which Google Analytics tracking mode is being used, and renders the correct script for Classic and Universal Analytics using the Ecommerce plugin.
Track the checkout using the Measure Ecommerce syntax
The following example uses the Measure Ecommerce library for Google Analytics, and the examples below refer to the Optimizely Commerce sample templates.
-
To make it easier to add the tracking to the page, add a helper class that knows how to render the correct Measure ecommerce syntax as follows:
public class TrackingHelper { public void TrackTransaction(HttpContext context, PurchaseOrder order) { var orderForm = order.OrderForms[0]; var items = new List<Dictionary<string, object>> (); foreach(LineItem item in orderForm.LineItems) { var ai = GetAddProduct(item, ((IPurchaseOrder) order).Currency); context.AddAnalyticsInteraction(ai); items.Add(ai.Arguments); } var orderId = order.TrackingNumber; var dict = new Dictionary<string, object> { { "transaction_id", order.TrackingNumber }, { "affiliation", CommerceExtensions.GetAffiliation() }, { "value", order.Total }, { "tax", order.TaxTotal }, { "shipping", order.ShippingTotal }, { "currency", ((IPurchaseOrder) order).Currency }, { "items", items } }; context.AddAnalyticsCustom("purchase", true, dict); } private AnalyticsInteraction GetAddProduct(LineItem item, string currency) { var dict = new Dictionary<string, object> { { "item_id", item.Code }, { "item_name", item.DisplayName }, { "item_category", item.CatalogNode }, { "price", item.GetExtendedPrice(new Mediachase.Commerce.Currency(currency)).Amount }, { "quantity", item.Quantity }, }; return new AnalyticsInteraction("add_to_cart", dict) { ClearWhenContextChanged = true }; } } -
Use the tracking methods in the
EPiServer.Commerce.Sampletemplate by callingTrackTransactioninOrderConfirmationController.csas follows:[HttpGet] public async Task<ActionResult> Index(OrderConfirmationPage currentPage, string notificationMessage, int ? orderNumber) { IPurchaseOrder order = null; if (_contextModeResolver.CurrentMode == ContextMode.Edit) { order = ConfirmationService.CreateFakePurchaseOrder(); } else if (orderNumber.HasValue) { order = ConfirmationService.GetOrder(orderNumber.Value); if (order != null) { await _recommendationService.TrackOrderAsync(HttpContext, order); } } if (order != null && order.CustomerId == CustomerContext.CurrentContactId) { var viewModel = CreateViewModel(currentPage, order); viewModel.NotificationMessage = notificationMessage; TrackTransaction(HttpContext, (PurchaseOrder) order); return View(viewModel); } return Redirect(Url.ContentUrl(ContentReference.StartPage)); }
Set the currency
If you run a multi-market website supporting different currencies for your customers, track the products and transactions using the correct currency. Your Google Analytics account has one default currency (USD if you have not changed it), and tracking that does not specify the currency uses the default currency.
This is no problem if your purchases are in the same currency. Change the currency setting in the Google Analytics admin interface at any time. However, if you sell the same product in two different markets, and do not specify the currency, the Google Analytics reports for revenue will be wrong.
Setting the currency for a transaction is easy with GA4 Tracking. For all requests, set the currency for the current market. The easiest way is to create an IPluginScript class that adds the currency.
The following example shows how to set currency based on the current market for the visitor, and adds a "require" for the Enhanced Ecommerce plugin script:
/// <summary>
/// Tells Google Anayltics to inject the Enhanced Ecommerce script
/// and use the currency for the current market
/// </summary>
public class RequireEnhancedCommercePlugin: IpluginScript {
  public string GetScript() {
    ICurrentMarket currentMarket = ServiceLocator.Current.GetInstance<ICurrentMarket>();
    IMarket market = currentMarket.GetCurrentMarket();
    // set currency
    string script = $ "gtag('set', {{ 'currency': '{market.DefaultCurrency}' }});";
    return script;
  }
}
Before the class above is used, register the class as the IPluginScript implementation to be used by the website:
public class Startup {
	public void ConfigureServices(IServiceCollection services) {
		services.AddSingleton<IPluginScript, RequireEnhancedCommercePlugin>();
	}
}
This adds the following script lines after the initial tracking script:
gtag('set', {currency: 'USD'});
If you support several currencies for a single market, set the currency as an AnalyticsInteraction on the page where you track ecommerce-related activities.
See also Google Analytics documentation about tracking currencies.
Updated about 2 months ago