Meta class
Create and manage meta classes and custom business objects to extend Commerce Connect data models.
Business Foundation extends the attributes of the Customer Management system to give you more flexibility with the displayed and collected fields and attributes. Business Foundation works with the metadata engine for no-code customization of the data model, letting you define objects and relations between them for the Customer Management system. For more information, see Business Foundation in the Developer section.
Specify the fields you want to display and work with system fields. For example, create a Gift Card field to track how much money a customer has on a gift card.
Meta class system
The Meta class system lets you extend the data models in Commerce Connect without modifying the underlying code. A meta class is a schema definition. It describes a custom object type, its fields, and the relationships between objects. Commerce Connect uses meta classes to represent orders, contacts, organizations, and catalog entries, and you can create your own to track data your business needs that the platform does not provide by default.
Create a business object when you need to track a type of data that does not fit into an existing Commerce Connect entity. Common scenarios include the following:
- Extending customer data – Track custom attributes for contacts or organizations, such as loyalty tier, account manager, or preferred communication channel.
- Custom financial instruments – Model gift cards, store credits, or vouchers as first-class objects with their own fields and relationships.
- Business-specific records – Create objects to represent internal concepts such as supplier agreements, rebate programs, or custom order attributes that fall outside standard order or catalog models.
- Integration data – Store identifiers, sync status, or metadata from external systems (such as an ERP or CRM) directly in Commerce Connect so they are available during order processing or reporting.
Relate business objects to existing objects (such as contacts or orders) through one-to-many, many-to-one, or many-to-many relationships, making them a flexible tool for modeling complex business logic without custom development.
Create a business object
Go to Settings > Meta Class and click New Business Object.
The New Business Object form defines a custom data object and its initial field. It is divided into two sections: Base Info and Field Info.
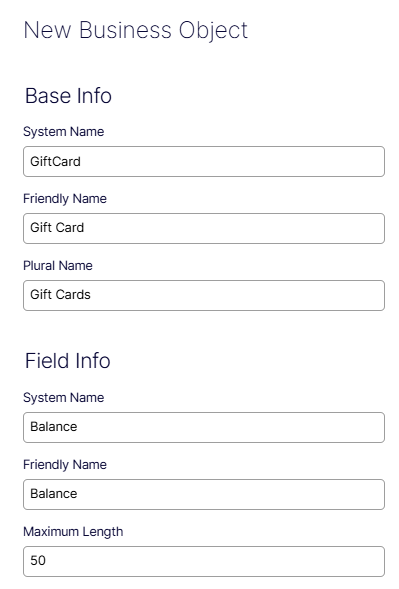
Base Info
- System Name – A required field for the internal identifier used in API calls and integrations. It should be concise and free of spaces. For example,
GiftCard. - Friendly Name – A human-readable label for the object as it displays in the UI. This field is automatically populated when you enter the System Name. For example,
Gift Card. - Plural Name – The plural form of the friendly name, used in list views and reports. This field is also automatically populated. For example,
Gift Cards.
Field Info
- System Name – The internal identifier for the object's initial field. Defaults to
Title. For example,Balance. - Friendly Name – The human-readable label for the initial field. Defaults to
Title. For example,Balance. - Maximum Length – The maximum number of characters allowed in this field. Defaults to
100. For example,50.
Click Cancel to discard all entered data and exit the form without creating the object, or click Save to create the business object.
Create fields
When you create a business object, or when you edit an existing business object, the Fields tab displays the fields defined on this Meta Class and lets you add or remove custom fields.
Go to Meta Classes > GiftCard > Fields.
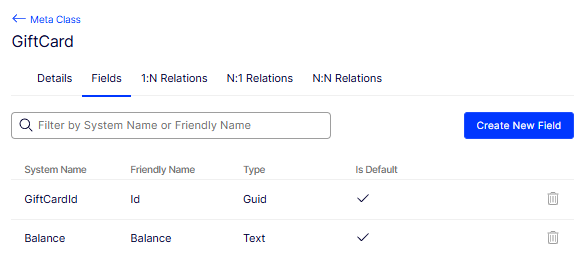
The Fields tab lists all system and custom fields that belong to the GiftCard Meta Class. Default fields are created automatically when the Meta Class is saved. Each field can be reviewed or deleted from here, and fields can be added using Create New Field.
- Filter by System Name or Friendly Name – Search input to narrow down the field list by either the internal system name or the human-readable friendly name.
- Create New Field – Opens the field creation form to add a custom field to this Meta Class.
- System Name – The internal identifier for the field used in code and integrations (for example,
GiftCardId,Balance). - Friendly Name – The display label shown in the UI (for example, Id, Balance).
- Type – The data type of the field (for example, Guid, Text).
- Is Default – Indicates whether the field is automatically included by default. Checked for fields created as part of the Meta Class setup.
- Delete icon – Removes a non-default field from the Meta Class. Default fields cannot be deleted.
The Create New Field form lets you define a custom field and attach it to the Meta Class. The available options adjust based on the selected Field Type.
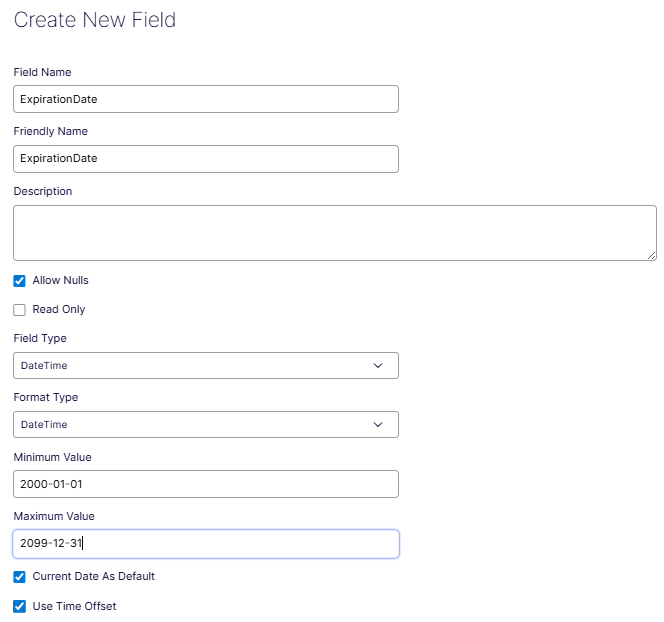
- Field Name – The internal system identifier for the field (for example,
ExpirationDate). Used in code and integrations. - Friendly Name – The human-readable label displayed in the UI (auto-populated from Field Name, editable).
- Description – Optional free-text description of the field's purpose.
- Allow Nulls – When checked, the field accepts null values.
- Read Only – When checked, the field value cannot be edited by users.
- Field Type – The data type of the field (for example, DateTime, Text, Guid). Controls which additional options appear.
- Format Type – The display format applied to the field value (for example, DateTime).
- Minimum Value – The earliest accepted value (for example, 2000-01-01).
- Maximum Value – The latest accepted value (for example, 2099-12-31).
- Current Date As Default – When checked, defaults the field value to the current date on record creation.
- Use Time Offset – When checked, adjusts the stored value using the user's time zone offset.
- Cancel – Closes the form without saving.
- Create Field – Saves the field and adds it to the Meta Class.
Create a 1:N relation
A 1:N (one-to-many) relation links a primary object to multiple instances of a related object. For example, a GiftCard can be associated with many orders, but each order references only one gift card. Define this relation when you need to model that kind of parent-child data structure in your content type schema.
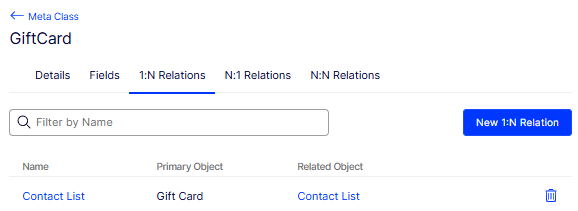
Click New 1:N Relation and use the form to configure how the relation is stored and labeled in the system.
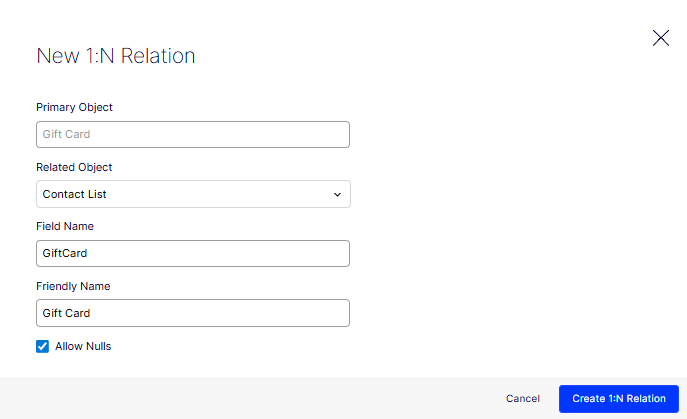
- Primary Object – The object that acts as the "one" side of the relation. This value is set automatically based on the content type you are editing.
- Related Object – The meta class to link to. Select the object type that represents the "many" side of the relation from the drop-down list.
- Field Name – The internal identifier for the relation property. Use alphanumeric characters with no spaces.
- Friendly Name – The label displayed in the editor interface. Enter a human-readable name that describes the relation.
- Allow Nulls – Select this checkbox to let the relation field be empty. If cleared, the field requires a value before the content can be saved.
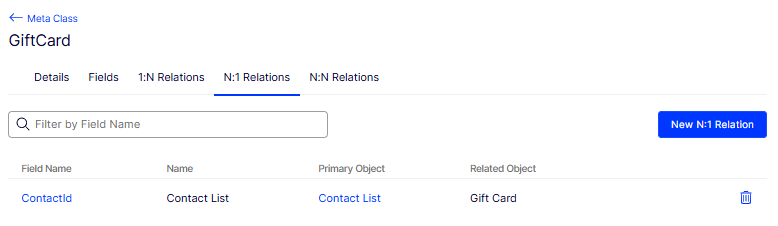
Create an N:1 relation
An N:1 (many-to-one) relation links multiple instances of a primary object to a single related object. For example, many orders can reference one gift card, but that gift card exists as a single record. Define this relation when you need to model that kind of many-to-parent data structure in your content type schema.
Use this form to configure how the relation is stored and labeled in the system.

- Primary Object – The object that acts as the "many" side of the relation. Select the meta class that holds multiple references to the related object. For example, select Contact List.
- Related Object – The object that acts as the "one" side of the relation. This value is set automatically based on the content type you are editing. For example, Gift Card.
- Field Name – The internal identifier for the relation property. Use alphanumeric characters with no spaces. For example, enter Contact.
- Friendly Name – The label displayed in the editor interface. Enter a human-readable name that describes the relation. For example, enter Contact List.
- Allow Nulls – Select this checkbox to let the relation field be empty. If cleared, the field requires a value before the content can be saved.
- Create N:1 Relation – Click to create the relationship.
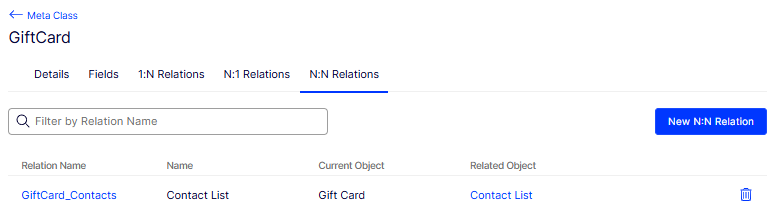
Create an N:N relation
An N:N (many-to-many) relation links multiple instances of the current object to multiple instances of a related object. For example, a gift card can apply to many promotions, and a promotion can apply to many gift cards. Define this relation when neither side of the relationship is limited to a single reference.
Use this form to configure how the relation is stored and labeled in the system.
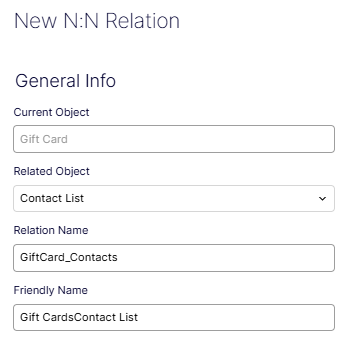
- Current Object – The object you are defining the relation from. This value is set automatically based on the content type you are editing. For example, Gift Card.
- Related Object – The meta class to link to. Select the object type that represents the other side of the relation from the drop-down list. For example, select Contact List.
- Relation Name – The internal identifier for the relation. Use alphanumeric characters with no spaces. For example, enter GiftCard_Contacts.
- Friendly Name – The label displayed in the editor interface. Enter a human-readable name that describes the relation. For example, enter Gift CardContact List.
Updated 12 days ago