Taxes
Configure tax categories, jurisdictions, and rates manually or by CSV import and export.
Taxes define the actual tax entries applied to transactions – each tax record represents a named, typed charge (such as a sales tax or VAT) that your system calculates and displays to customers. Common scenarios include:
- Jurisdiction-specific rate definition – Create a separate tax record for each rate you collect (for example, CA Sales Tax 9%, MA Sales Tax 6%) so each jurisdiction's obligation is tracked and reported independently.
- Tax type segmentation – Distinguishing between tax types (for example, Sales, VAT, Excise) lets your system apply the correct calculation method and display the right label on invoices and receipts.
- Display ordering – The sort order field controls the sequence in which taxes display on customer-facing documents, letting you present charges in a logical or legally required order.
- Localization – Name fields for each supported language ensure that tax labels display correctly for customers in different locales without requiring separate tax records per region.
Go to Settings > Taxes.
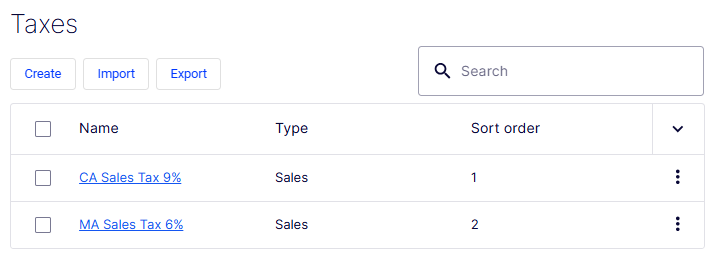
The Taxes list page displays all configured tax records and provides controls to create, import, export, and search them.
- Create – Opens the Create Tax form to define a tax record.
- Import – Lets you bulk create tax records by uploading a structured file (for example, CSV), useful when migrating from another system or adding many taxes at once. See the following Import taxes section.
- Export – Downloads the current list of tax records in a structured file format for backup, auditing, or use in external tools. See the following Export taxes section.
- Search field – Filters the list in real time by tax name as you type.
- Checkbox column – Selects one or more rows, typically for bulk actions.
- Name column – Displays the name of each tax as a clickable link (for example, CA Sales Tax 9%, MA Sales Tax 6%). Clicking the name opens the record for viewing or editing.
- Type column – Shows the tax type assigned to each record (for example, Sales).
- Sort order column – Displays the numeric sort order that controls how taxes are sequenced on customer-facing documents. The column header includes a sort toggle (
∨) to reorder the list. - Row action menu (⋮) – A context menu on each row exposing record-level actions such as Edit and Delete.
Configure taxes manually
To configure taxes manually, use the following steps.
-
Go to Settings > Tax Categories and click Create to create categories that associate catalog items with defined tax rates. For example, create categories such as General Sales, Food, and Luxury items, depending on tax regulations for these item types. See Tax Categories.
-
Go to Settings > Tax Jurisdictions and click Create to specify jurisdictions for a region by defining zip codes, country codes, and so on. Tax rates apply to the level of information you specify for each jurisdiction. For example, stating only the country code as US includes customers with a US address (regardless of state and county) in this jurisdiction. Country codes and region codes must match the codes defined earlier in countries and regions. See Tax jurisdictions.
-
Go to Settings > Tax Jurisdiction Groups and click Create to define groups of available tax jurisdictions. Include multiple tax jurisdictions in a tax jurisdiction group. See Tax jurisdiction groups.
-
Go to Settings > Taxes and click Create to add a tax, such as Sales Tax. Enter a name, specify the tax rate, and apply any tax categories or jurisdiction groups. See the following section.
Create tax
The Create Tax form defines a tax record with its name, type, display order, and localized labels.
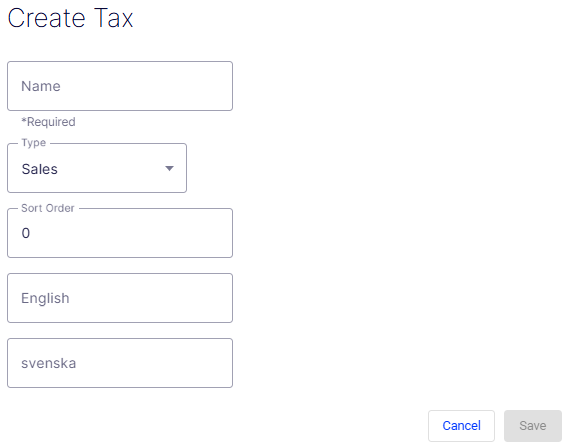
- Name – A required free-text field for the primary identifier of the tax (for example,
CA Sales Tax 9%). This value is used throughout the admin UI and may display on customer-facing documents depending on your locale settings. - Type – A required drop-down list specifying the category of tax. Defaults to Sales. The type determines how the tax is calculated and labeled (for example, Sales, VAT, Excise).
- Sort Order – A numeric field controlling the position of this tax relative to others when displayed on invoices or receipts. Lower numbers display first. Defaults to
0. - English – A localization field for the tax name as it should display to customers whose locale is set to English.
- svenska – A localization field for the tax name as it should display to customers whose locale is set to Swedish (svenska). Additional language fields display for each language configured in your system.
- Cancel – Discards all entered data and exits the form without creating a tax record.
- Save – Submits the form and creates the tax record. The button is disabled (grayed out) until the required Name field is filled in.
Import taxes
Using a CSV tax file with a specified format, import and update tax data in bulk, replacing manual configuration steps. Use the CSV import to associate catalogs with tax categories.
- Go to Taxes > Import.
- Select your file, and click Open.
When the import is completed, the tax configuration displays in Commerce Connect. Edit the configuration by importing a modified CSV file.
WarningRe-importing a CSV file only edits existing information or adds data – nothing is deleted. If you delete an entire row of data in the CSV file, you must manually delete those entries in Commerce Connect. Delete all tax data and perform the CSV tax import from scratch.
Export taxes
Use a CSV tax file to extract selected tax data from Commerce Connect to export and copy tax data among sites. The format of the CSV export file matches the file for importing taxes.
Go to Taxes > Export to export the taxes and their values. The export downloads a CSV file, which you can open and view or modify.
Define countries and regions
You must first define the countries and regions where you plan to sell products, using the correct country ISO codes for tax calculations to work properly (such as during checkout). See also Countries and regions.
Sample scenarios
Example 1 – Single tax per catalog item based on a single jurisdiction
Using State as the variable, specify the tax rate on a state level. For example, CA is 9%, and MA is 6%. Placing an order from California incurs the 9% sales tax during checkout.
| Jurisdiction | Jurisdiction Group | Tax Rate | Tax Category |
|---|---|---|---|
| California | CA Tax Group | 9% | General Sales |
| Massachusetts | MA Tax Group | 6% | General Sales |
Example 2 – Two or more taxes per catalog item based on more than one jurisdiction
If you have a luxury item that requires State and Federal tax, specify these tax rates. For example, a luxury item purchased in CA has a 9% state tax rate and a federal tax rate of 3%. Checkout applies both taxes.
| Jurisdiction | Jurisdiction Group | Tax Rate | Tax Category |
|---|---|---|---|
| California General | CA GS Tax Group | 9% | General Sales |
| Massachusetts General | MA GS Tax Group | 6% | General Sales |
| California Luxury | CA LX Tax Group | 9% | Luxury Sales |
| Massachusetts Luxury | MA LX Tax Group | 6% | Luxury Sales |
| US Federal Luxury | US LX Tax Group | 3% | Luxury Sales |
Example 3 – Tax CSV file with tax type specified
Specify the tax type. Optimizely provides Sales Tax and Shipping Tax.
| Jurisdiction | Jurisdiction Group | Tax Rate | Tax Category |
|---|---|---|---|
| California | CA Tax Group | 9% | Sales Tax |
| Massachusetts | MA Tax Group | 6% | Shipping Tax |
Updated 12 days ago