Payments (UI)
Create and manage payment types, gateways, and methods by market in Commerce Connect.
Payments define the payment methods available to customers at checkout. Each payment record represents a configured gateway or payment type that your storefront can present and process. Common scenarios include the following:
- Multi-gateway support – Configure separate payment records for each processor you support (for example, Adyen Payment, Bolt, PaymentService) so customers can choose their preferred payment option at checkout.
- Active or inactive control – Toggle a payment method on or off without deleting it, making it easy to disable a gateway temporarily during maintenance or a contract change.
- Default payment selection – Mark one payment method as the default so it is pre-selected at checkout, reducing friction for the most common payment type.
- Display ordering – Use the ordering value to control the sequence in which payment options display at checkout, prioritizing preferred or most-used methods.
- Localized payment names – The language tabs let you manage payment method names and descriptions in each supported language without creating separate records.
Go to Settings > Payments.
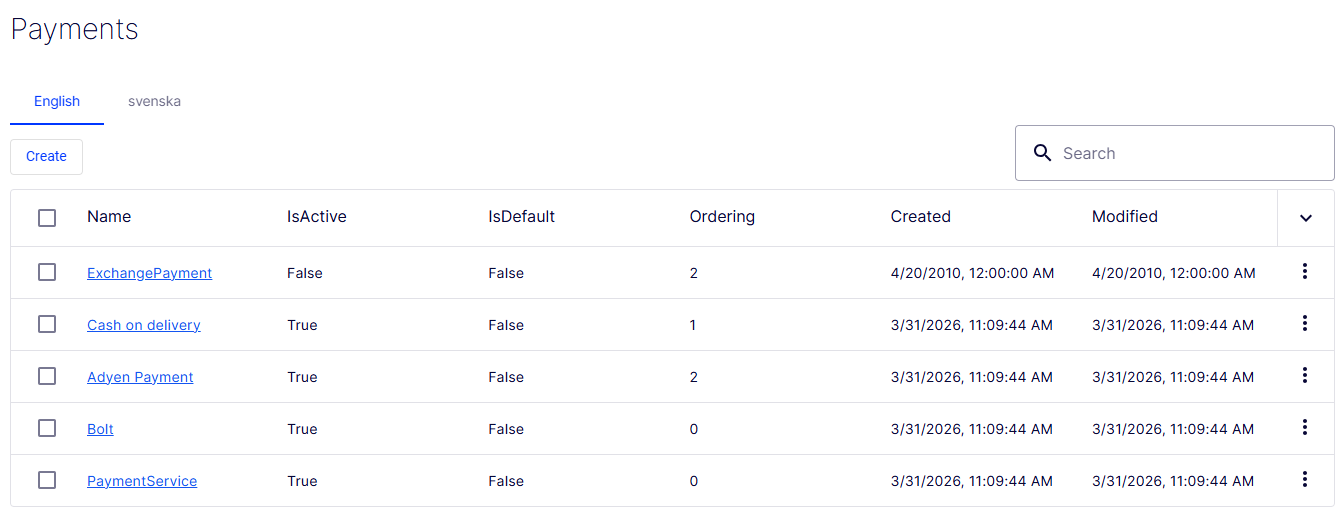
The Payments list page displays all configured payment methods and provides controls to create, search, and manage them.
- Language tabs – Switch between supported languages (for example, English, svenska) to view and manage localized payment method names. The active tab determines which language's display values are shown in the list.
- Create – Opens the form to define a payment method.
- Search field – Filters the list in real time by payment method name as you type.
- Checkbox column – Selects one or more rows, typically for bulk actions.
- Name column – Displays the name of each payment method as a clickable link (for example, ExchangePayment, Cash on delivery, Adyen Payment). Clicking the name opens the record for viewing or editing.
- IsActive column – Indicates whether the payment method is currently enabled. True means the method is active and available at checkout. False means it is disabled.
- IsDefault column – Indicates whether the method is pre-selected at checkout. True identifies the default method. False means it is not the default.
- Ordering column – Displays the numeric value controlling the sequence in which payment methods display at checkout. Lower numbers appear first. Methods with the same ordering value are sorted by name.
- Created column – Displays the date and time the payment record was created.
- Modified column – Displays the date and time the payment record was most recently updated.
- Sort toggle (
∨) – Changes the sort column or direction when clicked. - Row action menu (⋮) – A context menu on each row exposing record-level actions such as Edit and Delete.
Create a payment
The Create Payment form defines a payment method and its configuration. It is organized into three tabs, Details, Parameters, and Markets, which become fully accessible after the initial record is saved. The Details tab contains the core identity, classification, and behavior fields for the payment method.
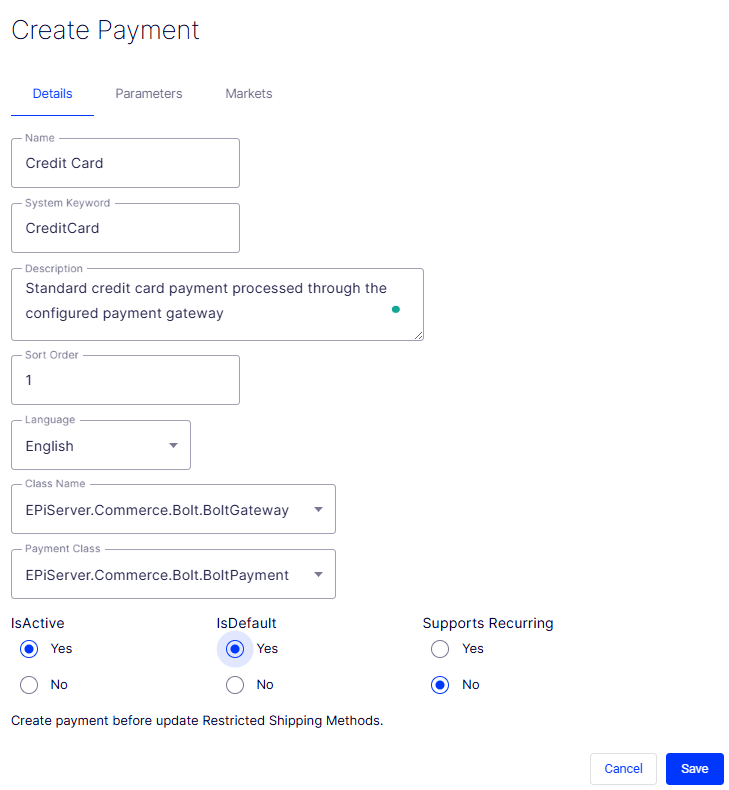
- Name – A required free-text field for the human-readable label of the payment method (for example, Cash on delivery, Adyen Payment). This name appears in the admin UI and at checkout.
- System Keyword – A required free-text field for the unique programmatic identifier used in API calls and integrations. It should be concise and free of spaces (for example,
CashOnDelivery,AdyenPayment). - Description – An optional multi-line text field for internal notes about the payment method, such as supported currencies, transaction limits, or integration requirements.
- Sort Order – A numeric field controlling the position of this payment method relative to others at checkout. Lower numbers appear first. Defaults to
0. - Language – A required drop-down list specifying the language context for the Name and Description values. Defaults to [ No value ] until a language is selected.
- Class Name – A required drop-down list that maps this payment method to its gateway handler class — the code responsible for processing transactions. Defaults to [ No value ].
- Payment Class – A required drop-down list specifying the payment class type that determines how the method behaves during order processing (for example, whether it supports captures, refunds, or voids). Defaults to [ No value ].
- IsActive – A radio button controlling whether this payment method is available at checkout. Defaults to No. Set to Yes to enable it immediately upon saving.
- IsDefault – A radio button controlling whether this method is pre-selected at checkout. Defaults to No.
- Supports Recurring – A radio button indicating whether this payment method can be used for subscription or recurring billing. Defaults to No. Set to Yes for gateways that support stored payment credentials and automatic recurring charges.
- Create payment before update Restricted Shipping Methods – An inline note reminding you that the Restricted Shipping Methods configuration (which controls which shipping methods are incompatible with this payment) is only available after the payment record is saved for the first time.
- Cancel – Discards all entered data and exits the form without creating a payment method.
- Save – Submits the form and creates the payment record. The button is disabled (grayed out) until all required fields — Name, System Keyword, Language, Class Name, and Payment Class — are filled in.
Add parameters
After you create a payment (or for existing payments), the Parameters tab on a payment record lists all key-value pairs assigned to the payment gateway and provides a button to add them. Parameters pass configuration values such as API credentials, merchant identifiers, and behavioral flags to the gateway's implementation class at runtime.
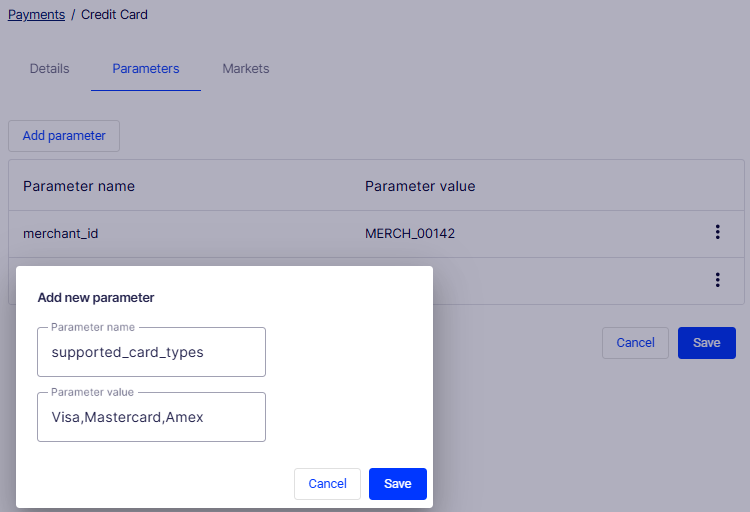
- Add parameter – Click to open the Add new parameter window to define a key-value pair for the payment method.
- Parameter name column – Displays the key portion of each saved parameter.
- Parameter value column – Displays the value assigned to each saved parameter.
- Add new parameter dialog – A modal overlay containing the fields and controls needed to define a single parameter:
- Parameter name – A required free-text field for the key that the gateway's implementation class reads at runtime (for example,
api_key,merchant_id,capture_mode). Consult your gateway's documentation for valid parameter names. - Parameter value – A free-text field for the value assigned to the parameter name (for example,
pk_live_abc123xyz,automatic,true). - Cancel – Closes the dialog without saving the parameter.
- Save – Adds the parameter to the payment record and closes the dialog. The button is disabled (grayed out) until the required Parameter name field is filled in.
- Parameter name – A required free-text field for the key that the gateway's implementation class reads at runtime (for example,
Select markets
The Markets tab on a payment record controls which markets the payment method is available in at checkout. Only customers shopping in a selected market see this payment option presented to them.
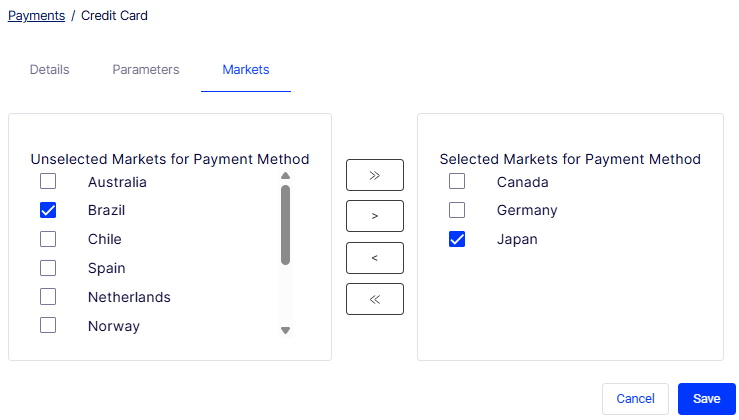
- Unselected Markets for Payment Method – The left panel lists all markets defined in your system that have not yet been enabled for this payment method. The list is scrollable. Each row has a checkbox for selection. In this screenshot, unselected markets include Australia, Brazil (checked and ready to move), Chile, Spain, Netherlands, and Norway, among others.
- Selected Markets for Payment Method – The right panel lists the markets for which this payment method is currently active. In this screenshot, Canada, Germany, and Japan (checked) are selected.
»(Add All) – Moves all markets from the Unselected panel into the Selected panel, enabling the payment method for every market in your system.>(Add Selected) – Moves only the checked markets from the Unselected panel into the Selected panel.<(Remove Selected) – Moves checked markets from the Selected panel back to the Unselected panel, disabling the payment method for those markets.«(Remove All) – Clears the Selected panel entirely, disabling the payment method for all markets.- Cancel – Discards any unsaved changes to the market assignments.
- Save – Commits the current market selections to the payment record.
Delete payment methods
Go to More > Delete on the Payments page to delete a payment. Click OK to confirm. You can also delete multiple payments by selecting the payments, clicking Delete Selected, and clicking OK to confirm.
Updated 12 days ago