Warehouses
Create and manage warehouses as fulfillment centers, pickup, and delivery locations.
Warehouses represent the physical locations from which your business stores inventory, fulfills orders, and offers pickup or delivery services. Configuring warehouses accurately ensures that inventory levels, shipping origins, and fulfillment routing reflect your real-world operations. Common scenarios include:
- Multi-location inventory – Define a separate warehouse for each physical location (for example, Hanoi store, London store, New York store) so that inventory is tracked and allocated per site.
- Fulfillment center designation – Mark locations that ship outgoing orders as fulfillment centers so the system routes orders to the correct dispatch point.
- Click-and-collect support – Enable the pickup location flag on stores that offer in-store pickup so customers can select those locations at checkout.
- Delivery location routing – Flag warehouses that accept inbound deliveries from suppliers, supporting inventory receiving workflows.
- Primary warehouse – Designate one warehouse as primary to serve as the default fulfillment source when no other routing rule applies.
Go to Settings > Warehouses. The Warehouses list page displays all configured warehouse locations and provides controls to create and manage them.
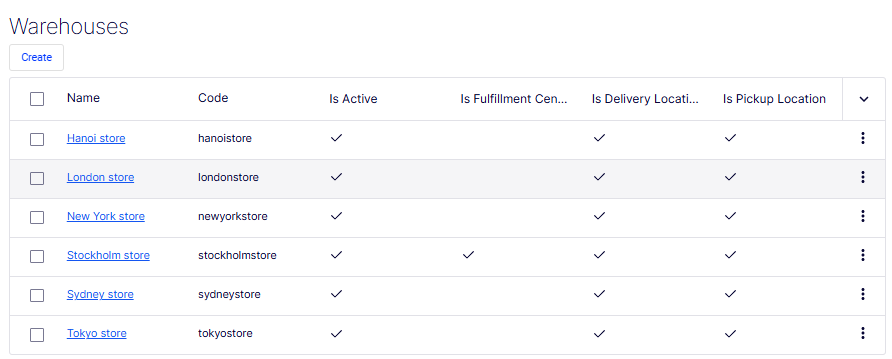
- Create – Opens the Create Warehouse form to define a location. See the following section.
- Checkbox column – Selects one or more rows, typically for bulk actions.
- Name column – Displays the name of each warehouse as a clickable link (for example, Hanoi store, London store, Tokyo store). Clicking the name opens the record for viewing or editing. Names that exceed the column width are truncated with an ellipsis.
- Code column – Displays the unique programmatic identifier for each warehouse (for example,
hanoisstore,londonstore,tokyostore). - Is Active column – A checkmark indicates the warehouse is active and available for use in fulfillment and inventory operations.
- Is Fulfillm... column – A checkmark indicates the warehouse is designated as a fulfillment center for outgoing shipments. In this screenshot, Hanoi store and Stockholm are fulfillment centers.
- Is Deliver... column – A checkmark indicates the warehouse accepts inbound deliveries. All visible warehouses have this enabled.
- Is Pickup... column – A checkmark indicates the warehouse supports in-store customer pickup. All visible warehouses have this enabled.
- Sort toggle (
∨) – Changes the sort column or direction when clicked. - Row action menu (⋮) – A context menu on each row exposing record-level actions such as Edit and Delete.
Create a warehouse
The Create Warehouse form is organized into two tabs: Overview and Address.
The Overview tab defines the warehouse's identity and operational role.
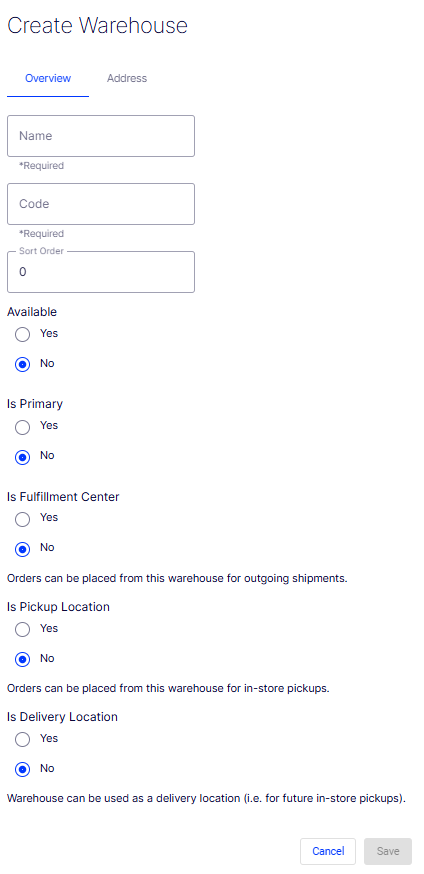
- Name – A required free-text field for the human-readable label of the warehouse (for example, New York Store, Tokyo Store).
- Code – A required free-text field for the unique programmatic identifier used in API calls, inventory routing, and integrations. It should be concise and free of spaces (for example,
newyorkstore,tokyostore). - Sort Order – A numeric field controlling the position of this warehouse relative to others in selection lists and drop-down lists. Defaults to
0. - Available – A radio button indicating whether this warehouse is available for use. Defaults to No. Set to Yes to make the warehouse active immediately upon saving.
- Is Primary – A radio button designating this warehouse as the primary fulfillment source. Defaults to No. Only one warehouse should be set as primary.
- Is Fulfillment Center – A radio button indicating that orders can be placed from this warehouse for outgoing shipments. Defaults to No. Set to Yes for locations that pick, pack, and ship customer orders.
- Is Pickup Location – A radio button indicating that customers can collect orders in person from this warehouse. Defaults to No. Set to Yes for stores that offer click-and-collect.
- Is Delivery Location – A radio button indicating that this warehouse accepts inbound deliveries from suppliers. Defaults to No.
The Address tab captures the physical address and contact details for the warehouse. This information is used as the shipping origin address on outgoing shipments and for carrier rate calculations.
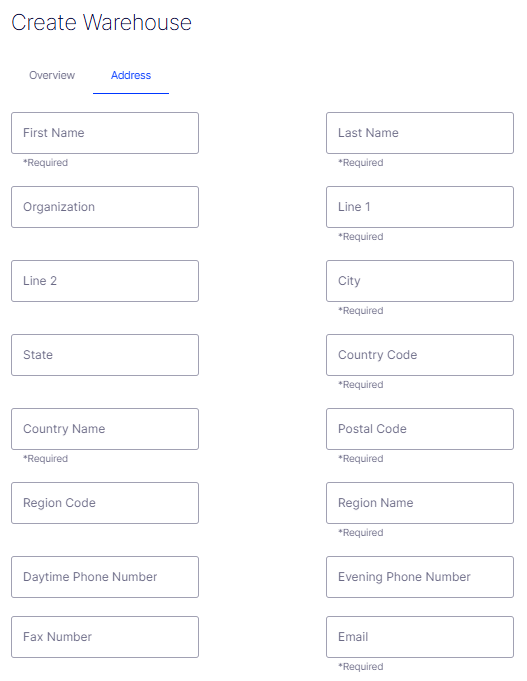
- First Name – A required field for the first name of the primary contact at this warehouse location.
- Last Name – A required field for the last name of the primary contact at this warehouse location.
- Organization – An optional field for the company or business name associated with this address.
- Line 1 – A required field for the first line of the street address (for example, building number and street name).
- Line 2 – An optional field for additional address information such as a suite, floor, or unit number.
- City – A required field for the city in which the warehouse is located.
- State – An optional field for the state or province.
- Country Code – A required field for the ISO 3166-1 alpha-2 country code (for example,
US,GB,JP). - Country Name – A required field for the full name of the country (for example, United States, Japan).
- Postal Code – A required field for the ZIP or postal code of the warehouse address.
- Region Code – An optional field for a sub-national region identifier used in shipping or tax calculations.
- Region Name – A required field for the name of the region or state as it should appear on shipping labels and documents.
- Daytime Phone Number – An optional field for the warehouse's primary contact phone number during business hours.
- Evening Phone Number – An optional field for an after-hours contact number.
- Fax Number – An optional field for a fax number if required for carrier or supplier communications.
- Email – A required field for the primary contact email address for this warehouse location.
- Cancel – Discards all entered data and exits the form without creating the warehouse.
- Save – Submits the form and creates the warehouse record. The button is disabled (grayed out) until all required fields across both tabs are filled in.
Updated 12 days ago