Markets (UI)
Create and manage markets with languages, currencies, countries, and tax settings.
Markets in Optimizely Commerce Connect help you target merchandising and create more personalized user experiences. For example, you can create a 20% off promotion for Independence Day in Canada. Only products in the Canadian market are eligible.
A single site can have multiple markets, each with its own product catalog, language, currency, and promotions. The market determines which products and prices a customer sees on the website. When you create a market, define a geographic entity (such as a region, a country, or a group of countries).
Because developers implement markets during site creation, each implementation can be different. Some sites let the visitor select a market on the storefront. Others use URLs for different markets, such as yoursite.uk and yoursite.de. A site can also use a visitor's IP address to determine the appropriate market for their location.
Configuring markets correctly ensures customers see the right prices, languages, and payment options for their location. Common scenarios include the following:
- Geographic segmentation – Create a separate market for each country or region you sell into (for example, AUS, JPN, DEU) so that currency, language, and tax settings are applied independently per region.
- Currency localization – Assign a default currency and additional supported currencies to each market so prices display in the customer's local currency.
- Tax-inclusive pricing – Enable the Include Tax in Prices option for markets where regulations require displayed prices to include tax (for example, most EU markets), ensuring compliance without changing your base price data.
- Lowest price transparency – Enable the Enable Lowest Price Display option for markets where consumer protection regulations require showing the lowest price offered in a recent period.
- Language control – Assign supported languages and a default language per market so storefront content, product descriptions, and UI labels are served in the correct language.
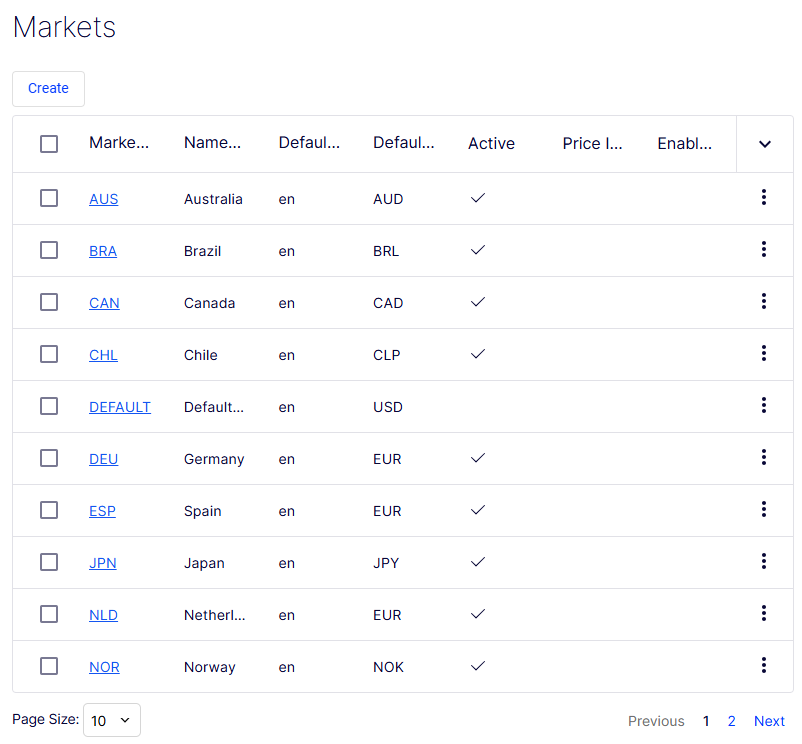
Go to Settings > Markets. The Markets list page displays all configured markets and provides controls to create and manage them.
- Create – Opens the Create Market form to define a market.
- Checkbox column – Selects one or more rows, typically for bulk actions.
- Market ID column – Displays the unique programmatic identifier for each market as a clickable link (for example, AUS, BRA, DEFAULT). Clicking the ID opens the record for viewing or editing.
- Name column – Displays the human-readable market name (for example, Australia, Brazil, Default Market).
- Default Lang... column – Shows the default language code assigned to each market (for example,
en). - Default Curre... column – Shows the default currency code assigned to each market (for example,
AUD,BRL,EUR). - Active column – A checkmark indicates the market is active and available for use at checkout. The Default Market has no checkmark in this screenshot, indicating it is inactive.
- Price Include ... column – A checkmark indicates that displayed prices in this market include tax. All visible markets have this disabled.
- Enable Lowes... column – A checkmark indicates that the lowest recent selling price displays to customers in this market. All visible markets have this disabled.
- Sort toggle (
∨) – Changes the sort column or direction when clicked. - Row action menu (⋮) – A context menu on each row exposing record-level actions such as Edit and Delete.
- Page Size – A drop-down list at the bottom left controlling how many rows display per page. Currently set to 10.
- Pagination controls – Lets you go between pages. This screenshot shows page 1 of 2.
The Create Market form defines a market and its regional settings across four sections: identity fields, country assignment, language assignment, and currency assignment.
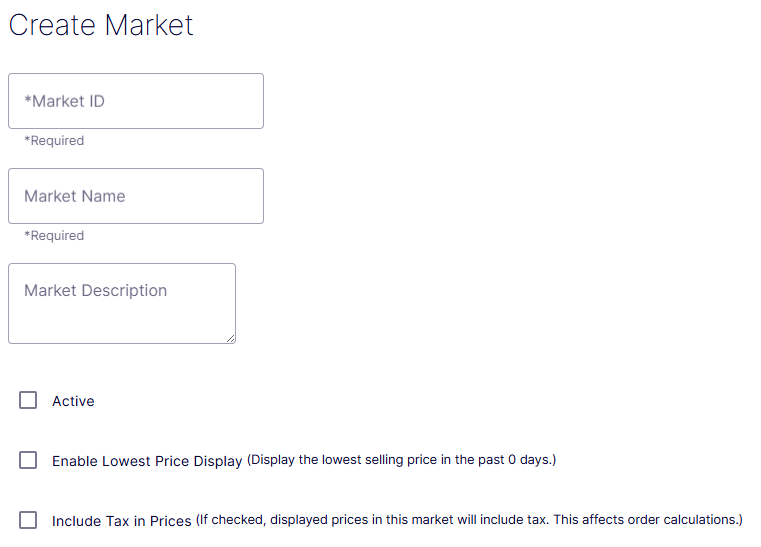
- Market ID – A required free-text field for the unique programmatic identifier of the market. Use a standard country or region code (for example,
AUS,DEU,DEFAULT). This value cannot be changed after the market is saved. - Market Name – A required free-text field for the human-readable label of the market (for example, Australia, Germany).
- Market Description – An optional multi-line text field for internal notes about the market, such as its scope, supported regions, or any special pricing rules that apply.
- Active – When checked, the market is live and available at checkout. Leave unchecked to configure the market before making it available to customers.
- Enable Lowest Price Display – When checked, the storefront displays the lowest selling price recorded in a configurable recent period. The inline note reads: Display the lowest selling price in the past 0 days. Set the number of days in your platform configuration to activate this feature. Use this for markets where price transparency regulations apply.
- Include Tax in Prices – When checked, displayed prices in this market include tax. The inline note reads: If checked, displayed prices in this market will include tax. This affects order calculations. Enable this for markets where tax-inclusive pricing is legally required or expected by customers.
Countries
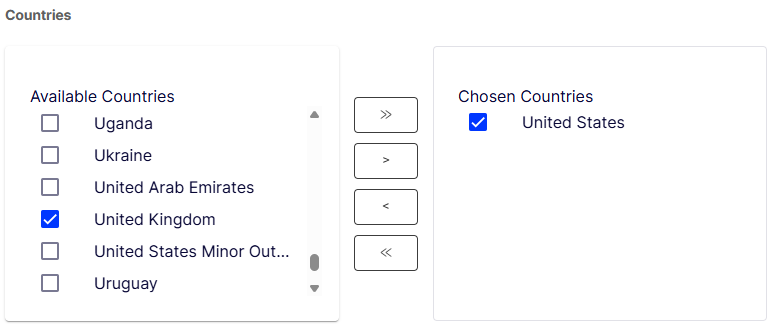
- Available Countries – The left panel lists all countries not yet assigned to this market. The list is scrollable and includes the full country catalog.
- Chosen Countries – The right panel lists the countries included in this market. Only customers from these countries are matched to this market at checkout.
- Transfer buttons (
»,>,<,«) – Move countries between the Available and Chosen panels.»adds all,>adds selected,<removes selected,«removes all.
Languages
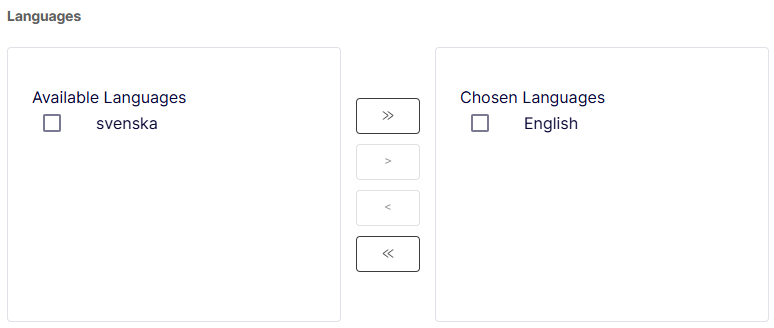
- Available Languages – The left panel lists all languages configured in your system that have not yet been assigned to this market (for example, English, svenska).
- Chosen Languages – The right panel lists the languages available to customers in this market.
Default Language
A drop-down list for selecting which of the chosen languages serves as the fallback when no customer language preference is detected. Must be set to one of the languages in the Chosen Languages panel.
Currencies
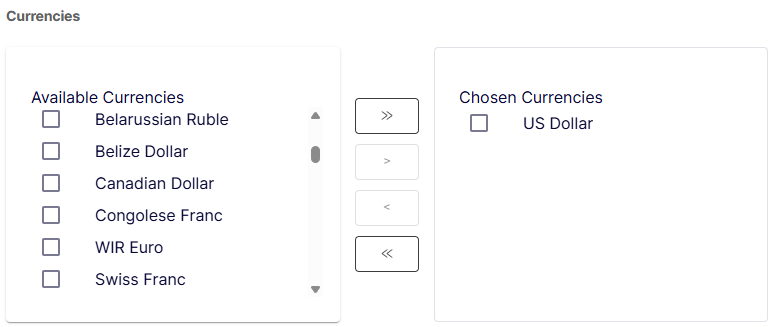
- Available Currencies – The left panel lists all currencies configured in your system that have not yet been assigned to this market (for example, UAE Dirham, Afghanistan Afghani, Albanian Lek).
- Chosen Currencies – The right panel lists the currencies available for transactions in this market.
Default Currency
A drop-down list for selecting which of the chosen currencies is used by default for pricing and transactions in this market. Must be set to one of the currencies in the Chosen Currencies panel.
Delete a market
- Select one or more markets from the list in the overview.
- Click Delete Selected and click OK to confirm.
Updated 12 days ago