Install and configure AuthorizeTokenEx
Describes how to install and use the AuthorizeTokenEx payment provider, one of several payment solutions available for Optimizely Commerce Connect.
AuthorizeTokenEx is a payment provider for Optimizely Commerce Connect that combines Authorize.Net for payment processing with TokenEx for PCI-compliant tokenization. To install and deploy the AuthorizeTokenEx payment provider, follow the steps in this article.
NoteThe AuthorizeTokenEx payment provider does not support subscriptions (payment plans).
Download the source packages
Download or clone the Commerce Connect Payment Providers repository on GitHub. It contains open-sourced payment gateways for Optimizely Commerce Connect, including the AuthorizeTokenEx payment provider projects described in this article.
NoteAuthorizeTokenEx requires Commerce Connect version 13.29.0 or later.
The repository contains the following AuthorizeTokenEx projects:
EPiServer.Commerce.Payment.AuthorizeTokenEx— ContainsAuthorizeTokenExPaymentandAuthorizeTokenExGateway. Deploy to both Commerce Manager and the front-end site.EPiServer.Commerce.Payment.AuthorizeTokenEx.CSR— Contains the API controller and React components. Deploy to the front-end site.
To add the projects to your solution, follow the steps in the next sections.
Build the AuthorizeTokenEx project
-
Open the
AuthorizeTokenExproject and save the solution. -
Rebuild the solution and confirm that the
AuthorizeNetandEPiServer.Commerce.Corepackages are installed from NuGet. To install them manually, run the following Package Manager Console commands:Install-Package AuthorizeNet -version 1.9.4 Install-Package EPiServer.Commerce.Core -
Rebuild the
AuthorizeTokenExproject. The build producesEPiServer.Commerce.Payment.AuthorizeTokenEx.dllandAuthorizeNet.dll.
Project structure
The project contains the following files and folders:
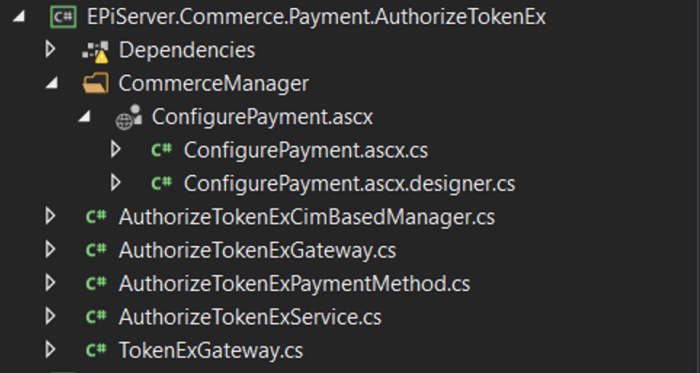
AuthorizeTokenExService.cs— Performs Authorize.Net operations integrated with TokenEx.AuthorizeNetTokenExCimBasedManager.cs— Implements the operations used byAuthorizeTokenExGateway.AuthorizeTokenExGateway.cs— Main payment gateway implementation.ConfigurePayment.ascx— Commerce Manager payment-method editor UI.
Build the AuthorizeTokenEx.CSR project
- Open the
AuthorizeTokenEx.CSRproject and save the solution. - Rebuild the solution. NuGet should restore the
AuthorizeNetandEPiServer.Commerce.Corepackages automatically. If they are not restored, install them manually with the Package Manager Console commands shown above. - Rebuild the
EPiServer.Commerce.Payment.AuthorizeTokenEx.CSRproject. The build producesEPiServer.Commerce.Payment.AuthorizeTokenEx.CSR.dll.
The key build artifact is CSRExtensibility/react-app/dist/tokenExPayment.min.js, deployed to the front-end site. It contains the TokenEx payment-method component for the Order Management (CSR) user interface and the TokenExConfiguration registration shown below.
Register the TokenEx scripts with the Order Management UI by adding a configuration class:
using EPiServer.Commerce.UI.CustomerService.Extensibility;
using EPiServer.ServiceLocation;

namespace EPiServer.Commerce.Payment.AuthorizeTokenEx.CSR
{
    [ServiceConfiguration(typeof(CSRUIExtensionConfiguration))]
    public class TokenExConfiguration : CSRUIExtensionConfiguration
    {
        public TokenExConfiguration() => ResourceScripts = new string[]
        {
            "/CSRExtensibility/react-app/dist/tokenExPayment.min.js",
            "https://htp.tokenex.com/Iframe/iframe-v3.min.js"
        };
    }
}
Project structure
The project contains the following files and folders:
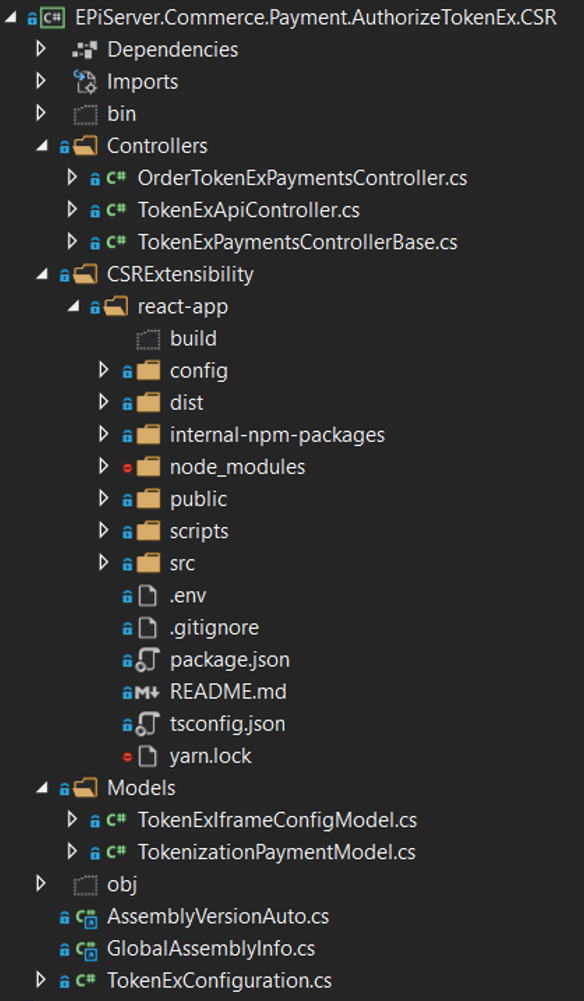
Controllers/TokenExApiController.cs— Generates the TokenEx configuration on demand.Controllers/TokenExPaymentsControllerBase.cs— Base controller for processing TokenEx payments.Controllers/OrderTokenExPaymentsController.cs— Processes TokenEx payments for an order. TokenEx does not support subscriptions.CSRExtensibility/— Contains the React application for the TokenEx component, built on the Order Management (CSR) extensibility feature.Models/TokenExIframeConfigModel.cs— Model for the TokenEx iFrame configuration sent to the client.Models/TokenizationPaymentModel.cs— Model representing a tokenized payment.TokenExConfiguration.cs— Registers TokenEx scripts with the Order Management (CSR) user interface (the same class shown in the code block above).
Set up Commerce Manager
- Open the
Commerce Manager Appsfolder in theOptimizely Commerce Managerproject. - Deploy
ConfigurePayment.ascxto theApps/Order/Payments/Plugins/AuthorizeTokenExfolder. If theAuthorizeTokenExfolder does not exist, create it. - Deploy
AuthorizeNet.dllandEPiServer.Business.Commerce.Payment.Authorize.dllto thebinfolder of your Commerce Manager site. - In your solution's Commerce Manager project, add references to the deployed DLLs and rebuild.
Configure AuthorizeTokenEx in Commerce Manager
After you deploy the files described in the previous section, open the Commerce Manager back-end site and follow these steps:
-
Go to Administration > Order System > Payments, then select the language for which you want to enable the AuthorizeTokenEx payment method (for example, English (United States)).
-
Click New to create a payment method.
-
For System Keyword, enter
AuthorizeTokenEx(the name of the folder you created during deployment). -
For Class Name, select
EPiServer.Business.Commerce.Payment.Authorize.AuthorizeTokenizationGatewayfrom the drop-down list. -
For Payment Class, select
EPiServer.Commerce.Order.Payments.Internal.TokenizationPaymentfrom the drop-down list.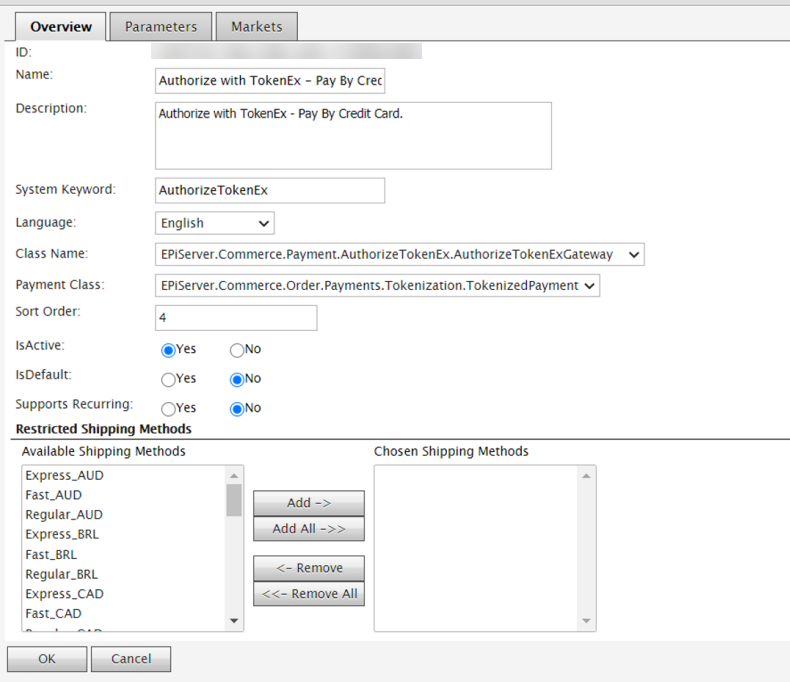
-
-
Click OK to save the AuthorizeTokenEx payment method.
-
Open the AuthorizeTokenEx payment method for additional editing.
-
Go to the Parameters tab and enter the following:
- API UserId — The API user name that Authorize.Net provides when you register for API access.
- Transaction Key — Your Authorize.Net API user password.
Configure AuthorizeTokenEx on the front-end site
-
Open your front-end site project.
-
Deploy
AuthorizeNet.dll,EPiServer.Commerce.Payment.Authorize.dll, andEPiServer.Commerce.Payment.AuthorizeTokenEx.CSR.dllto thebinfolder of your front-end site. -
In your front-end site project of your solution, add references to the deployed DLLs and rebuild.
-
In the root folder of the front-end site project, create the folder path
CSRExtensibility/react-app/distand copytokenExPayment.min.jsinto it.NoteYou can change the location for
tokenExPayment.min.js, but remember to updateTokenExConfiguration.cscorrespondingly. -
Edit the
appSettingssection ofweb.configto add the following keys:episerver:tokenization.TokenizationId— Your TokenEx account ID.episerver:tokenization.ClientSecretKey— Your TokenEx client secret key.episerver:tokenization.ApiKey— Your TokenEx API key.episerver:tokenization.TestMode—truefor the TokenEx sandbox,falsefor production.
NoteThe front-end site must run on HTTPS to use AuthorizeTokenEx.
Updated 12 days ago