Deploy Azure Web Apps in Commerce Connect
Describes how to set up an Optimizely Commerce Connect site to run on Azure websites.
Apply most steps through Visual Studio and NuGet package installations. See Azure Web Apps for an overview of the Azure platform.
Requirements
- An Azure Management Portal account with login details.
- A cloud-enabled license.
- Ensure each deployed application and module is designed to run in the cloud.
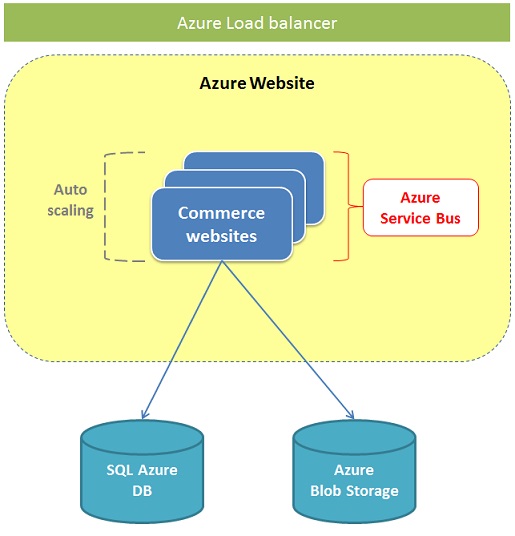
Like an Optimizely Content Management System (CMS) website on Azure, the Commerce Connect website runs on an Azure Web Apps environment with multiple instances. The website instances share the same Azure SQL database, and Azure Blob storage holds the file binary data. Load balancing is applied, and the Azure Service Bus manages events among the CMS websites.
Follow these steps to create a Commerce Connect website in an Azure Apps environment.
-
Create a basic CMS site.
a. Install the supported version of theEPiServer.CommerceNuGet package.
b. Install theEPiServer.Commerce.AzureNuGet package to the project.
c. Add the cloud license to the website. This is used and activated later, when deploying the website to Azure. -
Create Azure resources.
-
Update configurations.
-
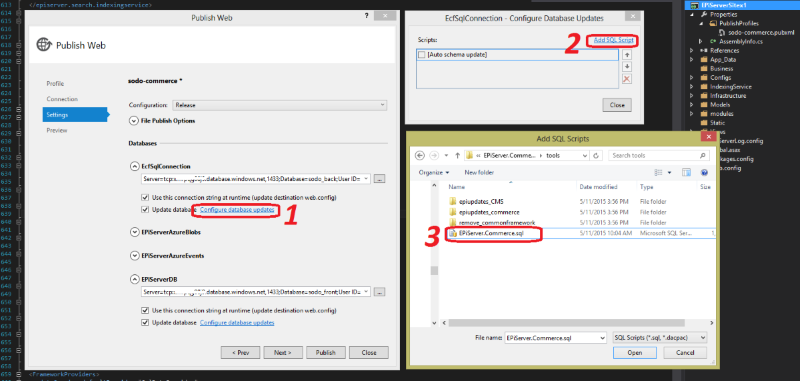
Deploy the Optimizely site. Because Commerce Connect has two databases, add two scripts in the Add SQL Script step:
EPiServer.Cms.Core.sqlunder<solution-dir>\packages\EPiServer.CMS.Core.x\toolstoEPiServerDBEPiServer.Commerce.sqlunder<solution-dir>\packages\EPiServer.Commerce.Core.x\toolstoEcfSqlConnection
-
When the database is successfully created, run the
Update-EPiDatabasecommand in the Package Manager Console. -
Change the site URL.
-
Build the site index.
a. Build the content index.
b. Rebuild the catalog index. In Commerce Admin, go to Administration > Search Index and select Rebuild Index. The catalog index is restored in your storage.NoteIf you are using
LuceneAzureSearchProvideras the default search provider, complete the following additional steps.- Open
appsettings.json, in the Commerce ConnectSearchOptionssection, set theDefaultSearchProviderkey toLuceneAzureSearchProvider. - Set your
connectionStringNameand storage keys pointing to your Azure storage connection string and index storage folder. Note that the Azure storageconnectionStringmust already exist in yourConnectionStringsection ofappsettings.json.
The following example shows search config in
appsettings.json, defined for using Lucene on Azure."SearchOptions": { "DefaultSearchProvider": "LuceneAzureSearchProvider", "IndexerBasePath": "indexcontainer", "IndexerConnectionString": "EPiServerAzureBlobs", "SearchProviders": [ { "Name": "LuceneAzureSearchProvider", "Type": "Mediachase.Search.Providers.Lucene.LuceneAzureSearchProvider, Mediachase.Search.LuceneSearchProvider", "Parameters": { "queryBuilderType": "Mediachase.Search.Providers.Lucene.LuceneSearchQueryBuilder, Mediachase.Search.LuceneSearchProvider", "storage": "indexcontainer", "simulateFaceting": "true", "connectionStringName": "EPiServerAzureBlobs" } } ], "Indexers": [ { "Name": "catalog", "Type": "Mediachase.Search.Extensions.Indexers.CatalogIndexBuilder, Mediachase.Search.Extensions" } ] } - Open
-
To improve the UI experience, enable WebSocket support.
Updated 12 days ago