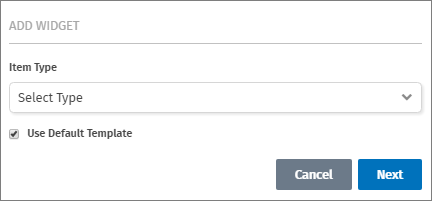
Add widget
Describes how to add widgets and configuring attributes.
ImportantClassic CMS reached end-of-life in January 2025 and is no longer receiving feature updates or bug fixes. You should migrate to Spire CMS.
Configured Commerce has a robust Content Management System that allows content editors and administrators the flexibility and control to easily design the look and feel of their website. Widgets are pre-configured content holders that allow you to rapidly add content to your pages without having to develop these elements. Widgets have a user interface that allow you to configure them to meet your needs.
The following steps show the general way to add a Widget to a site:
-
Click the Content Add button, which opens the Add Widget menu.

-
Choose the widget from the item Type, and select the template associated with the widget.
-
Each widget has a CSS class assigned to it. You can change the CSS class on any widget.

Widget class definitions must inherit from AbstractWidget. Customize the display name by decorating the class with the DisplayName attribute. If a DisplayName attribute is not used, the class name, by spacing camel casing, will be used by default. So "ContactUsForm" would default to "Contact Us Form". This class then becomes the Model in the MVC view.
[DisplayName("Form - Contact Us")]
		public class ContactUsForm : AbstractWidget
Use any one of the following attributes to decorate properties with functionality. These properties will then generate the appropriate input fields when editing pages or widgets in the CMS.
- AllowedChildren – Limit an AbstractPage so that it can only have children of a type specified.
- AllowedParents – List of pages that the widget is allowed to be added to.
- CheckBoxContentField – Uses CheckBox template.
- DatePickerContentField – Uses DatePicker template, includes a property to set whether to include time on the date.
- DropDownContentField – Uses DropDown template, contains a property for setting of values in the dropdown list.
- EnumDropDownContentField – Inherits from DropDownContentFieldAttribute, adds an Enum type as a list of values for a dropdown list.
- FilePickerContentField – Uses the FilePicker template. Allows setting of the ResourceType for the FilePicker, sets a default value of UserFiles.
- IntegerContentField – Inherits from TextContentFieldAttribute and sets the RegExValidation to enforce an integer value. Currently being used on the NewsList page for setting a default page size.
- ListContentField – Uses the List template. Allows adding content that contains a list of items, such as: on the Contact Form Edit Content screen you can Add multiple email addresses and Available Topics.
These attributes are built into the Configured Commerce framework located in the InSite.Content.Attributes namespace. Additional attributes can be built and extended to provide custom functionality within Configured Commerce.
For example the RichTextContentField provides a textbox with WYSIWIG functionality.
[RichTextContentField(IsRequired = true)]
  public virtual string SuccessMessage
  {
    get { return GetValue("SuccessMessage", "Your message has been sent.", FieldType.Variant); }
    set { SetValue("SuccessMessage", value, FieldType.Contextual); }
  }
The getters and setters for properties need to also make use of the methods GetValue and SetValue to properly persist data. FieldType.Contextual means the property value can vary by Context (Language, Persona, DeviceType). For fields that don't need to vary by context, FieldType.General can be used.
For example, Title needs to have a different value based on the current language.
It is possible to limit widgets by parent type. For example, the ZoneWidget can only be added to a TemplatePage.
For a given widget, such as RichContent, there can be one or more templates defined. If there is a need to create new functionality to display RichContent, an additional View could be added to the path of the RichContent folder.
Updated 3 months ago
