Install CMS 11 and Commerce Connect 13
Describes a first-time installation of Optimizely Content Management System (CMS) and Optimizely Commerce Connect websites with the latest updates, with or without sample templates, and Optimizely Search & Navigation, and other platform components.
NoteThis topic applies to versions Optimizely Content Management System (CMS 11) or Optimizely Commerce Connect version 13 and earlier, which are based on ASP.NET Framework.
For versions CMS 12 and Commerce Connect 14 and higher, based on ASP.NET Core, see Install Optimizely.
Prerequisites
You can install the desired Optimizely products individually, with or without sample templates. It is useful if you want to explore each product and its components or build a site from scratch with more control. You can also use the Optimizely Foundation reference architecture to get a solution with multiple products up and running.
Before installing, check the System requirements for Optimizely to ensure your installation environment has the required components and versions.
The following components are needed to follow the instructions described here:
- Use Microsoft Visual Studio to install and update Optimizely. (Community, Professional, or Enterprise)
- Optimizely Visual Studio extension is a full set of templates for MVC to get a jump-start when developing websites. To install the Optimizely extension:
- In Visual Studio, select Tools > Extensions and Updates.
- In the extensions window, select Online, and type episerver in the search box.
- Select CMS Visual Studio Extension and click Download (or Update if installed).
- Restart Visual Studio.
- The Optimizely NuGet feed source
<http://nuget.optimizely.com/feed/packages.svc/> added to your Visual Studio to add Optimizely Commerce Connect, Optimizely Search & Navigation, and other add-ons to your solution and upgrade your project with the latest. See Install Optimizely updates (CMS 11 and Commerce 13) on how to add the NuGet feed. - If your solution will be running in the cloud, follow the steps below to install the desired Optimizely components, and see Cloud deployment how to deploy the solution to cloud environments.
NoteYou can order a time-limited demo license for evaluation purposes—see Optimizely License Center (a license is not required when using IIS Express). You need a commercial Optimizely license for testing and production environments.
Install through reference architecture
The Optimizely Foundation reference architecture is an open-source option for installing an Optimizely solution with multiple products. Foundation offers a structured and modular starting point, allowing you to select products as projects to include or exclude from the solution. See Optimizely Foundation to learn how to install and get started.
Install CMS
Install a CMS website, empty or with the "Alloy" sample templates.
NoteThe description below applies to Visual Studio 2019. The steps are similar in Visual Studio 2017 and 2015. See Install Optimizely for a video illustrating the procedure.
-
Open Visual Studio and select File > New > Project.
-
Search for the Episerver Web Site project template, select it, and click Next.
-
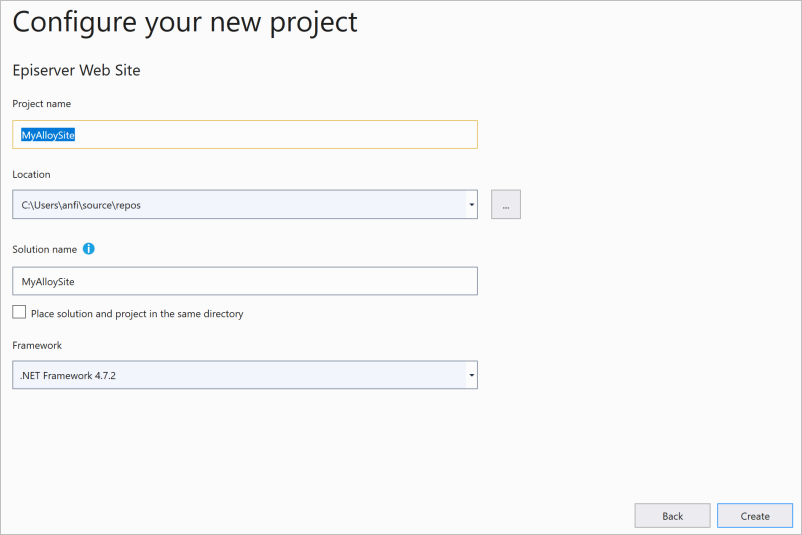
Provide a name for your project and click Create.
-
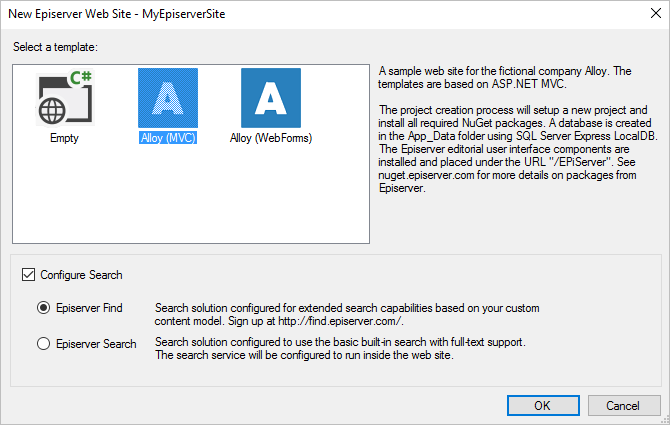
Select Alloy (MVC or WebForms) to create a site with sample content or Empty for a site without templates. You should use MVC for new projects because WebForms is deprecated.
-
Select a search option:
- For an Alloy site, select Episerver Find to use Optimizely Search & Navigation or Episerver Search to use a basic search.
- An empty site disables the Configure Search option and does not install the search. If desired, you can add Optimizely Search & Navigation or Episerver Search later.
-
Click OK. Visual Studio creates the project. When finalized, build and open the website in a browser.
-
Log in to the site:
- For an empty site, add /episerver to the site URL, and log in using your Windows credentials. For further information on configuring your empty project, see Create a starter project.
- For Alloy MVC, you will be prompted to create an administrator account (the site is using ASP.NET Identity). Provide the account credentials, click Register, and you will be logged in. See also Install a sample site.
- For Alloy WebForms, select the Log in link at the bottom of the start page, and log in using your Windows credentials. Note that you must be a local admin on the server you run Optimizely on. If not, create a local user with admin rights under Control panel > Local Users and Groups, and log in using that account.
Install Optimizely Commerce Connect
NoteThe description below applies to Visual Studio 2019. The steps are similar in Visual Studio 2017 and 2015. See Install Optimizely Commerce Connect for a video illustrating the procedure.
Empty Commerce site
These steps install an empty website locally with CMS and Optimizely Commerce Connect. Note that a Commerce installation has two sites: a front-end site with CMS and Optimizely Commerce Connect and a back-end site with Commerce Manager.
- To create a sample site locally with templates, see Install Quicksilver.
- To deploy an Optimizely Commerce Connect site to the cloud, see Install an Optimizely Commerce site to run on Azure Web Sites.
Part 1: Create the front-end site with CMS
- Open Visual Studio and select File > New > Project.
- Search for the Episerver Web Site project template, select it, and click Next.
- Provide a name for your project, and set the .NET Framework to 4.6.1 or higher.
- Click Create.
- In the Select a template dialog, select Empty and click OK. Visual Studio creates the project.
Part 2: Install Optimizely Commerce Connect components on the front-end site
- In Solution Explorer (CTRL + ALT + L), expand the project you just created, right-click on References, and select Manage NuGet Packages.
- In the Package source dropdown, select Episerver.
- Click Browse and enter Commerce in the search field.
- Select the
EPiServer.Commerce(main) package and click Install. - When the installation completes, a
Readme.txtfile displays. - Close the
Readme.txtfile, selectEPiServer.Commerce.UI.ManagerIntegrationand click Install, which adds the Commerce front-end components. - When the installation completes, a
Readme.txtfile displays.
Part 3: Create the back-end site
-
In the Solution Explorer, right-click the solution you created in part 1 and select Add > New Project.
-
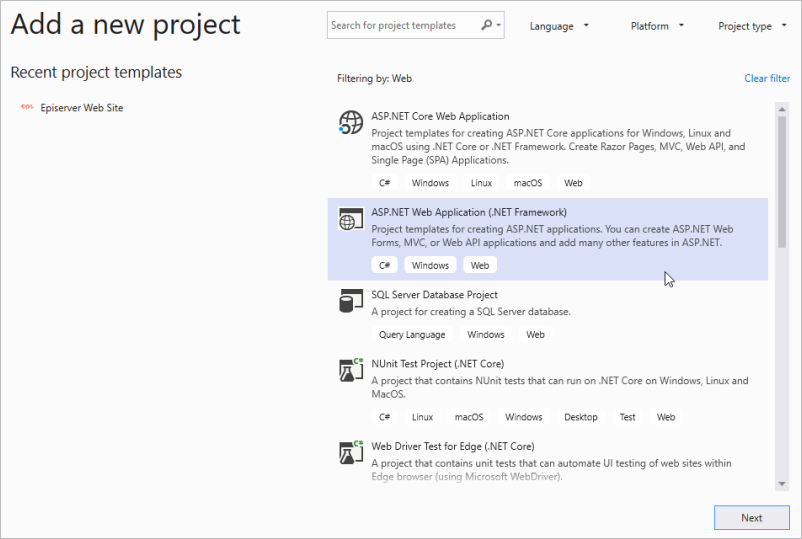
Select ASP.NET Web Application (.NET Framework) as the project type and click Next.
-
Give the project a name and click Create.
-
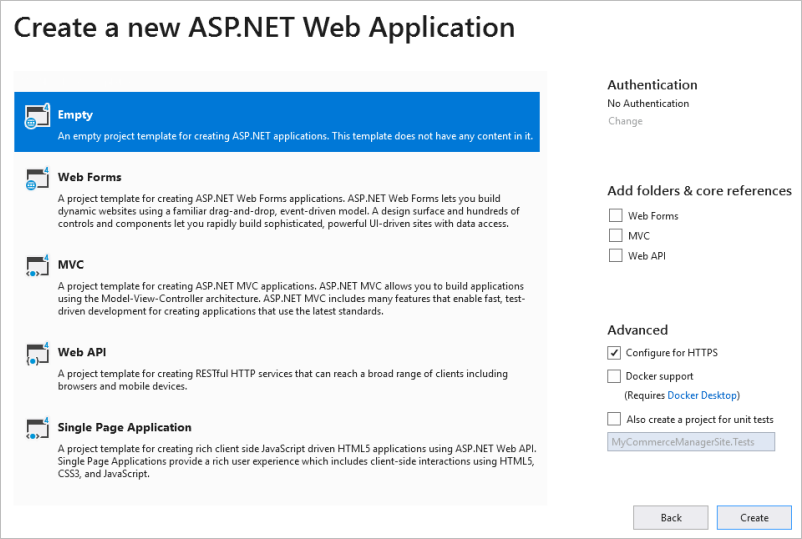
Select Empty and click Create.
Part 4: Install Commerce Manager on the back-end site
-
Right-click on the back-end site you created in part 3 and select Manage NuGet Packages.
-
In the Package source dropdown, select Episerver.
-
Click Browse and enter Commerce in the search field.
-
Select the
EPiServer.CommerceManagerpackage and click Install.
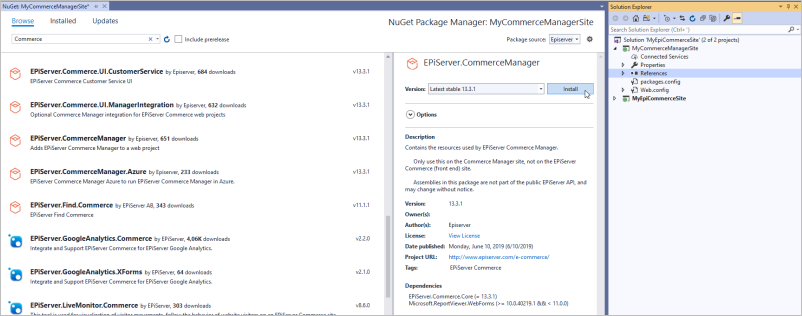
-
When installation completes, a
Readme.txtfile displays. -
Close the
Readme.txtfile and select theEPiServer.ServiceLocation.StructureMappackage and click Install, which adds an implementation of the ServiceLocation / Dependency Injection framework.
Part 5: Final steps
- Update the database.
a. Go to Tools > NuGet Package Manager > Package Manager Console.
b. At PM, enterupdate-epidatabase. - Build the solution (CTRL + SHIFT + B).
- Start the front-end site (Ctrl + F5).
- When prompted, log in using the default credentials admin/store (remember to change these later).
- If you see a page of migration steps, click Execute all pending steps.
- Verify that you can access the edit and admin views using
http://localhost:nnnnn/episerver(where nnnnn is the port number already displayed in the URL).
If you have difficulty accessing Commerce Manager from edit view:
- Right-click your back-end site with the Commerce Manager project in Visual Studio.
- Select Set as StartUp Project.
- Start the Commerce Manager site and log in.
- Make the front-end project the start-up project again.
To further set up your Commerce Connect project, continue with the project structure section on Create your project.
Install Optimizely Search & Navigation
Optimizely Search & Navigation consists of a service you sign up for and client packages you install on your site. See Create your project for instructions on how to add Search & Navigation to your solution.
Integrate Optimizely Search & Navigation with Commerce
This integration adds Commerce-specific functionality when using Optimizely Search & Navigation with Optimizely Commerce. To install this on your website, run the Search & Navigation content indexing job on the site after the EPiServer.Find.Commerce package is installed.
Install tracking and personalization
The Optimizely Personalization product suite adds personalized content and, product recommendations, and personalized search results to the site. Tracking and personalization components are based on services you sign up for and client packages you install on the site. See the following how to install and get started:
Install Marketing Automation components
The Marketing Automation product suite includes Optimizely Campaign for cross-channel automated campaign management and many marketing automation connectors for popular marketing tools like Delivra, Salesforce, and Microsoft Dynamics. Marketing automation components are based on services you sign up for and client packages you install on the site.
See the following how to install and get started:
Install other apps
You can extend Optimizely through applications (apps, also known as add-ons) that are available for a wide selection of areas, such as analytics, search optimization, and marketing automation. You install most apps as NuGet packages; see Optimizely add-ons and Install add-ons.
If your solution is using the Optimizely Digital Experience Platform cloud services, see DXP Requirements for supported apps.
Cloud deployment
There are different options for managing and deploying Optimizely solutions in the cloud. Before deploying, ensure that you have followed the requirements and recommendations to optimize your solution for cloud-based environments.
Updated 2 months ago
