Optimizely Social Reach
Describes Optimizely Social Reach that lets you use a single interface to share tailored and personalized content across social channels, including Twitter, Facebook and LinkedIn.
NoteOptimizely Social Reach is for CMS 11 and is not available on later versions of CMS.
Requirements
- No additional license fee.
- An Optimizely Content Management System (CMS) or Optimizely Customized Commerce installation.
- Accounts for the social channels to be used.
- See Add-ons platform compatibility for package and version information.
Install Social Reach
These instructions apply to Social Reach for CMS version 7.5 and higher. To install Social Reach, you need a working site with CMS 7.5 or higher, with a valid license installed.
- Versions 7.5 and higher are installed through NuGet.
Social Reach contains the following:
- Files – The installed files are located under Modules/Social.
- Virtual roles – The virtual roles SocialEditors and SocialAdmins are included in the default configuration. You can change the access rights as described in Change Default Access Rights.
- Providers – The social channels are created based on a provider model. Available example providers are Twitter, LinkedIn and Facebook. The shortening service is also based on a provider model. The available shortening service provider is bit.ly. Providers are registered in
web.configwith a default configuration to use Optimizely's accounts as follows:
<social>
  <providers>
    <provider name="Twitter"
              consumerKey=""
              consumerSecret=""
              type="EPiServer.Social.Providers.TwitterProvider, EPiServer.Social.Providers" />
    <provider name="LinkedIn"
              consumerKey=""
              consumerSecret=""
              type="EPiServer.Social.Providers.LinkedInProvider, EPiServer.Social.Providers" />
    <provider name="Facebook"
              consumerKey=""
              consumerSecret=""
              type="EPiServer.Social.Providers.FacebookProvider, EPiServer.Social.Providers" />
    <provider name="Bitly"
              providerType="UrlShortener"
              consumerKey=""
              consumerSecret=""
              type="EPiServer.Social.Providers.Bitly, EPiServer.Social.Providers" />
  </providers>
</social>
Change default access rights
You can change which roles that have access to the different views in Optimizely Social Reach by using the virtual roles SocialEditors and SocialAdmins through the <location> section in episerverframework.config and web.config for the following elements:
<location path="/modules/EPiServer.Social">
and
<location path="/modules/EPiServer.Social/Settings">
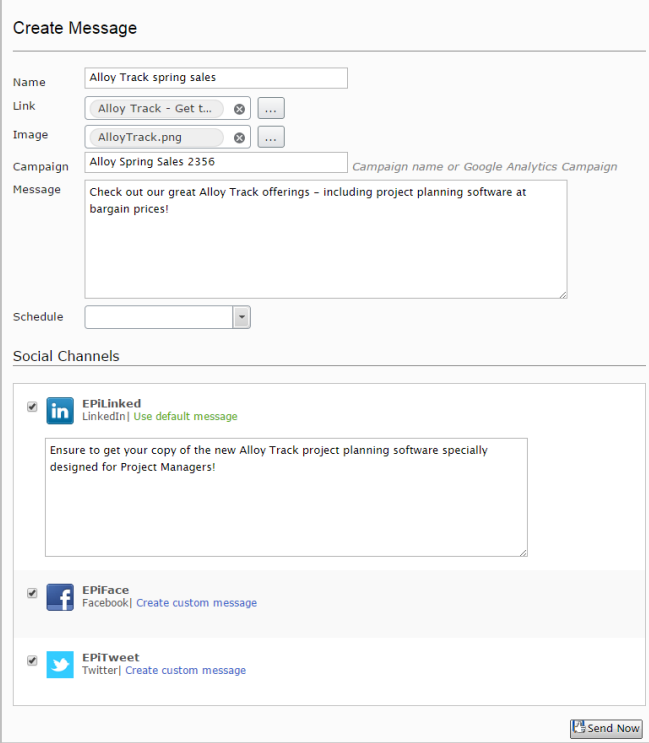
How the Social Reach App gadget constructs the auto-input message
This section explains how the Social Reach App gadget constructs the auto-input message. The message is created when a Social Reach user is posting a message and selects a link. Social Reach then populates the message's Name and Message fields by extracting information from the link per the following logic. The user can accept the values or edit them before sending the message.
- The widget gets the
contentlinkfrom Edit View and sends it to the OutReach panel. - In the OutReach panel, the widget extracts
contentDatafrom thecontentLink. - Using the following components, the widget populates the OutReach UI components.
message.Name = contentData.Namemessage.MessageBody = contentData\["MetaDescription"\]or"MainBody"or"Info\_Description"(in priority order).
Additional explanation of MessageBody
OutReach uses the contentData meta-description property if it exists.
- If that property has no value, OutReach uses the
MainBodyproperty. - If that property has no value, OutReach uses the
Info_Descriptionproperty.
See also: Social Reach Add-on
Updated 10 days ago