Optimizely Live Monitor
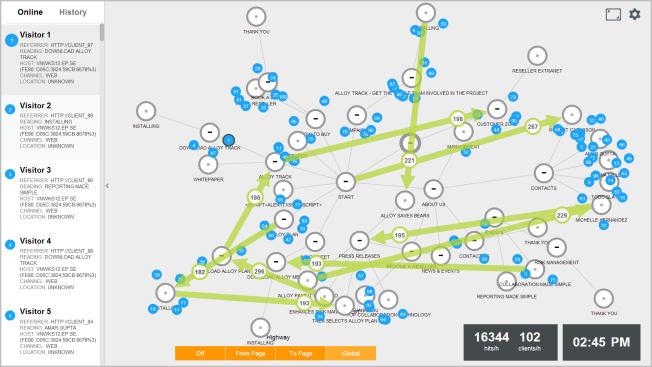
Describes Optimizely Live Monitor, which provides a real-time overview of the content structure on your website, reflecting the traffic and what parts visitors are currently browsing.
NoteOptimizely Live Monitor is for CMS 11 and Commerce 13 and is not available on later versions of CMS.

Requirements
- No additional license fee.
- An Optimizely Content Management System (CMS) website.
- SignalR is installed on the website; see Configuring Live Monitor.
- See Add-ons platform compatibility for package and version information.
Install
NoteVersion 7.17 (released February 2015) of Live Monitor (LIMO) is based on HTML5. From version 7.17 and higher, Optimizely Live Monitor is installed as a NuGet package in Visual Studio. From version 7.5.446, you can install EpiTrace/Live Monitor using NuGet. Earlier versions (former EpiTrace) where installed as .msi files from Optimizely Deployment Center (DC). Lower versions are available as zip files for download.
- Install Optimizely Content Management System (CMS) using the Visual Studio extension.
- Optionally update the NuGet packages.
- Install the
EPiServer.LiveMonitorNuGet package. - Configure OWINStartup.
Configure Live Monitor
This section describes how to configure the Optimizely Live Monitor app. You can customize the themes and animations.
NoteEach time you install a new version of Live Monitor to click Settings in the Live Monitor user interface settings > Reset Settings to get the latest settings of the new version.
Requirements
- Installation of Episerver (Optimizely Content Management System) CMS 7.5 and higher
- Installation of Microsoft .NET Framework 4.5.1
- SignalR 2.0.3 setup for the add-on to work on the website, see Configure SignalR.
- Enable WebSocket support for IIS8 on Windows 8/Windows 2012. SignalR supports long-polling and WebSocket for message transportation. Using WebSocket is more efficient for network utilization if you have IIS 8 (and higher) on Windows 8 /Windows 2012 (and higher), see Use WebSocket in .NET 4.5.
- Ensure that your "master page" (
_root.cshtml) has@Html.RequiredClientResources("Header")before the</head>tag, and@Html.RequiredClientResources("Footer")before the</body>tag.
Change the configuration settings
Configuration is done in LiveMonitor.config.
You can change the following configuration settings:
-
pushInterval– The time interval (in seconds) for collecting visits before sending to the dashboard. When server detects a visit of a visitor to a page, server will start to collect all visits in pushInterval amount of time and then pushes to the dashboard. The default value is set to 0.5 seconds, which is a suitable setting for normal traffic and visits are shown in the dashboard almost immediately. In case the traffic is high and/or there are a lot of visitors visiting the site, you can change to a higher value to prevent the dashboard from overloading. visitorActiveEntryTimeout– The time amount in minutes from the last activity of a visitor when the visitor is considered online. Default is2minutes.visitorHistoryEntryTimeout– The time amount in minutes from the last activity of a visitor when the visitor are not considered online but still in the history list. This should be set to the Session.Timeout of .NET for correct behavior. Default is5minutes.collectingTransferTimeWindow– The time amount in hours for collecting transfers to show statistics data about transfers (From Page/To Page/Global). Default is 24 hours.themes– The collection of implemented themes that can be chosen from the user interface settings. A theme can be selected from the Live Monitor user interface settings.defaultTheme– The name of the default theme for the first time loading the Live Monitor board. Default isFlatLight.
realtimeTransportsignalRUrl– The default route URL, which visitors will use to connect to your hub. In most cases the default SignalR will work on “wwwroot/signalr”. However, if it already exists a folderwwwroot/signalrused by another app, a conflict will cause the default SignalR not to work. In that case, you can change the base URL by writing your own custom OWINStartup class. In that class, you must call the classapp.MapSignalR("/EXAMPLEPATH", new HubConfiguration()). When you have this class, changeEXAMPLEPATHto the path you want the custom startup class (the new default path of signalR) to point to in your configuration. TheOWINStartupclass can be written in any DLL of the website. See the Microsoft article about OWINStartup class.
monitoringTarget– The root where you to start monitoring from. Most often Live Monitor is set up with the start page on the website as root, but any page can be used as root.contentId– Where you define the ID of content to start monitoring from. Example:10or123456__CatalogContent. Default is1.
Create Live Monitor extensions
The Live Monitor extension is a custom tracker that you can modify. You can create it to track specific content types or show additional information about your site visitors.
The Live Monitor - Commerce Support extension enables the monitoring of three types of Optimizely Customized Commerce content:
EPiServer.Commerce.Catalog.ContentTypes.NodeContentEPiServer.Commerce.Catalog.ContentTypes.ProductContentEPiServer.Commerce.Catalog.ContentTypes.VariationContent
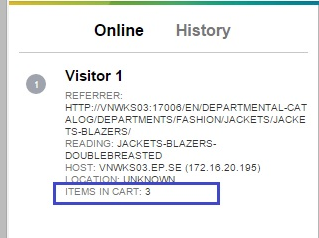
The Live Monitor main package provides user information related to Optimizely Customized Commerce, along with basic user information, as shown in the following image.
Placed orders– The number of orders placed by the user is displayed for logged-in users only because order history can be retrieved only for logged-in users, and this information is useful only when a user is logged in.Last orders– Information about the current user’s last order, displayed for logged-in users only. The last order’s total and date are provided.Cart total– Total number of current user’s shopping carts.Items in cart– Number of items in the current user shopping cart.
Information is retrieved by using Optimizely Commerce services (Mediachase.Commerce).
When you create the Live Monitor extension, you should make a tracker that extends the ModuleTrackerBase (unless you want to make it entirely yourself). Live Monitor uses trackers to generate the tracking URL and process data received by the tracker handler. Live Monitor trackers must implement the EPiServer.LiveMonitor.Services.ITracker interface. In the Live Monitor main package, the ModuleTrackerBase class implements the EPiServer.LiveMonitor.Services.ITracker interface and provides validation before performing further actions.
Custom module tracker that implements the ITracker interface
The ITracker interface defines two methods:
-
string BuildTrackingUrl(string trackingUrl, ContentData contentData)You manipulate the tracking URL by adding query strings that serve information necessary for processing in the
ProcessingTrackingRequest()method. You can retrieve the query strings added here in theProcessingTrackingRequest()method from theHttpContextobject. -
void ProcessTrackingRequest(ref MonitoringData monitoringData, HttpContextBase context)You can retrieve information from the
HttpContextBaseobject, or you can set other services to the monitoring data object to provide information about the current hit (such as the action of opening a page). The Live Monitor Visitor Panel displays the information as visitor information.Set the
NodeIdandVisitorIdon themonitorigDataobject; without them, the current hit is not processed.
NoteTo bypass any concrete content data (pages) or any types of content, do not set the necessary data fields for the
monitoringData(NodeId, VisitorId).
You can add custom information to the PropertyBag of monitoringData. See the Show custom information about visitors section.
Module tracker, which inherits the ModuleTrackerBase
ModuleTrackerBase filters content data types to be tracked by Live Monitor and filters tracking requests to be processed. Based on content types and the request validation logic provided by the module, the ModuleTrackerBase validates before building the tracking URL or processing a tracking request.
ModuleTrackerBase exposes the following abstract methods that need to be implemented by the module in the extension.
-
protected abstract ITypeFilter TypeFilter { get; }Specifies the content types filter for the module to be tracked. Only content types allowed by the type filter are tracked. See the Define a TypeFilter section to create a type filter.
-
protected abstract string AddParamsToTrackingUrl(string trackingUrl, ContentData contentData);Adds the query string to the tracking URL and returns the modified tracking URL.
-
protected abstract bool IsValidRequest(HttpContextBase context);Validates a tracking request before processing in
ITracker.ProcessingTrackingRequest, such as checking for the existence of a query string in the context. -
protected abstract void AddData(ref MonitoringData monitoringData, HttpContextBase context);Set basic data fields for the
monitoringDataobject. You must set at least the two required fields (NodeId,UserId) to make themonitoringDatavalid. You can add custom data to thePropertyBagof themonitoringData.
Define a TypeFilter
Live Monitor uses TypeFilter to filter the types of content (nodes) displayed on the Dashboard UI.
NoteEvery module needs to create a
TypeFilter. If the module does not provide aTypeFilter, no nodes are visible in the UI.
The following example shows how to define a custom TypeFilter by inheriting from the LiveMonitor.Services.TypeFilter:
public class CustomTypeFilter: LiveMonitor.Services.TypeFilter {
  public CommerceTypeFilter(): base( /*string*/ typefilterName,
    new List < Type > () {
      /* list of allowed content types*/ }) {}
}
Show custom information about visitors
To show information about visitors browsing the site along with the basic information provided by Live Monitor main package, follow these steps.
-
Define the key for the field. For example,
"itemsincart".monitoringData.PropertyBag[“itemsincart”] = 3 /*number of item in cart*/ -
Create a node in the embedded language file corresponding to the key (defined in step 1) to translate the property name on the Visitor Panel to the necessary languages. The following example shows how the node should be structured:
<?xml version="1.0" encoding="utf-8" standalone="yes"?>
<languages>
  <language name="English" id="en">
    <livemonitor>
      <components>
        <listbox>
          <extrainfo>
            <itemsincart>Items In Cart</itemsincart>
          </extrainfo>
        </listbox>
      </components>
    </livemonitor>
  </language>
</languages>
The custom user information displays in the Visitor Panel, as shown.

Updated 2 months ago
