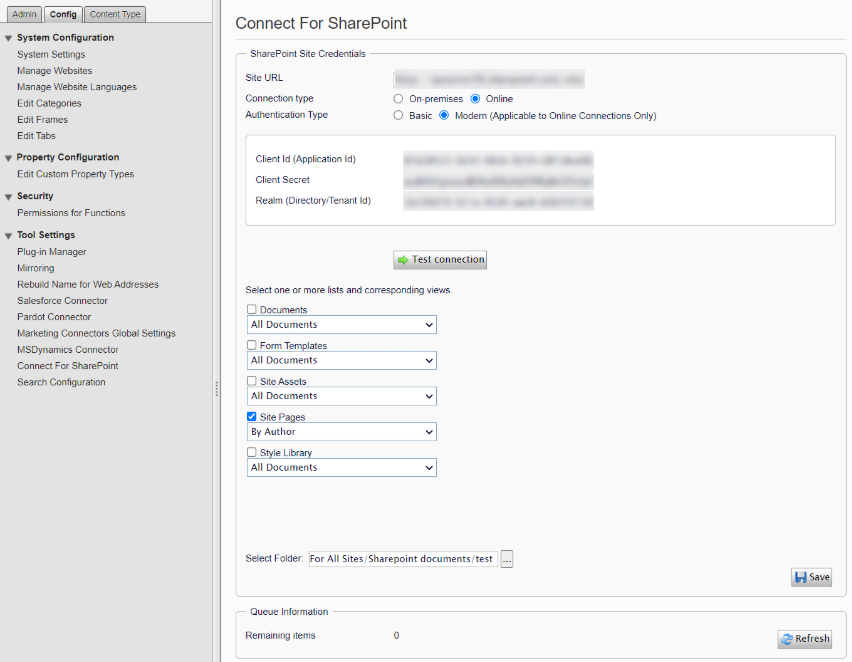
Optimizely Connect for SharePoint
Describes Optimizely Connect for SharePoint, which provides a transparent connection between Optimizely Content Management System (CMS) and Microsoft SharePoint.
NoteOptimizely Connect for Sharepoint is for CMS 11 and is not available on later versions of CMS.
The connector copies documents, blocks, or other items from SharePoint document libraries and lists these automatically.
You can manually schedule and manage updates available in CMS as media or blocks. Additionally, developers can manipulate documents or blocks as they transfer to customize applications to specific CMS requirements.
Requirements
- Contact Support to request a license
- A SharePoint license
- SharePoint versions 2013, 2016, 2019, or SharePoint Online
- An Optimizely Content Management System (CMS) installation
- See Add-ons platform compatibility for package and version information
- See User guide: Optimizely Connect for Sharepoint
Install
- Versions 7.5 and higher are installed through NuGet
- Lower versions are available as zip files for download
About the installation
The Optimizely SharePoint connector is installed as a NuGet package.
When you install the SharePoint NuGet package, a third-party dependency adds the following entry in web.config, but because the entry is already in web.config, it causes a duplicate name error. You can fix the duplicate name error by changing the name of ExtensionlessUrlHandler-Integrated-4.0 to something else.
<add name="ExtensionlessUrlHandler-Integrated-4.0"
     path="."
     verb=""
     type="System.Web.Handlers.TransferRequestHandler"
     preCondition="integratedMode,runtimeVersionv4.0" />
About ISharepointProcessor
The ISharePointProcessor interface lets you implement a class to override or enhance how Optimizely processes SharePoint objects. For example, you want to add a prefix to filenames as you copy the SharePoint files to the Optimizely CMS, filter specific file types from being copied to the Optimizely CMS, or notify a user after you copy the files.
ISharePointProcessor interface
The ISharePointProcessor interface has the following methods:
AddDocument– Adds a document to the data store.AddFolder– Adds a folder to the data store.DeleteDocument– Deletes a document from the data store.DeleteFolder– Deletes a folder from the data store.UpdateDocument– Updates (overwrites) a document in the data store.UpdateFolder– Updates (overwrites) a folder in the data store.
Install the SharePointProcessor example
The SharePointProcessor example code consists of two classes:
InitializeModule.cs. Implements thePackageInitializerclass, which registers the demo processing module.DemoProcessor.cs.DemoProcessoris for demonstration purposes only. The sampleDemoProcessorimplementation calls the default behavior of the existing SharePoint processor and describes how to override the default behavior to extend or enhance it. You can create a class that inheritsISharePointProcessorso that when you initialize it, it overrides the default SharePoint processor.
NoteYou can have only one overriding processing service.
To install the SharePointProcessor example code:
- Create a project in Visual Studio.
- Copy the DLL that contains your processor implementation into the
binfolder of your solution. - Restart the web server.
Register your processor
Register your SharePoint processor using the service locator in Optimizely, as shown in the following example:
private void InitializationEngine_InitComplete(object sender, EventArgs e) {
  _serviceLocator.Buildup(_processor); // Register our processor
}
Demo Processor
The demo processor class implements the ISharePointProcessor interface. The default implementation of each method is to call the default processor. For example:
public void AddFolder(SPListItem item) {
  // Do some custom processing
  // Optionally call the default processor
  defaultProcessor.AddFolder(item);
}
NoteThe demo processor reads only the metadata for a specific document in SharePoint and sends the metadata to the plugin processor methods. The demo processor and the
AddDocumentmethod show how to retrieve the data use the default SharePoint processor by calling the default processor’sgetFileStream(item)method, as shown in the following code samples.
InitializeModule.cs
using EPiServer.ConnectForSharePoint.Messaging;
using EPiServer.Framework;
using EPiServer.Framework.Initialization;
using EPiServer.Packaging;
using EPiServer.ServiceLocation;
using System;
using System.Threading;

namespace DemoSharepointProcessor {
  /// <summary>
  /// Episerver Module initializer for this plugin.
  /// </summary>
  [InitializableModule]
  [ModuleDependency(typeof (EPiServer.Web.InitializationModule))]
  public class InitializeModule: PackageInitializer {
    IServiceLocator _serviceLocator;
    ISharePointProcessor _processor;

    public InitializeModule() {
      // Get the service locator from the environment
      _serviceLocator = ServiceLocator.Current;
      _processor = new DemoProcessor();
    }

    /// <summary>
    /// For unit testing
    /// </summary>
    /// <param name="serviceLocator"></param>
    internal InitializeModule(IServiceLocator serviceLocator, ISharePointProcessor processor) {
      // Use the Mocked service locator passed in
      _serviceLocator = serviceLocator;
      _processor = processor;
    }

    public override void Initialize(InitializationEngine context) {
      context.InitComplete += InitializationEngine_InitComplete;
    }

    private void InitializationEngine_InitComplete(object sender, EventArgs e) {
      _serviceLocator.Buildup(_processor); // Register our processor
    }

    public override void AfterInstall() {}
    public override void AfterUpdate() {}
    public override void BeforeUninstall() {}
  }
}
DemoProcessor.cs
For example, you can add a prefix to filenames you bring into media from SharePoint.
- Add
item.File.Name = "EPi" + item.FIle.Name;in the AddDocument section, just after the codevar data = defaultProcessor.getFileStream(item);. - Build
DemoProcessor.cs. - Run the SharePoint connector to upload the
Sample.txtsample file. The customDemoProcessorchanges the file's name and passes it to the default processor, which copiesSample.txttoEPiSample.txtin the media store.
using EPiServer.ConnectForSharePoint.Messaging;
using EPiServer.ConnectForSharePoint.Models;
using EPiServer.ServiceLocation;
using EPiServer.ConnectForSharePoint.Helpers;

namespace DemoSharepointProcessor {
  [ServiceConfiguration(ServiceType = typeof (ISharePointProcessor))]
  public class DemoProcessor: ISharePointProcessor {
    private SharePointProcessor dp;

    // Default processor that adds documents and folders to EPiServer (optional)
    private SharePointProcessor defaultProcessor {
      get {
        if (dp == null)
          dp = new SharePointProcessor();
        return dp;
      }
    }

    public void AddDocument(SPListItem item) {
      // Do some custom processing

      // The splistitem does not contain the data stream associated with the file.
      // The following line is an example of how to get the data associated with the SPListItem
      SharePointProcessorHelper helper = new SharePointProcessorHelper();
      var rawdata = helper.GetDocumentStream(item);

      // Optionally call the default processor - note that the default processor
      // also gets the data stream so that the data can be inserted into EPiServer
      defaultProcessor.AddDocument(item);
    }

    public void AddFolder(SPListItem item) {
      // Do some custom processing

      // Optionally call the default processor
      defaultProcessor.AddFolder(item);
    }

    public void AddListItem(SPListItem item) {
      // Do some custom processing

      SharePointProcessorHelper helper = new SharePointProcessorHelper();
      var rawdata = helper.GetRawListItemData(item);
      var dictionary = helper.GetMetaData(item.ParentList);
      var fields = helper.ParseRawListItemData(dictionary, rawdata);

      // Optionally call the default processor
      defaultProcessor.AddListItem(item);
    }

    public void DeleteDocument(SPListItem item) {
      // Do some custom processing

      // Optionally call the default processor
      defaultProcessor.DeleteDocument(item);
    }

    public void DeleteFolder(SPListItem item) {
      // Do some custom processing

      // Optionally call the default processor
      defaultProcessor.DeleteFolder(item);
    }

    public void DeleteListItem(SPListItem item) {
      // Do some custom processing

      // Optionally call the default processor
      defaultProcessor.DeleteListItem(item);
    }

    public void UpdateDocument(SPListItem item) {
      // Do some custom processing

      // Optionally call the default processor
      defaultProcessor.UpdateDocument(item);
    }

    public void UpdateFolder(SPListItem item) {
      // Do some custom processing

      // Optionally call the default processor
      defaultProcessor.UpdateFolder(item);
    }

    public void UpdateListItem(SPListItem item) {
      // Do some custom processing

      // Optionally call the default processor
      defaultProcessor.UpdateListItem(item);
    }
  }
}
Register the Connect for SharePoint app
-
Log on to the Azure portal using your global admin user account.
-
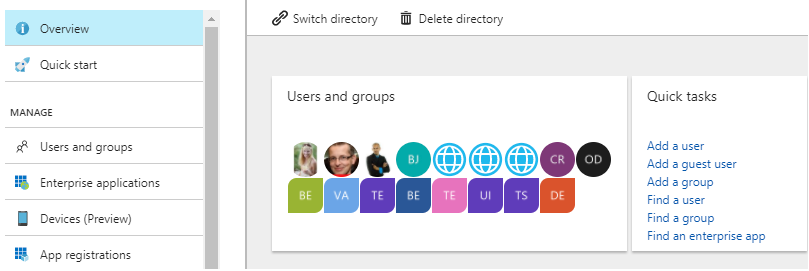
Go to Azure Active Directory.
-
Click App registrationsin the navigation panel—the App registrations page displays.
-
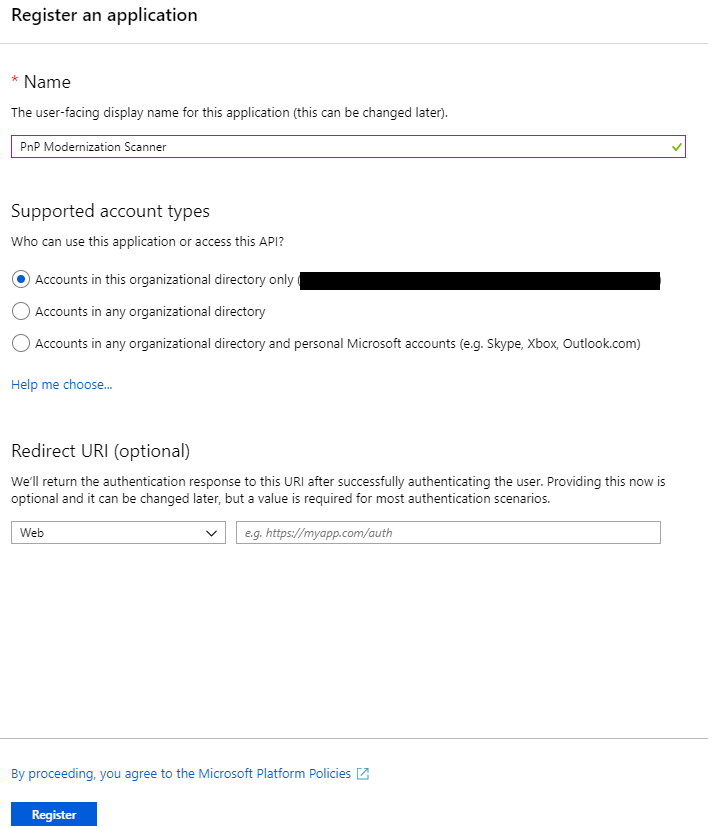
Click New registration. The Register an application page displays.
-
In the Name box, enter a name for the app.
-
Under Supported account types, select Accounts in this organizational directory only (tenant_prefix - Single tenant).
-
Click Register.
 Important
Copy and paste the following values in a document that you can access later. You will enter these values in the Optimizely software when you complete the Office 365 guided setup.
Application ID
Directory ID -
In the navigation panel, click API permissions.
-
Click Add a permission.
-
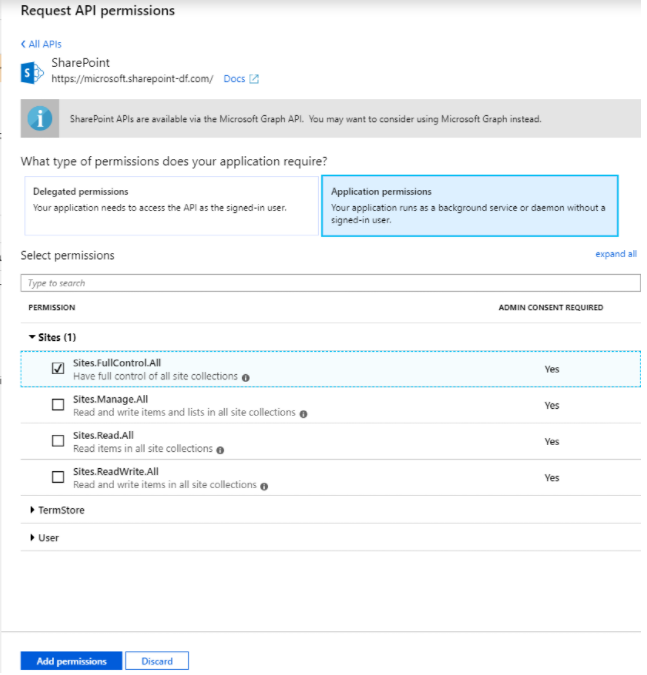
Click Microsoft Graph and complete the following steps:
a. Click Application permissions.
b. Select the User.Read permission.
-
Click Add permissions.
-
Click Grant admin consent for tenant_name.
-
Click Yes.
-
In the navigation panel, click Certificates & secrets. The Certificates & secrets page displays.
-
Click New client secret. The Add a client secret dialog box displays.
-
Enter a description, and then optionally select Never expire.
-
Click Add.
-
Copy and paste the client secret value in a document you can access later. You will enter this value when you complete the Office 365 guided setup.
-
To assign full permissions to the tenant to back up SharePoint sites, go to the tenant URL in your browser. For example, go to
https://<office_365_tenant_URL>/_layouts/15/appinv.aspx. The SharePoint admin center page displays. -
In the App ID box, enter the application ID you recorded earlier and then click Lookup. The application's name appears in the Title box.
-
In the App Domain box, type
tenantname.onmicrosoft.com. To get the correct domain name, go to the Microsoft Azure website, Custom domain names. -
In the App's Permission Request XML box, type the following XML:
<AppPermissionRequests AllowAppOnlyPolicy="true"> <AppPermissionRequest Scope="http://sharepoint/content/tenant" Right="FullControl" /> <AppPermissionRequest Scope="http://sharepoint/social/tenant" Right="Read" /> </AppPermissionRequests> -
Click Create.
-
Click Trust It.
Updated 9 days ago