
Configure Real-Time Audiences to personalize CMS
Configure real-time CMS personalization with Optimizely Data Platform (ODP) to enhance user experiences and drive engagement.
Optimizely Data Platform (ODP) lets you achieve real-time personalization with product and customer information in your Optimizely Content Management System (CMS) website. This capability is available even if your site is not ecommerce focused. Personalize content based on your visitors' interests in your content rather than on your products.
Personalization in CMS lets you target website content to selected audiences (formerly called visitor groups). You create audiences based on a set of personalization criteria. CMS provides a set of criteria, such as the number of visits, referring search phrases, access to the site on certain devices, or passing a campaign query parameter in the URL.
After you have defined your audiences, you can personalize content by creating blocks and markup tailored specifically to each audience. For visitors who do not match any predefined audience, you can offer fallback content to ensure a seamless experience.
Link your CMS audiences with ODP real-time audiences to gain expanded data and insights about your platform visitors. With ODP, you can enrich your audience profiles by incorporating criteria from channels including mobile, customer relationship management (CRM) systems, and social channels.
Prerequisites
- Optimizely Content Management System (CMS)
- Optimizely Data Platform (ODP)
- Add the ODP snippet to your site
Important
The ODP snippet is optional if you do not use ODP as your customer data platform (CDP) and are implementing the audience sync version of this integration. You can also use automatic tracking snippet injection instead of adding the snippet manually.
- Have real-time audiences configured in ODP (pre-built or custom)
Integration considerations
- Third-party customer data platform (CDP) – If you do not use ODP as your CDP, you still need an ODP account. However, you do not need to implement the ODP snippet on your site. To configure real-time audiences for CMS integration using a third-party CDP, see Integrate with other CDPs.
- ODP – If you use ODP as your CDP, see Configure Real-Time Audiences for Web Experimentation.
- Performance – The audience membership check makes a synchronous call to the ODP GraphQL API on the request thread (on cache miss only). For high-concurrency scenarios, tune cache time-to-live (TTL) values to minimize API calls.
- Visitor identification – Without a valid visitor identifier, the criterion cannot evaluate membership. The default identifier is the
vuidcookie — the anonymous visitor ID set by the ODP JavaScript snippet — but you can configure custom identifiers.
Install the ODP package
Install the official Optimizely.Cms.Odp NuGet package to add ODP audience-based personalization criteria to your CMS site.
Install the NuGet package
dotnet add package Optimizely.Cms.OdpRegister in Startup.cs
Startup.csusing Optimizely.Cms.Odp.Extensions;
public class Startup
{
private readonly IConfiguration _configuration;
public Startup(IConfiguration configuration)
{
_configuration = configuration;
}
public void ConfigureServices(IServiceCollection services)
{
services
.AddCms()
// ... other registrations
.AddOptimizelyOdp(_configuration);
}
public void Configure(IApplicationBuilder app)
{
app.UseStaticFiles();
app.UseOptimizelyOdp();
// ... other middleware
}
}UseOptimizelyOdp() adds the tracking snippet injection middleware. Place it after UseStaticFiles() so it does not process static assets.
Configure in appsettings.json
appsettings.jsonEach ODP account is defined as a named entry under Instances:
NoteIf your ODP account is hosted in another region, change the
ApiBaseURL below to your region's endpoint before running this integration. See the ODP API reference to find the correct value for your region.
{
  "Optimizely": {
    "Odp": {
      "ApiBase": "https://api.us1.odp.optimizely.com",
      "Instances": {
        "My ODP Account": {
          "PrivateApiKey": "YOUR_PRIVATE_KEY",
          "PublicApiKey": "YOUR_PUBLIC_KEY"
        }
      }
    }
  }
}
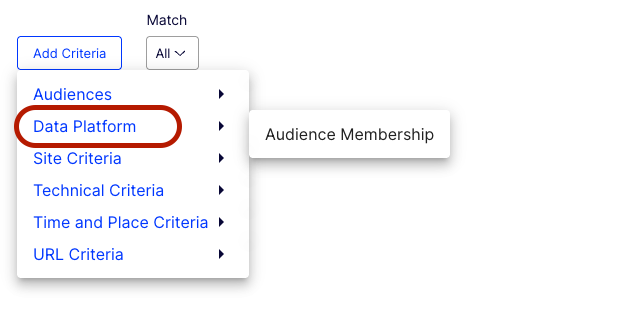
After installation, the Data platform > Audience Membership criterion — a rule you add to a CMS audience — becomes available in the audience editor.
Configuration reference
ImportantThe package validates ODP configuration at application startup. Missing or invalid required settings — such as an empty
PublicApiKey, a missingTracking.Sitesarray when tracking is enabled, or a site name that does not match any CMS site definition — will prevent the application from starting. Review your configuration carefully before deploying.
Root settings
These apply as defaults to all instances unless overridden at the instance level:
| Property | Type | Default | Description |
|---|---|---|---|
ApiBase | string | required | ODP API base URL (for example, https://api.us1.odp.optimizely.com) |
AudiencesCacheTimeoutSeconds | int | 300 | How long the audience list is cached (seconds) |
MembershipCacheTimeoutSeconds | int | 60 | How long membership check results are cached (seconds) |
CacheSizeLimit | long | 1024 | Maximum number of cached entries |
ApiTimeoutSeconds | int | 10 | HTTP request timeout for ODP GraphQL API calls such as audience list fetching and membership checks (seconds) |
ApiCircuitBreakerFailureThreshold | int | 5 | Minimum number of failures within the sampling window before the circuit breaker opens (minimum 2) |
ApiCircuitBreakerDurationSeconds | int | 30 | How long the circuit breaker stays open before allowing a probe request (seconds) |
Identifiers | array | [{ "Field": "vuid" }] | Visitor identifiers to resolve from cookies or query strings |
Instances | object | required | Dictionary of named ODP instances (see Instance settings) |
Instance settings
Each entry under Instances represents an ODP account. Instance-level values override the root defaults:
| Property | Type | Default | Description |
|---|---|---|---|
PrivateApiKey | string | required | Server-side API key for audience queries |
PublicApiKey | string | required | Client-side API key (must be unique across instances) |
ApiBase | string | inherited | Override the root API host for this instance |
AudiencesCacheTimeoutSeconds | int | inherited | Override the root audience cache TTL |
MembershipCacheTimeoutSeconds | int | inherited | Override the root membership cache TTL |
Identifiers | array | inherited | Override the root identifier list |
ApiTimeoutSeconds | int | inherited | Override the root API timeout |
ApiCircuitBreakerFailureThreshold | int | inherited | Override the root circuit breaker threshold |
ApiCircuitBreakerDurationSeconds | int | inherited | Override the root circuit breaker duration |
Tracking | object | disabled | Tracking snippet injection settings (see Instance tracking settings) |
Instance tracking settings
| Property | Type | Default | Description |
|---|---|---|---|
Enabled | bool | true | Enable automatic ODP tracking snippet injection for this instance |
Sites | array | required when enabled | List of CMS site names this instance serves. Each CMS site can only belong to one instance |
SnippetUrlTemplate | string | https://tag.odp.optimizely.com/v2/{PublicApiKey}/snippet.json | URL template for fetching the tracking snippet. {PublicApiKey} is replaced at runtime |
CacheTimeoutSeconds | int | 300 | How long the fetched snippet HTML is cached (seconds) |
SnippetTimeoutSeconds | int | 5 | HTTP timeout for fetching the tracking snippet from CDN (seconds) |
InjectionLocation | string | HeadEnd | Where to inject the snippet: HeadEnd (before </head>) or BodyEnd (before </body>) |
Cache tuning
The package uses an in-memory cache to avoid redundant API calls. Each unique visitor-audience combination is cached as a separate entry. When a page with ODP audience criteria is requested and the visitor's membership result is already cached, no API call is made.
CacheSizeLimitcontrols the maximum number of entries the cache can hold. The default of1024may not be sufficient for high-traffic sites. Increase this value based on your expected number of active visitors within the membership cache TTL window.MembershipCacheTimeoutSecondscontrols how long each membership result is cached. The default of60seconds means a visitor's audience membership is re-checked at most once per minute. Increasing this reduces API load but delays personalization changes for returning visitors.
Identifier configuration
By default, the package identifies visitors using the vuid cookie set by the ODP JavaScript snippet. You can configure additional identifiers:
{
  "Optimizely": {
    "Odp": {
      "Identifiers": [
        { "Field": "vuid" },
        { "Field": "email", "CookieName": "user_email" }
      ]
    }
  }
}
Each identifier specifies:
- Field – The ODP field name to match against.
- CookieName (optional) – The cookie to read the value from. If omitted, defaults to the field name.
The resolver checks cookies first, then falls back to query string parameters.
Timeout and circuit breaker
The package includes built-in resilience to protect your CMS from ODP API outages:
- Timeout – Each API call is bounded by
ApiTimeoutSeconds(default 10 seconds). If ODP does not respond in time, the request is canceled and the criterion falls back to its safe default. - Circuit breaker – The circuit breaker opens when enough requests fail within the sampling window (twice
ApiCircuitBreakerDurationSeconds, so 60 seconds by default) with server errors, DNS failures, or timeouts, and at leastApiCircuitBreakerFailureThresholdrequests were made. It then rejects further calls forApiCircuitBreakerDurationSeconds. After the break duration, one probe request is allowed through. If it succeeds, the circuit closes and normal operation resumes. If it fails, the circuit reopens for another break duration.
The circuit breaker operates per instance. A failing endpoint for one instance does not affect other instances.
These settings can be overridden per instance:
{
  "Optimizely": {
    "Odp": {
      "ApiTimeoutSeconds": 10,
      "ApiCircuitBreakerFailureThreshold": 5,
      "ApiCircuitBreakerDurationSeconds": 30,
      "Instances": {
        "Slow Region": {
          "PrivateApiKey": "YOUR_PRIVATE_KEY",
          "PublicApiKey": "YOUR_PUBLIC_KEY",
          "ApiTimeoutSeconds": 20,
          "ApiCircuitBreakerDurationSeconds": 60
        }
      }
    }
  }
}
Automatic tracking snippet injection
The package can automatically inject the ODP tracking snippet into every HTML page, which removes the need to manually add tracking code to CMS layouts.
To enable it, add a Tracking section to your instance with Sites listing the CMS sites it serves, and ensure UseOptimizelyOdp() is registered in the middleware pipeline. Each CMS site name must exactly match the CMS site definition name (as shown in Admin > Config > Manage Websites). Each CMS site can only belong to one instance.
{
  "Optimizely": {
    "Odp": {
      "ApiBase": "https://api.us1.odp.optimizely.com",
      "Instances": {
        "My ODP Account": {
          "PrivateApiKey": "YOUR_PRIVATE_KEY",
          "PublicApiKey": "YOUR_PUBLIC_KEY",
          "Tracking": {
            "Sites": ["MySite"]
          }
        }
      }
    }
  }
}
The middleware fetches the snippet HTML from the ODP CDN (via https://tag.odp.optimizely.com/v2/{PublicApiKey}/snippet.json) using the instance's PublicApiKey and injects it before </head> by default. The snippet is cached in memory for CacheTimeoutSeconds (default five minutes) to avoid repeated CDN calls.
The middleware skips injection for:
- Static files (
.css,.js,.png, and so on) - CMS admin paths (
/episerver/,/util/) - Non-HTML responses
The middleware resolves the current CMS site by hostname and port, then looks up the instance whose Tracking.Sites list contains a match. Unmatched sites are skipped.
In multi-instance configurations, each instance uses its own PublicApiKey to fetch its site-specific snippet. To disable tracking for a specific instance, set Tracking:Enabled to false:
{
  "Optimizely": {
    "Odp": {
      "ApiBase": "https://api.us1.odp.optimizely.com",
      "Instances": {
        "Brand A": {
          "PrivateApiKey": "BRAND_A_PRIVATE_KEY",
          "PublicApiKey": "BRAND_A_PUBLIC_KEY",
          "Tracking": {
            "Sites": ["Site A"]
          }
        },
        "Brand B": {
          "PrivateApiKey": "BRAND_B_PRIVATE_KEY",
          "PublicApiKey": "BRAND_B_PUBLIC_KEY",
          "Tracking": {
            "Enabled": false
          }
        }
      }
    }
  }
}
Error handling
The package handles API failures gracefully without blocking page rendering:
- API unreachable, timeout, or circuit breaker open – The criterion returns a safe default based on the condition type:
- Is a member of – returns
false(cannot confirm membership). - Is not a member of – returns
true(an unknown visitor is assumed not a member).
- Is a member of – returns
- Cache-first – If cached data is available, it is used regardless of API state.
- All API failures are logged at
Warninglevel through the standardILoggerinfrastructure.
Create a real-time audience
Link CMS audiences to the real-time audiences in ODP. Audiences in ODP are a similar concept to audiences in CMS because they both group visitors (or customers) by a set of criteria.
Real-time audiences are updated with minimal delay, so data remains fresh with a latency of less than 90 seconds. When used in a personalization strategy, this lets you learn and react to visitor interactions with the site in real time. Unlike normal audiences, real-time audiences only consider data from the last 28 days, which creates a virtually no-refresh interval. Normal audiences can take up to 15 minutes to reflect the true state of the audience and are not as useful for real-time personalization. As such, they cannot be linked back to CMS audiences.
In ODP, manage audiences on the Customers > Audiences page.
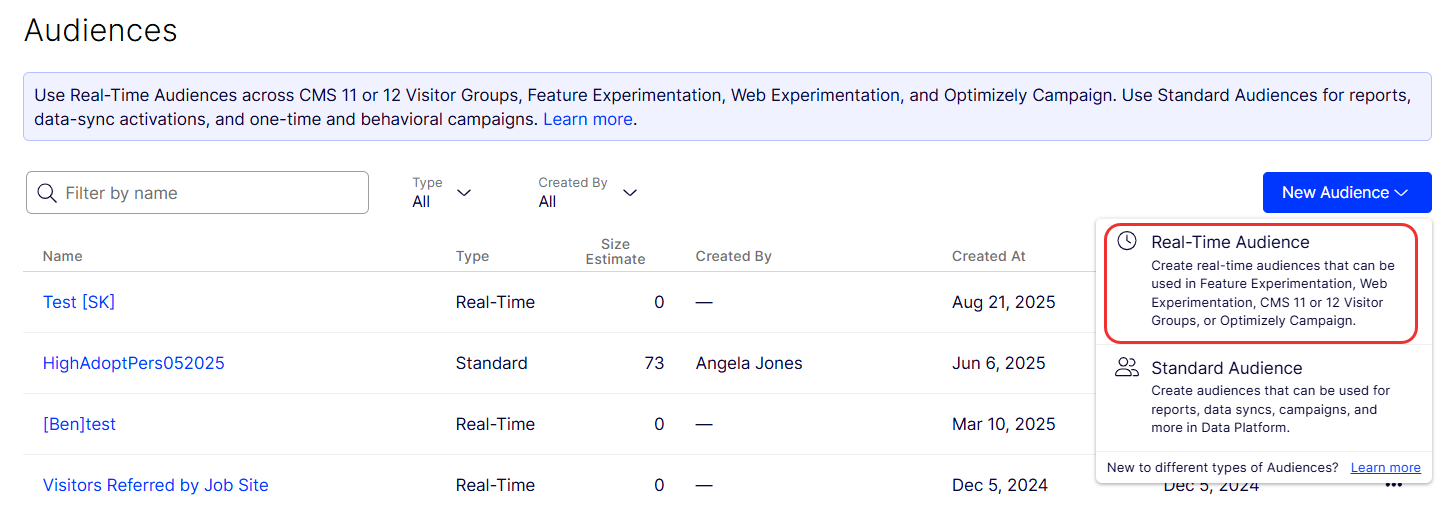
Group customers by any of the touch points in ODP, such as the following:
- Customer attributes – Country, name, gender, and so on.
- AI-driven customer insights – Order likelihood, engagement rank, probability still a customer, and so on.
- Customer observations – Computed age, total revenue, session count, first product, last product, and so on.
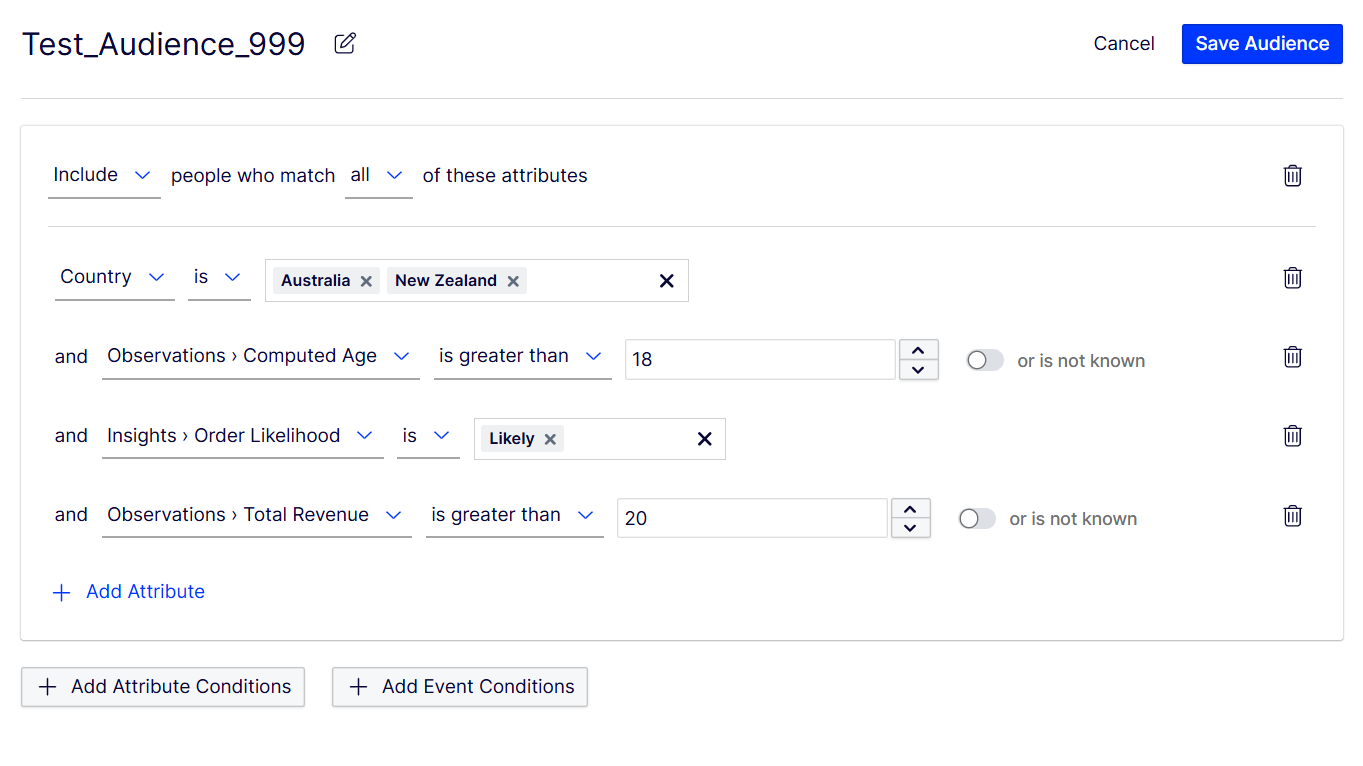
Editing criteria for a real-time audience in ODP looks like the following:
The preview for real-time audiences in ODP looks like the following:
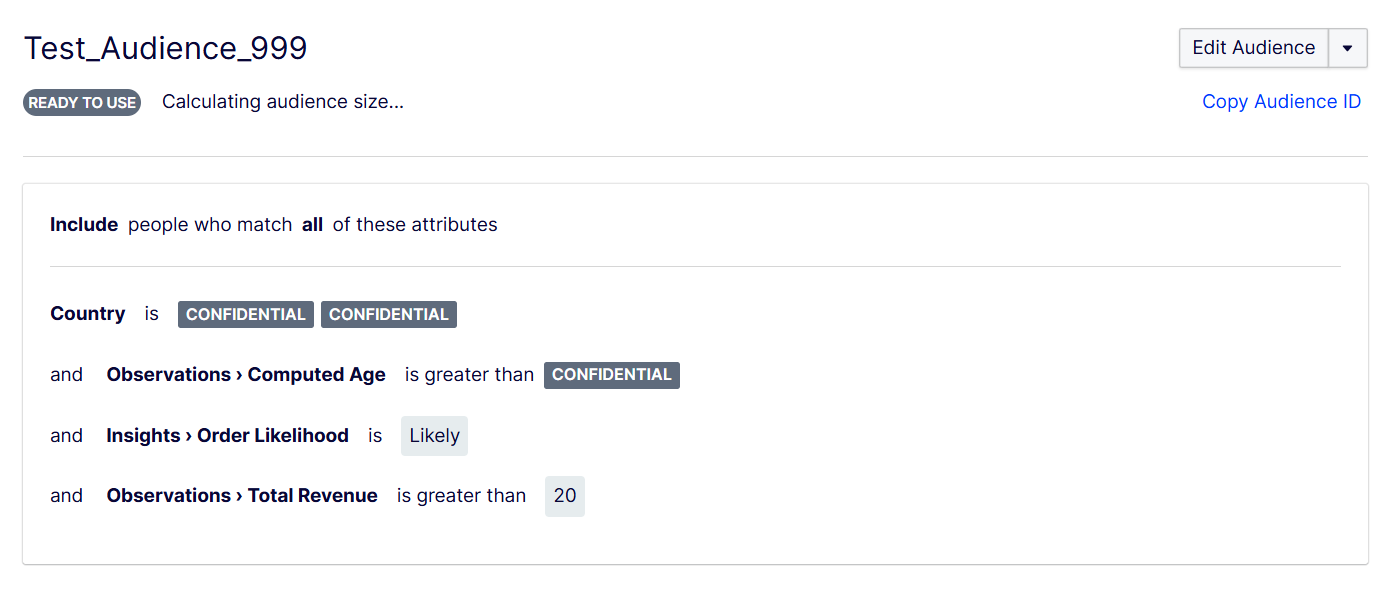
The previous example includes visitors who meet all of these criteria:
- Country is Australia or New Zealand.
- Age is greater than 18.
- Purchase likelihood is "likely."
- Total revenue is greater than $20.
You can also group customers by event conditions, such as page views, logins, and custom events. The following image targets visitors who triggered these events a given number of times within a given timeframe:
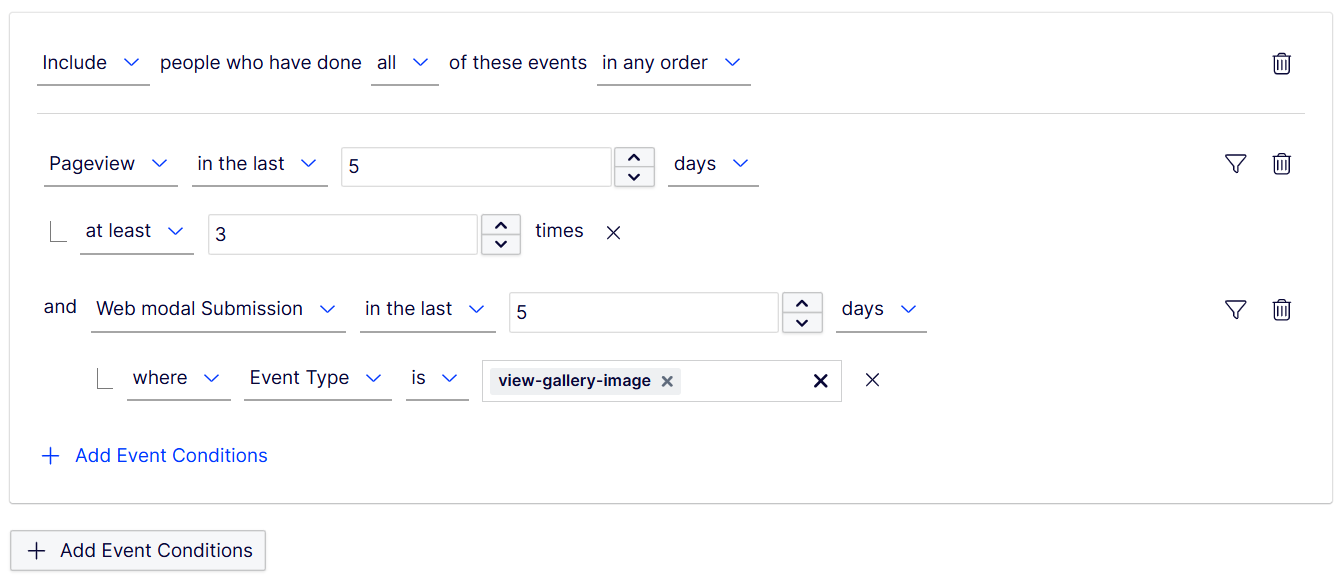
This criterion groups visitors who viewed a page on your site at least three times in the last five days and also clicked an image gallery in the same period.
Create an audience
After you integrate CMS and ODP, use real-time audiences as the foundation for audiences and personalization.
-
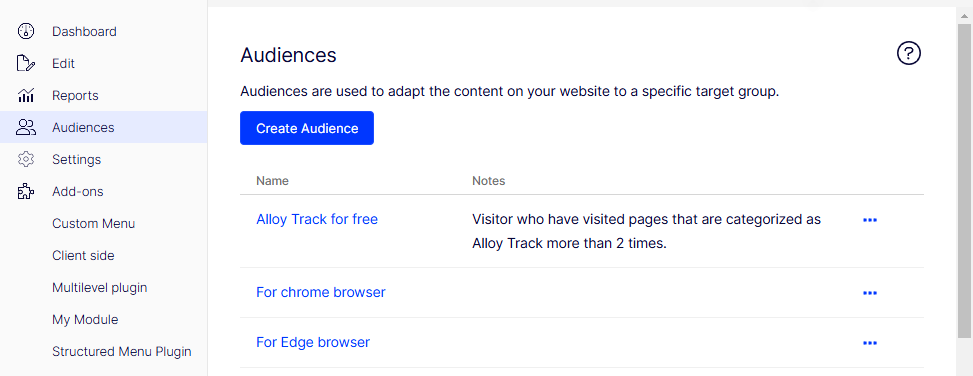
In Optimizely CMS, go to the Audiences tab.
-
Click Create Audience.
-
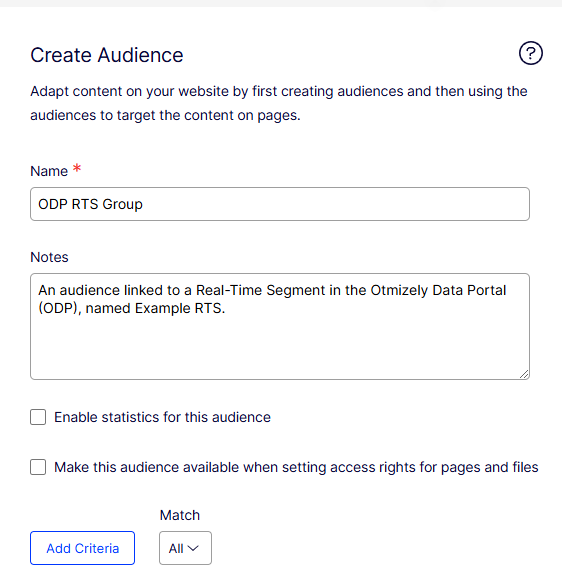
Enter values for Name and Notes.
-
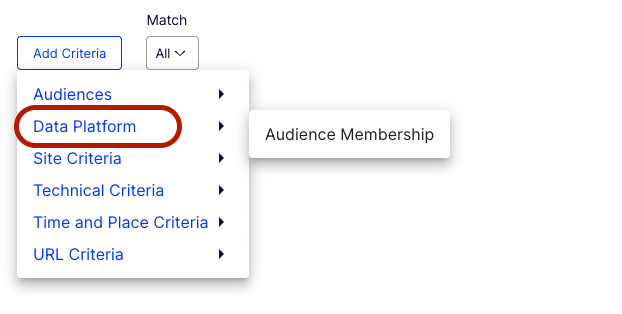
Click Add Criteria, then select Data platform > Audience Membership and choose from the available real-time audiences in ODP.
-
Select the relevant real-time audience, then click Create Audience. The audience is linked to a segment in ODP that you can use to personalize your content.
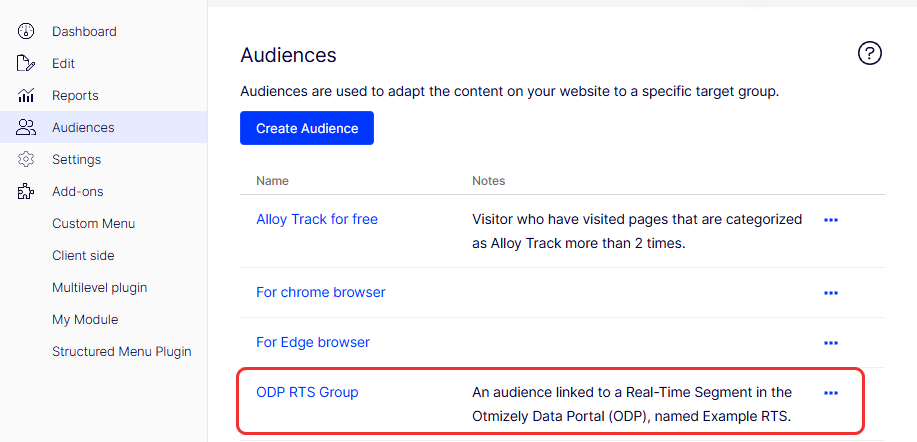
Personalize your content
Optimizely CMS lets you personalize the content that is rendered inside content areas or rich text editors.
The following image shows an Article Banner Block for the Header Content Area of the page connected to an ODP real-time audience. When someone matches this segment in ODP, they are served this content, while everyone else sees the default.
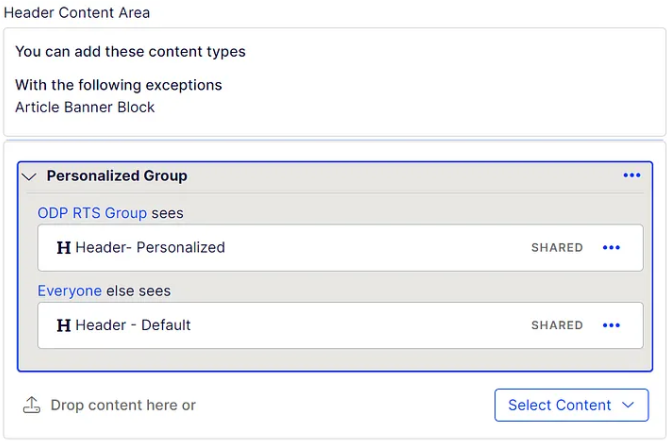
To configure content personalization with CMS audiences, see Audiences in the CMS user guide.
Personalize based on content interest
To personalize based on content interest rather than customer or product data, use ODP with some additional configuration. For example, a marketing editor at a news site might want to tailor the homepage for users interested in topics like current affairs, finance, or sports. ODP lets you target these visitors and present them with the most relevant content.
The following example uses a custom page object called Content Cloud Page that holds the page metadata relevant to your personalization strategy, such as author, blog name, blog post ID, blog title, body HTML, and creation date.
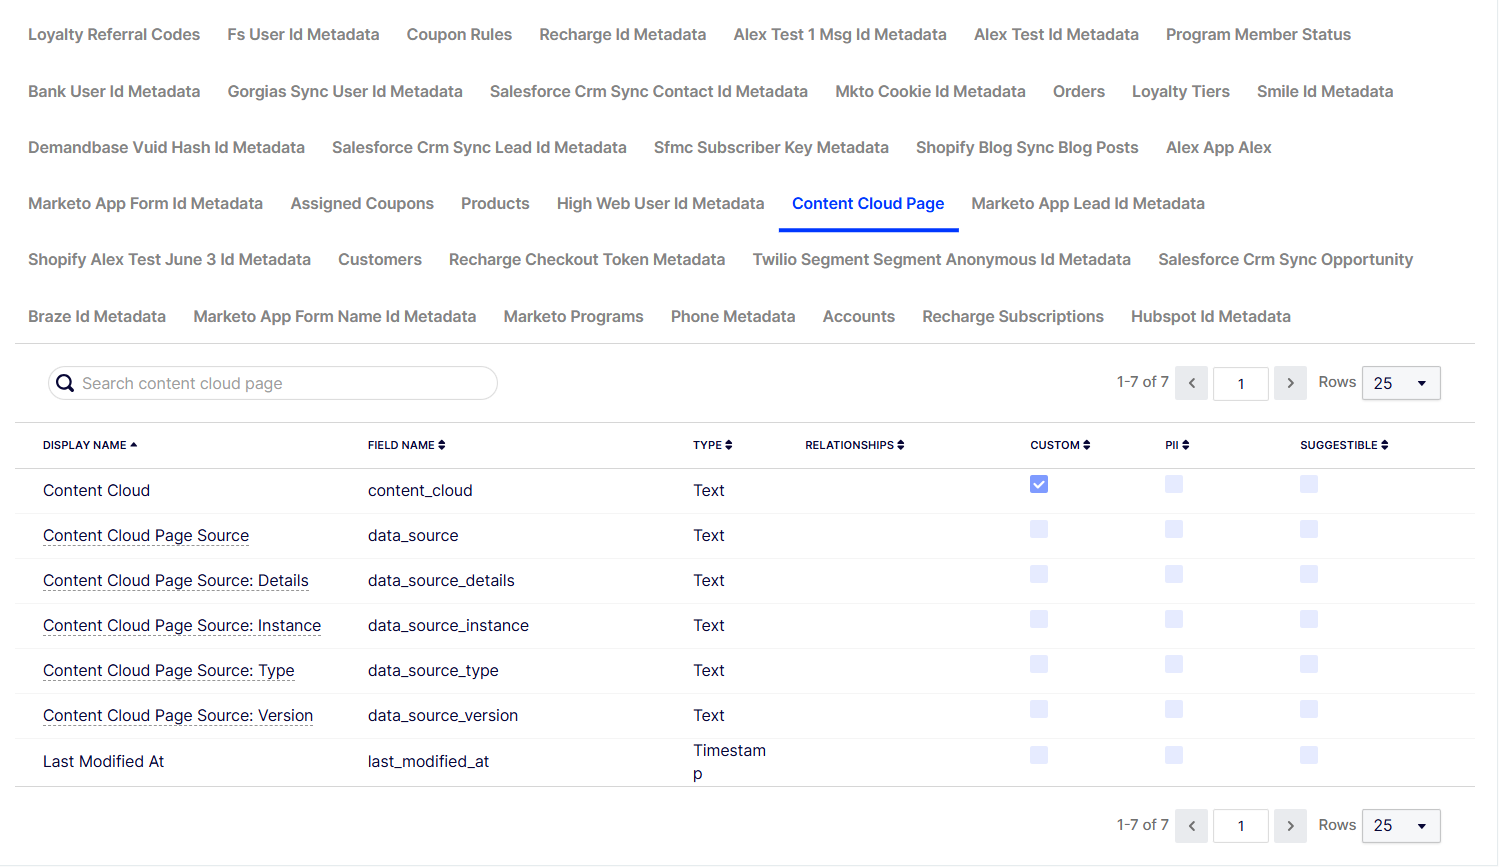
Sync CMS pages to ODP custom page objects
When you have a custom page object, you can create instances by posting to the ODP REST API to sync your content pages from CMS to ODP.
When you map the object's ID field in ODP, use the value from your page's Content Reference GUID to create a unique value that can link events captured in ODP back to the page.
To keep your ODP content objects up-to-date as your CMS content changes, you have the following options:
- Create an event handler that listens to the publish event and immediately posts the content to ODP.
- Create a scheduled job that syncs published content since the last successful run.
Link your custom objects to events
Define a relationship between your events and your pages by creating a field on the Events object using the same Field Name as your custom object. See the following image:
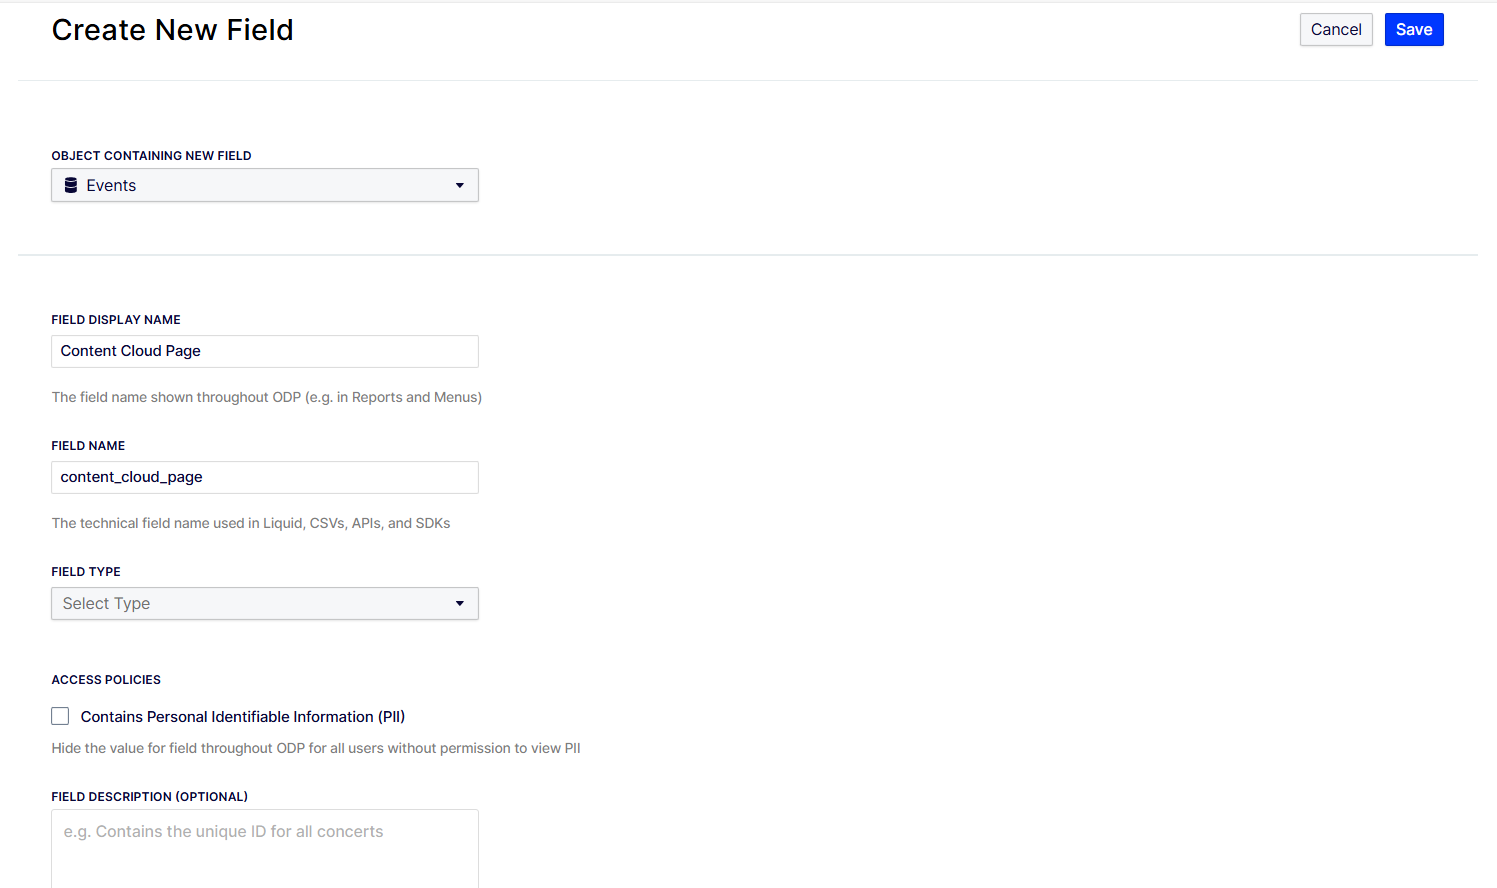
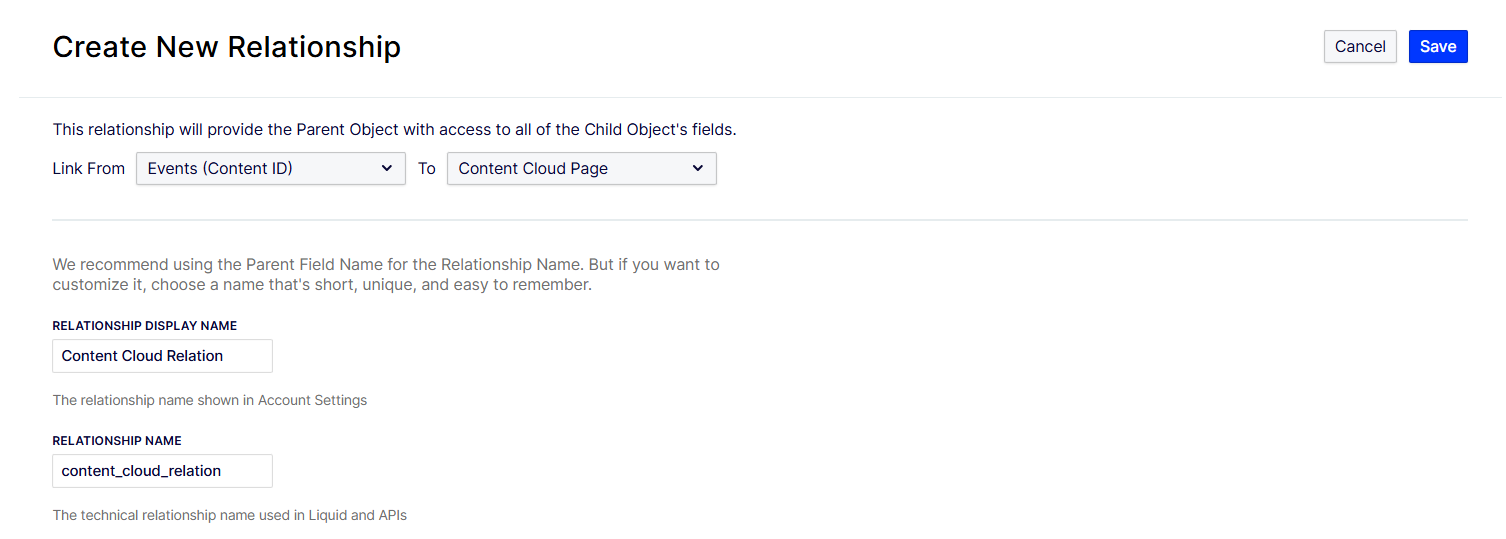
Next, create a Relationship between Events and your custom object.
Pass your page ID in ODP events
In your browser, pass the custom object's ID with all events related to the page.
The following code example adds the page's ContentGuid to the pageview event, which fires on every page load:
// From the ODP Web SDK JavaScript tag
zaius.event('pageview', {
     content_cloud_page_id: '@((PageData)Model)?.ContentGuid'
});
The following example attaches the ContentGuid to a custom event that fires when a visitor clicks to add a page to their favorites:
zaius.event('web_modal', {
      action: 'click',
      action_sub_type: 'add_favourite',
      content_cloud_page_id: '@((PageData)Model)?.ContentGuid'
});
Create real-time audiences tied to your content
If you followed the example from the previous sections, ODP knows about your pages and can relate your visitors' events and observations back to those pages. Go to ODP and create an audience based on your visitors' affinity to your content.
Following the news site example, you could segment visitors who opened 10 sports articles in the last two weeks.
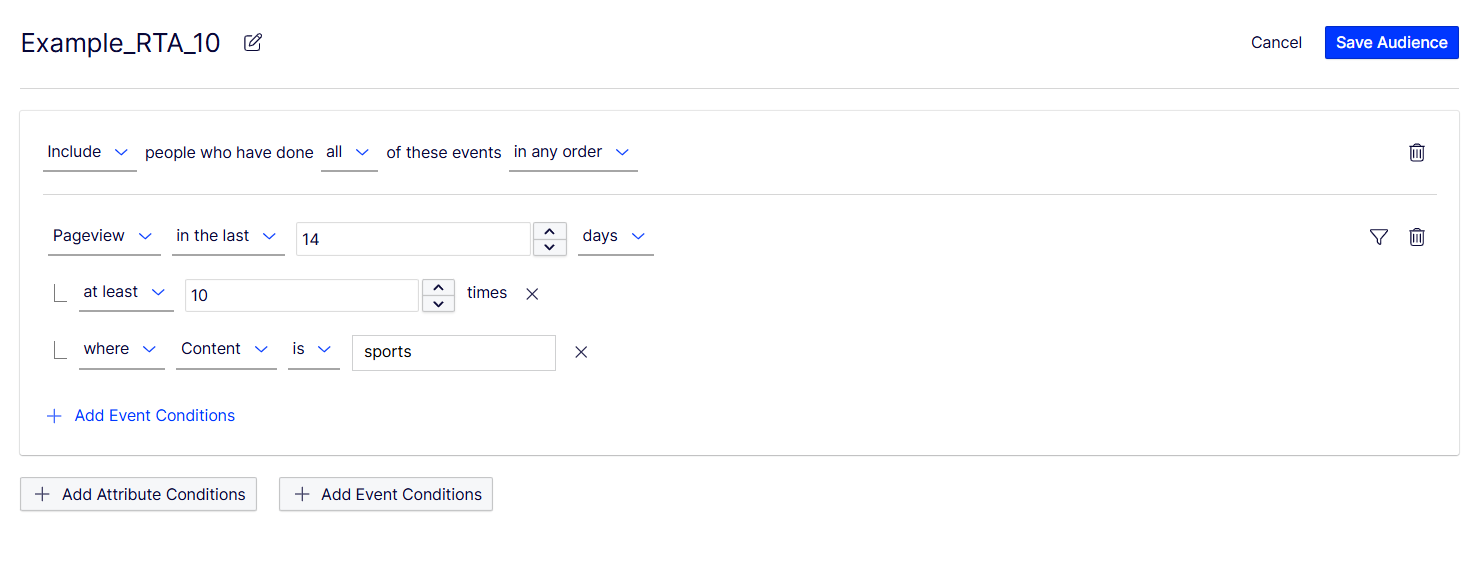
Alternatively, target visitors who favorited three or more articles in the last five days, where the article is in the category finance and tagged interest rates.
Updated 26 days ago