Migrate DAM assets using the API
Provides an overview of the process and associated endpoints used to migrate assets from a third-party platform or repository to the Optimizely CMP DAM using the REST Open API
Whether you have access to the Optimizely DAM as a standalone product or as part of the CMP, the steps below start from the assumption that you have configured your taxonomy (fields) and the Digital Asset Manager (DAM) is empty.
- Folder structure creation
- Assets upload
- Assets Renditions retrieval
- Assets core metadata update
- Assets Taxonomy or Fields update
Requirements
- Configured fields
- Configured renditions, if you use them
Recommendations
- Track the list of assets being migrated and the associated metadata through a CSV or JSON file and update it as the migration proceeds. This effectively acts as a dynamic log and is useful to review or refer to in case of errors.
- Collect the required metadata for each of your assets. Here is a list of metadata that may be required:
- Title
- Metadata
Descriptionalt_textattribution_texttags(for images)is_publicis_archivedexpires_at
- Folder and parent folder names (up to root)
- Fields
- Request for your API limit to be increased for the duration of the migration by contacting the support team and providing:
- Timeline for the migration
- Expected number of calls
Migrate
To make API calls, create an app in the Optimizely CMP instance where you plan on using the API.
Following the authentication flow provided lets you authenticate and make API requests using your applications.
Alternatively, the API documentation lets you test endpoints directly from your browser.
Create an app under Settings (your avatar) > Apps & Webhooks > Apps, then click Generate Temporary Token at the bottom of your created app page.
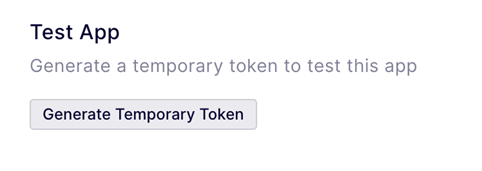
Use this token on any endpoint definition page to make API requests from your browser. Fill in the required parameters and click Try It!.
Step 1: Create folders
NoteIf all assets need to be at the root folder, you can skip this step.
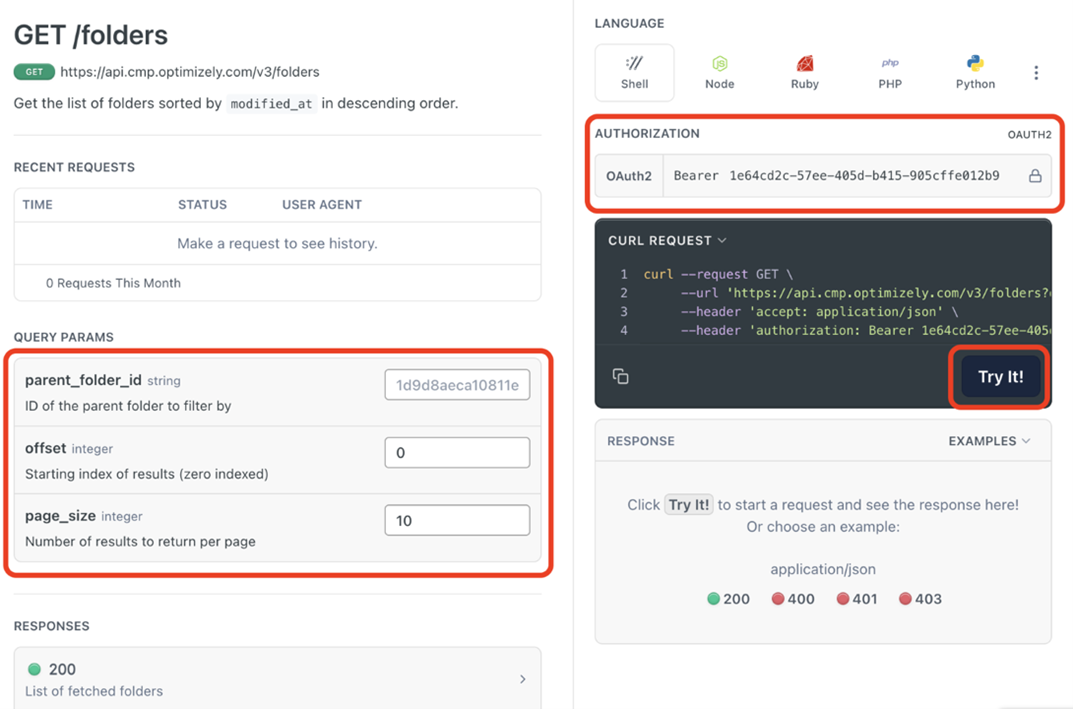
Endpoint
The endpoint accepts the name and parent_folder_id body parameters. If you create a folder without the parent_folder_id, it is created at the root level. Start by creating folders at the DAM's root and then continue by creating the folders below them.
Create the folder situated at the root:
curl --request POST \\
\--url <https://api.cmp.optimizely.com/v3/folders> \\
\--header 'accept: application/json' \\
\--header 'authorization: Bearer 14146623-496c-4940-8556-4af7deee9dbd' \\
\--header 'content-type: application/json' \\
\--data '
{
 "name": "Root folder 1"
}
'
The response includes the created folder id you can use to create child folders.
curl --request POST \\
\--url <https://api.cmp.optimizely.com/v3/folders> \\
\--header 'accept: application/json' \\
\--header 'authorization: Bearer 14146623-496c-4940-8556-4af7deee9dbd' \\
\--header 'content-type: application/json' \\
\--data '
{
 "name": "Child folder 1",
 "parent_folder_id": "482d7b840ebd11efad5682f6fb19ea1f"
}
'
Repeat the process for child folders.
To retrieve the id of a previously created folder, loop through the existing folders using GET /folders.
Response payload key
id– Unique ID used to create folders and assets within the folder.
NoteThere is no PATCH endpoint. If you do not create the folder under the correct parent folder, you must manually move it. You also must set up permissions manually if required. See Share folders and assets.
Step 2: Upload assets to the DAM
Endpoints
Upload to Amazon AWS
- Retrieve a pre-signed upload URL using GET /v3/upload-url. The response includes the
urlandupload_meta_fieldskeys and their associated values. - Upload the asset using an HTTP POST request to the
urlreceived from the previous call’s response. Send the payload asmulti-form/form-data, which should be the content ofupload_meta_fields, as received with a key calledfileappended at the end that contains the asset to be uploaded. You should receive a 204 HTTP response code.
Response payload key
key– Unique ID for the uploaded asset, needed for pushing the asset to the DAM.
NoteThe validity time for the pre-signed URL is 60 minutes.
If this URL is accessed multiple times with the same meta-fields, the last successfully uploaded file creates the asset.
Post assets to the DAM
Endpoint
When you upload the asset to AWS, you can post it to the CMP DAM using the POST /assets endpoint.
The endpoint accepts the key, title and folder_id body parameters. If you create an asset without a folder_id, it is created at the root level.
curl --request POST \\
\--url <https://api.cmp.optimizely.com/v3/assets> \\
\--header 'accept: application/json' \\
\--header 'authorization: Bearer 14146623-496c-4940-8556-4af7deee9dbd' \\
\--header 'content-type: application/json' \\
\--data '
{
"key": "65665fc2232f9a6129dd1a9d/9eda54760ecb11efb4583ab17c74a82c",
"title": "MyAsset",
"folder_id": "482d7b840ebd11efad5682f6fb19ea1f"
}
'
Response payload keys
id– This is the unique ID of the uploaded asset, used with different endpoints to update the asset metadata.links.self– This is the endpoint that needs to be hit with a PATCH request to update key metadata for the asset.
NoteThe asset PATCH endpoints do not currently let assets move in and out of folders. If the asset is not created under the correct folder, it needs to be moved manually.
Retrieve asset renditions (Optional)
If you configure asset renditions, they are created automatically when you upload the asset to the DAM. You can retrieve the asset rendition details using the GET /assets/{asset_id}/renditions endpoint.
The endpoint accepts the asset_id path parameter. The call response returns an array of objects, each representing a rendition.
Response payload keys
name– This is the format of the image as pre-configured in the admin section (such as Article banner, Facebook, category thumbnail)url– This is the live URL that serves the selected rendition of the image.
NoteEach rendition URL is different and needs to be retrieved via the API (can’t be accessed via default URL and query parameter)
Step 3: Update asset metadata
Endpoints
Depending on the type of asset that you want to patch, the endpoint is slightly different. The right endpoint is provided under the key links.self from the response payload from POST /assets endpoint in Step 2.
Each asset type has slightly different body parameters. The example below focuses on PATCH /images/{id} that makes use of the common parameters. Review each endpoint definition to confirm the appropriate parameters for your asset type.
The endpoint PATCH /images/{id} requires one PATH parameter: asset id and accepts eight body parameters:
titledescriptionalt_textattribution_texttagsis_publicis_archivedexpires_at
curl --request PATCH \\
\--url <https://api.cmp.optimizely.com/v3/images/b495e49e0eec11efac14927b0027e3e4> \\
\--header 'accept: application/json' \\
\--header 'authorization: Bearer 14146623-496c-4940-8556-4af7deee9dbd' \\
\--header 'content-type: application/json' \\
\--data '
{
"title": "guiltyDog.jpeg",
"description": "A dog that looks really guilty!",
"alt_text": "A pug dog in a yellow coat looking over his shoulder and looking very guilty.",
"attribution_text": "Clever photographer",
"tags": \[
"dog",
"guilty",
"animal",
"clothes"
\],
"is_public": true,
"is_archived": false,
"expires_at": "2024-10-07T13:15:30Z"
}
'
Response payload key
url– This is the URL to access the asset. If the asset is private, the URL includes a token that expires after a short time.
NoteTo get a new token to access a private asset via the API, you can use GET /asset-urls/{asset_id}
Step 4: Taxonomy update
Endpoints
Retrieve the fields definition
Retrieve the fields definition first by sending a GET /fields (optimizely.com) request.
Response payload keys
id– This is the unique ID for the field, required to set a field value for an asset.name– This is the field’s name, usually used to match against the reference mapping document used during the migration.type– This field type informs the expected data entry format.is_multi_select– This indicates whether this is a single-select or multi-select field (for fields with choices).choices– This is an array of objects representing the possible choices for the field. Each choice object contains:id– This is the unique ID for the field choice, required to set choice values for an asset field.name– This is the choice’s name, usually used to match against the reference mapping document used during the migration.
NotesThe page size supports a maximum of 100 per page. You will need to manage pagination to retrieve all the data in case a lot of fields have been configured.
Update the assets fields
With access to the field definition and the necessary IDs, you can request PUT /assets/{asset_id}/fields to update fields for an asset in bulk.
curl --request PUT \\
\--url <https://api.cmp.optimizely.com/v3/assets/aec0566c0eec11efbdf0a2c505a7f888/fields> \\
\--header 'accept: application/json' \\
\--header 'authorization: Bearer 1e64cd2c-57ee-405d-b415-905cffe012b9' \\
\--header 'content-type: application/json' \\
\--data '
\[
 {
  "type": "label",
  "id": "cc9334cced6811ec906c0a498722dff5",
  "values": \[
   "cc964e8ced6811ec906c0a498722dff5"
  \]
 },
 {
  "type": "label",
  "id": "cc9fa9a0ed6811ec906c0a498722dff5",
  "values": \[
   "cca0b43aed6811ec906c0a498722dff5",
   "cca8cb84ed6811ec906c0a498722dff5"
  \]
 }
\]
'
NotesThe PUT requests above mean that all values need to be provided at once as current values are overridden.
Updated 10 days ago