Display options
Describes how to specify which render templates are available for selection in the user interface.
When working with content in a content area in Optimizely Content Management System (CMS), editors often like to specifically choose how the content should be laid out, which means deciding which rendering template should be used to display each item. Display options let developers specify which render templates are available for selection in the user interface.
Configure display options
You can make rendering templates available for selection in the user interface by adding a EPiServer.Web.DisplayOption to the DisplayOptions options class, which you can configure on IServiceCollection as in the example below:
services.Configure<DisplayOptions>(options => {
  options
    .Add("full", "/displayoptions/full", Global.ContentAreaTags.FullWidth, "", "epi-icon__layout--full")
    .Add("wide", "/displayoptions/wide", Global.ContentAreaTags.TwoThirdsWidth, "", "epi-icon__layout--two-thirds")
    .Add("narrow", "/displayoptions/narrow", Global.ContentAreaTags.OneThirdWidth, "", "epi-icon__layout--one-third");
});
See the EPiServer.Web.DisplayOptions class for information and method overloads.
Appearance in the user interface
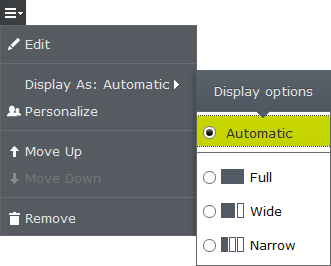
Adding display options to the site automatically enables an additional option in the context menu for content within a content area. The example below is from the CMS sample site. The Automatic option is selected by default, meaning the content uses the rendering template specified by the content area. Selecting a display option other than Automatic renders that particular content in that content area using the rendering template associated with the display option.

Because display options are available in the context menu, you can select an option where the tag does not match a rendering template for the given content. In that case, a message is rendered instead of the content, informing you that the content cannot be displayed with this chosen option.
Updated 5 months ago
