Create a React component
Describes how you can use the JavaScript framework React in the Optimizely Content Management System (CMS) user interface; most concepts should be applicable to other JavaScript frameworks also.
Optimizely Content Management System (CMS) has support for using JavaScript frameworks in the user interface, which means that you can use them to build components used by editors in the on-page edit view.
You can add components to different parts of the user interface, this example describes how to create a custom edit view.
Register the view server-side
To create an edit view for content data, register a ViewConfiguration class on the server side and point to the JavaScript file that should be loaded. In this case, the file is your bundled React view. The following code will do this:
[ServiceConfiguration(typeof (ViewConfiguration))]
public class MyView: ViewConfiguration<IContentData> {
  public MyView() {
    Key = "my-view";
    Name = "React View";
    ControllerType = "alloy/components/ReactGadget";
    IconClass = "epi-iconStar";
    SortOrder = 100;
  }
}
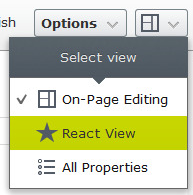
When you look in edit view, an extra view (React View) is listed in the view switcher.

Create the entry point
If you have ever made a React application before, you are familiar with having an entry point called index.js that calls ReactDOM.render (see ReactDOM Render section). However, in this case, because your view is running inside a Dojo application, the entry point needs to pretend to be a widget, and that widget will call ReactDOM.render. You can do it with this code:
index.js
import React from "react";
import ReactDOM from "react-dom";
import declare from "dojo/_base/declare";
import WidgetBase from "dijit/_WidgetBase";
import MyComponent from "./MyComponent";

export default declare([WidgetBase], {
	postCreate: function() {
		ReactDOM.render( < MyComponent / > , this.domNode);
	},
	destroy: function() {
		ReactDOM.unmountComponentAtNode(this.domNode);
	}
});
This creates a widget that renders the React component to its DOM node. It will also unmount the component when the view is destroyed.
This code can be used as a boilerplate, just replace MyComponent with your React component.
Build the bundle
At this point, let's assume you have your MyComponent implemented in React. It needs to be bundled into a single file (the one your view configuration is pointing to) to get it to display in the user interface. To do this, you can use bundlers like webpack or rollup. Examples of the methods are given below.
The first thing to note is that because CMS uses AMD for its module loading, the bundle we produce also needs to be AMD formatted. Luckily, the build tools will do this with a single configuration line.
The second thing to note is that in the entry point code, in the previous example, there are imports for Dojo and Dijit. These, however, exist inside the CMS application and should not be bundled, so they need to be marked as external. This is also done with a few lines of configuration.
The entry point for your bundle is the index.js file from the previous example and the output file should be the path to the folder for your JavaScript file that you configured in your module.config, plus the relative path to the file you configured in the view configuration. Change the paths in the examples below to suit your needs.
webpack.config.js
const path = require("path");

module.exports = {
	entry: path.resolve(__dirname, "src/index.js"),
	output: {
		filename: "ReactGadget.js",
		libraryTarget: "amd",
		libraryExport: "default",
		path: path.resolve(__dirname, "ClientResources/Scripts/components/")
	},
	module: {
		rules: [{
			test: /\.js$/,
			exclude: /node_modules/,
			use: {
				loader: "babel-loader"
			}
		}]
	},
	externals: [
		"dojo/_base/declare",
		"dijit/_WidgetBase"
	]
};
The interesting parts of this configuration are the settings for libraryTarget, libraryExport, and externals.
For webpack, it is important to set the libraryExport to return the default export from the entry point rather than an object containing the exports.
rollup.config.js
import babel from "rollup-plugin-babel";
import commonjs from "rollup-plugin-commonjs";
import replace from "rollup-plugin-replace";
import resolve from "rollup-plugin-node-resolve";

export default {
	input: "src/index.js",
	output: {
		file: "ClientResources/Scripts/components/ReactGadget.js",
		format: "amd"
	},
	plugins: [
		babel({
			exclude: "node_modules/**"
		}),
		commonjs(),
		replace({
			"process.env.NODE_ENV": JSON.stringify(process.env.NODE_ENV)
		}),
		resolve()
	],
	external: [
		"dojo/_base/declare",
		"dijit/_WidgetBase"
	]
};
The interesting parts of this configuration are the settings for format and external.
Access CMS features from the React component
At this point, you should have your React component loading in the user interface. But what if you want to use a component from the CMS? For example, you may want the user to be able to select a page using the content selector.
Events are automatically connected from the props to the widget based on the naming convention onEventName; and settings for the widget are only passed to the widget during construction. Setting changes are not propagated after mount, although it is probably not hard to implement.
An example usage could look like this:
import React, { Component } from "react";
import DojoWidget from "./DojoWidget";

class MyComponent extends Component {
  constructor(props) {
    super(props);
    this.state = {
      value: null
    };
    this.handleChange = this.handleChange.bind(this);
  }

  handleChange(value) {
    this.setState({ value });
  }

  render() {
    const { value } = this.state;
    const label = value ? <div>ContentLink: {value}</div> : null;
    return (
      <div>
        <DojoWidget type="epi-cms/widget/ContentSelector" settings={{ repositoryKey: "pages" }} onChange={this.handleChange} />
        {label}
      </div>
    );
  }
}
export default MyComponent;
Something else that may be worth looking at is the @episerver/amd-loader-proxy mentioned earlier (see also @episerver/amd-loader-proxy). With this, you can dynamically require AMD modules from CMS from your JavaScript application. This is framework agnostic, so it can be used with whichever JavaScript framework you prefer.
Updated 6 months ago
