Display channels
Describes the concept of display channels in Optimizely Content Management System (CMS).
Display channels let you control which template to use in a specific rendering context; for example, when previewing and displaying content targeted for mobile devices with different resolutions.
NoteThe examples are based on ASP.NET Core.
EPiServer.Web.DisplayChannel is a base class for creating display channels, detecting viewport settings, and selecting templates to render content for a targeted device format.
The display channel is evaluated for each rendering request. Using matching tags, you can control exactly which template to use in a specific context. Select templates prefers templates with a tag matching a DisplayChannel, and the output is scaled and resized to fit the targeted device. If no such template exists, it falls back to using the most suitable template.
No channels are available by default; you must add them to your solution. You do not have to specifically register channels, as the system automatically scans and registers discovered active channels during initialization.
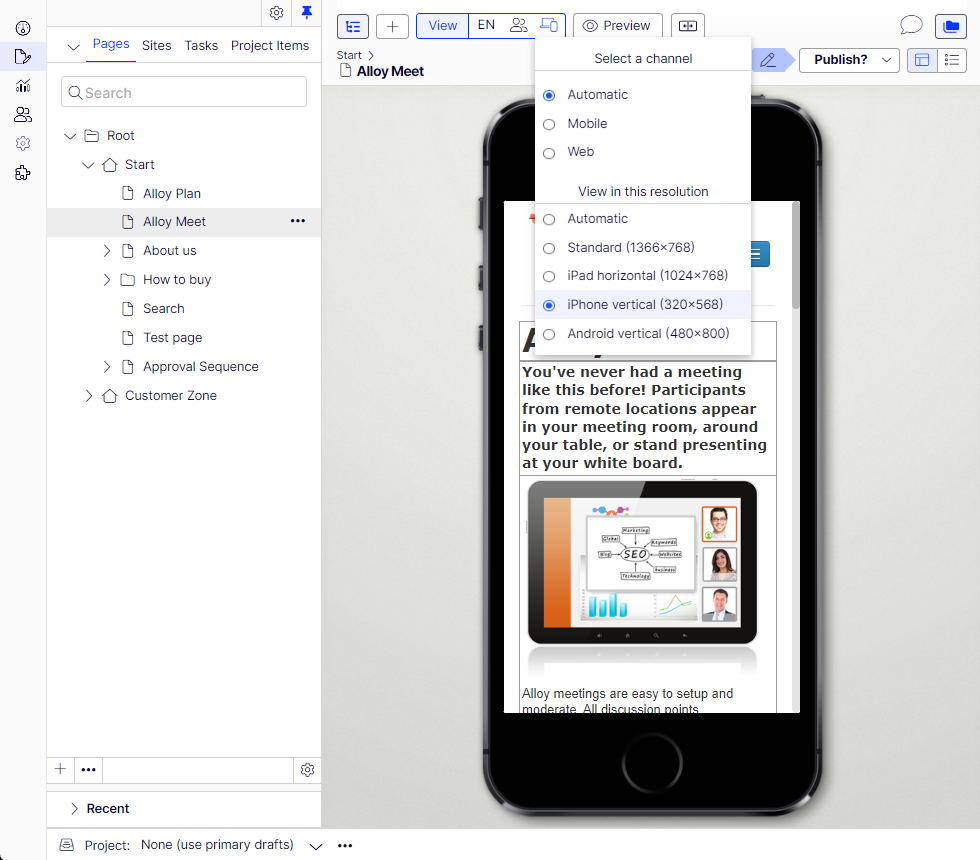
Optimizely has built-in functionality to let editors preview the output in edit view and apply available display channels and their resolutions before publishing. Inheriting from EPiServer.Web.IDisplayResolution adds resolution preview options to the edit view.
Create a display channel
In the following example, a MobileDisplayChannel display channel class is added to a Channel folder in the (MVC) Business folder of the solution in Visual Studio.
The class inherits from DisplayChannel, and the IsActive method adds logic controlling whether the channel can be considered active. When evaluating for display channel, the system checks which channels are active and prefers templates with a tag included in EPiServer.Framework.DataAnnotations.TemplateDescriptorAttribute.Tags, and that matches EPiServer.Web.DisplayChannel.ChannelName for the active channel.
Example: A display channel active for mobile devices.
using EPiServer.Framework.Web;
using EPiServer.Web;
using System;
using System.Collections.Generic;
using System.Linq;
using Microsoft.AspNetCore.Http;

namespace MyOptimizelySite.Business.Channels {
  public class MobileDisplayChannel: DisplayChannel {
    public override bool IsActive(HttpContext context) {
      //The sample code uses package 'Wangkanai.Detection' for device detection
      var detection = context.RequestServices.GetRequiredService<IDetection>();
      return detection.Device.Type == DeviceType.Mobile;
    }

    public override string ChannelName {
      get {
        return RenderingTags.Mobile;
      }
    }
  }
}
If you have two different templates registered for the same content type, and one template has a tag matching the ChannelName, then that template is used when the channel is active.
Example: Using tags for rendering in a mobile device context.
[ContentType]
public class MyBlock : BlockData {}

[TemplateDescriptor]
public partial class MyBlockComponent : BlockComponent<MyBlock>
{ }

[TemplateDescriptor(Tags = new string[] { RenderingTags.Mobile })]
public partial class MyBlockMobileComponent : BlockComponent<MyBlock>
{ }
Add preview resolutions and devices
You can change the size of the preview viewport to let editors visualize content as it would display in different resolutions. Optimizely also has a built-in feature for adding background device images for visualization; see below.
In the following example, a mobile display channel is created and associated with a specific resolution of (320x658). The channel and resolution are associated by returning the FullName of the MobileResolution type.
Example: DisplayChannel for mobile display.
namespace MyOptimizelySite.Business.Channels {
  public class MobileChannel: DisplayChannel {
    public override string ChannelName {
      get {
        return "Mobile";
      }
    }

    public override bool IsActive(HttpContext context) {
      //The sample code uses package 'Wangkanai.Detection' for device detection
      var detection = context.RequestServices.GetRequiredService<IDetection>();
      return detection.Device.Type == DeviceType.Mobile;
    }

    public override string DisplayName {
      get {
        return "Mobile";
      }
    }

    public override string ResolutionId {
      get {
        return typeof (MobileResolution).FullName;
      }
    }
  }
}
Example: Resolution class for mobile display.
namespace MyOptimizelySite.Business.Channels {
  public class MobileResolution: IDisplayResolution {
    public int Height {
      get {
        return 568;
      }
    }

    public string Id {
      get {
        return GetType().FullName;
      }
    }

    public string Name {
      get {
        return "Mobile (320x568)";
      }
    }

    public int Width {
      get {
        return 320;
      }
    }
  }
}
Combining these adds the Mobile preview option in edit view, with the iPhone vertical (320x568) as a selected resolution.
Add a background device image
The following example adds a preview option for the Google Nexus 7 tablet to the preview resolutions drop-down list.
If you inspect the HTML structure around the preview iframe, you will notice an auto-generated CSS class named epi-viewPort-600x790, where the numbers correspond to the dimensions specified in the definition.
Define this CSS class to customize the look of the viewport – assuming you are in the CMS sample project – you add a CSS file ClientResources/Style/displayresolutions.css with the following contents:
.epi-viewPort-600x790
{
  background: url('../images/nexus7.png') no-repeat center center;
}
The image nexus7.png referenced in the CSS class above is a background image picturing the Nexus 7, shown behind the scaled-down viewport.
To get this CSS file loaded when the user interface loads, piggyback on the CMS module’s resource bundle. Knowing that the Optimizely Content Management System (CMS) module depends on a epi.cms.widgets.base resource bundle, add your CSS file to this resource bundle from the module.config of your project.
<clientResources>
  <add name="epi.cms.widgets.base"
       path="Styles/displayresolutions.css"
       resourceType="Style"
       isMinified="false" />
</clientResources>
The displayresolutions.css file is loaded whenever the CMS module is started, that is, when going to the editorial interface.
NoteThere is no file watch on
module.config, so changes are not picked up automatically by the application. Therefore you have to restart the application by other means to see the changes on the site.
Select another option in the resolution drop-down list and get the preview. While this approach does not give the same result as on the virtual device, it can give the editor a close idea of how a page will look on a different screen.
Updated 11 days ago