
DIBS installation and configuration
Describes how to install and use the DIBS payment provider, one of several Optimizely Customized Commerce payment solutions.
Note
This content is retired and no longer maintained.
Build a DIBS project
-
Download the DIBS payment provider file package, which provides an EPiServer.Business.Commerce.Payment.DIBS project.
-
Open the DIBS project and save the solution.
-
Install the
EPiServer.Commerce.CoreNuGet package by executing this command in Package Manager Console:Install-Package EPiServer.Commerce.Core.Note
To avoid assembly conflicts, install the Optimizely Customized Commerce Core version that your site is using. Also, apply no database transforms.
Important!
If you are using Optimizely Customized Commerce 11 or higher, ignore step 4. That code was removed from Optimizely Customized Commerce 11.
-
If you are using workflow, uncomment the following line in
DIBSPaymentGateway.cs.payment.Properties\["NextAction"\] as Action).Invoke(); -
Rebuild the DIBS project. Now you have the file
EPiServer.Business.Commerce.Payment.DIBS.dll.
The project package includes these files:
DIBSPaymentMethod.cs(Optimizely Customized Commerce versions 12 and up) – represents a payment method for DIBSDIBSPaymentOption(Optimizely Customized Commerce versions 10.5 and 11) – represents a payment method for DIBSDIBSPaymentGateway.cs– mainpayment gateway businessDIBSPaymentController.cs– the page controllerRedirectAndPostActionResult.cs,TransactionRequest.cs– helpers for the controller- XML files in lang folder – language files
ConfigurePayment.ascx,EditTab.ascxand itsascx.cs,ascx.designer.cs– Commerce Manager payment editorPaymentMethod.ascxand itsascx.cs,ascx.designer.cs– front-end webform viewDIBS.cshtml,DIBSConfirmation.cshtml(Optimizely Customized Commerce 12 versions and up) – front-end mvc viewDIBSPaymentMethod.cshtml,DIBSConfirmation.cshtml(Optimizely Customized Commerce versions 10.5 and 11) – front-end mvc viewDIBSConfiguration.cs,DIBSCurrencies.cs,DIBSLanguages.cs,DIBSRequestHelper.cs,Utilities.cs– helper classesDIBSPage.cs– page typeDIBS-logo.jpglogo – in the images folder
Commerce Manager
- Find the Commerce Manager Apps folder, located under the Optimizely Commerce Manager project folder.
- Deploy the
ConfigurePayment.ascxfile to theApps\Order\Payments\Plugins\DIBSfolder. Create the DIBS folder if it does not exist. - Deploy the
EditTab.ascxfile to theApps\Order\Payments\MetaData\DIBSfolder. Create the DIBS folder if it does not exist. - Deploy
EPiServer.Business.Commerce.Payment.DIBS.dllto your Commerce Manager site's bin folder.
Front-end site Webform (Sample site)
- Deploy
PaymentMethod.ascxto the website'sTemplates\Sample\Units\CartCheckout\DIBSfolder. - Deploy
DIBS-logo.jpgto the website'sstyles\imagesfolder. - Deploy the all files in lang folder to the Commerce Sample site's lang folder.
- Deploy
EPiServer.Business.Commerce.Payment.DIBS.dllto the Commerce Sample Site's bin folder.
Front-end site MVC (Quicksilver)
- Deploy DIBS-logo.jpg to your website's styles\images folder.
- Deploy all files in
langfolder to the Quicksilver site's\langfolder. - Deploy
EPiServer.Business.Commerce.Payment.DIBS.dllto your Quicksilver site's bin folder. - Deploy
DIBSConfirmation.cshtmlandDIBS.cshtmlto your website'sViews\Sharedfolder.
(Optional) The following steps allow the creation of a DIBS under the Checkout page.
- In your solution's front-end site project, add references to the deployed .dll's.
- Open CheckoutPage page type in
Features/Checkout/Pages. - Add
DIBSPagetype to theAvailableContentTypesattribute.
[AvailableContentTypes(Include = new \ { typeof(OrderConfirmationPage), typeof(MultiShipmentPage), typeof(DIBSPage) }, IncludeOn = new \ {typeof(StartPage)})\ - Rebuild the Quicksilver project.
DIBS configuration
Set up the DIBS payment provider in Commerce Manager
After deploying all necessary files, follow these steps.
-
Open the Optimizely Customized Commerce Manager back-end site
-
Go to Administration > Order System > Payments > English (United States). The last option is the language in which you want to make the PayPal payment available.
-
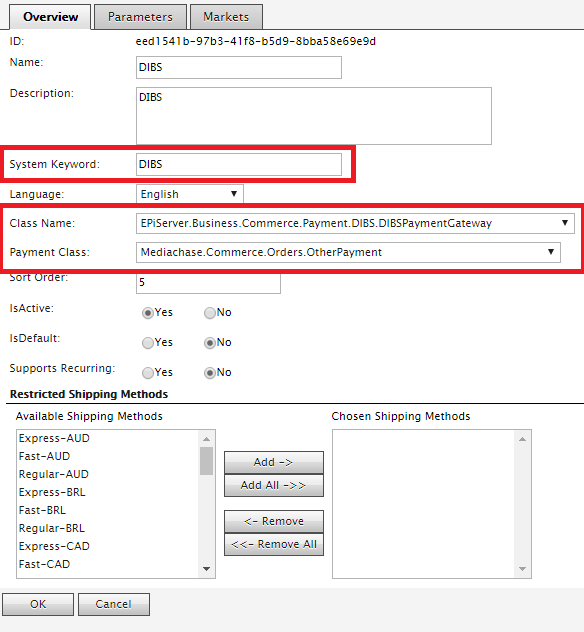
Select Create new payment method.
-
For System keyword, select DIBS, the name of the folder created during deployment.
-
For Class Name, select EPiServer.Business.Commerce.Payment.DIBS.DIBSPaymentGateway.
-
For Payment Class, select Mediachase.Commerce.Orders.OtherPayment.
-
-
Click OK to save DIBS payment method.
-
Open the DIBS payment method for editing.
-
Click the Parameters tab and enter the following:
- API UserId – The user for the DIBS administration page.
- Merchant Password – To let customers view, you need only the API UserId. But to be able to complete and return an order, you also must add a valid Merchant Password.
- Processing Url – The URL to process a DIBS payment, usually
https://payment.architrade.com/paymentweb/start.action. - HMAC key – Use HMAC key to secure data sent between your system and DIBS.
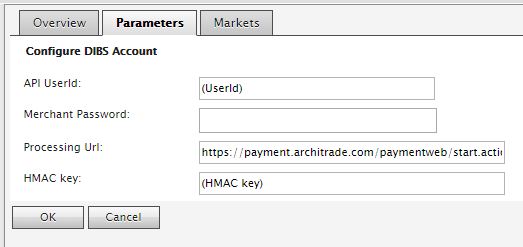
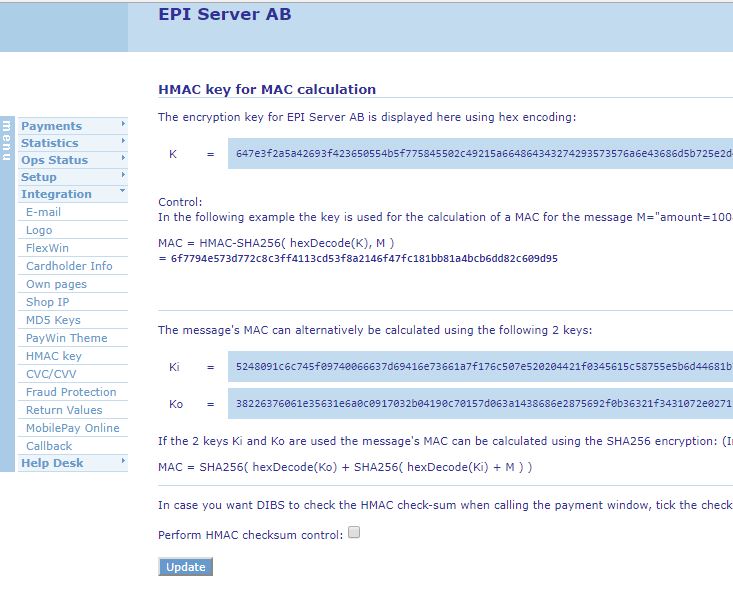
- The key values are available from the DIBS Administration interface
(Integration > HMAC key > K value):
-
Click the Markets tab and add the expected markets for this payment.

Setup DIBS payment provider in front-end site
To set up a DIBS payment provider, browse to the front-end site and follow these steps.
-
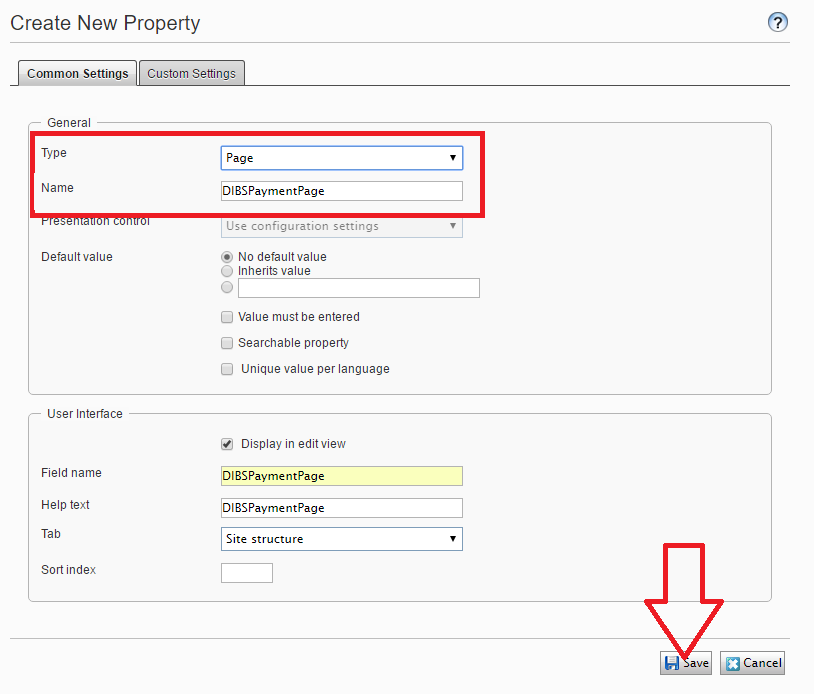
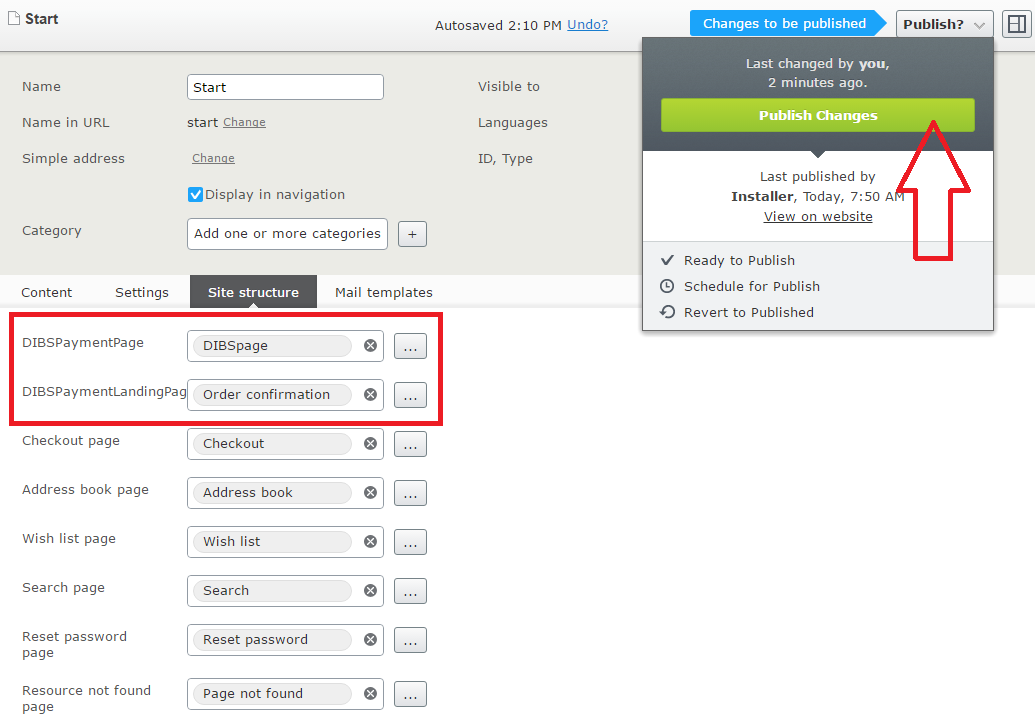
Go to CMS > Admin > Content Type tab.
-
Add two properties, DIBSPaymentPage and DIBSPaymentLandingPage of the type Page, to the Start page (or Home page) page type.
-
Go to CMS > Edit.
-
Create a Page using DIBS Payment Page under the Checkout page, then publish it.
-
Open the site's home page, click the Site Structure tab, and define two new properties.
- Set DIBSPaymentPage property to the DIBS page that was just created.
- Set DIBSPaymentLandingPage property to the Order confirmation page.
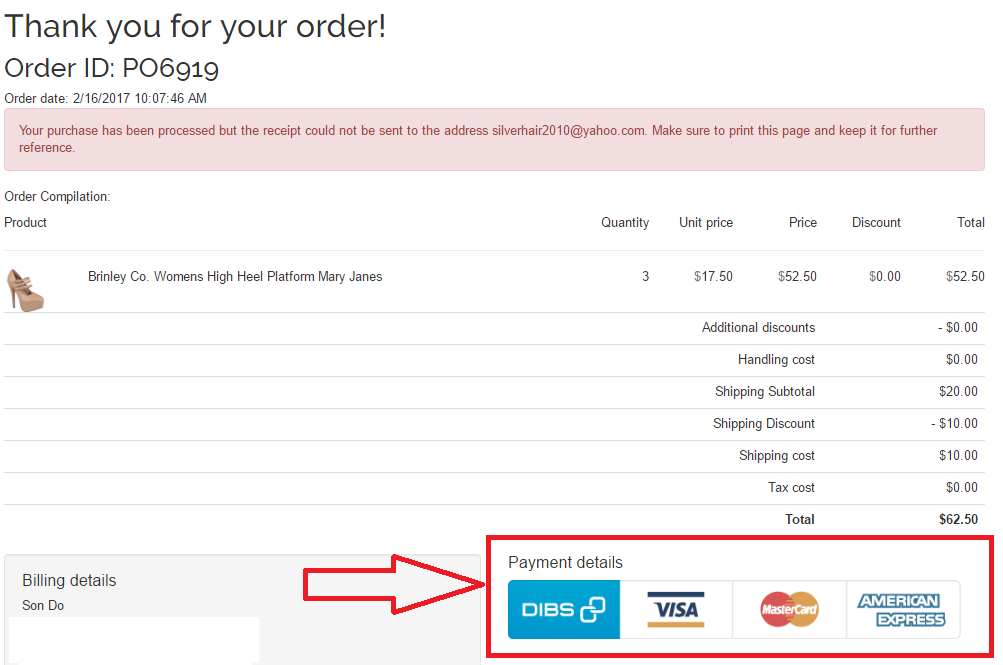
DIBS user experience
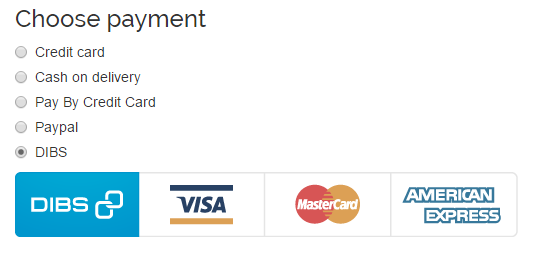
After you deploy the files and configure the DIBS payment module on your Optimizely Customized Commerce website, a DIBS option should appear on your checkout page. This section explains how a user interacts with DIBS.
-
During checkout, on the checkout page, select DIBS as the payment method.
-
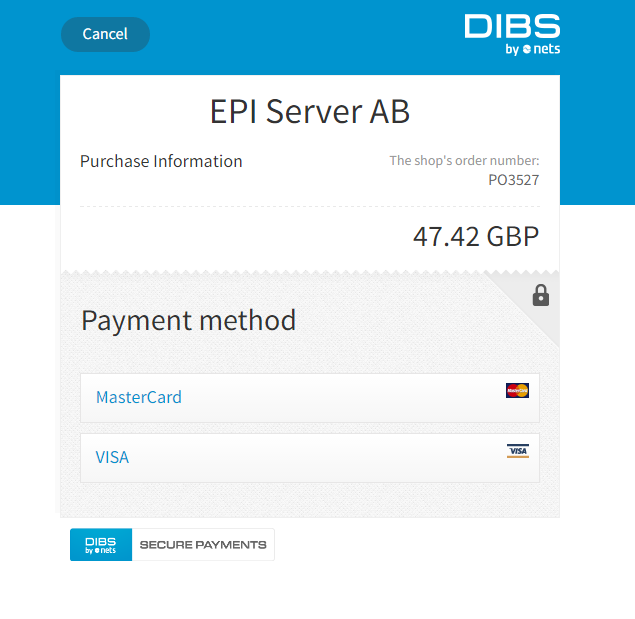
When you click Place order, you are redirected to DIBS to verify the payment.
-
When you finalize the approval process, you are redirected to the Order confirmation page (previously configured).
Updated 28 days ago