Deploy to Azure Web Apps
Describes how to set up an Optimizely Content Management System (CMS) site to run on Azure Web Apps.
This topic describes setting up an Optimizely Content Management System (CMS) site for Azure Web Apps. The example creates an Alloy sample site using the Optimizely Visual Studio extensions, but you can apply most steps to sites created in other ways.
NoteSee also the Install the Optimizely Alloy sample site video for information about cloud installation.
Cloud requirements
- You need a cloud-enabled license from the Optimizely License Center.
- Microsoft Azure Portal requires an account with login details.
- Content mirroring and workflows are not supported.
- When you install a database using Microsoft Azure SQL Database, ensure that SQL Database supports each product and add-on that you want to use on the site for the site to work properly.
- Ensure that each deployed application and module is designed for the cloud.
Set up a cloud website
The following image illustrates a CMS website running in an Azure Web Apps environment with multiple instances. The website instances share the same SQL database and BLOB storage that stores binary file data in the cloud environment. The sites are load-balanced, and a Service Bus manages events between the CMS websites.

Using App Service plans, you can increase or reduce the number of CMS sites from the Azure portal.

The following steps create an Optimizely CMS website running in an Azure website environment.
1. Create a site
- In Visual Studio, create a new project by selecting New > Project, and then Episerver Web Site.
- Select Alloy templates (MVC or Web Forms).
- Uncheck Configure Search; to use search functionality when you run in Azure, see Search in Azure.
- Install the NuGet package
EPiServer.Azureto the project. See Install Optimizely updates (CMS 11 and Commerce 13). - Save your license file under the site root, on the same level in the folder structure as the
/binfolder. The license is used and activated later when you deploy the website to Azure.
2. Create Azure resources
Log in to the Azure portal and follow these steps to create the necessary Azure components:
-
Create an Azure web app.
a. In the Azure portal, select Create a resource in the top left corner, and select Web App.
b. Choose whether to create a new Resource group or use an existing one. (A resource group is a logical container into which web apps and databases are deployed.)

c. Enter a name for your web app. The name must be unique for all web apps in Azure.
d. Select Publish: Code, Runtime stack: ASP.NET V4.7, and your operating system and region.
e. Select or create an App Service plan.
f. The performance monitoring service Application Insights is enabled by default. If you want to disable it, go to Monitoring and select No under Enable Application Insights.
g. Click Review + create at the bottom of the window and then Create again after you have reviewed your settings.
TipSelect Pin to dashboard to make it easier to find your web app later.
-
Create an SQL database.
a Select Create a resource in the top left corner, and select SQL Database.
b. Select an existing server or create one, and provide a login user and password.
c. Under Networking, select Connectivity method: Public endpoint and enable Allow Azure services and resources to access this server and Add current client IP address.

d. Adjust other settings as necessary.
e. Click Review + create and then Create again after you have reviewed your settings. -
Create Azure BLOB storage.
When you run on Azure, you should store media (such as images) in Azure BLOB storage to enable scaling.
a. Select Create a resource in the top left corner, and select Storage account.
b. Enter a name for the storage. For DNS compatibility, the storage container name must be in lowercase, such as mysitemedia.TipCreate two BLOB storage accounts: one for development and one for production, and switch between them using just the connection string.

c. Adjust other settings as necessary.
d. Click Review + create and then Create again after you have reviewed your settings -
Create a service bus.
To scale the site to run on several instances, set up a Service Bus in Azure to handle messages among the site instances.
a. Select Create a resource in the top left corner, and then Integration > Service Bus.
b. Select a name, a pricing tier, a resource group, and a region. Tip: Create two Service Bus accounts, one for development and one for production, and switch between them using just the connection string.
c. Click Create.
3. Update the configuration
Next, you need to change some configurations to work with Azure for the website.
CautionDo not skip this step! If you do, assets are stored locally, and will not deploy properly to the Azure Blob storage.
-
Map BLOB and event providers.
Open
web.configand add the following configuration under theepiserver.frameworksection to map BLOB and event providers to Azure.The attributes container and topic are the names of the BLOB provider (the storage account) and event provider (the service bus), respectively. They should be unique per web app and storage or service bus account, meaning you need to update the mapping for BLOBs and Events. (The
connectionStringNameattribute value is the name of the connection string from theconnectionStringssection in the Azure portal.)
You can change the container and topic names "mysitemedia" and "MySiteEvents" to names of your choice.
<blob defaultProvider="azureblobs">
  <providers>
    <add name="azureblobs"
         type="EPiServer.Azure.Blobs.AzureBlobProvider,EPiServer.Azure"
         connectionStringName="EPiServerAzureBlobs"
         container="mysitemedia"/>
  </providers>
</blob>
<event defaultProvider="azureevents">
  <providers>
    <add name="azureevents"
         type="EPiServer.Azure.Events.AzureEventProvider,EPiServer.Azure"
         connectionStringName="EPiServerAzureEvents"
         topic="MySiteEvents"/>
  </providers>
</event>-
Update connection strings.
In theweb.configfile, configure the following three connection strings:
a. Change the connection string forEPiServerDBto the SQL database connection string from the Azure portal. Remember to keep the settingMultipleActiveResultSets=true. You can find the connection string to your Azure SQL database in the Azure portal under your SQL database > Overview > Show database connection strings.
b. Add a connection string named
EPiServerAzureBlobs(it should match the BLOB provider name inepiserver.framework). You can find the connection string to your Azure BLOB provider in the Azure portal under your storage account > Settings > Access keys. The connection string to the BLOB storage should be in the format:connectionString="DefaultEndpointsProtocol=https;AccountName=<name>;AccountKey=<key>"c. Add a connection string named
EPiServerAzureEvents(it should match the event provider name inepiserver.framework). You can find the connection string to the event provider in the Azure portal under your service bus account > Settings > Shared access policies. Select the policyRootManagedSharedAccessKey. In a panel, you will see the connection strings and access keys.The following example shows the three database connection strings in web.config, defined for Azure:
<connectionStrings> <clear /> <add name="EPiServerDB" connectionString="Server=tcp:abcdefgh.database.windows.net,1433;Database=mySiteDB;User ID=dbadmin@abcdefgh;Password={password};Trusted_Connection=False;Encrypt=True;Connection Timeout=30;MultipleActiveResultSets=True" providerName="System.Data.SqlClient" /> <add name="EPiServerAzureBlobs" connectionString="DefaultEndpointsProtocol=https;AccountName=mystorageccount;AccountKey=abcdefghijklmnoabcdefghijklmnoabcdefghijklmno" /> <add name="EPiServerAzureEvents" connectionString="Endpoint=sb://myservicebus.servicebus.windows.net/;SharedAccessKeyName=RootManageSharedAccessKey;SharedAccessKey=abcdefghijklmnoabcdefghijklmnoabcdefghijklmno=" /> </connectionStrings> -
In the
web.configfile, under the<providers>element, add an explicit<clear/>element to ensure that your application does not inherit default provider registrations.<profile defaultProvider="DefaultProfileProvider"> <properties> . . . </properties> <providers> <clear/> <add name="DefaultProfileProvider" type="System.Web.Providers.DefaultProfileProvider, System.Web.Providers, Version=2.0.0.0, Culture=neutral, PublicKeyToken=31bf3856ad364e35" connectionStringName="EPiServerDB" applicationName="/" /> </providers> </profile> -
Update the workflows.
NoteYou can skip this step for sites created using the latest version of the Visual Studio extension where workflows are disabled by default.The database schema for Workflow 3.5 is not supported in the Azure database. Therefore, you must remove the configuration for Workflow persistence service from
web.config; that is, the entry with typeSqlWorkflowPersistenceServiceunderworkflowRuntime/Services.
Removal of workflow persistance configuration inweb.config:<workflowRuntime EnablePerformanceCounters="false"> <Services> <add type="System.Workflow.Runtime.Hosting.DefaultWorkflowSchedulerService, System.Workflow.Runtime, Version=3.0.00000.0, Culture=neutral, PublicKeyToken=31bf3856ad364e35" maxSimultaneousWorkflows="5" /> <add type="System.Workflow.Runtime.Hosting.SharedConnectionWorkflowCommitWorkBatchService, System.Workflow.Runtime, Version=3.0.00000.0, Culture=neutral, PublicKeyToken=31bf3856ad364e35" /> <strong>REMOVE THIS: <add type="System.Workflow.Runtime.Hosting.SqlWorkflowPersistenceService, System.Workflow.Runtime, Version=3.0.0.0, Culture=neutral, PublicKeyToken=31bf3856ad364e35" UnloadOnIdle="true" /></strong> </Services> </workflowRuntime>Disable workflows completely by adding the disabled attribute to the
workflowSettingselement. [Requires 7.14]<episerver> (...) <workflowSettings disabled="true" /> (...) </episerver>
4. Deploy to Azure
You can upload the site manually using FTP or integrate your source control system to get the process fully automated.
Publish code and database from Visual Studio
The following steps describe the publish functionality available from Visual Studio 2012 and later. Previous versions of Visual Studio do not have the database publishing capabilities described here. This option is also only available when the connectionstrings are defined in web.config (rather than in an external file such as connectionstrings.config).
NoteMake sure the
modulesandmodulesbinfolders are included in the project so they are published. Publishing the database schema should be performed only on the first publish operation.
-
Right-click on the Visual Studio project (not the solution) and select Publish.

-
In the Pick a publish target dialog box, select App Service and Select Existing > Publish, and the App Service dialog box displays.

-
Select your web app in the Publish profile and click Edit.

-
The Connection section displays. It should display the imported Azure profile; no changes should be required. Validate your connection and click Next.

-
The Connection section should display the imported Azure profile; no changes should be required. Validate your connection and click Next.
-
In the Settings section, select the remote connection string to the SQL Database from the drop-down list under EPiServerDB.

-
Select the checkboxes Use this connection string at runtime and Update database.
-
Click Configure database updates and clear the option [Auto schema update].
-
Click Add SQL Script. Go to and select the file
[SolutionDir]\packages\EPiServer.CMS.Core.x.x.x\tools\EPiServer.Cms.Core.sql. Click Open. In the EPiServerDB - Configure Database Updates dialog box, click Close.
-
Click Publish to publish the site and database.
NoteYou can also deploy the database schema using SQL Server Management Studio or the tools available in the Azure Portal. The script you should run is available relative to the project (
[SolutionDir]\packages\EPServer.CMS.Core.x.x.x\tools\EPiServer.Cms.Core.sql). See also Microsoft's SQL Server database migration to Azure SQL Database.
Deploy through source control
You can configure Azure Web Apps to use continuous deployment from source code control. It supports Git, GitHub, Bitbucket, and VSTS/TFS. See Continuous Deployment to Azure App Service on the Microsoft Azure portal. When you commit to your source control, Windows Azure gets the latest code from the source control, builds it, and deploys the output to the website. When you work with a local Git repository, you can push your changes to Azure Web Apps instead. See Local Git Deployment to Azure App Service.
Deploy content
A bootstrap feature for content works so that if there is an export package located at [SolutionDir]\App_Data\DefaultSiteContent.episerverdata then, it imports that package and creates a site during initialization. The bootstrap only happens if the site does not have any previous content. For cloud deployment, you may want to fublish the project to the cloud environment before starting a local site configured against the cloud database. Then, the bootstrap happens in the cloud environment, which is much faster (because the site and database are likely in the same data center). It also sets the SiteUrl to the cloud URL for the created site.
You can transfer data to an Optimizely site running on Azure Web Apps using the Optimizely CMS export/import functionality. Before proceeding to the next step, export the start page from your local site and database and import it into the Azure site.
5. Create an admin or edit user
To log in to the site on Azure, create a user with access to the edit or admin view, start the local site while connected to the SQL Database, and perform the following steps. You must allow the source IP address to access the Azure database server. You can enable this in the Azure Portal on the specific SQL Database server (select the SQL server > Firewall/Virtual Networks > Add client IP). How to create the first user depends on which identity provider is configured: membership or AspNet Identity provider.
Membership Identity Provider
- Start the site (Debug/F5).
- Go to the CMS admin view > Administer Groups.
- Log in with a local Windows administrator account.
- Create the two groups WebAdmins and WebEditors. These are the default Optimizely groups providing access to the edit/admin user interface.
- Go to Create User and create a user that is a member of WebAdmins and WebEditors. After deployment, you will need this user later when logging in to the Azure website.
AspNet Identity Provider
- Start the site (Debug/F5).
- A register page lets you register the first user in the WebAdmins group.
- Go to the CMS admin view > Administer Groups.
- Create another group, WebEditors. The WebAdmins and WebEditors are default Optimizely groups that provide access to the edit/admin user interface.
- Go to Create User and create a user that is a member of WebAdmins and WebEditors. After deployment, you will need this user later when logging in to the Azure website.
6. Activate the license
Go to the CMS admin view and activate your cloud license on test and production environments. The running instances will count towards the total number of instances allowed by the license. See also Manage cloud licenses.

7. Change the site URL
Depending on how you created the site (see Deploy content), you might need to update the site definition for the CMS website created in the first steps after deployment. If so, log in to the website, go to the CMS admin view > Config > Manage Websites, and change the Site URL to the URL in Azure to map a hostname to the correct site in CMS. The URL is in the Azure portal. Select your web app > Overview. The site URL is in the right column.

Activate logging
Optimizely supports writing to the diagnostics log using BLOB storage. See Log into .Net Diagnostics Trace for more details on how this works.
Follow these steps to activate the logging:
- Open your web app and go to Monitoring > App Service logs.
- Set the Application Logging (Blob) to On, select the desired Level of verbiage and select a storage account and container under Storage Settings.
- Click Save when done.
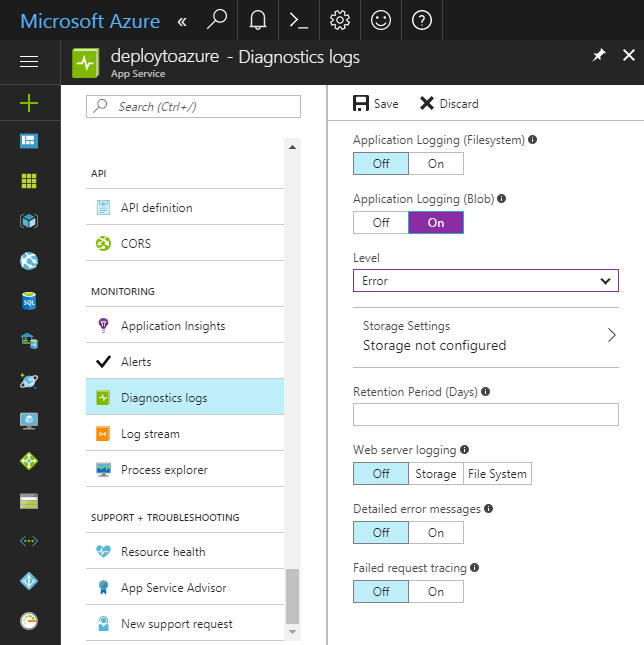
NoteThe web app will restart when activating the logging.
SQL database automatic tuning
The Azure SQL Database Automatic tuning is a feature that provides improved performance and automatic database tuning, based on AI and machine learning. You should leave the settings as default, and in particular, leave CREATE INDEX as Off, as turning it on might cause problems with the Optimizely Dynamic Data Store (DDS) and sub-optimal indexes.

Search in Azure
You should use a scalable search solution when you host in Azure. It is not recommended to use the Optimizely Search package in Azure Web Apps, as data corruption can occur in the Lucene index used by the built-in search when scaling up to multiple instances.
If you need scaling, use Optimizely Search & Navigation instead, a hosted service you connect to and works like when your site runs on-premises. Your solution in Optimizely Digital Experience Platform (DXP) includes Optimizely Search & Navigation.
Staged deployment
Azure Web Apps supports deployment slots, so you can deploy code into a staging environment before moving it to production. To make sure deployment slots do not interfere with the production environment, make sure you define the EPiServerDB, EPiServerAzureEvents and EPiServerAzureBlobs connection strings in the Azure portal as "sticky" (session affinity) to each slot. If a deployment slot re-uses the production connection strings, it is treated as a load-balanced server, part of the production environment, including licensing restrictions. See Microsoft documentation for details about using staging with Azure Web Apps.
NoteDefining EPiServerDB as a connection string in the Azure Portal requires at least EPiServer.CMS.Core 8.3.0. You must enable this feature by adding an app setting
episerver:ReadOnlyConfigurationAPIin the portal (under your web app > Configuration > Application settings > Connection strings), with the value set to true.

The core parts of CMS do not use Session State, but some functionality does, such as some Visitor Groups criteria. There are two approaches to enabling session state, depending on the sticky session feature (also known as session affinity) provided by Azure Web Apps. This feature ensures a user is reaching the same server combined with the default in-memory session state provider.
Another approach to enable better scaling is using an optimized provider for Azure, such as the session provider for Azure Web Apps.
Updated 4 months ago