React SDK quickstart
Welcome to the quickstart guide for Optimizely Feature Experimentation's React SDK v4+. Follow the steps in this guide to create a feature flag, roll out a flag delivery, and run an A/B test using a simple React application.
NoteThis quickstart is for React SDK v4+. For versions 3.x and earlier, see the React SDK quickstart (prior to v4).
Part 1: Create a sample app
1. Get a free account
You need an Optimizely account to follow this guide. If you do not have an account, you can register for a free account. If you already have an account, navigate to your Feature Experimentation project.
2. Get your SDK key
To find your SDK Key in your Optimizely project:
- Go to Settings > Primary Environment.
- Copy and save the SDK Key for your primary environment.
ImportantEach environment has its own SDK key. Ensure you copy the correct key.

Click image to enlarge
3. Copy the sample code
To try out the SDK:
- Create a new React app:
npx create-react-app optimizely-react-quickstart
cd optimizely-react-quickstart- Install the Optimizely React SDK:
npm install @optimizely/react-sdkThe React SDK is open source and available on GitHub.
- Copy the following code sample into
src/App.jsfile. ReplaceYOUR_SDK_KEYwith the SDK key you found in a previous step.
import { useState } from 'react';
import {
  createInstance,
  createPollingProjectConfigManager,
  createBatchEventProcessor,
  OptimizelyProvider,
  useDecide,
} from '@optimizely/react-sdk';

const optimizelyClient = createInstance({
  projectConfigManager: createPollingProjectConfigManager({
    sdkKey: 'YOUR_SDK_KEY',
  }),
  eventProcessor: createBatchEventProcessor(),
});

function Pre(props) {
  return <pre style={{ margin: 0 }}>{props.children}</pre>;
}

function App() {
  // Generate a random user ID for this session
  const [userId] = useState(() =>
    (Math.floor(Math.random() * 999999) + 100000).toString()
  );

  return (
    <OptimizelyProvider
      client={optimizelyClient}
      user={{ id: userId }}
    >
      <pre>Welcome to our Quickstart Guide!</pre>
      <Pre>Your user ID: USERID</Pre>
      <br />
      <Decision />
    </OptimizelyProvider>
  );
}

function Decision() {
  const { decision, isLoading, error } = useDecide('product_sort');

  if (isLoading) return <Pre>Loading decision...</Pre>;
  if (error) return <Pre>Error: {error.message}</Pre>;

  const variationKey = decision.variationKey;
  const sortMethod = decision.variables['sort_method'];

  return (
    <Pre>
      {`Flag ${
        decision.enabled ? 'on' : 'off'
      }. You saw flag variation: ${variationKey} and got products sorted by: ${sortMethod} config variable as part of flag rule: ${
        decision.ruleKey
      }`}
    </Pre>
  );
}

export default App;
NoteDo not run your app yet, because you still need to configure the flag in the Optimizely app.
Part 2: Run your app
After completing Part 1, your app does nothing. You need to create a flag and a flag rule in the Optimizely app to enable the app.
1. Create the feature flag
A flag lets you control the users that are exposed to new code in your application. For this quickstart, imagine that you are rolling out a redesigned sorting feature for displaying products.
Create a flag in your Feature Experimentation project named product_sort and give it a variable named sort_method:
- Select Create New Flag... from the Flags tab.
- Enter product_sort in the Name field.
- Keep the auto-created Key, product_sort, and click Create Flag. The Key corresponds to the flag key in your sample app.
Next, create a variable in your flag:
- In your new flag,
product_sort, under Flag Setup, go to Variables and click Add Variable (+). - Select String in the Add Variable drop-down.
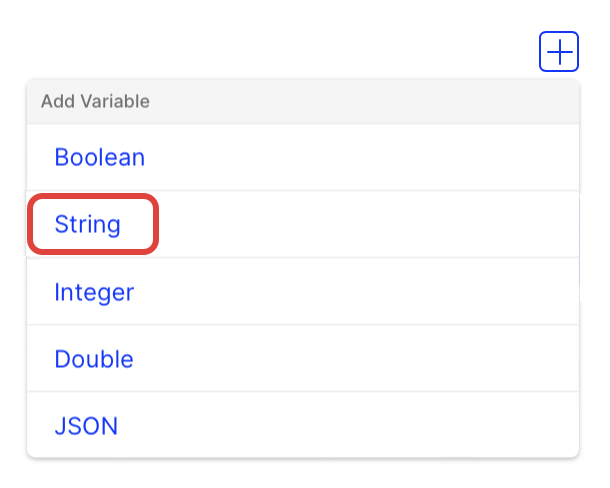
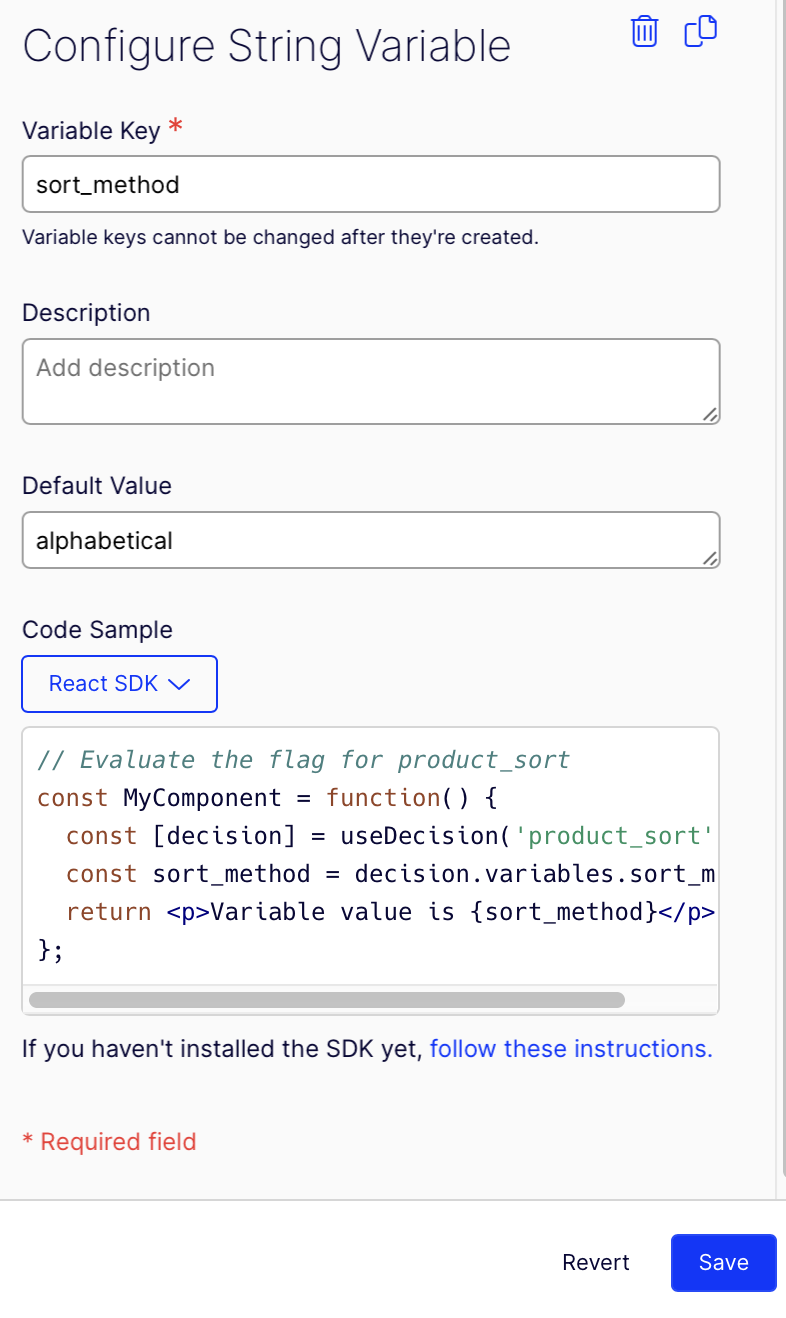
- Enter sort_method for the Variable Key, which corresponds to the variable key in your sample app.
- Enter alphabetical for the Default Value, which represents your old sorting method. The new sorting method is what you are rolling out.
- Click Save.
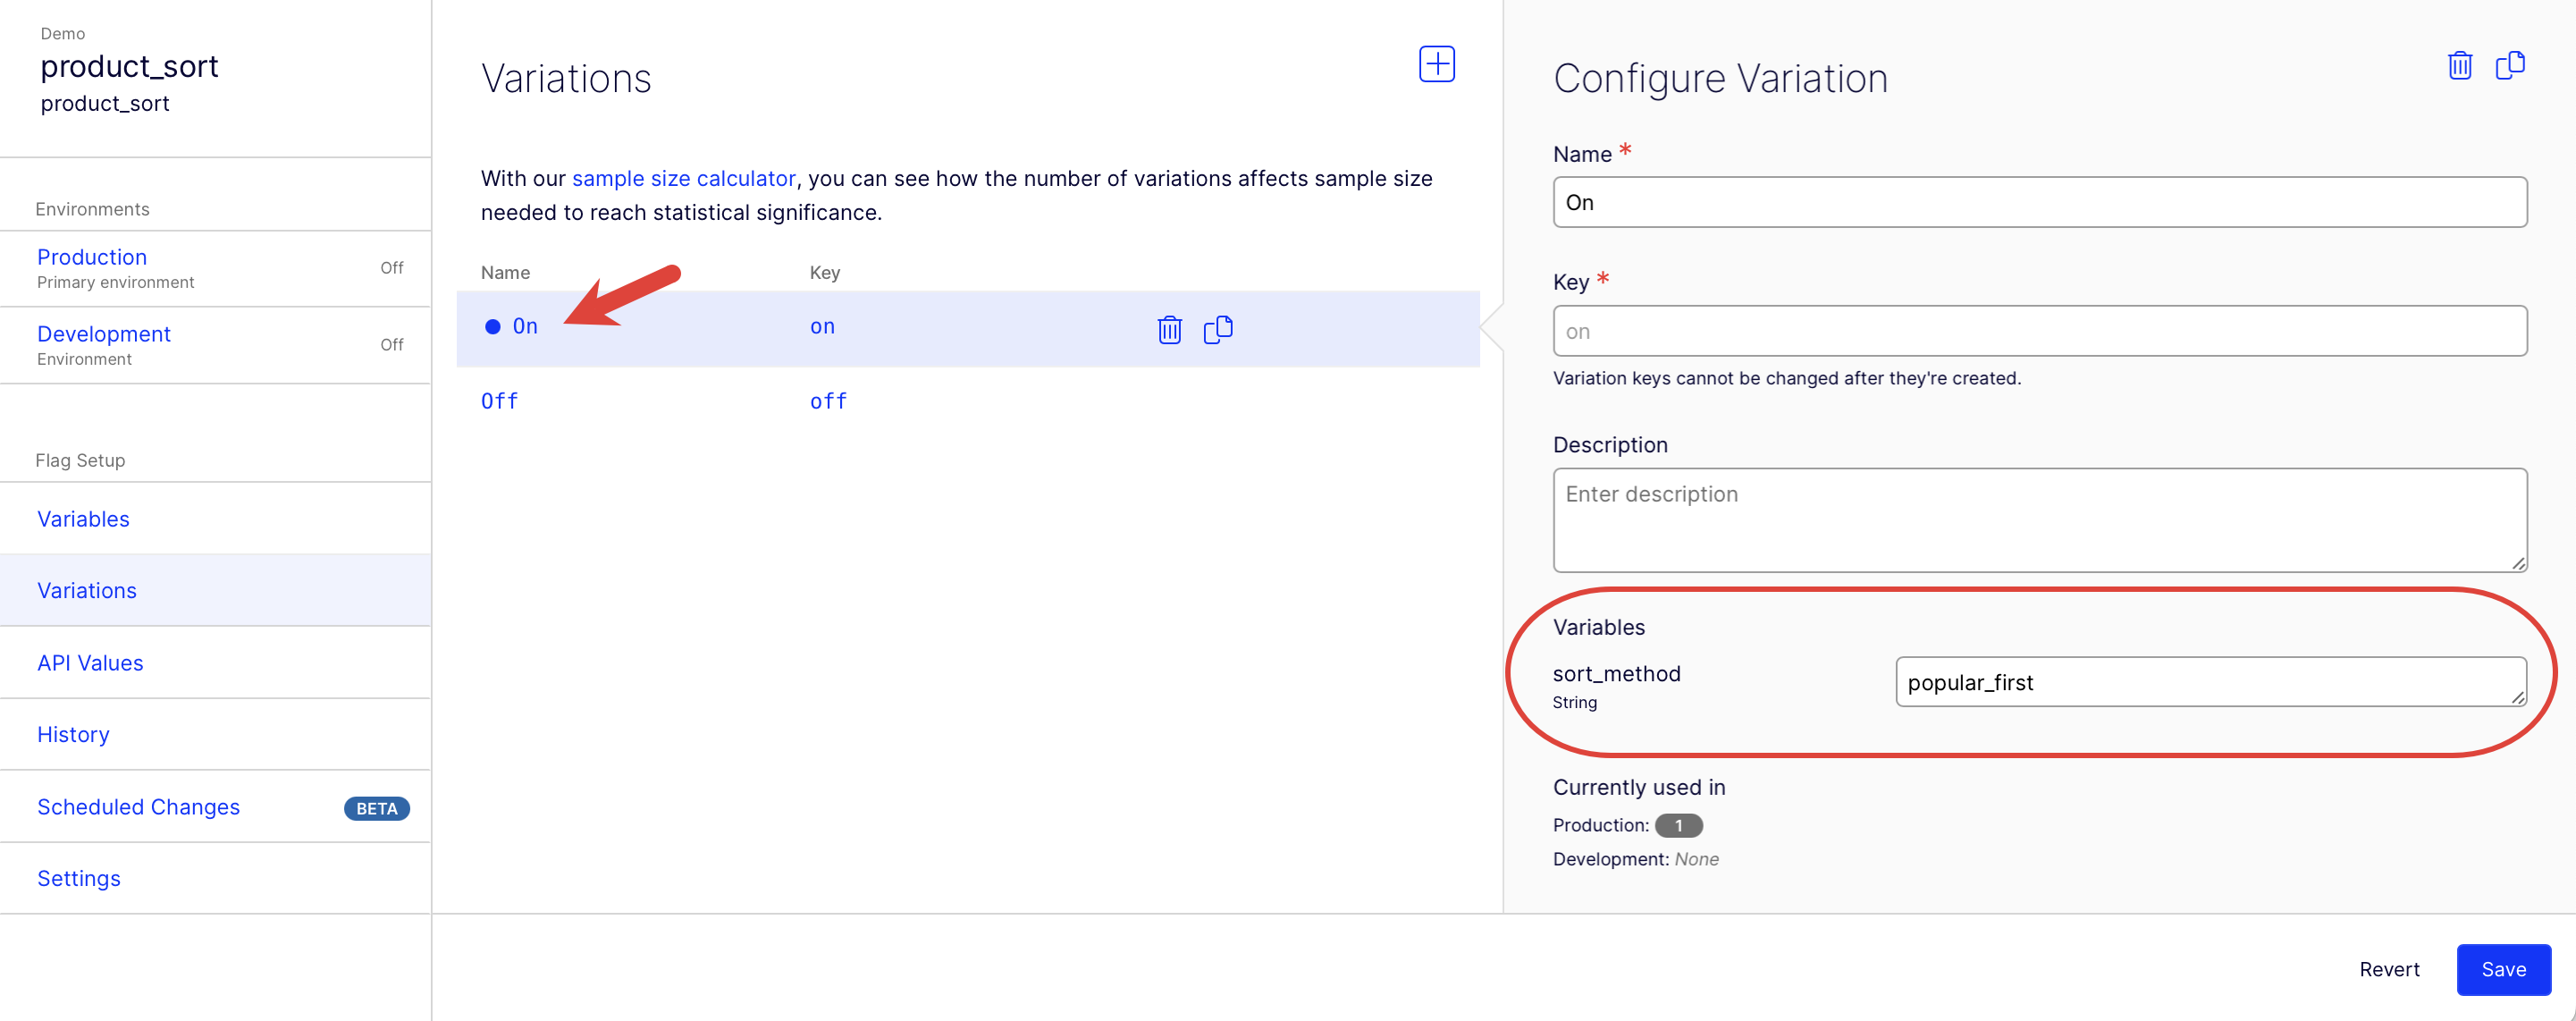
Next, create a variation in your flag:
- Under Flag Setup, go to Variations and select the On variation. A variation is a wrapper for a collection of variable values.
- For the sort_method variable value, enter popular_first, which represents your new sorting method.
- Click Save.
2. Create the flag delivery rule
Your sample app still does not do anything because you need to create and enable a flag rule.
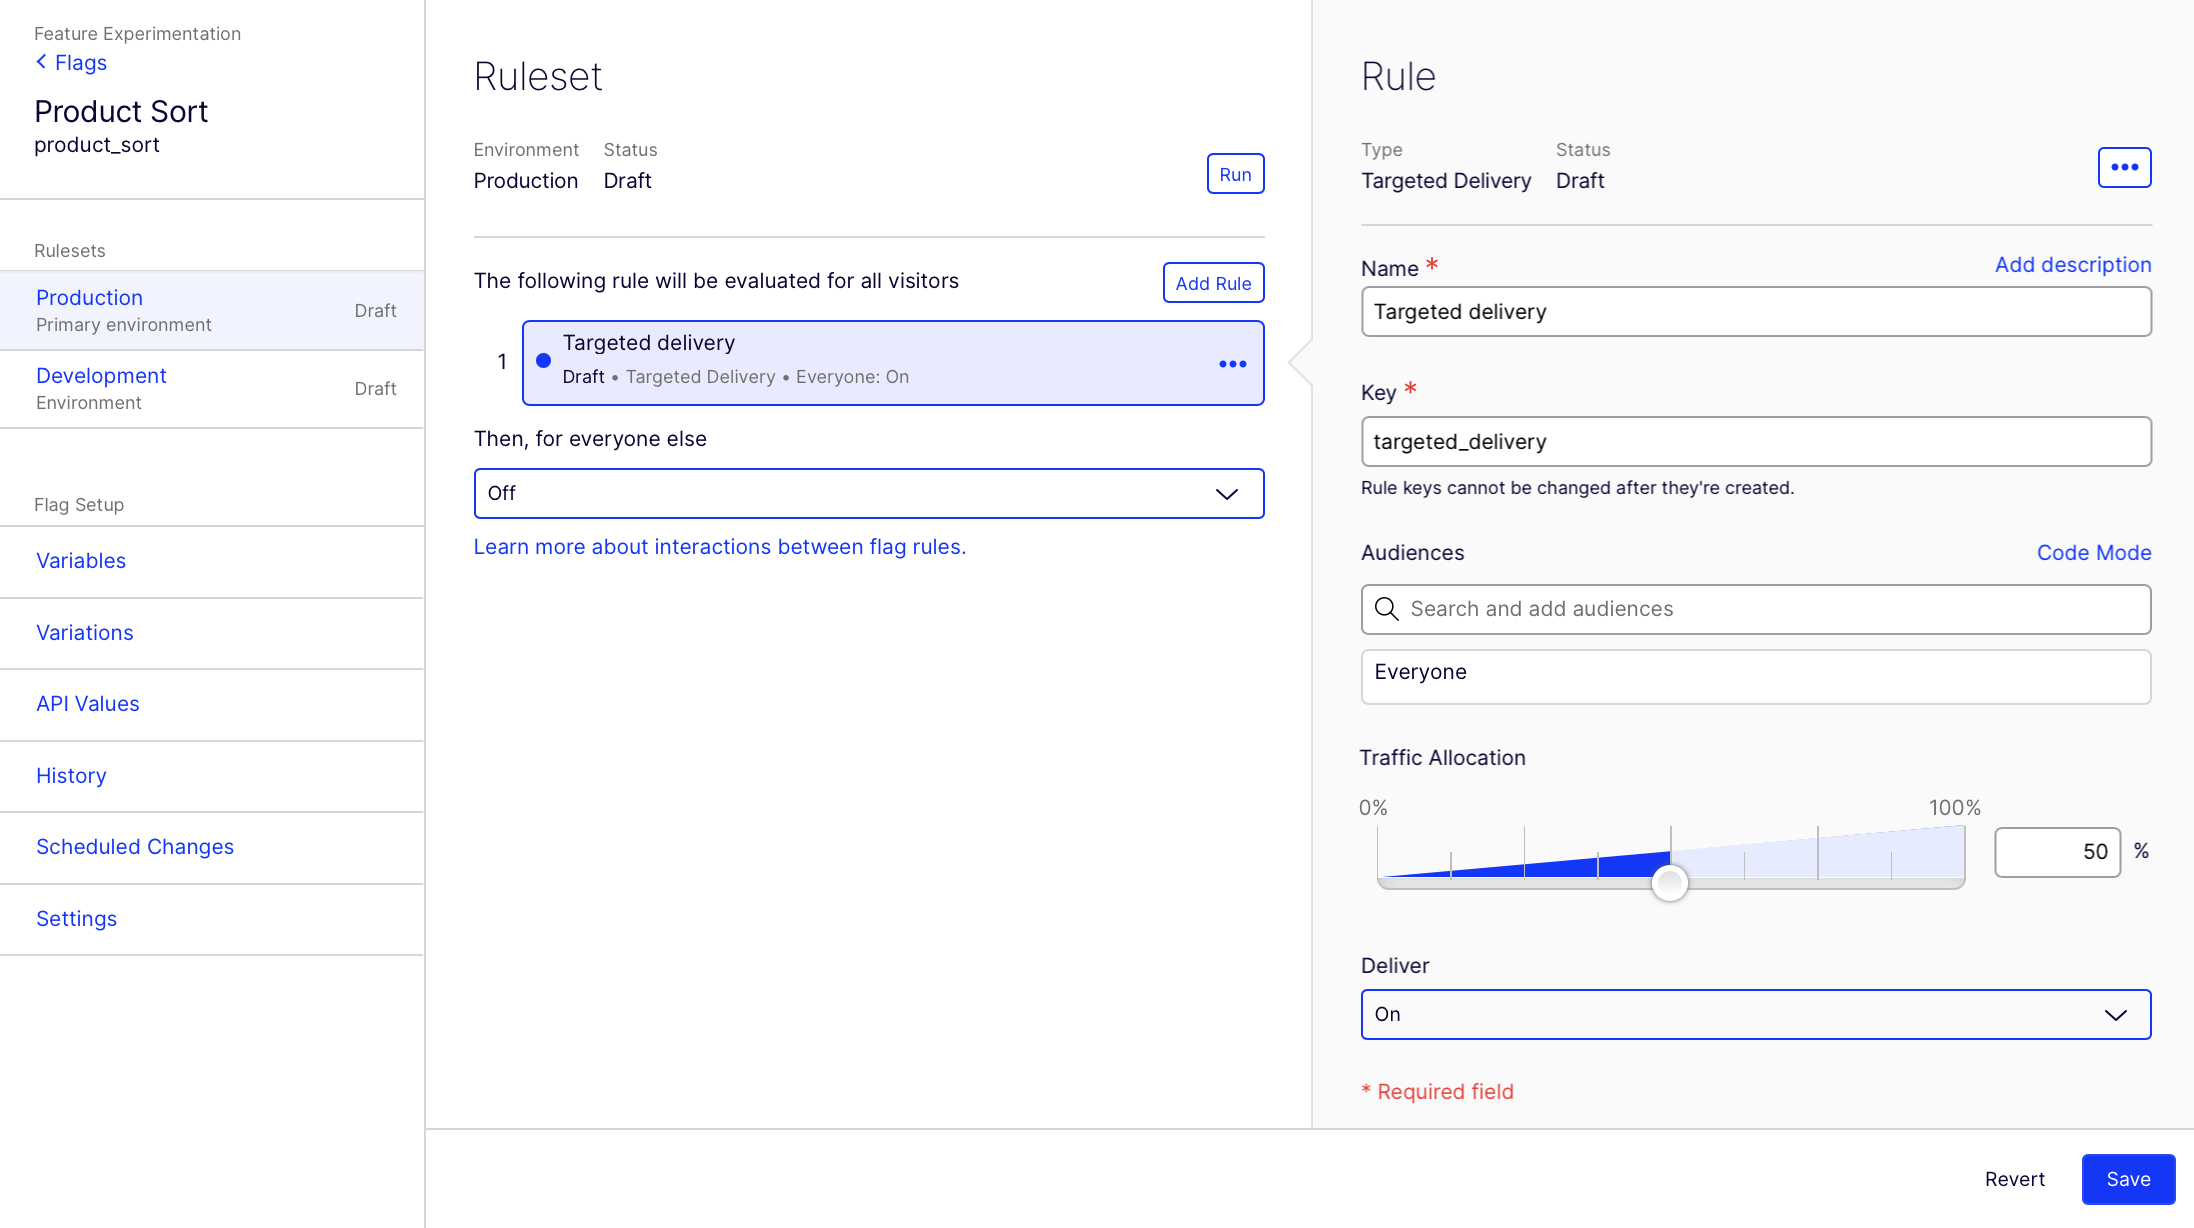
Make a targeted delivery rule for the On variation for the product_sort flag. A targeted delivery lets you gradually release a feature flag to users, but with the flexibility to roll it back if you encounter bugs.
-
Ensure you are in your primary environment (because you are using the primary environment SDK key from Part 1).

-
Click Add Rule and select Targeted Delivery.
-
Enter Targeted Delivery for the Name field.
-
Keep the default Key and Audiences.
-
Set the Traffic Allocation slider to 50%. This delivers the product_sort flag to 50% of everyone who triggers the flag in this environment. You can roll out or roll back the product_sort flag to a percentage of traffic whenever you want.
-
From the Deliver drop-down list, select the On variation.
-
Click Save.
3. Run your sample app
To run your sample application:
-
Click Run on your targeted delivery rule:
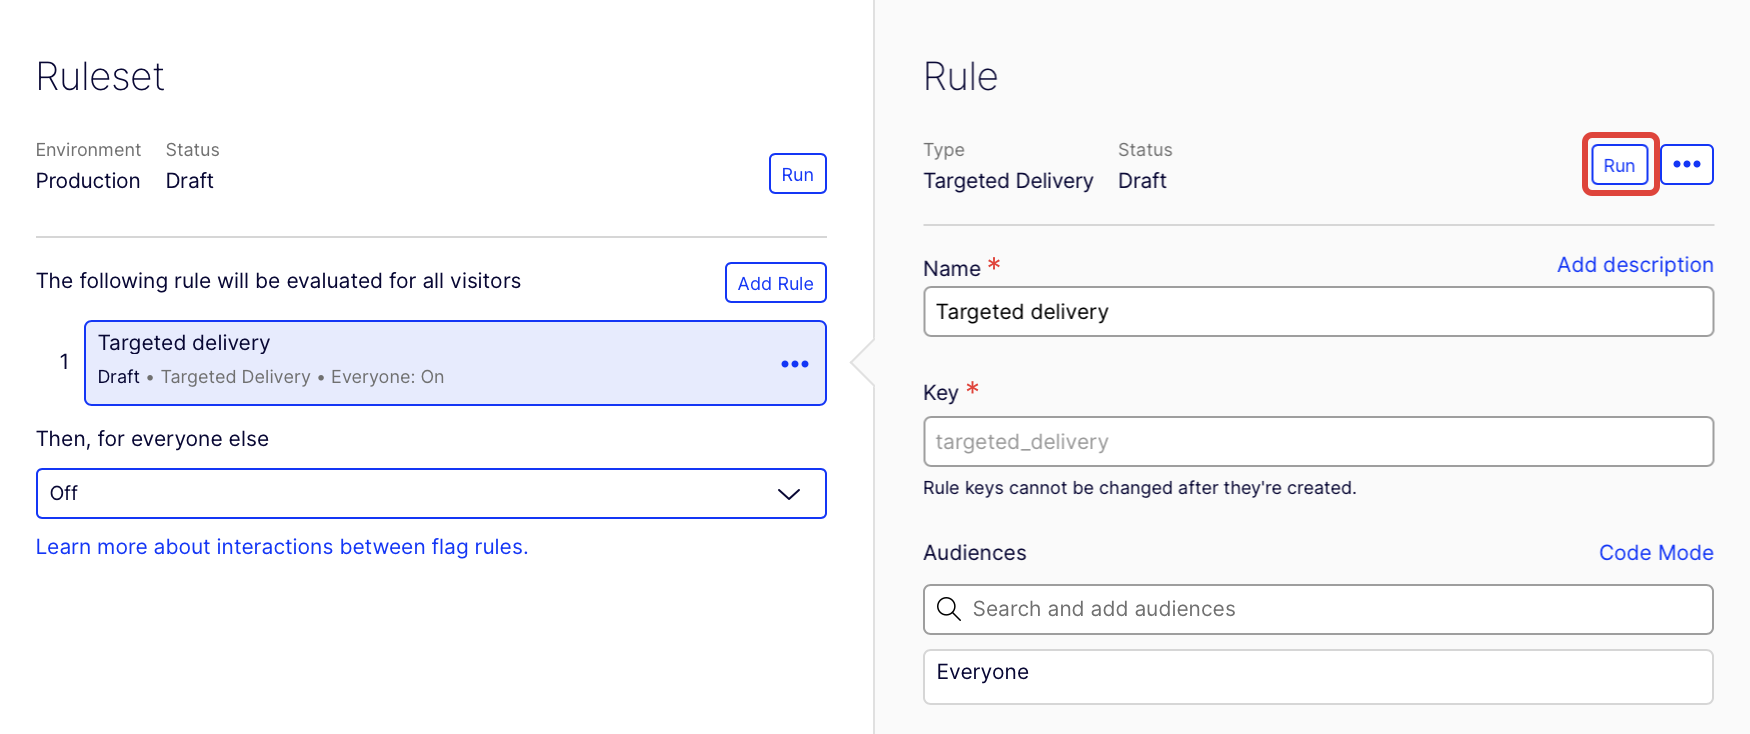
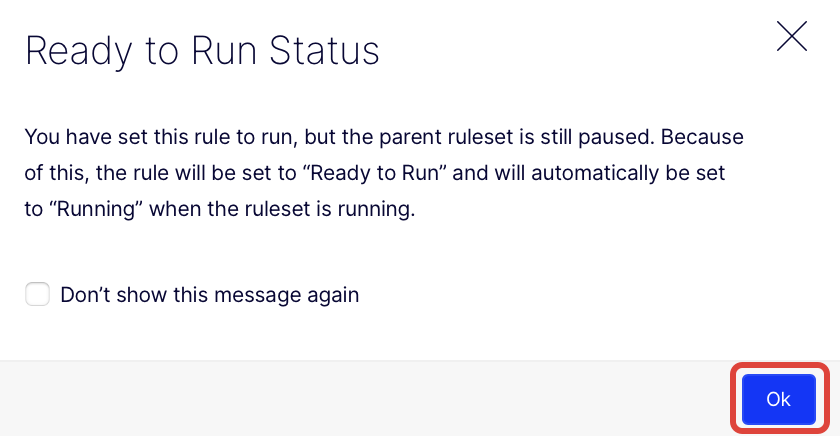
-
Click Ok on the Ready to Run Status page. This lets you know that your ruleset has not been set to run, yet.
-
Click Run on your ruleset (flag):

-
Run the React application using
npm start. The output should display in the browser similar to the following:
Your user ID: 483921
Flag on. You saw flag variation: on and got products sorted by: popular_first config variable as part of flag rule: targeted_delivery
NoteWhether the flag is on or off depends on your user ID and the 50% traffic allocation. Refresh to get a new random user ID and potentially see a different result.
4. How it works
So far, you:
- Created a flag, flag variable, and a flag variation (wrapper for your variables) in your Optimizely project.
- Implemented a flag in your app with the useDecide hook.
What is going on in your sample app?
How it works: decide to show a user a flag
The React SDK's useDecide hook determines whether to show or hide the feature flag for a specific user.
NoteYou can reuse this hook for different flag rules -- whether for delivering to more traffic, or running an experiment to show different sorting methods to just a portion of users.
After you learn which sorting method works best to increase sales, roll out the product sort flag to all traffic with the method set to the optimum value.
In your sample app:
// "product_sort" corresponds to the flag key you create in the Optimizely app
const { decision, isLoading, error } = useDecide('product_sort');
NoteInclude attributes when you create your user (via the
userprop onOptimizelyProvider), so that you can target specific audiences. For example:var attributes = { logged_in: true }; <OptimizelyProvider client={optimizelyClient} user={{ id: 'userId', attributes: attributes, }}> { /*Application Components here*/ } </OptimizelyProvider>
How it works: configure flag variations
You can dynamically configure a flag variation using flag variables. In your sample app:
// always returns false until you enable a flag rule in the Optimizely app
if (decision.enabled)
{
  // "sort_method" corresponds to variable key you define in Optimizely app
 var sortMethod = decision.variables['sort_method'];
 console.log('sort_method: ', sortMethod);
}
For your product_sort flag, you can configure variations with different sort_method values, sorting by popular products, relevant products, promoted products, and so on. You can set different values for the sort method at any time in the Optimizely app.
Part 3: Run an A/B test
Part 2 of this tutorial guided you through a targeted delivery because it is the most straightforward flag rule. However, you often want to A/B test how users react to feature flag variations before you roll out a flag delivery.
- Targeted delivery rule – You can roll out your flag to a percentage of your general user base (or to specific audiences), or roll back if you encounter bugs.
- A/B test rule – Experiment by A/B testing a flag before you invest in delivering, so you know what to build. Track how users behave in flag variations, then interpret your experiment results using the Optimizely Stats Engine.
For Part 3, you will run an A/B test on the On variation of your product_sort flag.
1. Add event tracking
You need to add event tracking to your sample app, so you can mock up user events and then see metrics.
- Delete your old sample code, and paste in the following code.
- Replace your SDK key. See Get your SDK Key.
- Do not run your app yet because you still need to configure the A/B test in the Optimizely application.
import { useState } from 'react';
import {
  createInstance,
  createPollingProjectConfigManager,
  createBatchEventProcessor,
  OptimizelyProvider,
  useDecide,
  useOptimizelyUserContext,
} from '@optimizely/react-sdk';

const optimizelyClient = createInstance({
  projectConfigManager: createPollingProjectConfigManager({
    sdkKey: 'YOUR_SDK_KEY',
  }),
  eventProcessor: createBatchEventProcessor(),
});

function Pre(props) {
  return <pre style={{ margin: 0 }}>{props.children}</pre>;
}

function App() {
  const [userId] = useState(() =>
    (Math.floor(Math.random() * 999999) + 100000).toString()
  );

  return (
    <OptimizelyProvider
      client={optimizelyClient}
      user={{ id: userId }}
    >
      <pre>Welcome to our Quickstart Guide!</pre>
      <Pre>Your user ID: USERID</Pre>
      <br />
      <Decision />
      <br />
      <TrackPurchase />
    </OptimizelyProvider>
  );
}

function Decision() {
  const { decision, isLoading, error } = useDecide('product_sort');

  if (isLoading) return <Pre>Loading decision...</Pre>;
  if (error) return <Pre>Error: {error.message}</Pre>;

  const variationKey = decision.variationKey;
  const sortMethod = decision.variables['sort_method'];

  return (
    <Pre>
      {`Flag ${
        decision.enabled ? 'on' : 'off'
      }. You saw flag variation: ${variationKey} and got products sorted by: ${sortMethod} config variable as part of flag rule: ${
        decision.ruleKey
      }`}
    </Pre>
  );
}

function TrackPurchase() {
  const { userContext, isLoading } = useOptimizelyUserContext();
  const [tracked, setTracked] = useState(false);

  if (isLoading) return null;

  const handleTrack = () => {
    if (userContext) {
      userContext.trackEvent('purchase');
      setTracked(true);
    }
  };

  return (
    <div>
      {!tracked ? (
        <button onClick={handleTrack}>Simulate Purchase</button>
      ) : (
        <Pre>Purchase event tracked! Check your experiment results.</Pre>
      )}
    </div>
  );
}

export default App;
2. Delete other rules in free accounts
If you have a free Optimizely account, you need to delete the Targeted Delivery you created in Part 2 before you create your A/B test:
-
Select the Flag that contains the Targeted Delivery you created in Part 2 from the Flags tab.
-
Select the primary environment and the Targeted Delivery rule you created in Part 2.
-
Click More Options > Delete:
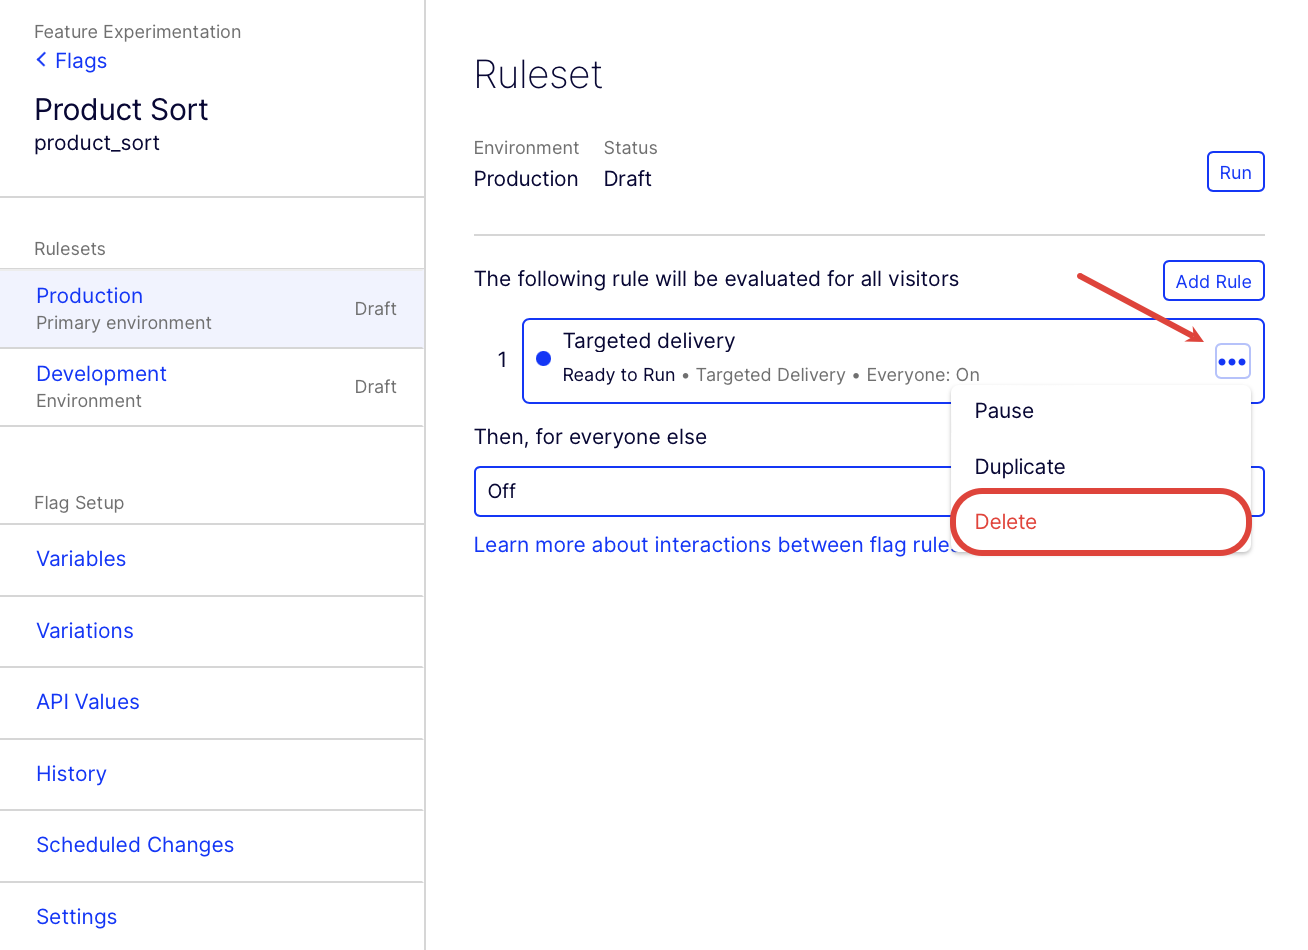
-
Click Save.
3. Create the A/B test
To create an A/B Test rule in your Feature Experimentation project, in the flag you created in Part 2:
- Click Add Rule and select A/B Test.
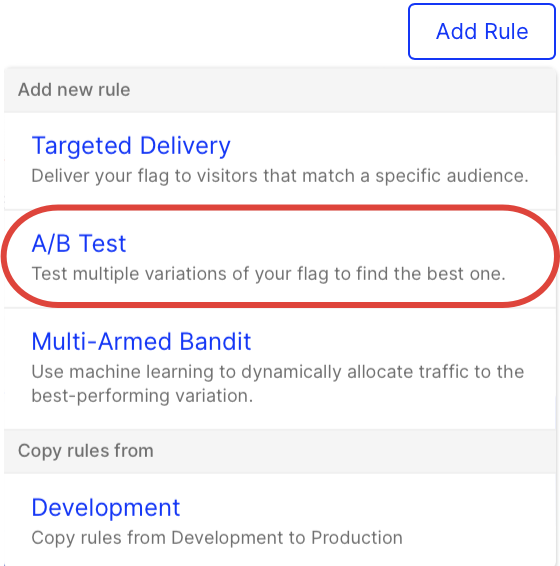
- Enter Experiment for the Name field.
- Keep the default Key and Audiences
- Keep the Ramp Percentage traffic allocation slider set to 100%.
4. Add an event
In an experiment, you track users' relevant actions to measure how they react to your flag variations. To define the actions you want to track, called events:
- Click on the Metrics field.
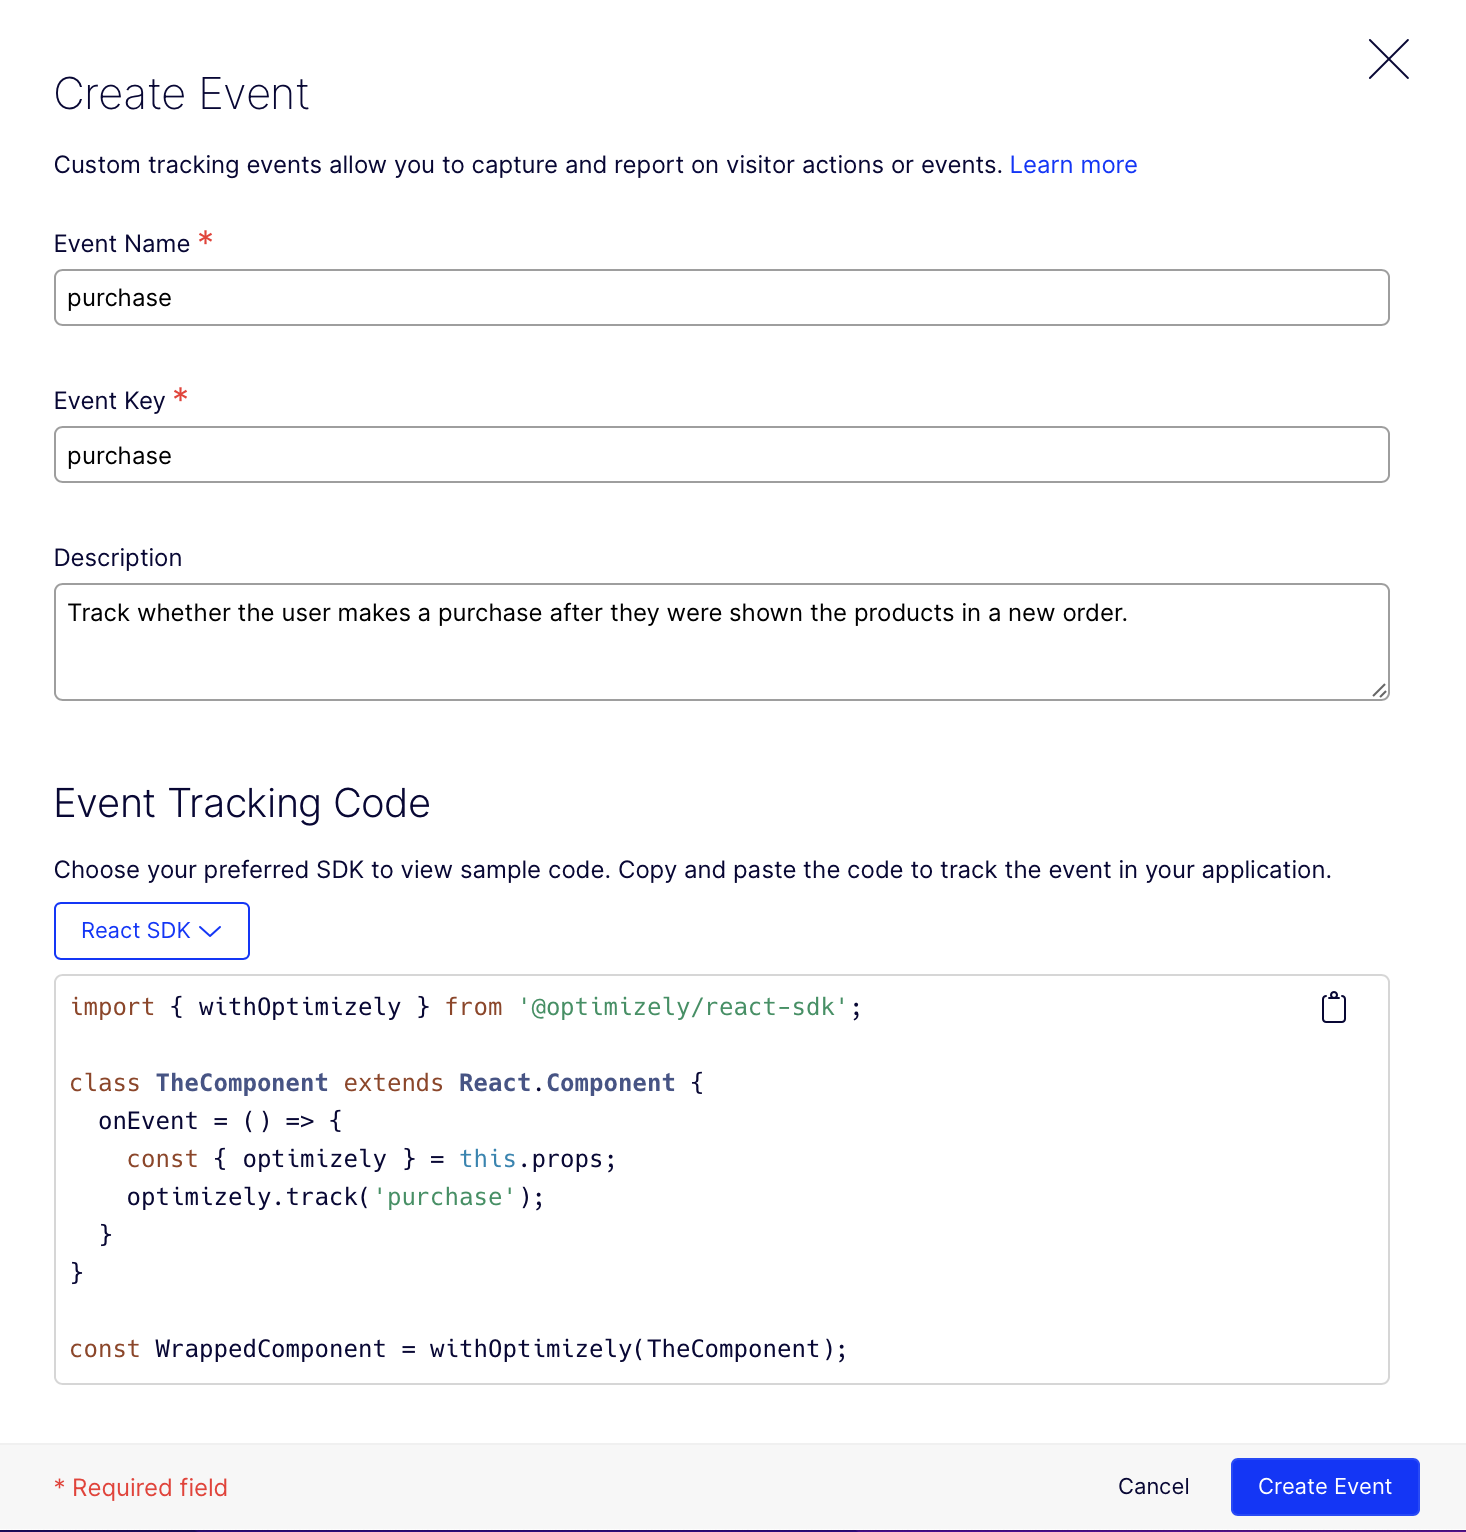
- Click Create new event.
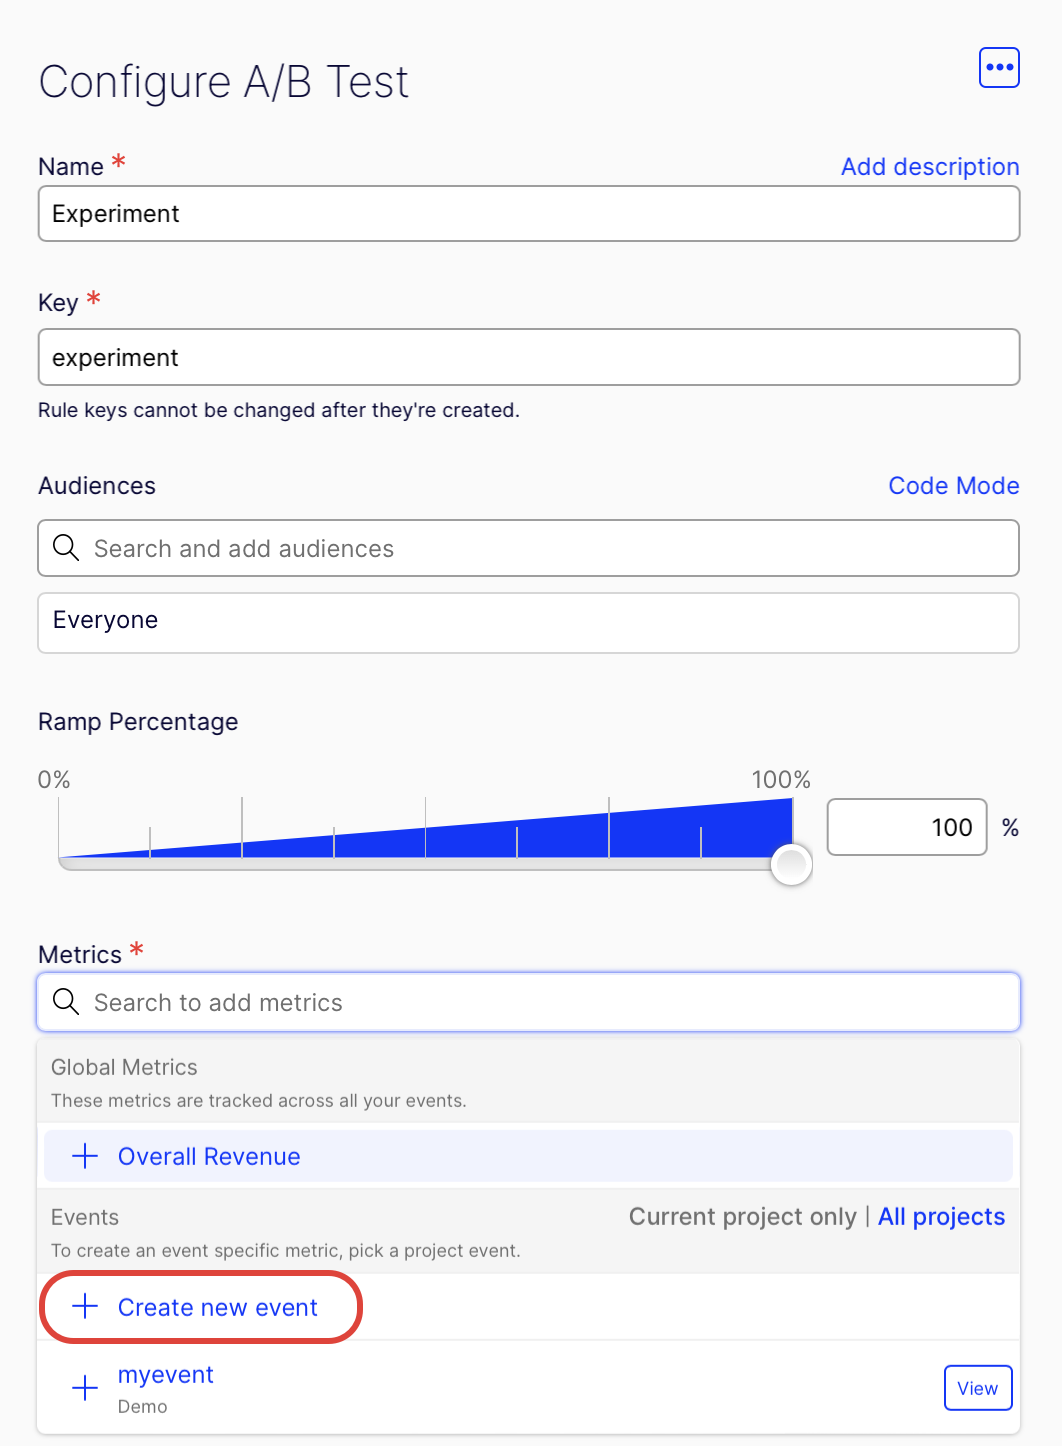
- Enter purchase for the Event Name, and the Event Key is automatically filled.
- (Optional) Enter a Description. You will want to know whether the new sorting flag helps customers figure out what to buy, so track whether the user makes a purchase after they were shown the products in a new order.
- Click Create Event.
- In the Add Metric modal, leave the defaults, measure increase in unique conversions.
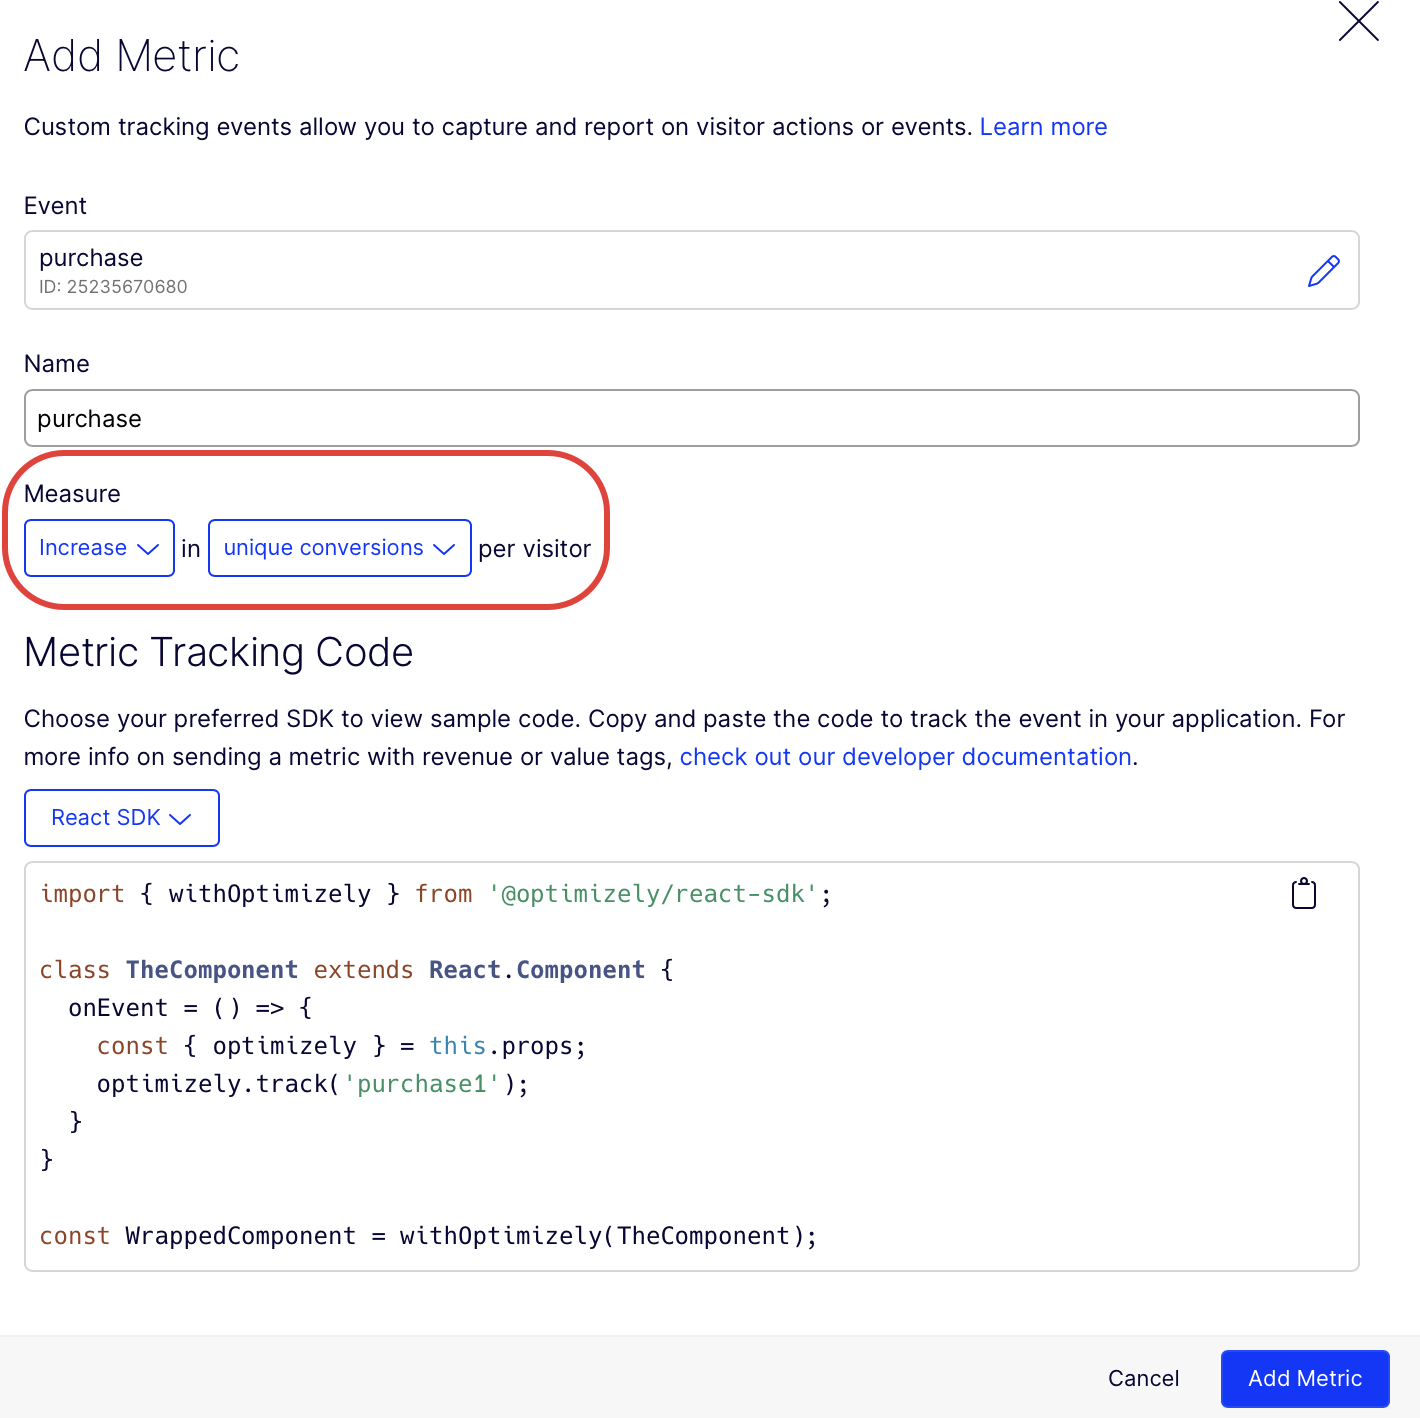
- Click Add Metric.
- Leave the default Off variation as a control. Select the On variation you configured in Part 2:
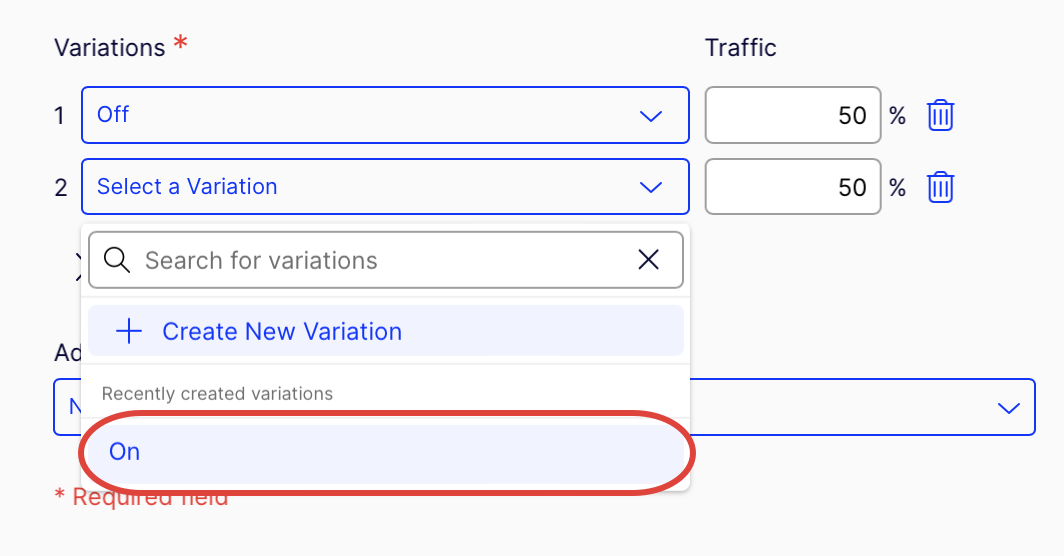
NoteYou are not limited to two variations; you can also create A/B tests with multiple variations.
-
Click Save to create your A/B Test rule.
-
Click Run.
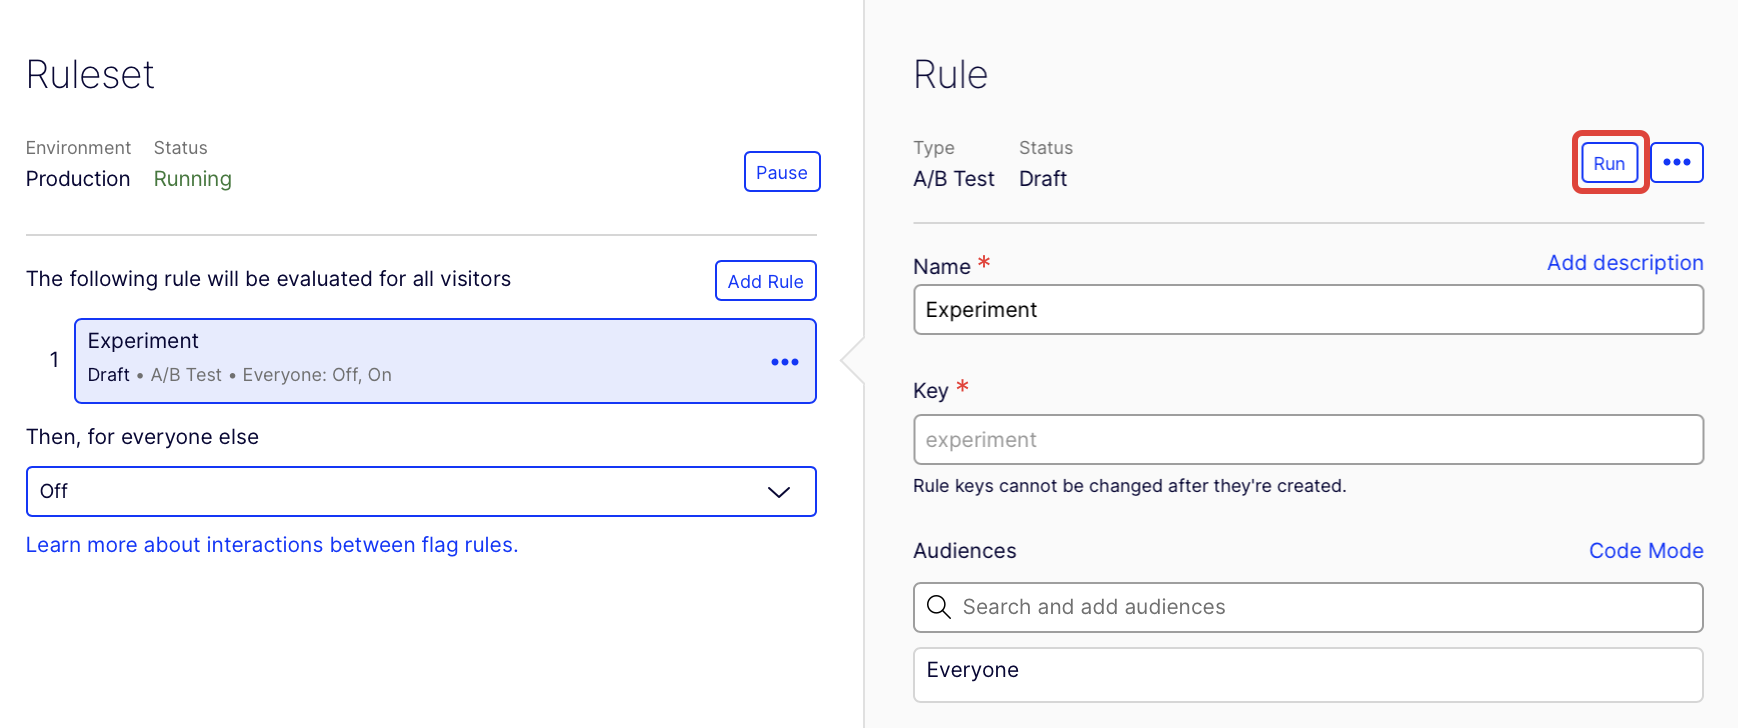
5. Run the A/B test
Ensure your ruleset's (flag's) status is Running, and the rule's status is Running so your experiment can run:
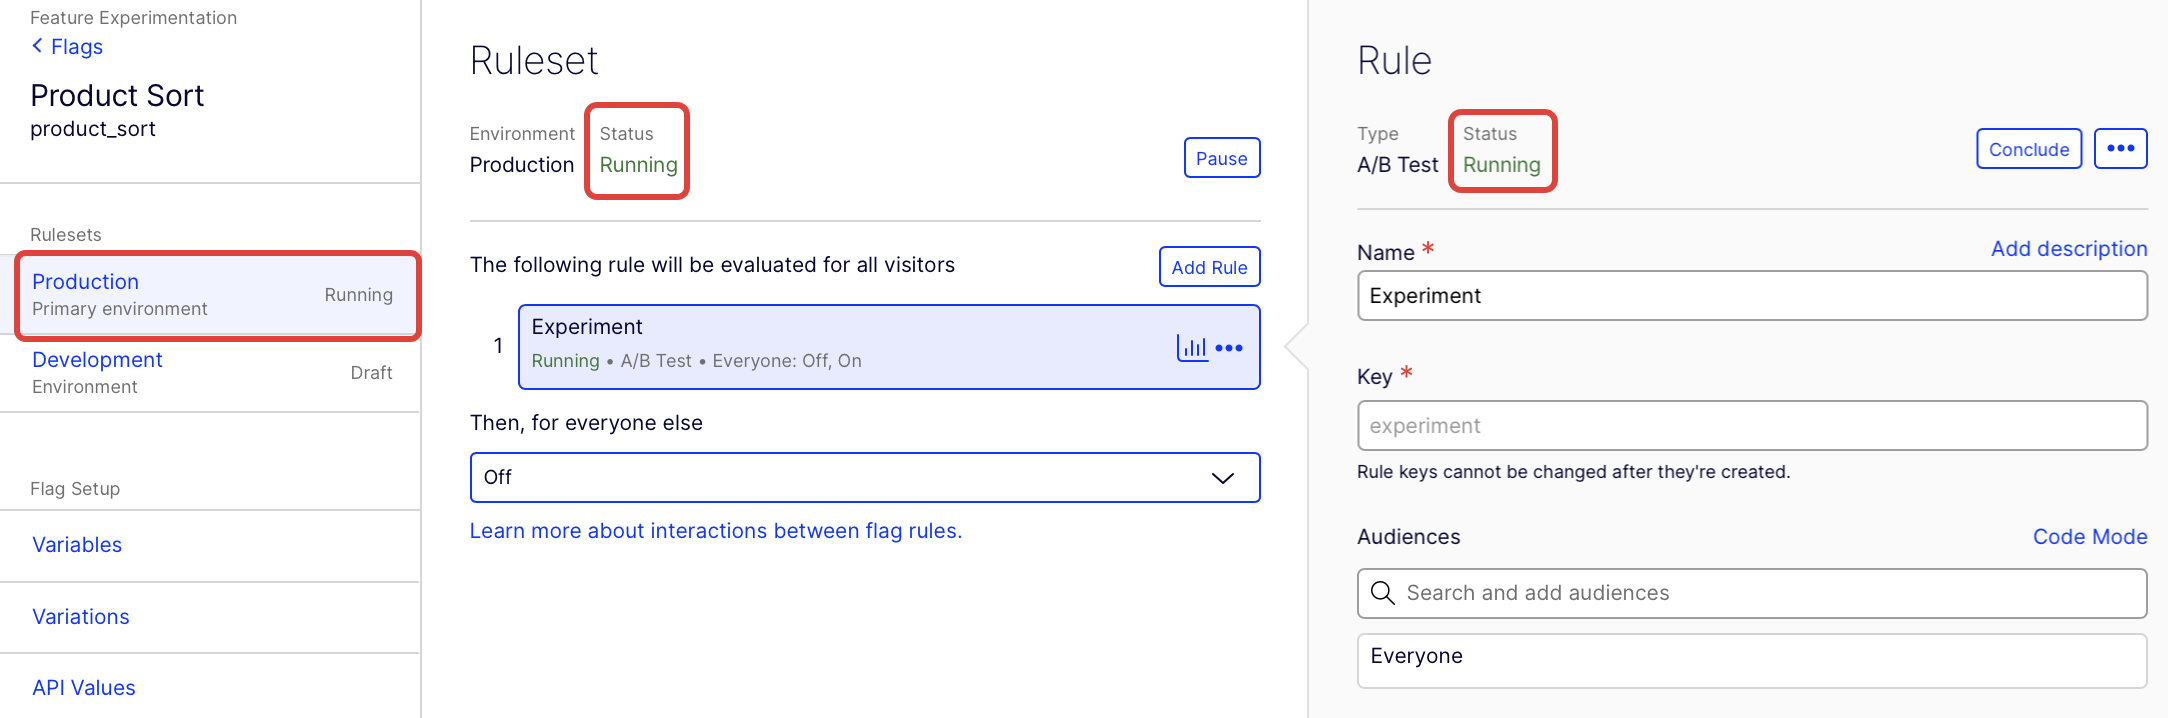
Run your React app using npm start. You will see the flag decision and a "Simulate Purchase" button. Click it to track a purchase event for your user.
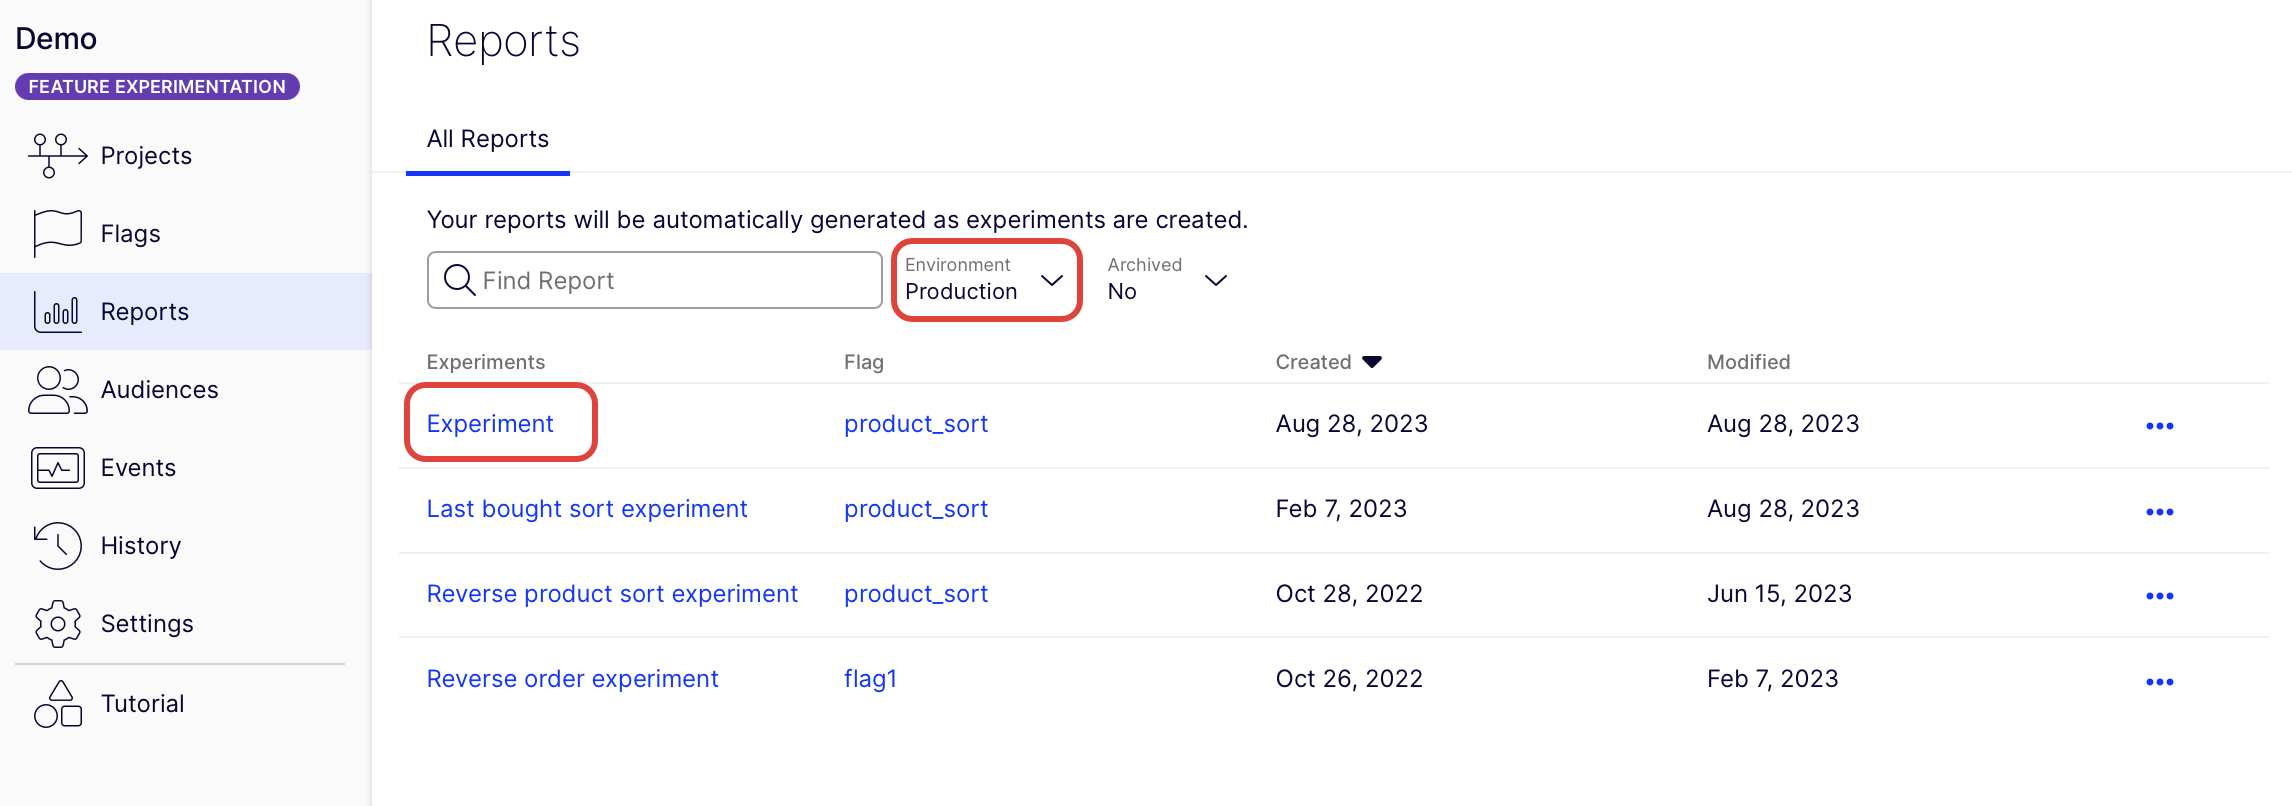
6. See your A/B test results
Go to the Reports tab and select your experiment to see your results.
Note
- You might not see the exact user traffic percentages you configured for your flag variations until you have larger numbers of users.
- You might not see your user traffic immediately. Refresh the browser to refresh traffic.
- Your experiment results will not tell you a winning variation until you have a large number of users (on the order of 100,000).
7. How it works
For an A/B test, you need a way to tell Optimizely when a user made a purchase in your app and map this event in your app code to the specific event you created in Optimizely. Use the useOptimizelyUserContext hook to get the user context and call trackEvent. In your sample app:
const { userContext } = useOptimizelyUserContext();

// Track how users behave when they see a flag variation
userContext.trackEvent('purchase');
NoteOptionally add tags to your event to enrich it (not shown in your sample app). You can also use reserve tag keys like revenue to track quantitative results. For example:
var tags = {
  category: 'shoes',
  revenue: 6432,
};

userContext.trackEvent('purchase', tags);
Conclusion
Congratulations! You configured and launched your first Feature Experimentation experiment. While this example focused on optimizing sales, Optimizely's experimentation platform can support an open-ended set of experimentation use cases.
See the complete React SDK documentation to learn more ways to optimize your software using experimentation.
Updated 7 days ago