Flutter SDK quickstart
Welcome to the quickstart guide for Optimizely Feature Experimentation's Flutter SDK. Follow the steps in this guide to create a flag, roll out a flag delivery, and run an A/B test using a simple command-line application.
Part 1: Create a sample app
1. Access or create your account
You need an Optimizely account to follow this guide. If you do not have an account, you can register for a free account. If you already have an account, navigate to your Feature Experimentation project.
2. Get your SDK key
To find your SDK key in an Optimizely project:
- Go to Settings > Primary Environment.
- Copy and save the SDK Key for your primary environment.
ImportantEach environment has its own SDK key. Ensure you copy the correct key.

Click image to enlarge
3. Copy the sample code
To work with the Flutter SDK:
- Install the Flutter plugin in Android Studio.
- In Android Studio, create a new Flutter project (File -> New -> New Flutter Project...) called
optimizely_flutter_quickstart. - Select Java for Android language. Select Swift for iOS language.
- Toggle Android and iOS for Platform.

- Click Finish.
- To install the Optimizely Feature Experimentation Flutter SDK. Open the pubspec.yaml file and add:
dependencies:
  optimizely_flutter_sdk: ^1.0.1
The full source code is available on GitHub.
- Copy the following code sample into the main.dart file (located in the lib directory) for your app. Replace
<Your_SDK_Key>with the SDK key you found in a previous step.
import 'dart:math';
import 'package:flutter/material.dart';
import 'package:optimizely_flutter_sdk/optimizely_flutter_sdk.dart';
import 'dart:async';

// NOTE: You need to change this SDK key to your project's SDK Key
const String sdkKey = "Your_SDK_Key";
const String logTag = "OPTIMIZELY_QUICK_START";

void main() {
  runApp(const MyApp());
  var productSorter = ProductSorter();
  productSorter.initializeQuickStart();
}

class MyApp extends StatefulWidget {
  const MyApp({Key? key}) : super(key: key);

  @override
  State<MyApp> createState() => _MyAppState();
}

class _MyAppState extends State<MyApp> {
  String uiResponse = 'Unknown';

  @override
  void initState() {
    super.initState();
  }

  @override
  Widget build(BuildContext context) {
    return MaterialApp(
      home: Scaffold(
        appBar: AppBar(
          title: const Text('Quick start example app'),
        ),
        body: Center(
          child: Text(uiResponse),
        ),
      ),
    );
  }
}

class ProductSorter {
  String _datafileHost = "https://cdn.optimizely.com";
  String _datafileSuffixAndroid = "/datafiles/%s.json";
  String _datafileSuffixIOS = "/datafiles/%@.json";

  Future<void> initializeQuickStart() async {
    // Setting up custom datafile URL format
    Map<ClientPlatform, DatafileHostOptions> datafileHostOptions = {};

    datafileHostOptions[ClientPlatform.android] =
        DatafileHostOptions(_datafileHost, _datafileSuffixAndroid);

    datafileHostOptions[ClientPlatform.iOS] =
        DatafileHostOptions(_datafileHost, _datafileSuffixIOS);

    // Initializing OptimizelyClient
    var flutterSDK = OptimizelyFlutterSdk(
        sdkKey, datafileHostOptions: datafileHostOptions);
    var response = await flutterSDK.initializeClient();
    if (response.success) {
      flutterSDK.addConfigUpdateNotificationListener((msg) {
        runQuickStart(flutterSDK);
      });
      await runQuickStart(flutterSDK);
    }
  }

  Future<void> runQuickStart(OptimizelyFlutterSdk flutterSDK) async {
    /* --------------------------------
     * to get rapid demo results, generate random users. Each user always sees the same variation unless you reconfigure the flag rule.
     * --------------------------------
     */
    // simulate 50 users
    var rangeMax = 9999;
    var rangeMin = 1000;
    var range = Random();
    var hasOnFlags = false;

    for (int i = 0; i < 10; i++) {
      var userId = "${range.nextInt(rangeMax - rangeMin) + rangeMin}";
      /* --------------------------------
       Create hardcoded user & bucket user into a flag variation
       --------------------------------
      */
      var user = await flutterSDK.createUserContext(userId: userId);
      // "product_sort" corresponds to a flag key in your Optimizely project
      var decisionResponse = await user!.decide("product_sort");
      var decision = decisionResponse.decision;
      // did decision fail with a critical error?
      if (decision?.variationKey == null) {
        print("\n\n$logTag decision error: ${decisionResponse.reason}");
      }
      // get a dynamic configuration variable
      // "sort_method" corresponds to a variable key in your Optimizely project
      String sortMethod = decision?.variables["sort_method"] as String;

      if (decision!.enabled) {
        // Keep count how many users had the flag enabled
        hasOnFlags = true;
      }
      /* --------------------------------
         Mock what the user sees with print statements (in production, use flag variables to implement feature configuration)
         --------------------------------
      */
      var userIdResponse = await user.getUserId();
      // always returns false until you enable a flag rule in your Optimizely project
      print("\n\n$logTag Flag ${(decision.enabled
          ? "on"
          : "off")}. User number ${userIdResponse.userId} saw flag variation: ${decision
          .variationKey} and got products sorted by: ${sortMethod} config variable as part of flag rule: ${decision
          .ruleKey}");
    }
    if (!hasOnFlags) {
      print(
          "\n\n$logTag Flag was off for everyone. Some reasons could include:" +
              "\n1. Your sample size of users was too small. Rerun, or increase the iterations in the FOR loop" +
              "\n2. By default you have 2 keys for 2 project environments (dev/prod). Verify in Settings>Environments that you used the right key for the environment where your flag is toggled to ON." +
              "\nCheck your key at  https://app.optimizely.com/v2/projects/YOUR_PROJECT_ID/settings/implementation");
    }
  }
}
NoteDo not run your app yet. You still need to configure the flag and flag delivery rule in the Optimizely app.
Part 2: Run your app
After completing Part 1, your sample app still does nothing. You need to create a flag and a flag rule in the Optimizely app to enable your sample application.
1. Create the feature flag
A flag lets you control the users that are exposed to new code in your application. For this quickstart, imagine that you are rolling out a redesigned sorting feature for displaying products.
Create a flag in your Feature Experimentation project named product_sort and give it a variable named sort_method:
- Select Create New Flag... from the Flags tab.
- Enter product_sort in the Name field.
- Keep the auto-created Key, product_sort, and click Create Flag. The Key corresponds to the flag key in your sample app.
Next, create a variable in your flag:
- In your new flag,
product_sort, under Flag Setup, go to Variables and click Add Variable (+). - Select String in the Add Variable drop-down.
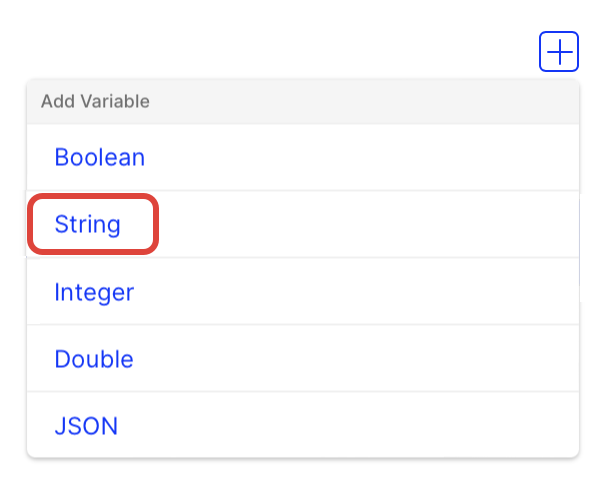
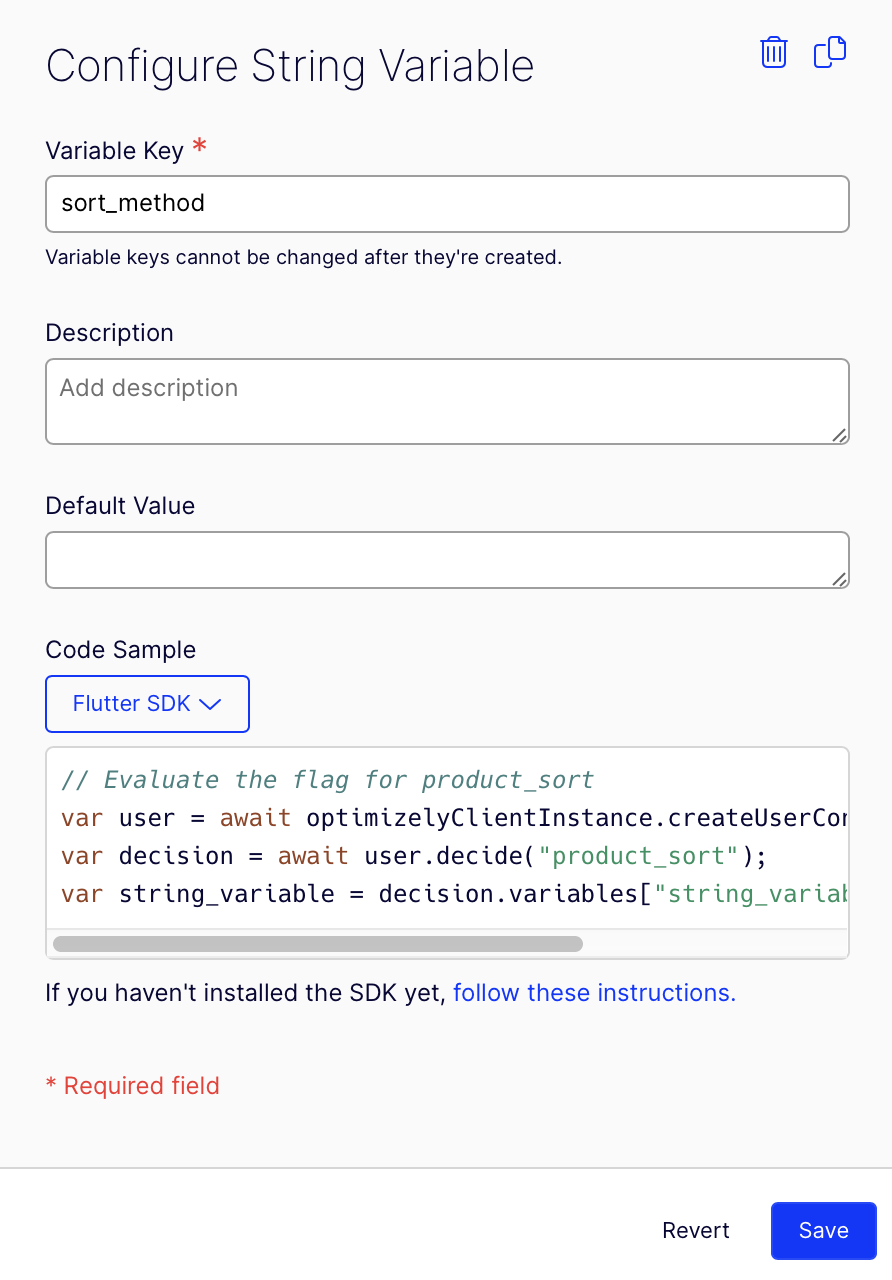
- Enter sort_method for the Variable Key, which corresponds to the variable key in your sample app.
- Enter alphabetical for the Default Value, which represents your old sorting method. The new sorting method is what you are rolling out.
- Click Save.
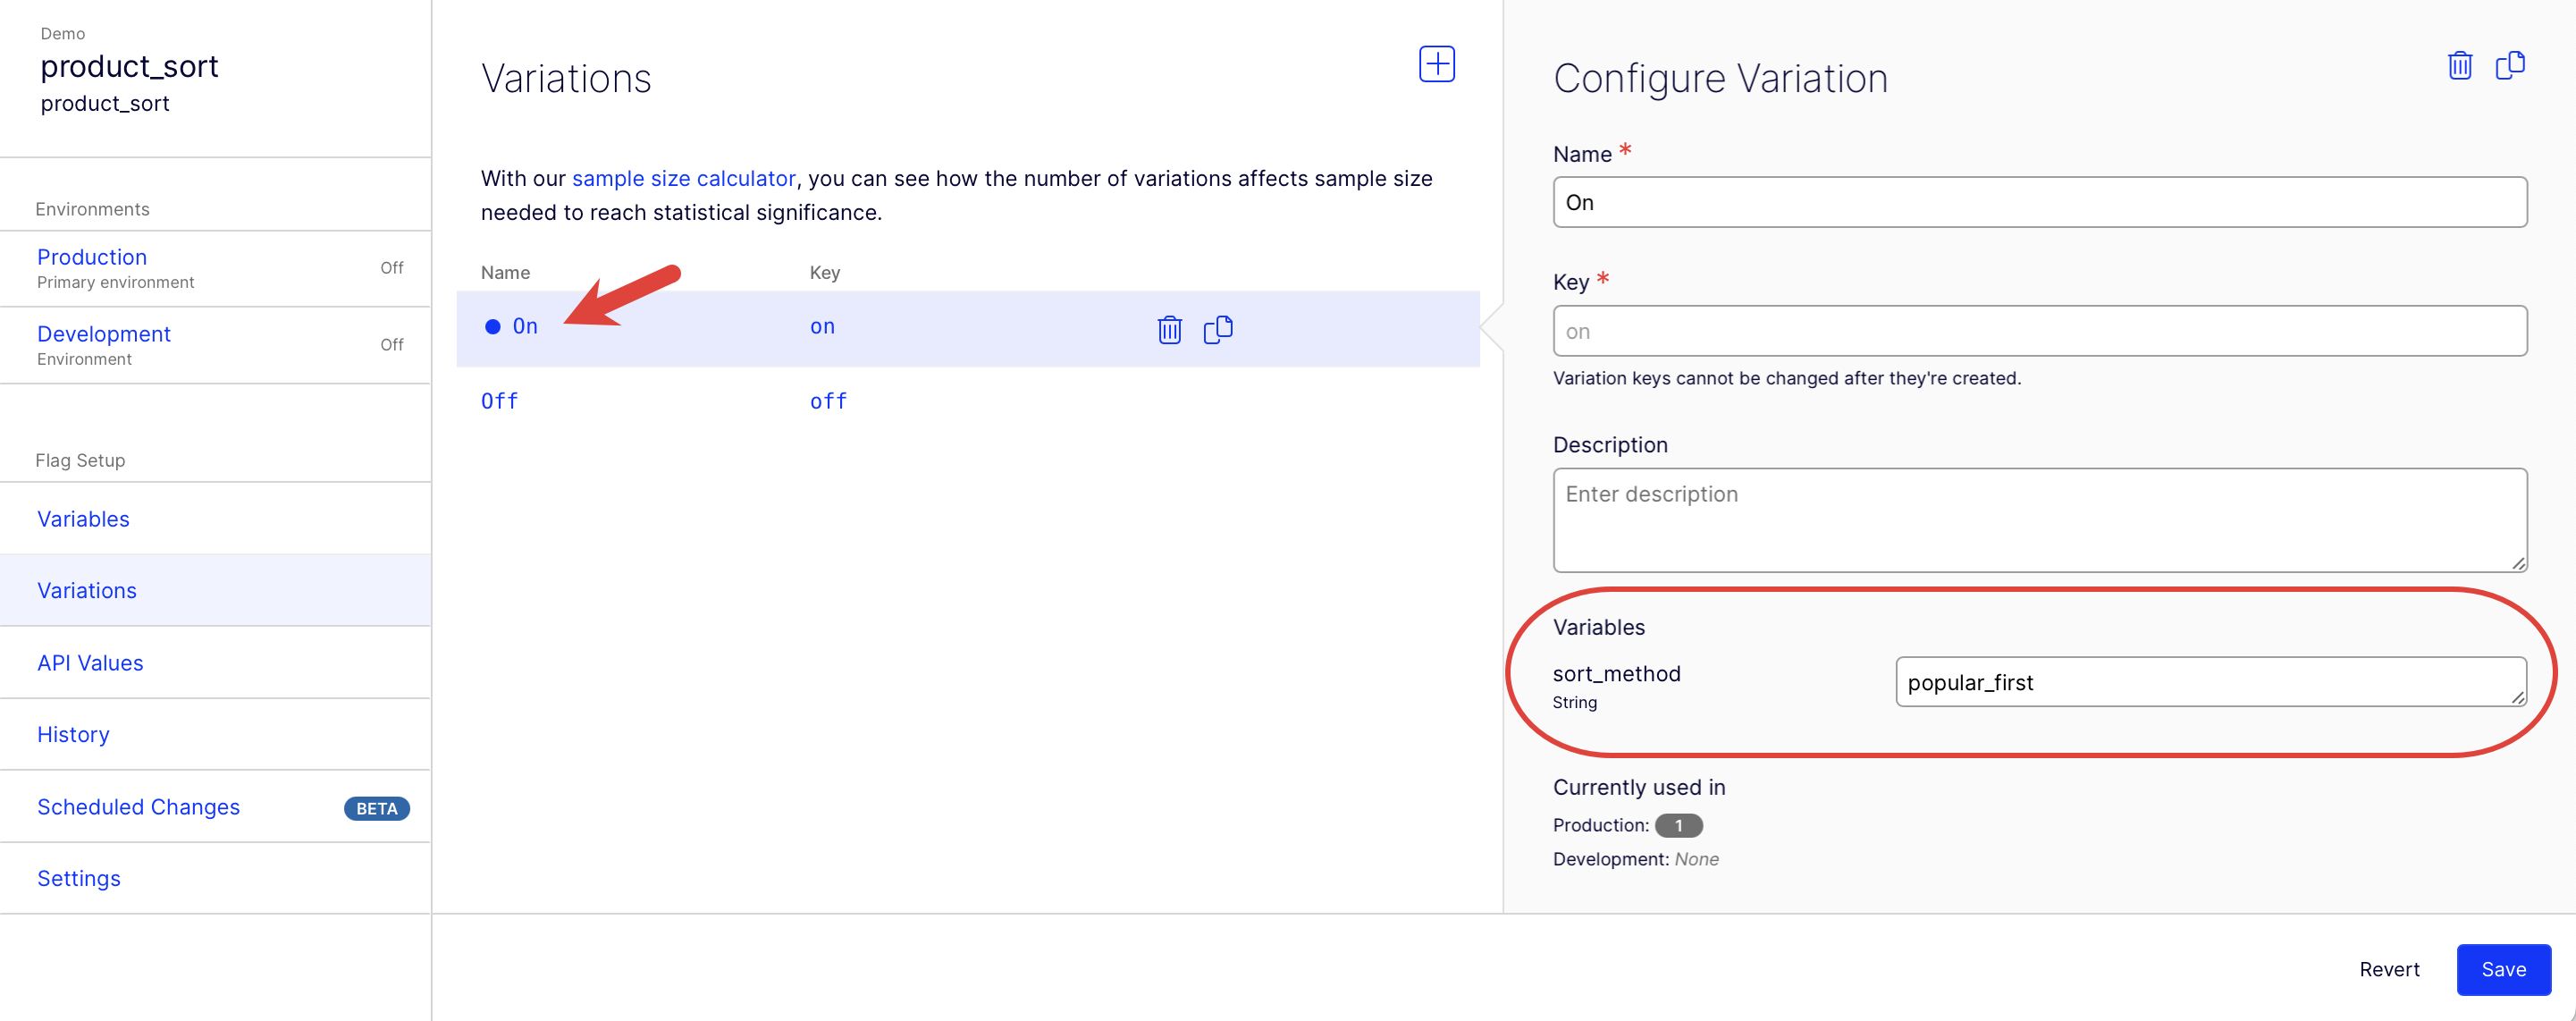
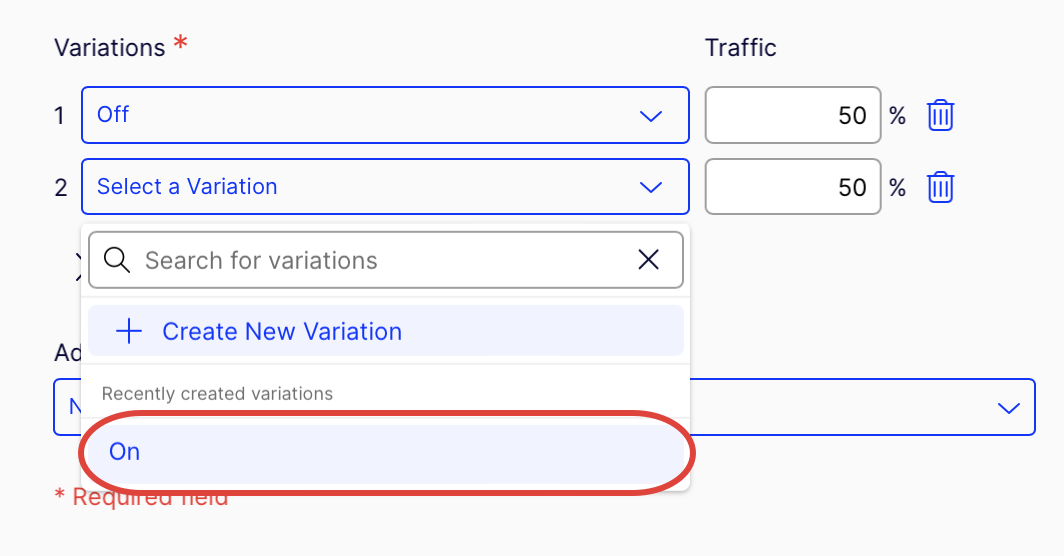
Next, create a variation in your flag:
-
Under Flag Setup go to Variations and select the On variation. A variation is a wrapper for a collection of variable values.
-
For the sort_method variable value, enter popular_first, which represents your new sorting method.
-
Click Save.
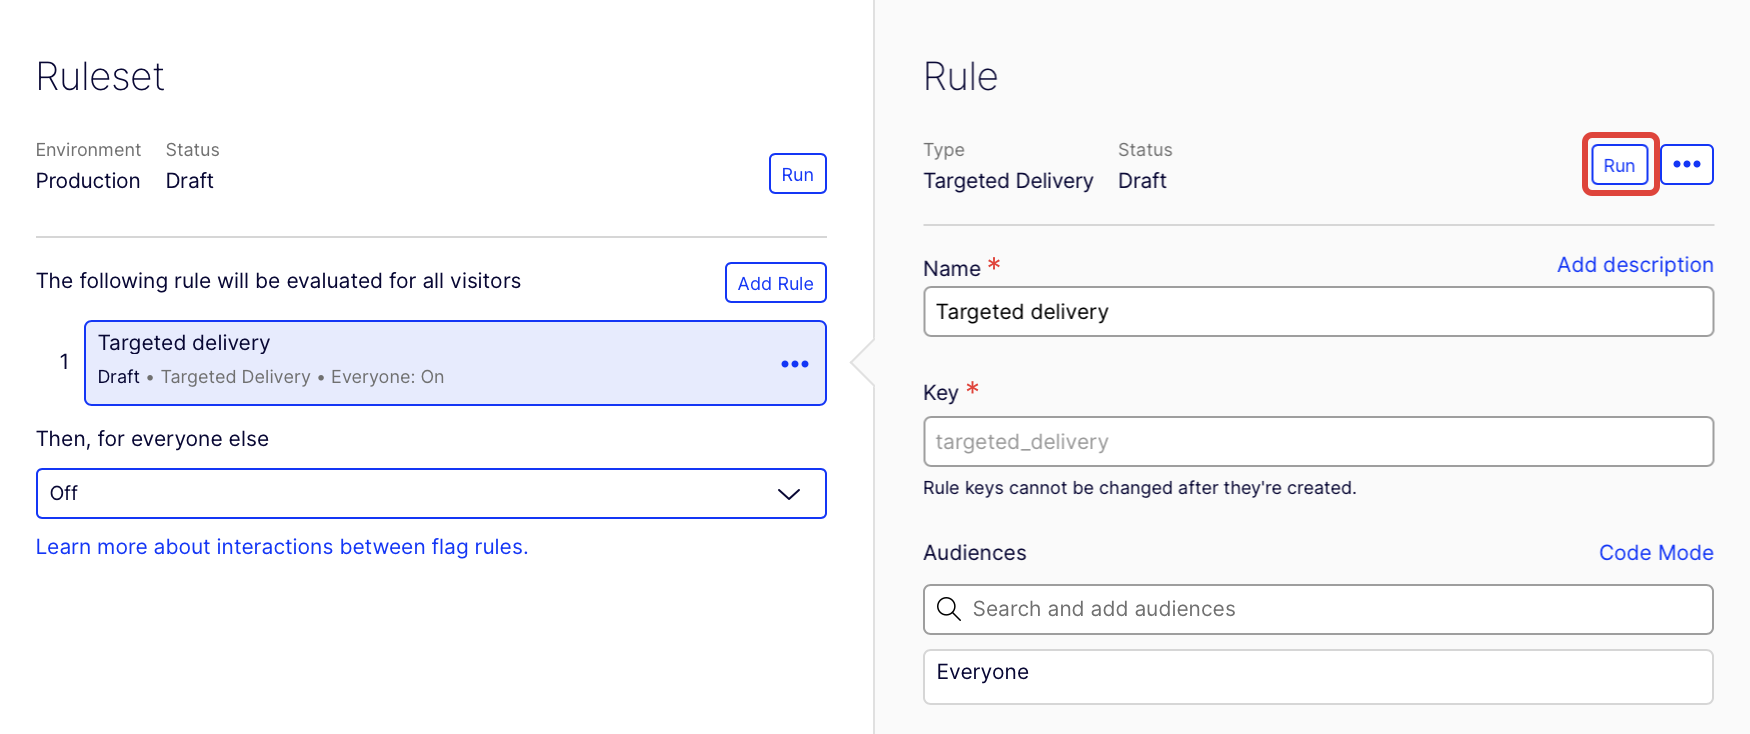
2. Create the flag delivery rule
Your sample app still does nothing because you need to create and enable a flag rule.
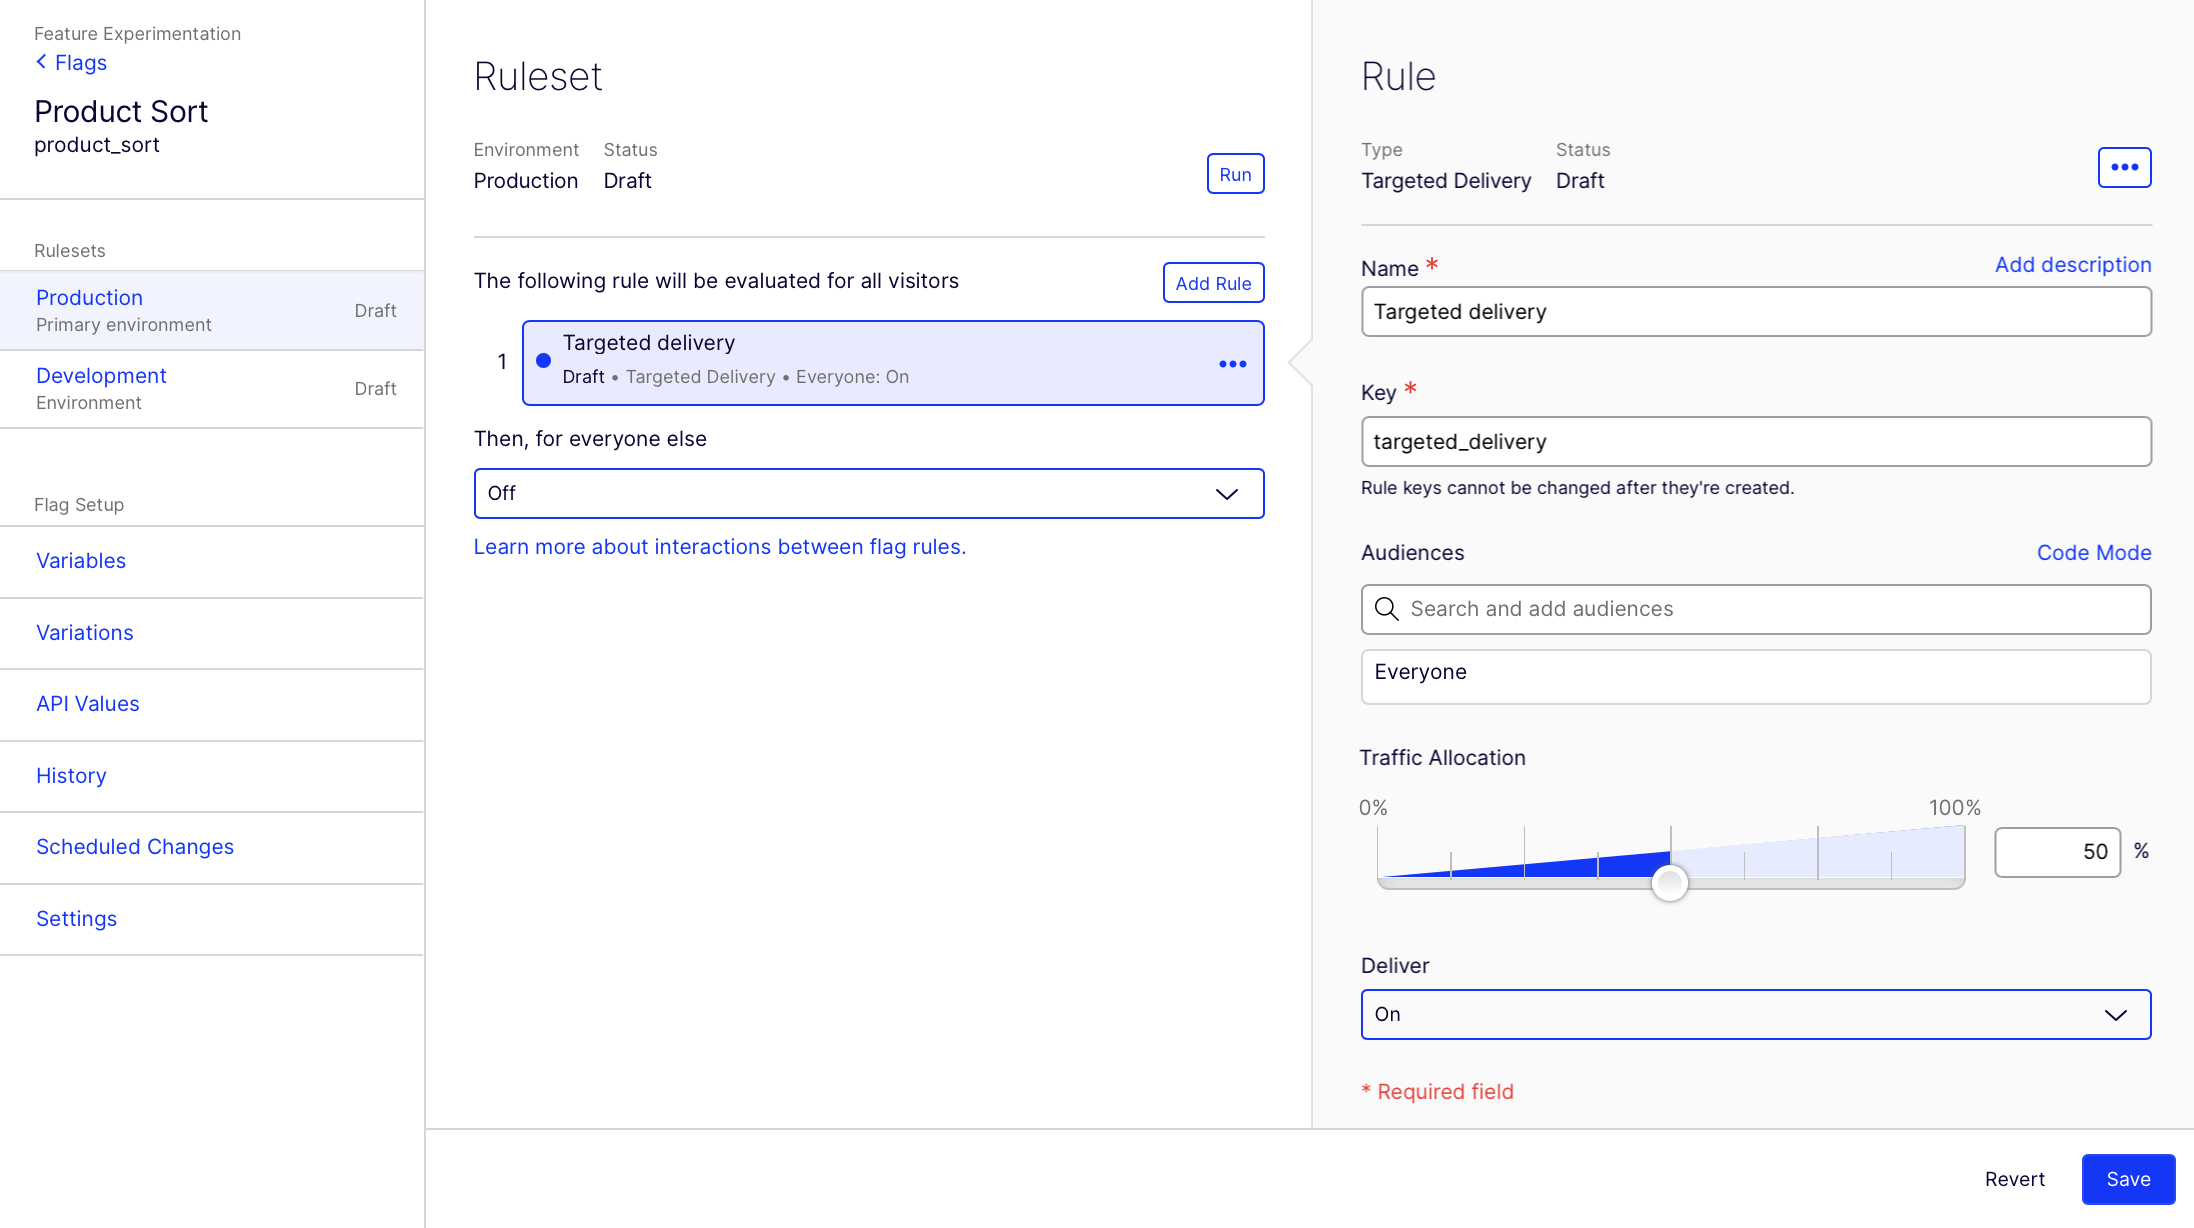
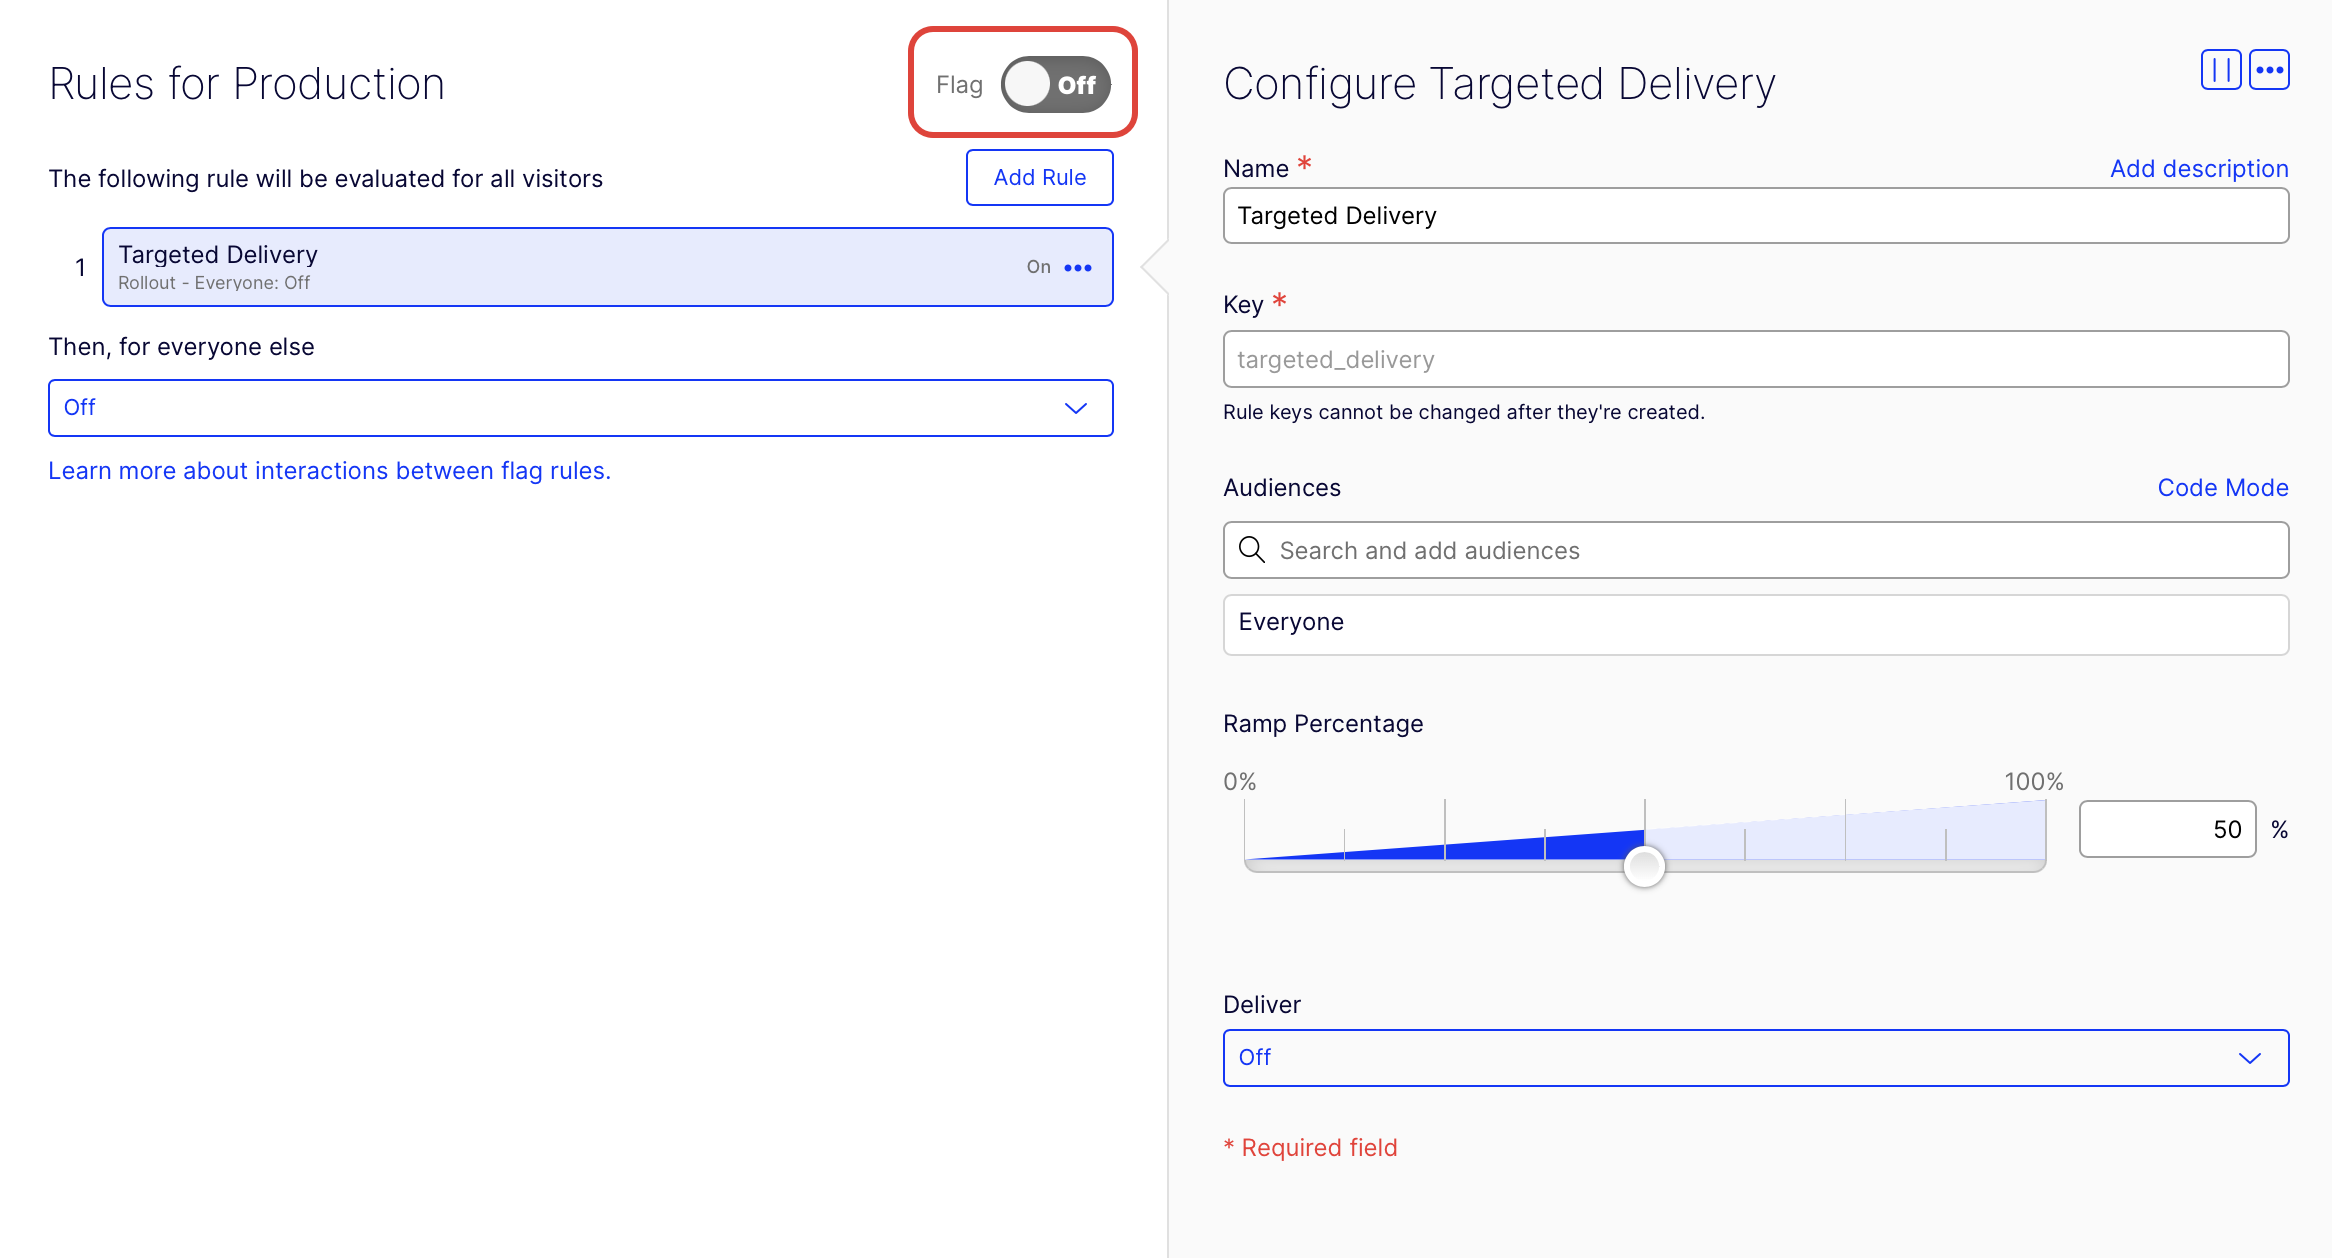
Make a targeted delivery rule for the On variation for the product_sort flag. A targeted delivery lets you gradually release a feature flag to users but with the flexibility to roll it back if you encounter bugs.
-
Ensure you are in your primary environment (because you are using the primary environment SDK key from Part 1).
-
-
Click Add Rule and select Targeted Delivery.
-
Enter Targeted Delivery for the Name field.
-
Keep the default Key and Audiences.
-
Set the Traffic Allocation slider to 50%. This delivers the product_sort flag to 50% of everyone who triggers the flag in this environment. You can roll out or roll back the product_sort flag to a percentage of traffic whenever you want.
-
From the Deliver drop-down list, select the On variation.
-
Click Save.

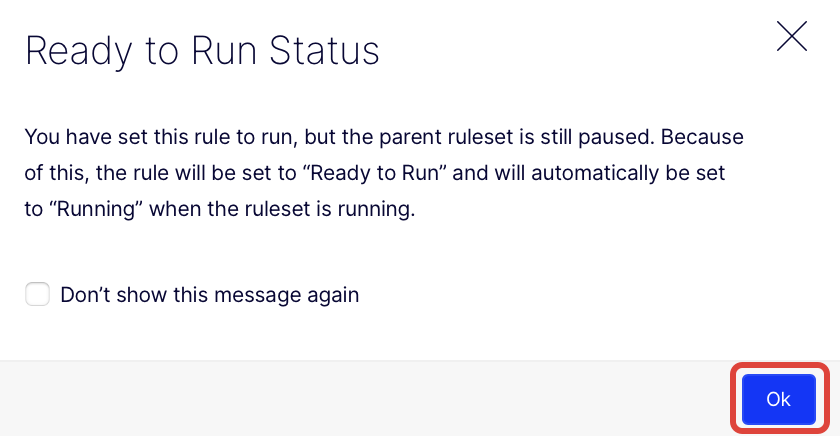
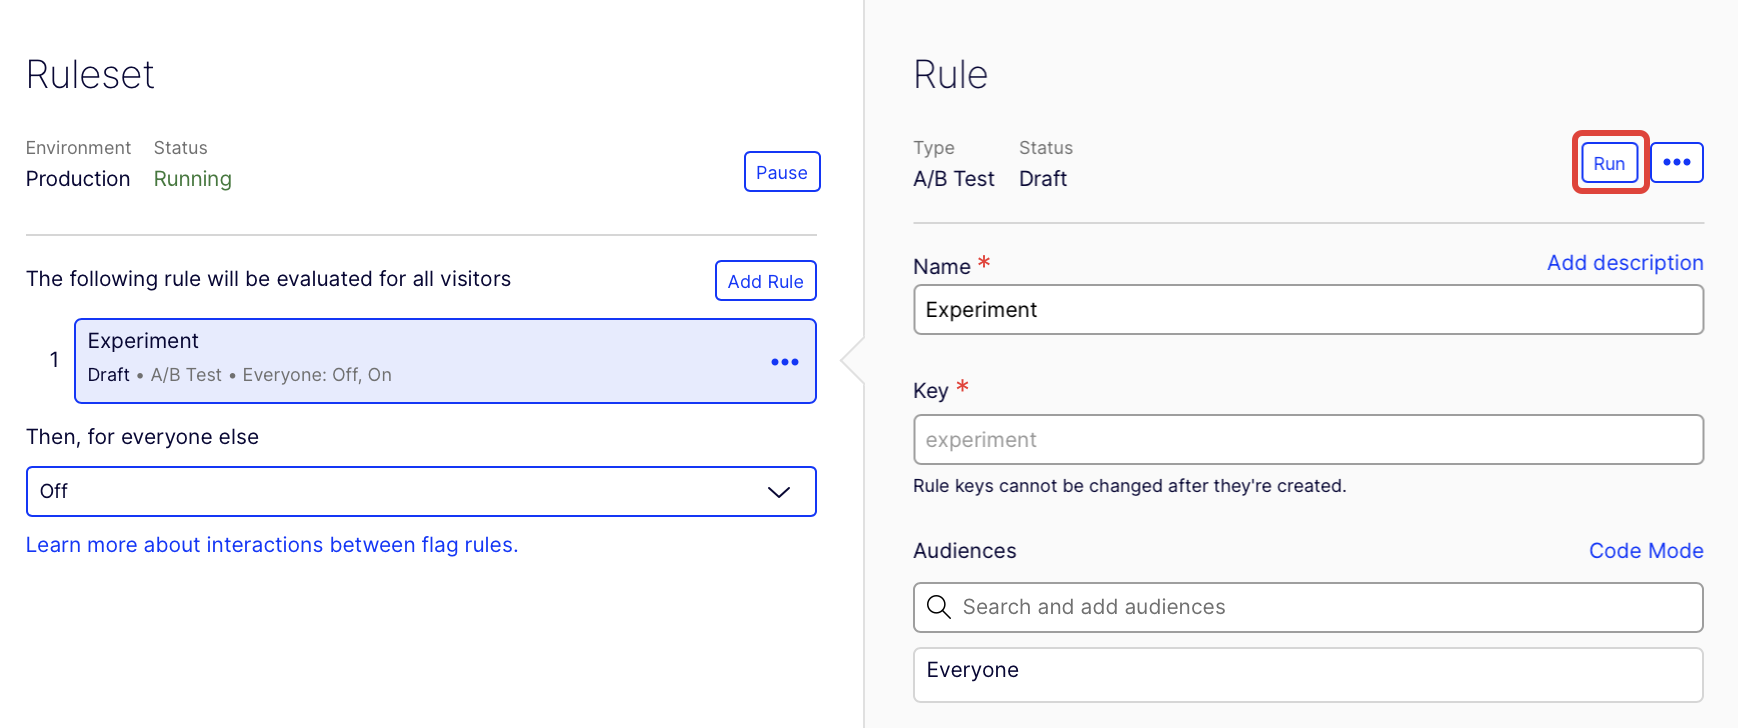
3. Run your sample app
To run your sample application:
-
Click Run on your targeted delivery rule:
-
Click Ok on the Ready to Run Status page. This lets you know that your ruleset has not been set to run, yet.
-
Click Run on your ruleset (flag):
-
In Android Studio, start an emulator. Click Run to execute the sample app code you created earlier. Your output displays similar to the following:
Flag on. User number 6998 saw flag variation: on and got products sorted by: popular_first config variable as part of flag rule: targeted_delivery

Flag on. User number 1177 saw flag variation: on and got products sorted by: popular_first config variable as part of flag rule: targeted_delivery

Flag on. User number 9714 saw flag variation: on and got products sorted by: popular_first config variable as part of flag rule: targeted_delivery

Flag on. User number 4140 saw flag variation: on and got products sorted by: popular_first config variable as part of flag rule: targeted_delivery

Flag on. User number 4994 saw flag variation: on and got products sorted by: popular_first config variable as part of flag rule: targeted_delivery

Flag off. User number 8700 saw flag variation: off and got products sorted by: alphabetical config variable as part of flag rule: default-rollout-208-19963693913

Flag off. User number 9912 saw flag variation: off and got products sorted by: alphabetical config variable as part of flag rule: default-rollout-208-19963693913

Flag on. User number 6560 saw flag variation: on and got products sorted by: popular_first config variable as part of flag rule: targeted_delivery

Flag on. User number 9252 saw flag variation: on and got products sorted by: popular_first config variable as part of flag rule: targeted_delivery

Flag on. User number 6582 saw flag variation: on and got products sorted by: popular_first config variable as part of flag rule: targeted_delivery
NoteYou will not get exactly 50% of your user traffic in the "on" variation, because you are working with such a small number of users. Also, users who get an "off" flag will not make it into the 50% traffic you set, so they fall through to the default "off" rule (default-rollout in the preceding print statements).
4. How it works
So far, you:
- Created a flag, flag variable, and a flag variation (wrapper for your variables) in the Optimizely app.
- Implemented a flag in your app with the Decide method from the Flutter SDK.
What is going on in your sample app?
How it works: decide to show a user a flag
The Flutter SDK’s Decide method determines whether to show or hide the feature flag for a specific user.
NoteYou can reuse this method for different flag rules, for example for delivering more traffic or running an experiment to show different sorting methods to just a portion of users.
After you learn which sorting method works best to increase sales, roll out the product sort flag to all traffic with the method set to the optimum value.
In your sample app:
var user = await optimizelyClient.createUserContext(userId: userId);
// "product_sort" corresponds to the flag key you create in the Optimizely app
var decideResponse = await user!.decide("product_sort");
NoteOptionally include attributes when you create your user (not shown in your sample app), so you can target specific audiences. For example:
var attributes = <String, dynamic>{};
attributes["logged_in"] = true;
var user = await optimizelyClient.createUserContext(userId: "user123", attributes: attributes);
How it works: configure flag variations
You can dynamically configure a flag variation using flag variables. In your sample app:
// always returns false until you enable a flag rule in the Optimizely app
if (decideResponse.decision!.enabled) {
  // "sort_method" corresponds to variable key you define in Optimizely app
  var sortMethod = decideResponse.decision!.variables["sort_method"] as String;
  print("sort_method: $sortMethod");
}
For your product_sort flag, you can configure variations with different sort_method values, sorting by popular products, relevant products, promoted products and so on. Set different values for the sort method at any time in the Optimizely app.
Part 3: Run an A/B test
Part 2 of this tutorial guided you through a targeted delivery because it is the most straightforward flag rule. However, you often want to A/B test how users react to feature flag variations before you roll out a flag delivery.
- Targeted delivery rule – You can roll out your flag to a percentage of your general user base (or to specific audiences), or roll back if you encounter bugs.
- A/B test rule – Experiment by A/B testing a flag before you invest in delivering, so you know what to build. Track how users behave in flag variations, then interpret your experiment results using the Optimizely Stats Engine.
For Part 3, you will run an A/B test on the On variation of your product_sort flag.
1. Add event tracking
You need to add a Track Event method to your sample app, so you can mock up user events and then see metrics.
- Delete your old sample code, and paste in the following code.
- Replace your SDK key. See Get your SDK Key.
- Do not run your app yet because you still need to configure the A/B test in the Optimizely application.
import 'dart:math';
import 'package:flutter/material.dart';
import 'package:optimizely_flutter_sdk/optimizely_flutter_sdk.dart';
import 'dart:async';
import 'package:optimizely_flutter_sdk/src/user_context/optimizely_user_context.dart';

// NOTE: You need to change this SDK key to your project's SDK Key
const String sdkKey = "Your_SDK_Key";
const String logTag = "OPTIMIZELY_QUICK_START";

void main() {
  runApp(const MyApp());
  var productSorter = ProductSorter();
  productSorter.initializeQuickStart();
}

class MyApp extends StatefulWidget {
  const MyApp({Key? key}) : super(key: key);

  @override
  State<MyApp> createState() => _MyAppState();
}

class _MyAppState extends State<MyApp> {
  String uiResponse = 'Unknown';

  @override
  void initState() {
    super.initState();
  }

  @override
  Widget build(BuildContext context) {
    return MaterialApp(
      home: Scaffold(
        appBar: AppBar(
          title: const Text('Quick start example app'),
        ),
        body: Center(
          child: Text(uiResponse),
        ),
      ),
    );
  }
}

class ProductSorter {
  String _datafileHost = "https://cdn.optimizely.com";
  String _datafileSuffixAndroid = "/datafiles/%s.json";
  String _datafileSuffixIOS = "/datafiles/%@.json";

  Future<void> initializeQuickStart() async {
    // Setting up custom datafile URL format
    Map<ClientPlatform, DatafileHostOptions> datafileHostOptions = {};

    datafileHostOptions[ClientPlatform.android] =
        DatafileHostOptions(_datafileHost, _datafileSuffixAndroid);

    datafileHostOptions[ClientPlatform.iOS] =
        DatafileHostOptions(_datafileHost, _datafileSuffixIOS);

    // Initializing OptimizelyClient
    var flutterSDK = OptimizelyFlutterSdk(
        sdkKey, datafileHostOptions: datafileHostOptions);
    var response = await flutterSDK.initializeClient();
    if (response.success) {
      flutterSDK.addConfigUpdateNotificationListener((msg) {
        runQuickStart(flutterSDK);
      });
      await runQuickStart(flutterSDK);
    }
  }

  Future<void> runQuickStart(OptimizelyFlutterSdk flutterSDK) async {
    /* --------------------------------
     * to get rapid demo results, generate random users. Each user always sees the same variation unless you reconfigure the flag rule.
     * --------------------------------
     */

    /* --------------------------------
       OPTIONAL: Add a notification listener so you can integrate with third-party analytics platforms
       --------------------------------
    */
    // var notificationId = await flutterSDK.addDecisionNotificationListener((decisionNotification) {
    //   if (decisionNotification.type == "flag") {
    //
    //     var serializedInfo = decisionNotification.decisionInfo.toString();
    //     print("$logTag Feature flag access related information: ${serializedInfo}");
    //     // Send data to analytics provider here
    //   }
    // });


    // simulate 50 users
    var rangeMax = 9999;
    var rangeMin = 1000;
    var range = Random();
    var hasOnFlags = false;

    for (int i = 0; i < 10; i++) {
      var userId = "${range.nextInt(rangeMax - rangeMin) + rangeMin}";
      /* --------------------------------
       Create hardcoded user & bucket user into a flag variation
       --------------------------------
      */
      var user = await flutterSDK.createUserContext(userId: userId);
      // "product_sort" corresponds to a flag key in your Optimizely project
      var decisionResponse = await user!.decide("product_sort");
      var decision = decisionResponse.decision;
      // did decision fail with a critical error?
      if (decision?.variationKey == null) {
        print("\n\n$logTag decision error: ${decisionResponse.reason}");
      }
      // get a dynamic configuration variable
      // "sort_method" corresponds to a variable key in your Optimizely project
      String sortMethod = decision?.variables["sort_method"] as String;

      if (decision!.enabled) {
        // Keep count how many users had the flag enabled
        hasOnFlags = true;
      }
      /* --------------------------------
         Mock what the user sees with print statements (in production, use flag variables to implement feature configuration)
         --------------------------------
      */
      // always returns false until you enable a flag rule in your Optimizely project
      var userIdResponse = await user.getUserId();
      print("\n\n$logTag Flag ${(decision.enabled
          ? "on"
          : "off")}. User number ${userIdResponse.userId} saw flag variation: ${decision
          .variationKey} and got products sorted by: ${sortMethod} config variable as part of flag rule: ${decision
          .ruleKey}");
      await mockPurchase(user);
    }
    if (!hasOnFlags) {
      print(
          "\n\n$logTag Flag was off for everyone. Some reasons could include:\n1. Your sample size of users was too small. Rerun, or increase the iterations in the FOR loop\n2. By default you have 2 keys for 2 project environments (dev/prod). Verify in Settings>Environments that you used the right key for the environment where your flag is toggled to ON.\nCheck your key at  https://app.optimizely.com/v2/projects/YOUR_PROJECT_ID/settings/implementation");
    }
  }

  // mock tracking a user event so you can see some experiment reports
  Future<void> mockPurchase(OptimizelyUserContext user) async {
    print("\n\n$logTag Pretend that user made a purchase? y/n ");
    Random rnd = new Random();
    int yesOrNo = rnd.nextInt(2);
    // Assigning random yes and no
    String answer = yesOrNo == 1? "y" : "n";
    print("\n\n$logTag $answer");
    var userIdResponse = await user.getUserId();
    if (answer == "y") {
      // track a user event you defined in the Optimizely app
      await user.trackEvent("purchase");
      print("\n\n$logTag Optimizely recorded a purchase in experiment results for user ${userIdResponse.userId}");
    } else {
      print("\n\n$logTag Optimizely didn't record a purchase in experiment results  for user ${userIdResponse.userId}");
    }
  }
}
2. Delete other rules in free accounts
If you have a free Optimizely account, you must delete the Targeted Delivery you created in Part 2 before you save your A/B test:
-
Select the Flag that contains the Targeted Delivery you created in Part 2 from the Flags tab.
-
Select the primary environment and the Targeted Delivery rule you created in Part 2.
-
Click More Options > Delete:
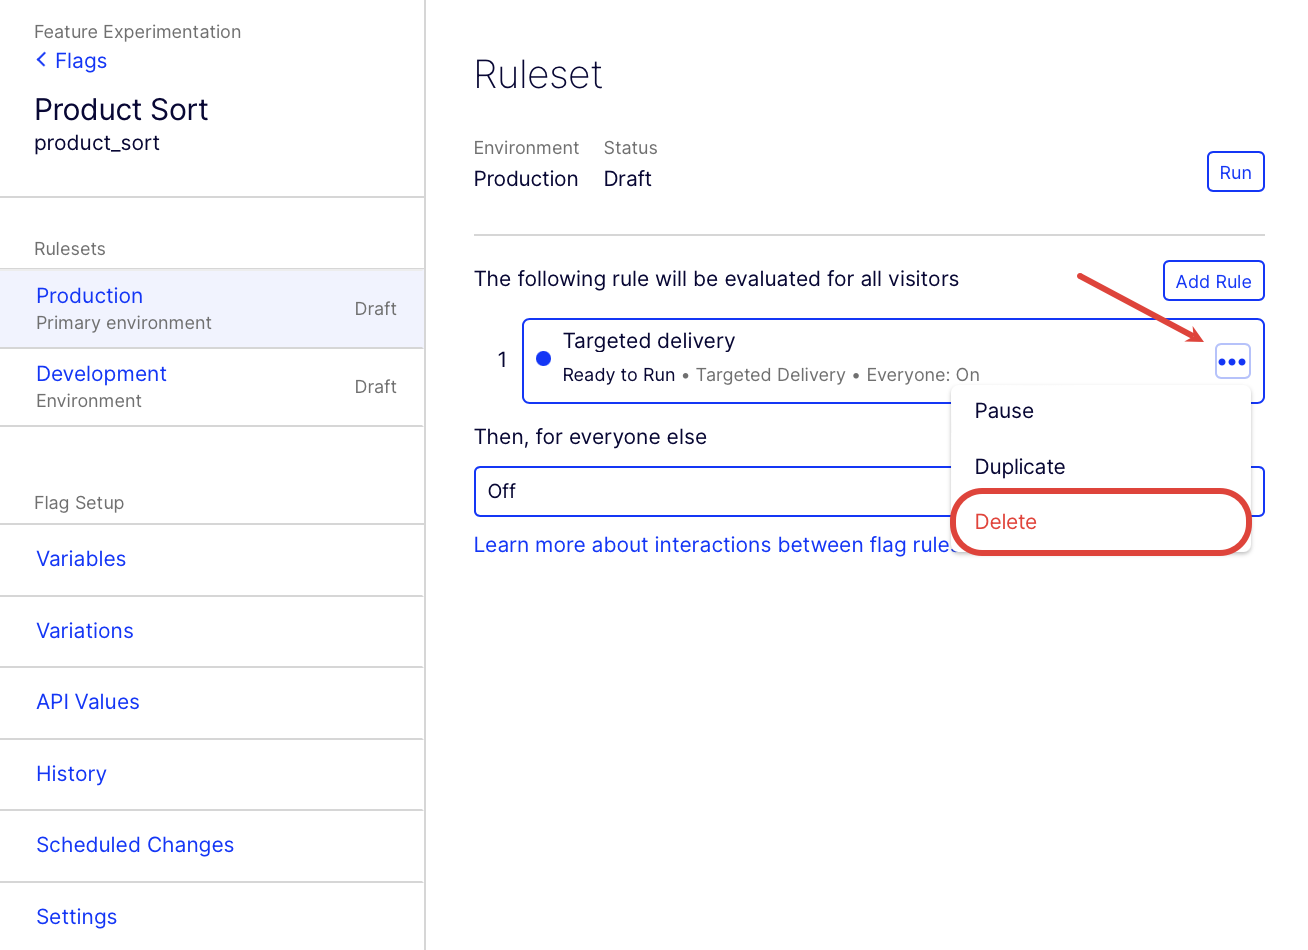
-
Click Save
3. Create the A/B test
To create an A/B Test rule in your Feature Experimentation project, in the flag you created in Part 2:
- click Add Rule and select A/B Test.
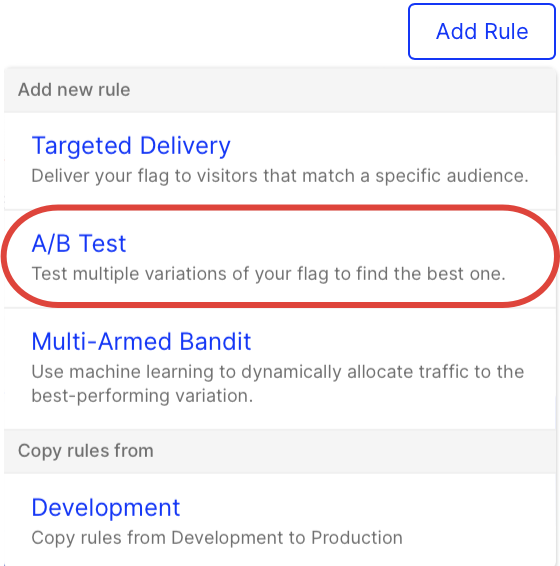
- Enter Experiment for the Name field.
- Keep the default Key and Audiences
- Keep the Traffic Allocation slider set to 100%.
4. Add an event
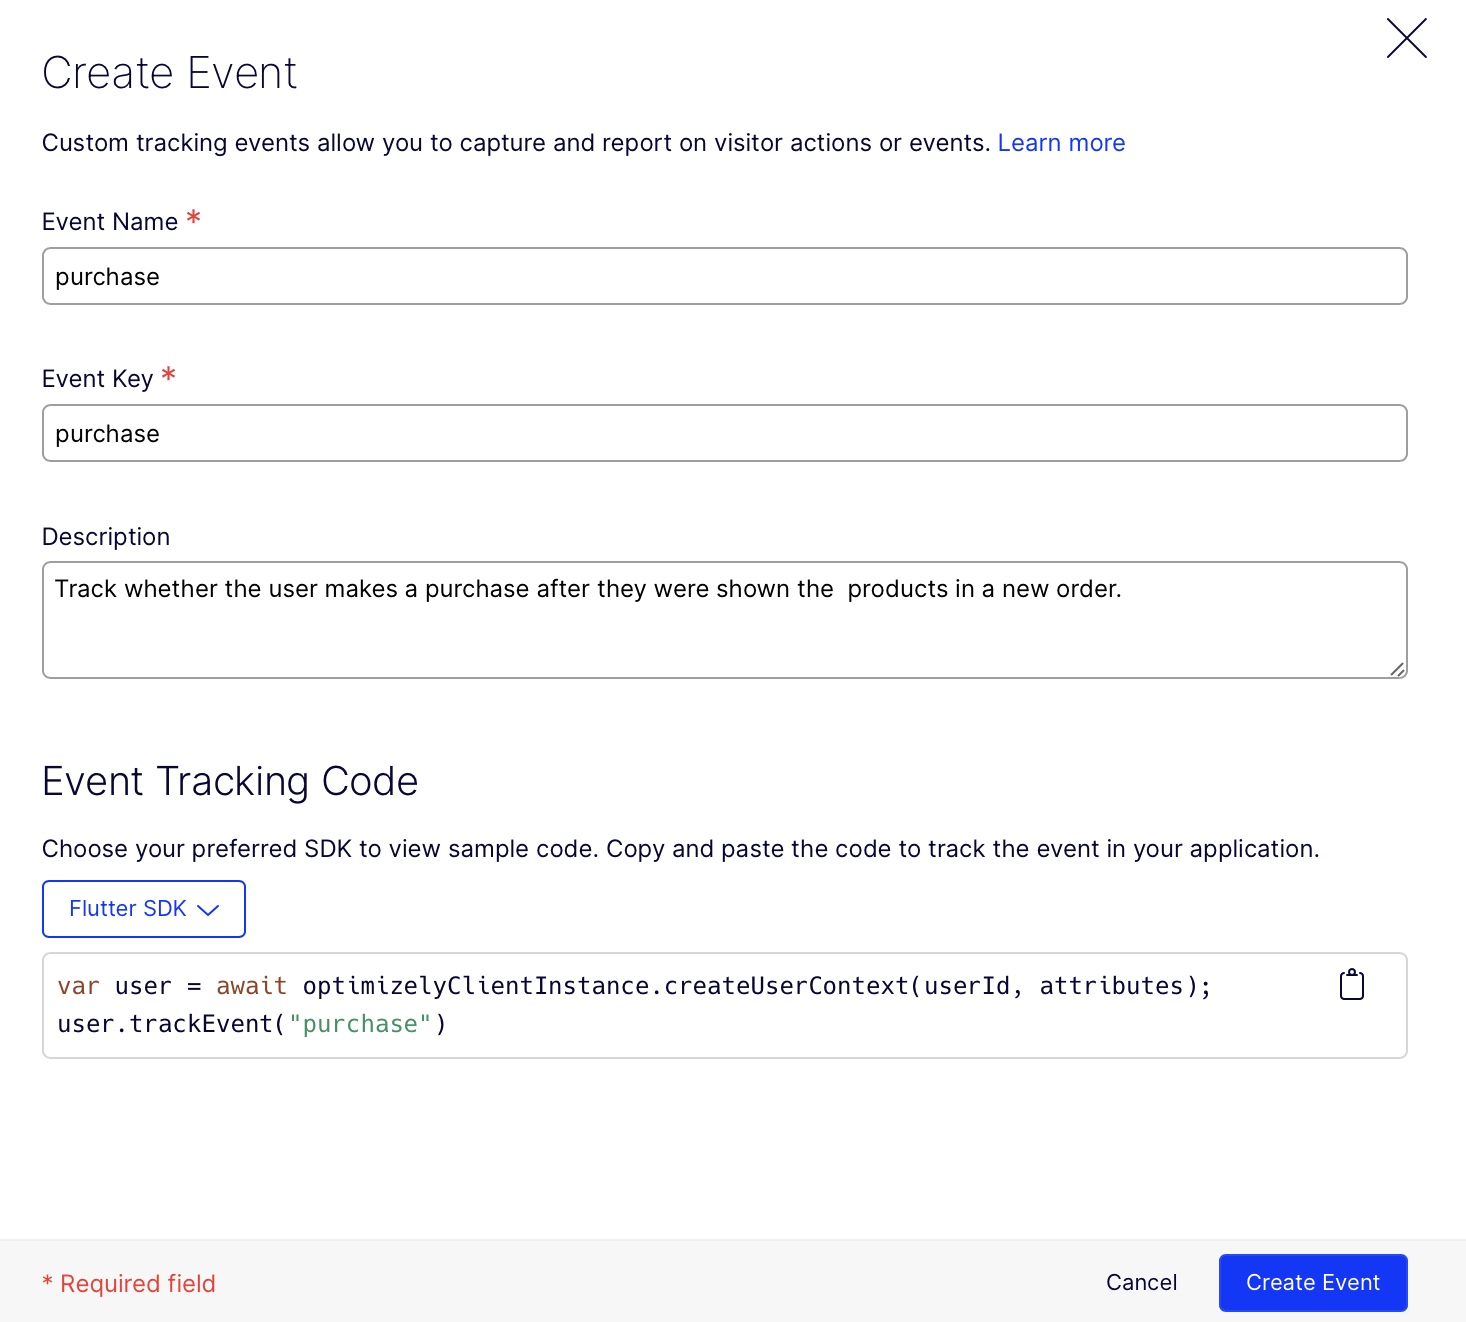
In an experiment, you track users' relevant actions to measure how they react to your flag variations. To define the actions you want to track, called events:
- Click on the Metrics field.
- Click Create new event.
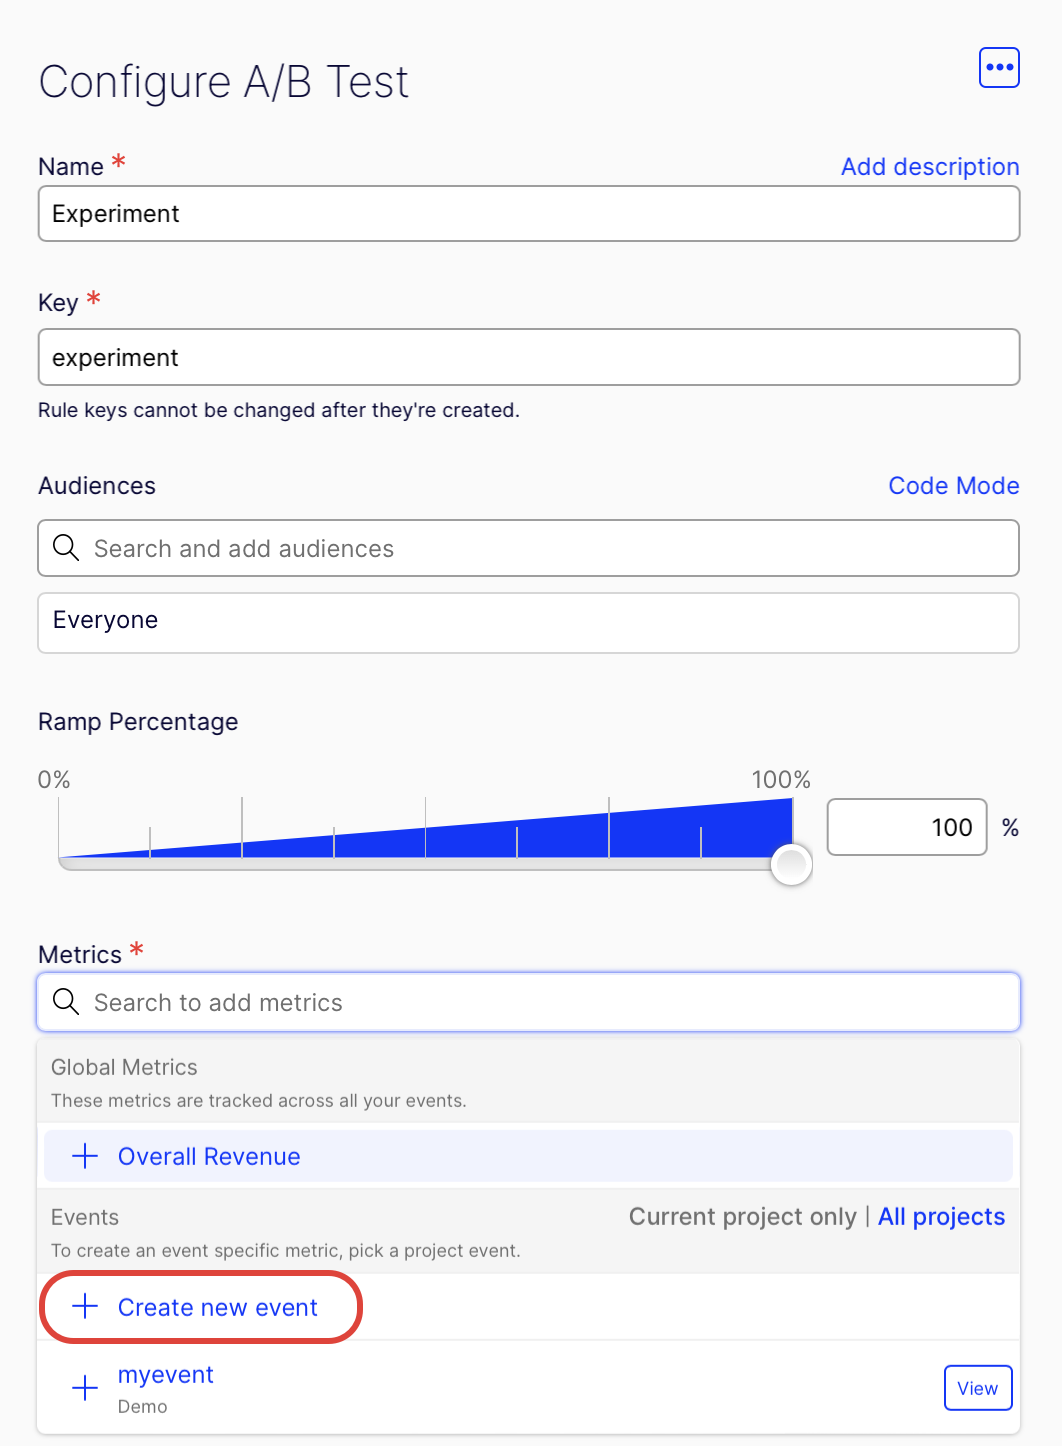
- Enter purchase for the Event Name, and the Event Key is automatically filled.
- (Optional) Enter a Description. You want to know whether the new sorting flag helps customers figure out what to buy, so track whether the user makes a purchase after they were shown the products in a new order.
- Click Create Event.
- In the Add Metric modal, leave the defaults, measure increase in unique conversions.
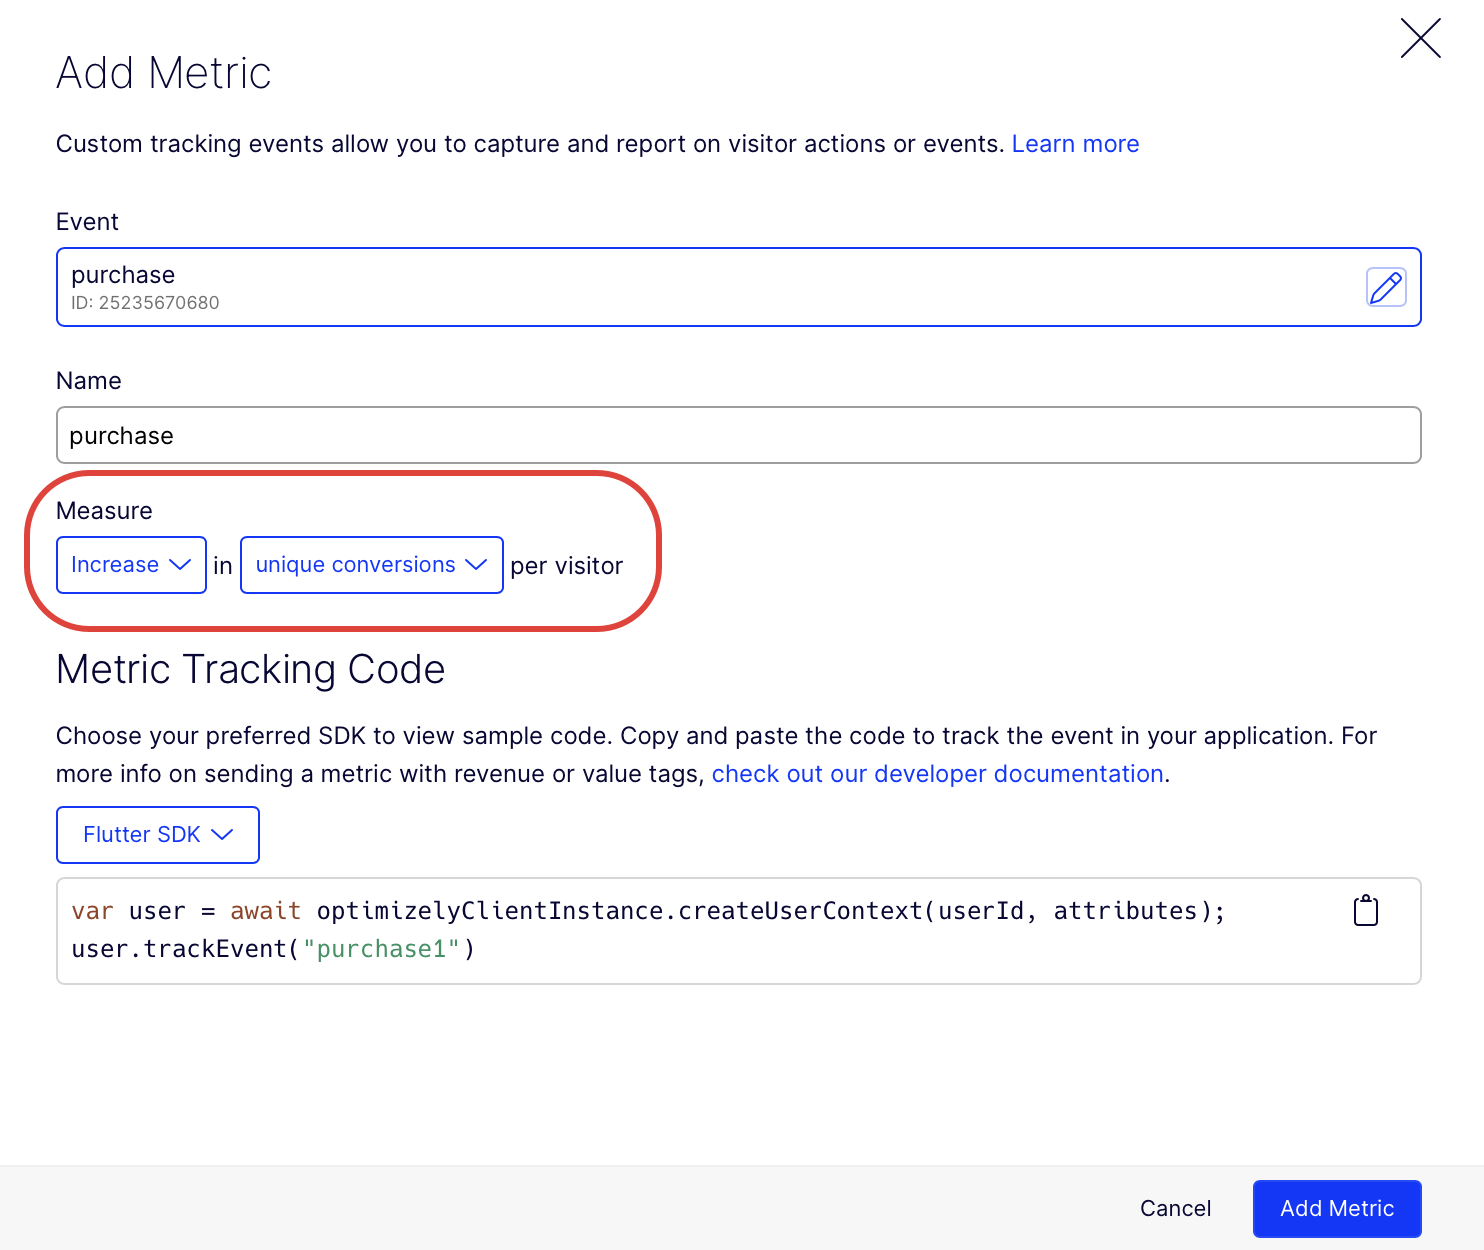
- Click Add Metric.
- Leave the default Off variation as a control. Select the On variation you configured in Part 2:
NoteYou are not limited to two variations; you can also create A/B tests with multiple variations.
-
Click Save to create your A/B Test rule.
-
Click Run on the A/B test rule.
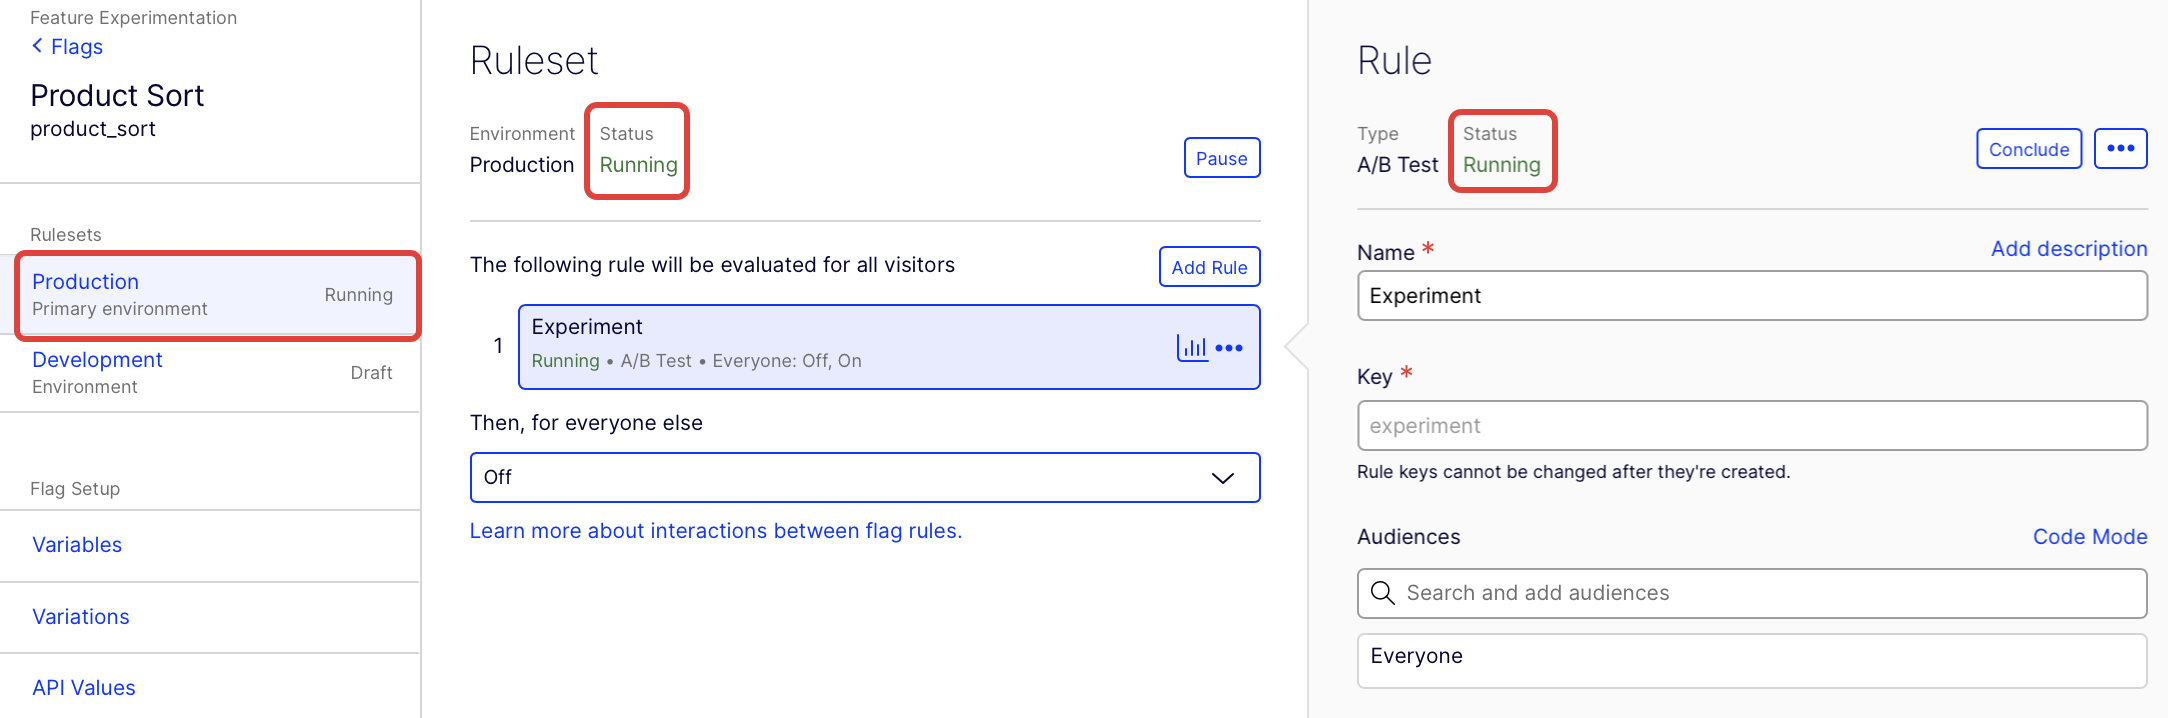
5. Run the A/B test
Ensure your ruleset's (flag's) status is Running, and the rule's status is Running so your experiment can run:
Click Run in Android Studio and answer the command-line prompts. Your output should display similar to the following:
Flag on. User number 1496 saw flag variation: on and got products sorted by: popular_first config variable as part of flag rule: experiment_1
Pretend that user made a purchase? y/n
n
Optimizely didn't record a purchase in experiment results for user 1496


Flag off. User number 1194 saw flag variation: off and got products sorted by: alphabetical config variable as part of flag rule: experiment_1
Pretend that user made a purchase? y/n
y
Optimizely recorded a purchase in experiment results for user 1194


Flag off. User number 5815 saw flag variation: off and got products sorted by: alphabetical config variable as part of flag rule: experiment_1
Pretend that user made a purchase? y/n
y
Optimizely recorded a purchase in experiment results for user 5815


Flag on. User number 1248 saw flag variation: on and got products sorted by: popular_first config variable as part of flag rule: experiment_1
Pretend that user made a purchase? y/n
y
Optimizely recorded a purchase in experiment results for user 1248


Flag off. User number 9580 saw flag variation: off and got products sorted by: alphabetical config variable as part of flag rule: experiment_1
Pretend that user made a purchase? y/n
n
Optimizely didn't record a purchase in experiment results for user 9580


Done with your mocked A/B test.
Check out your report at  https://app.optimizely.com/v2/projects/<your-project-id>/reports
Be sure to select the environment that corresponds to your SDK key
6. View your A/B test results
Go to the Reports tab and select your experiment to see your results.
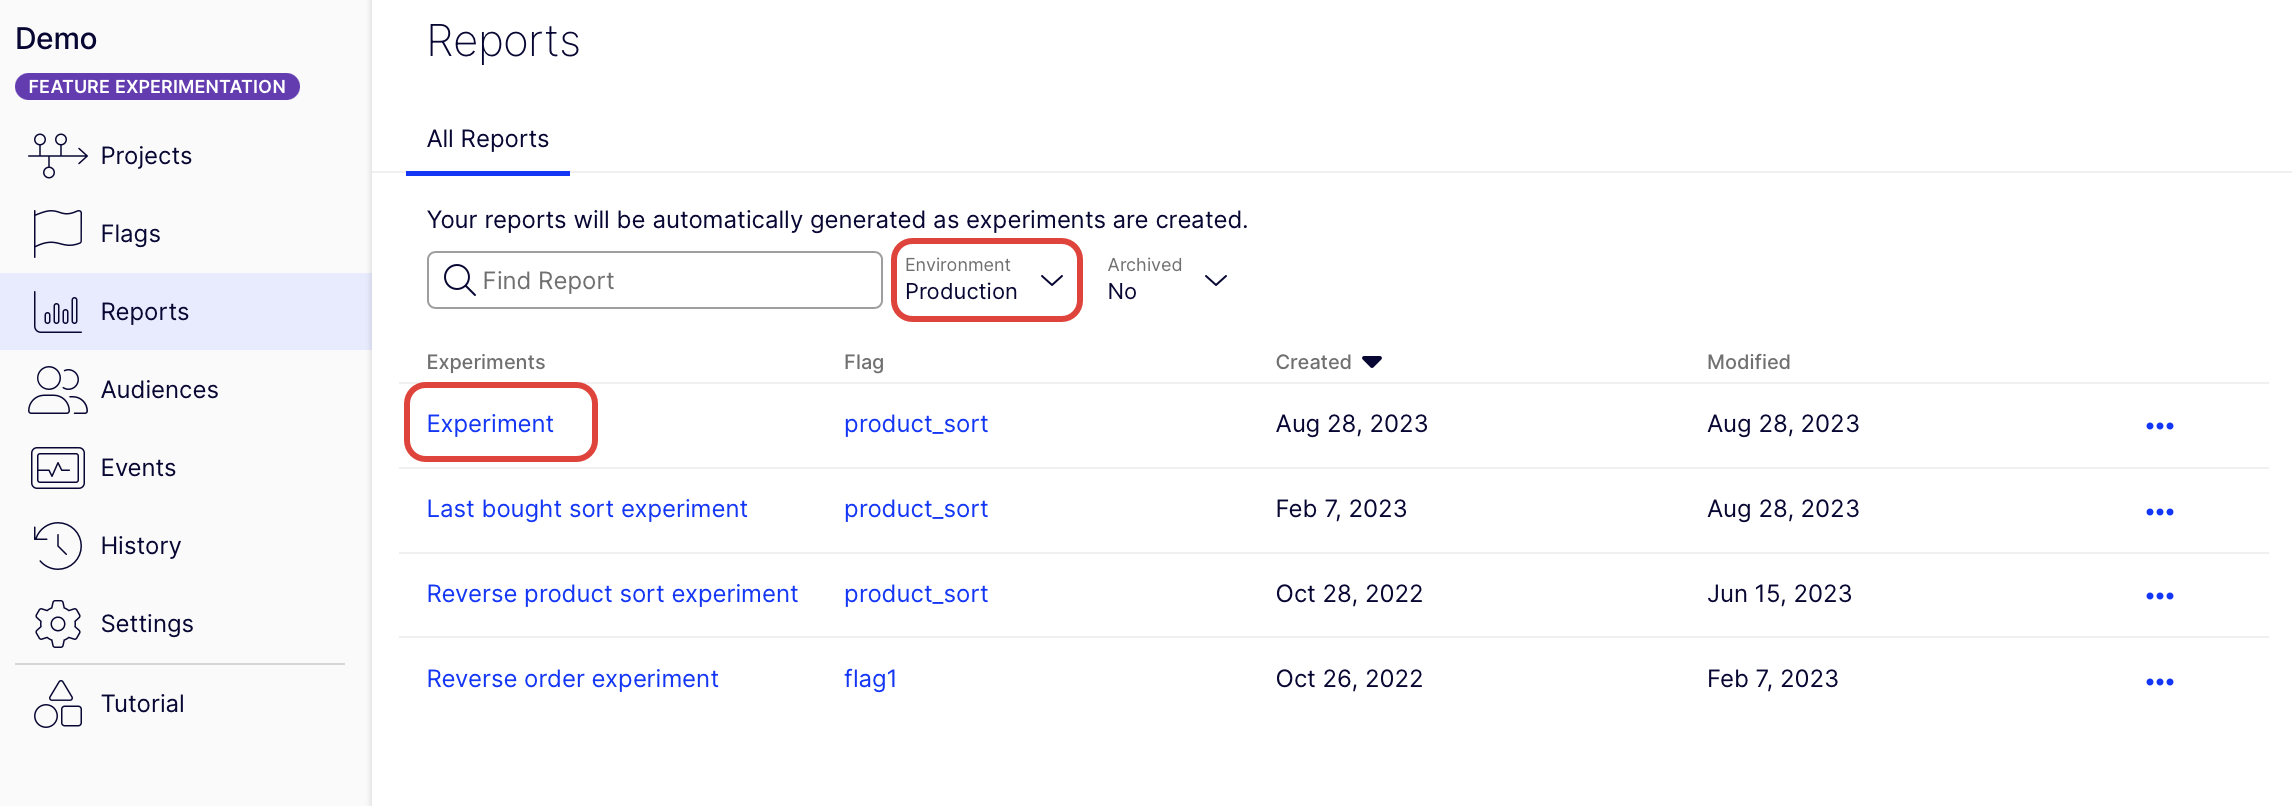
Your results should look similar:

Click image to enlarge
Note
- You might not see the exact user traffic percentages you configured for your flag variations until you have a larger number of users.
- You might not see your user traffic immediately. Refresh the browser to refresh traffic.
- Your experiment results will not tell you a winning variation until you have a larger number of users (on the order of 100,000 or more).
7. How it works
For an A/B test, you need a way to tell Optimizely when users make purchases in your app and map this event in your app code to the specific event you created in Optimizely. The SDK has a method for that! Use the Track Event method and pass in the key for the event you created (purchase). In your sample app:
// Track how users behave when they see a flag variation
// for example, after your app processed a purchase, let Optimizely know what happened:
user.trackEvent("purchase");
NoteOptionally add tags to your event to enrich it (not shown in your sample app). You can also use reserve tag keys like revenue to track quantitative results.
Event tracking is currently supported only for experiment rules, not delivery rules. Tracking for deliveries will be supported in a future release.
Either way, you should include event tracking when you implement a flag because it can help you integrate with a third-party analytics platform. It also gives you flexibility when you create A/B tests.
Conclusion
Congratulations! You configured and launched your first Feature Experimentation experiment. While this example focused on optimizing sales, Optimizely’s experimentation platform can support an open-ended set of experimentation use cases.
See the complete Flutter SDK documentation to learn more ways to optimize your software using experimentation.
Updated 3 months ago