Enable live preview
Enable live preview for Optimizely CMS (SaaS).
Optimizely Content Management System (SaaS) provides a user-friendly WYSIWYG (what you see is what you get) authoring interface. To ensure compatibility, you should develop your application's views with this in mind. The preview functionality is framework-agnostic, and you can use plain JavaScript.
You must complete four main tasks to enable a live preview of the content.
- Configure an application.
- Enable communication between CMS (SaaS) and your application.
- Enable property overlays.
- Refresh the application's view when content has changed.
Prerequisites
To complete the following steps, you must create a content type and content item.
Configure application
CMS (SaaS) requires information about your application, particularly its URL.
- Go to Settings > Applications.
- Click Create Application.
- Enter an Application Name. The API ID is automatically generated. If you want to update it, click Change.
Note
The API ID must have 2 to 255 characters and start with a lowercase or uppercase letter followed by any combination of letters, digits, or underscores.
- Select From Existing and click an existing page to use as your start page. You can also select New to create a new Experience or Page as your start page.
- Click Create Application.
- Click the Application Name or click More > Edit.
- Click the Hostnames tab.
- Click Add Hostname and add a Hostname where Optimizely can locate your application.
Note
Your hostname can be a local hostname on your computer, such as
localhost:5000. See Get started with a demo site for information. - (Optional) Select or clear the Use a secure connection (HTTPS) checkbox.
- Click Add.
Enable communication between CMS and your application
For seamless content updates, CMS (SaaS) must notify your application whenever editors change the content. The system must also identify which properties your view is rendering and how to display an overlay for them. To establish this communication, you must implement a script that facilitates interaction between CMS (SaaS) and your application.
You must embed the https://app-[UUID].cms.optimizely.com/util/javascript/communicationinjector.js script (available from your instance) in your application to preview content in CMS (SaaS). Replace [UUID] with your instance's ID.
ImportantIf your application has configured Content Security Policies (CSP), make sure they let you embed your application in an iframe and load the communication script from your CMS (SaaS) URL:
https://app-[UUID].cms.optimizely.com.
Custom preview URL format
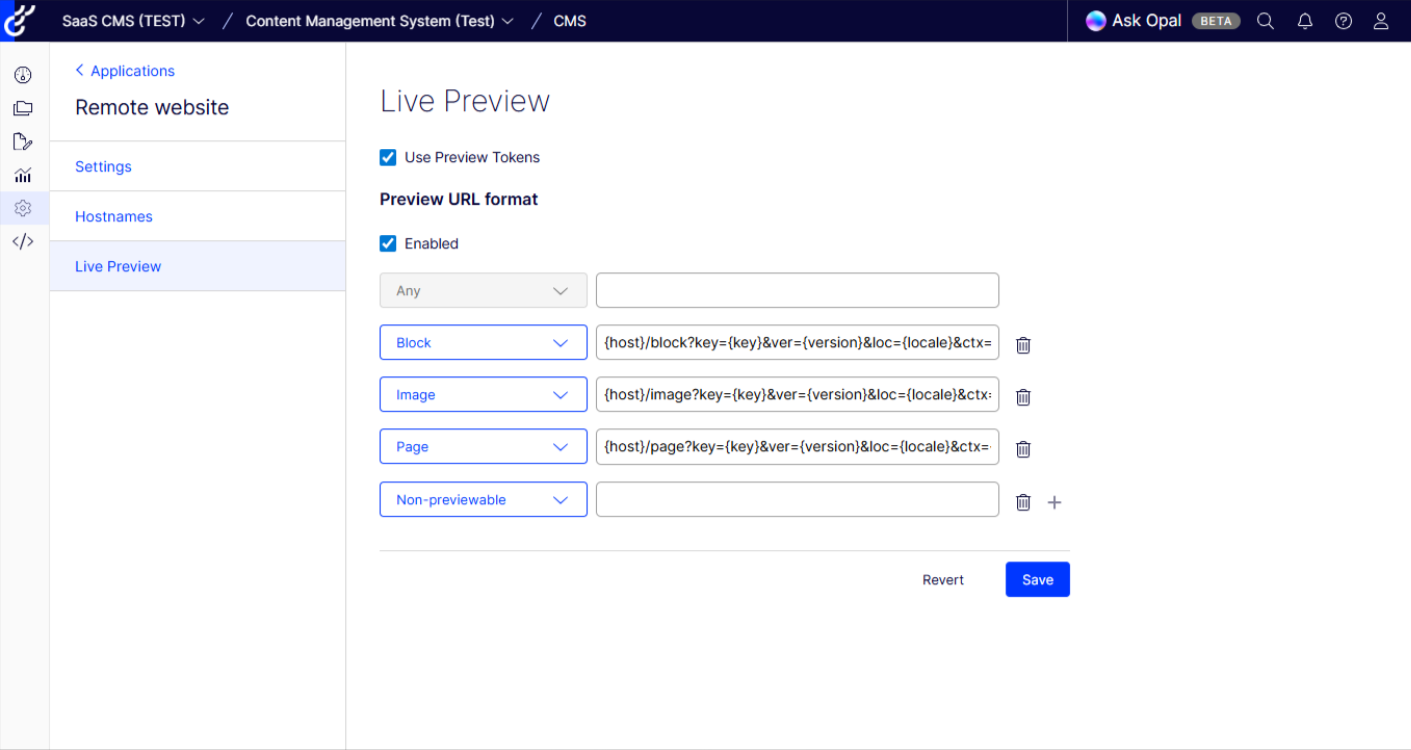
- Go to Settings > Applications and click your newly created application.
- Click the Live Preview tab.
- Select Use Preview Tokens.
- Click Enabled under Preview URL format. A default format is added automatically for all types.
- Add a row for the content type you want to enable preview for or edit an existing row.
- Click Save.
The default format is:
{host}/preview?key={key}&ver={version}&loc={locale}&ctx={context}The preview URL format supports a set of predefined tokens that get replaced with real values while previewing content in Visual Builder.
Available tokens:
{host}(Required) – Gets replaced with the primary hostname defined in the Hostnames tab.{key}– Gets replaced with the content's unique identifier.{context}– Gets replaced witheditorpreview. See the Context modes section for information.{version}(Required) – Gets replaced with the content's version.{locale}– Gets replaced with the content's locale.{path}– Gets replaced with the content's relative hierarchical path (slug). Unique value within the application.{segment}– Gets replaced with the content's URL segment. Unique value for the content and its siblings.
Leaving a format empty disables the preview for the selected content type. The Any row applies to all content types without a format. Leaving the Any format empty disables the preview for all content types without a format. Leaving the format empty for media types (images, videos, and files) does not disable the preview because there is a built-in preview of these types in CMS. It is, however, possible to add an external preview of these types by specifying a custom format.
Note that the preview token gets appended automatically to the URL with the query parameter preview_token when the Use Preview Tokens checkbox is selected.
Authorization
Live preview requires access to unpublished content, such as drafts. To retrieve this content from Optimizely Graph, use the preview_token provided in the preview URL.
Extract the token from the preview URL and use it in the Authorization header of your GraphQL request:
curl --location 'https://cg.optimizely.com/content/v2' \
--header 'Content-Type: application/json' \
--header 'Authorization: Bearer {the preview token}' \
--data '{ your GraphQL query }'
NoteThe preview token is valid for five minutes.
Enable property overlays
To create an interactive editing environment, CMS (SaaS) lets you enable property overlays. These overlays offer a visual representation of editable content properties, letting you click and edit them. In Visual Builder, the preview automatically scrolls to the property that you are editing.
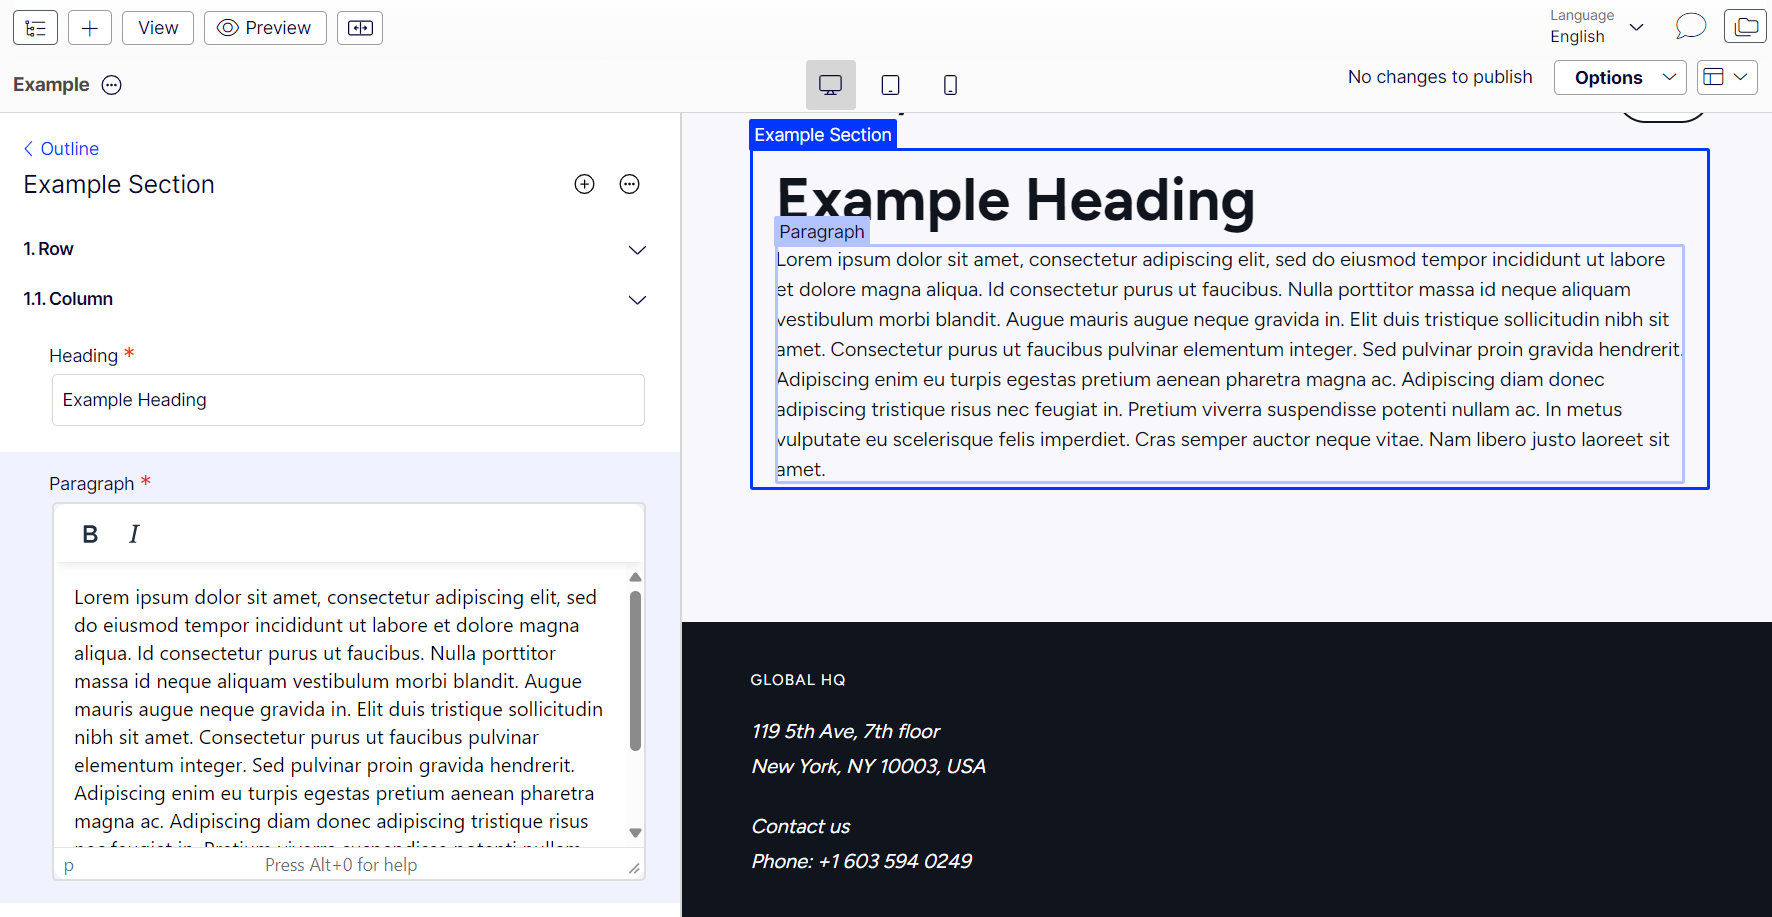
Example of property overlays in Visual Builder.
Required attributes
Use data-epi-block-id on all blocks, sections, rows, and columns. This attribute is required for the Visual Builder to recognize and select components. Set its value using the key returned by your Optimizely Graph query.
Use data-epi-edit on individual properties that should be editable. Set its value to the property name, such as heading, body, or title.
The UI introduces the data-epi-edit attribute that you can add to editable Document Object Model (DOM) elements:
<section data-epi-block-id="block_abc123">
  <h2 data-epi-edit="heading">Welcome</h2>
  <p data-epi-edit="bodyText">This is the main content</p>
</section>
Each selectable component in the Visual Builder must have a data-epi-block-id attribute matching the content item's id. Add data-epi-edit to individual elements that represent CMS properties.
NoteThe
idfield from each content item in your GraphQL query (such as rows, columns, components) must be rendered as thedata-epi-block-idattribute.The structure of your GraphQL query must match the structure of your DOM. For example, if a
rowcontainscolumns, and eachcolumncontainscomponents, your rendered HTML must reflect this nesting.This ensures that the Visual Builder can locate and display overlay editing controls correctly.
Encapsulate the rendering of these HTML attributes within a shared function that ensures they are only rendered during content preview and when the context mode is set to edit.
Context modes
Two context modes are available when previewing content: edit and preview. The context mode is determined by the preview URL format you have defined. By default, this is available in the query parameter ctx. You should only render data-epi-edit and data-epi-block-id attributes when the context mode is edit. This prevents overlays from affecting the user experience during normal content preview. This lets editors preview the content without the property overlays blocking the view. See Visual Builder.
Refresh the application's view when content changes
Subscribe to events emitted by the communication script to ensure real-time updates of your application's view when an editor changes content in CMS (SaaS). These events contain an updated preview URL and a preview token that you should use to update your application's view with the latest content version from Optimizely Graph.
The optimizely:cms:contentSaved event indicates that the changes to the edited content are saved, Optimizely Graph has indexed them, and you can fetch them. The view application can refetch or rerender the data and see the changes.
window.addEventListener('optimizely:cms:contentSaved', (event) => {
   const message = event.detail;
   // Re-run your GraphQL queries using the new previewToken which is returned as part of `message` or
   // extract the new preview URL from the message and refresh your view or state with it.
});
interface ContentSavedEventArgs {
contentLink: string;
previewUrl: string;
previewToken: string;
properties: PropertySaved[];
parentId?: string;
sectionId?: string;
}
window.addEventListener('optimizely:cms:contentSaved', (event) => {
const message = event.detail as ContentSavedEventArgs;
// Re-run your graphql queries using the new previewToken which is returned as part of `message` or
// extract the new preview URL from message and refresh your view or state with it.
});Get a new preview token from ContentSaved event message
ContentSaved event messageFor security reasons, the preview token has a short lifetime, so the frontend site cannot use the same token to query for content after it has expired.
However, you can get a preview token from the event message of the ContentSaved event. The event message includes a previewUrl field that contains the preview token.
 onSuccess: (message: ContentSavedMessage) => {
   //...
   const newPreviewUrl = message.previewUrl
   const urlParams = new URLSearchParams(newPreviewUrl);
   const newPreviewToken = urlParams.get('preview_token');
   //...
 }
You can use this preview token to query Optimizely Graph to refresh the frontend page.
NoteThe preview token has a short lifetime and you must replace it after expiration.