Configure the Optimizely CMS (SaaS) integration
Use an Optimizely Feature Experimentation experiment to manage your Optimizely Content Management System (SaaS) content.
The Optimizely CMS (SaaS) and Feature Experimentation integration lets you A/B test CMS (SaaS) content variations. After you configure the integration, your frontend decides a user's variation with the Feature Experimentation React SDK and then fetches the matching content from Optimizely Graph.
Optimizely CMS (SaaS) is a headless content management system (CMS) that lets you manage and distribute content across multiple platforms.
Prerequisites
- An Optimizely account with the following:
- A Feature Experimentation project.
- A CMS (SaaS) instance with at least one variation.
- Optimizely Graph.
- A Next.js project.
- The Feature Experimentation React SDK (version 3.2.4+) installed in your frontend.
NoteIf you use Remko's npm package to help connect to Optimizely Graph, you need Next.js version 14.2+ and TypeScript version 5+. See the Configure Optimizely Graph routes and client section.
Configure your experiment in Feature Experimentation
ImportantThe following walk-through example configuration does not use secure environments.
If your Feature Experimentation project uses secure environments, ensure you understand that you must pass a datafile authentication token when you send requests to the datafile URL through the SDK. See Manage environments for information.
Create a flag
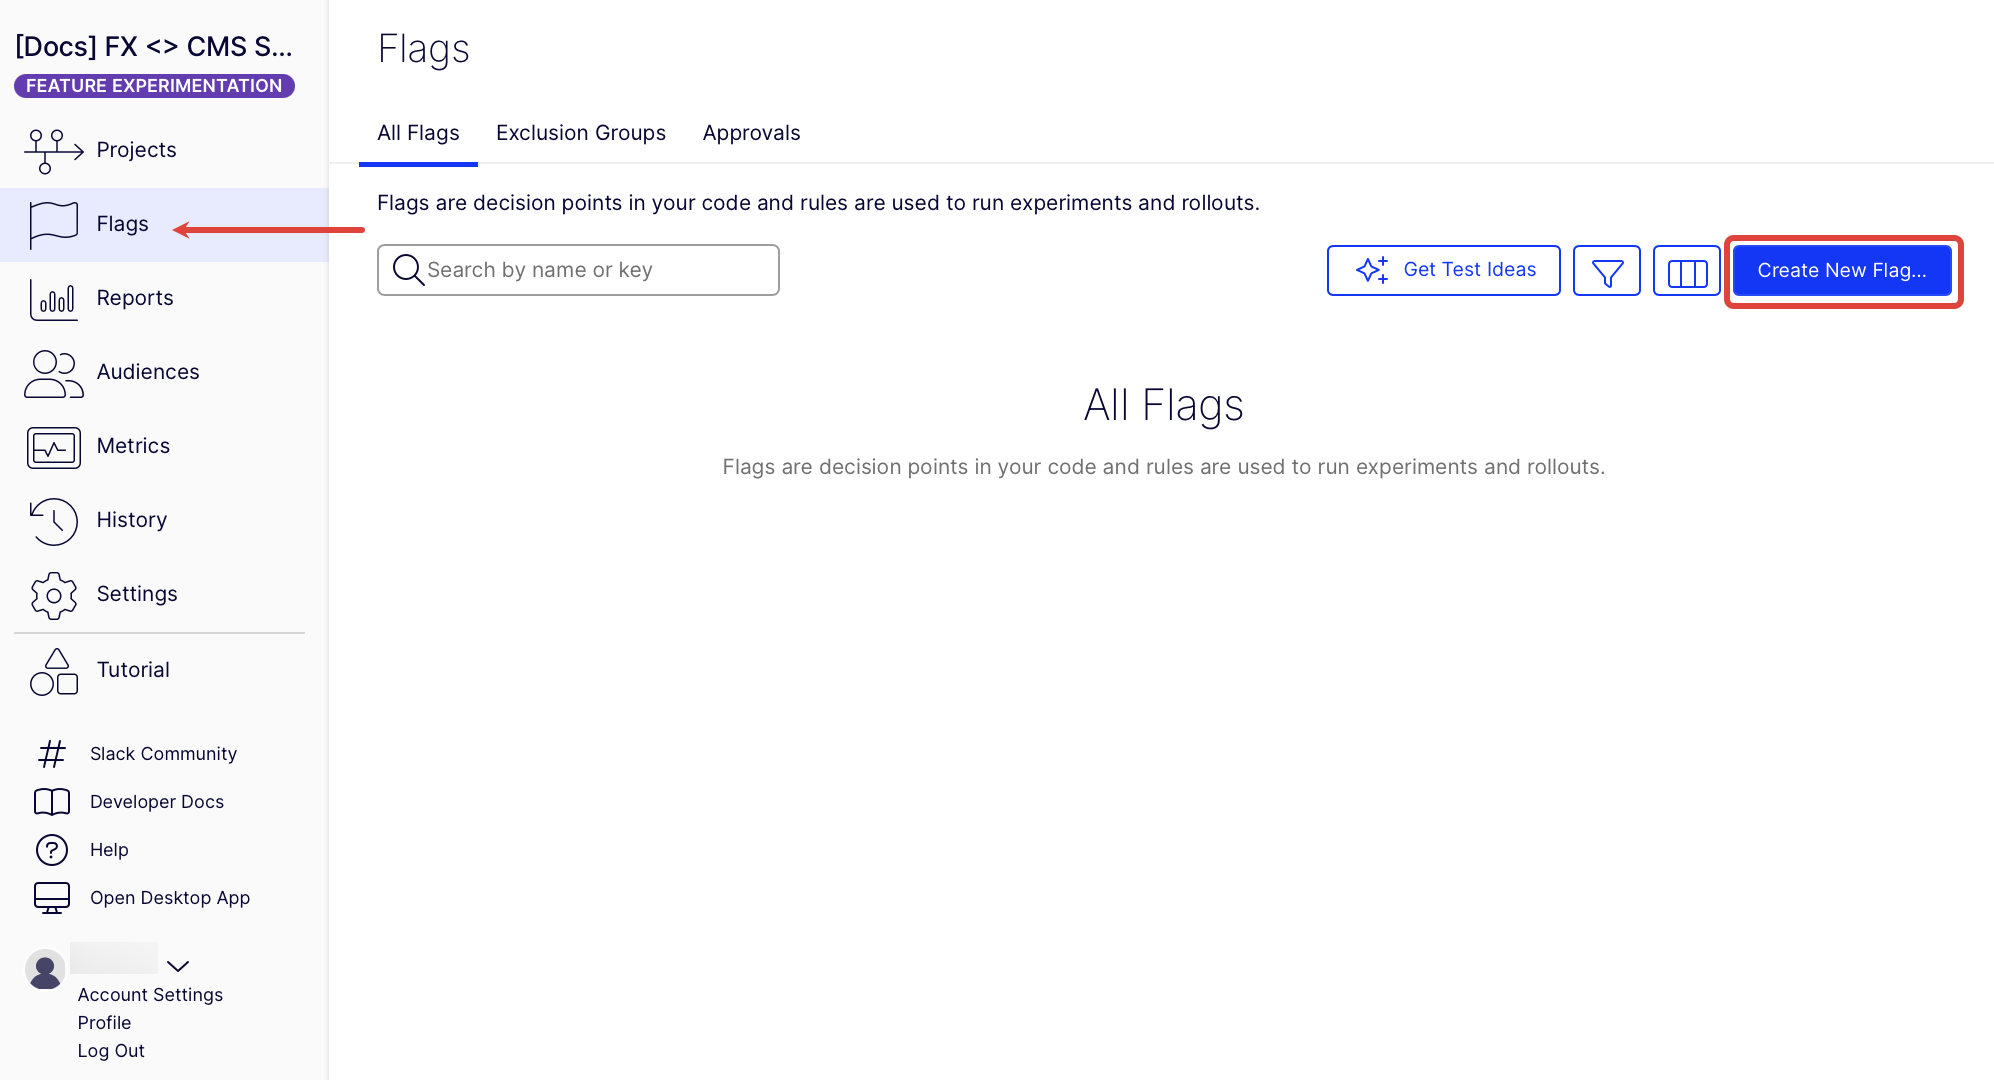
Select an existing flag in your Feature Experimentation project, or create one using the following example steps:
-
Go to Flags > Create New Flag.
-
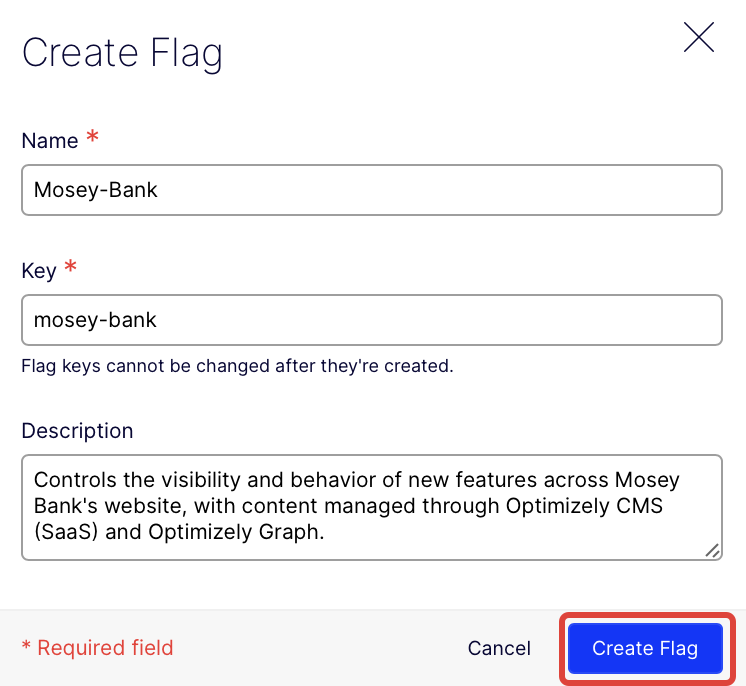
Complete the following on the Create Flag page, then click Create Flag.
- Name – Enter Mosey-Bank.
- Key – Automatically populated based on the name, so you do not have to enter anything.
- (Optional) Description – Enter a description for the flag.
Create flag variables and variations
Variables are dynamic values you configure in Feature Experimentation that control what content your front end displays. In this integration, the variables map directly to variation names in CMS (SaaS). You create the corresponding variations in CMS (SaaS) later.
This integration uses the following:
- Feature Experimentation variations – Defines how users are bucketed in the experiment.
- Feature Experimentation variables – Provides the variation key used in your frontend logic.
- CMS (SaaS) content variations – Contains the actual content to display, queried from Optimizely Graph using the variation key.
To add a flag variable, complete the following:
-
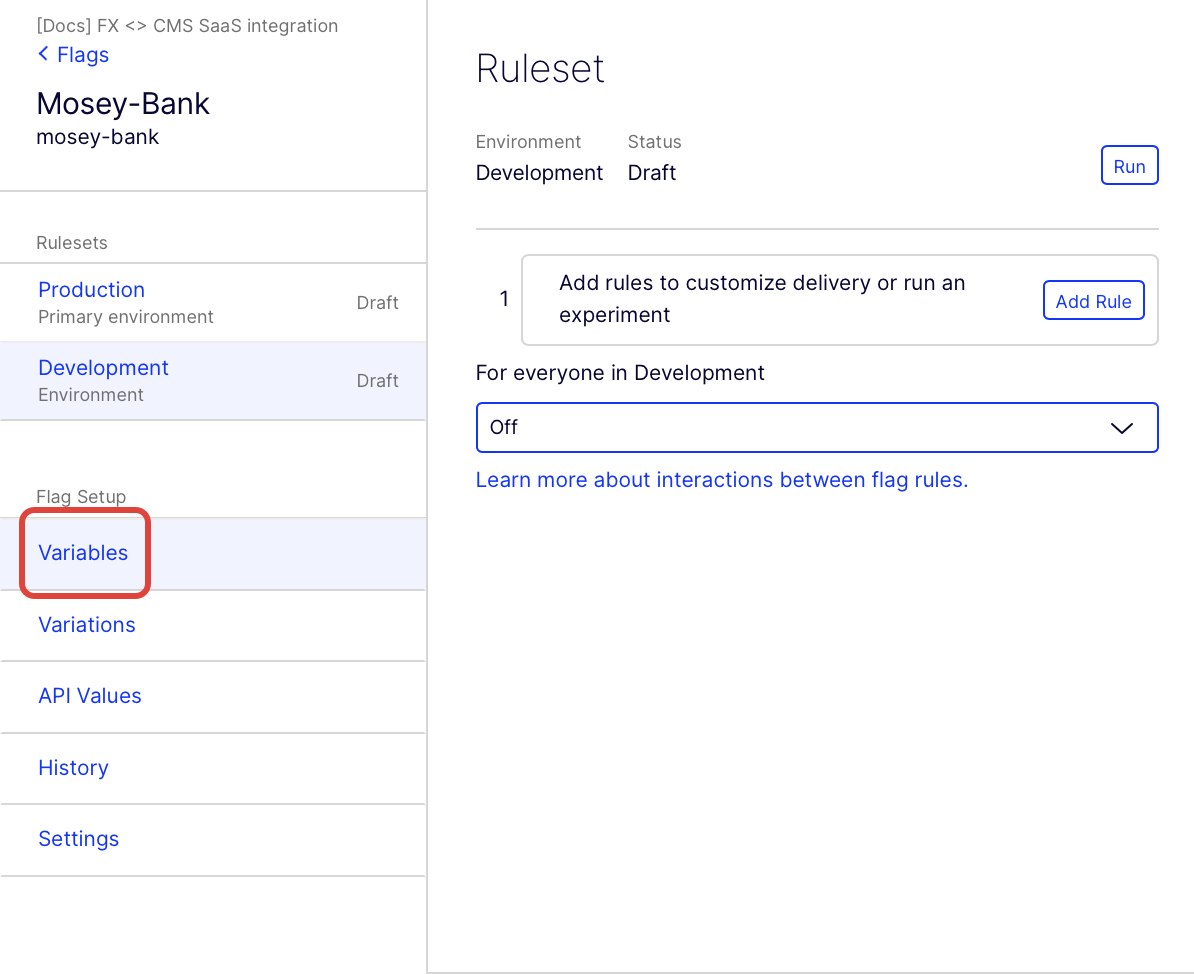
Click Variables in the flag you previously created or selected.
-
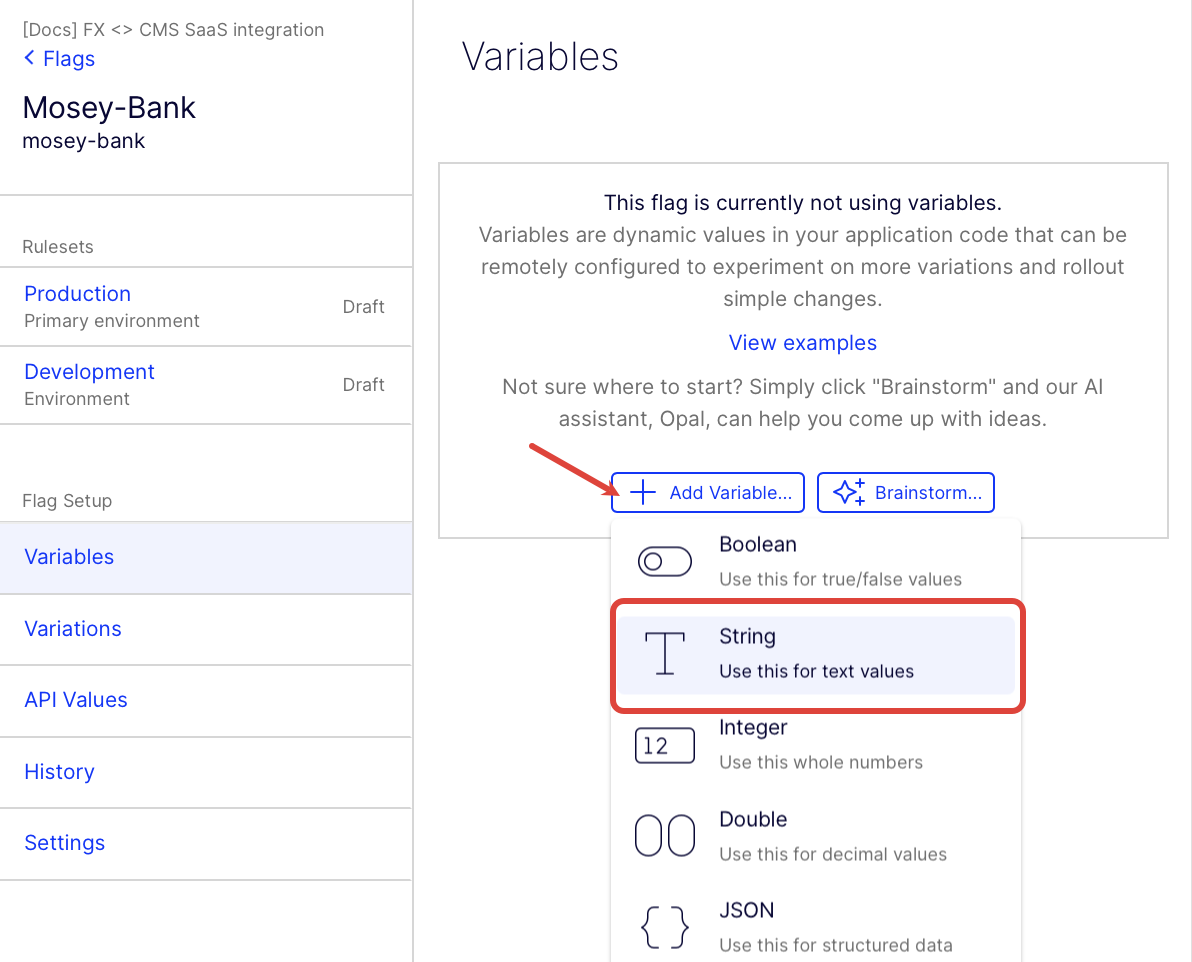
Click Add variable and select String.
-
Enter cms-saas-content-variation in the Name field on the Configure String Variable page.
-
(Optional) Enter a Description.
-
Enter Original for the Default Value.
-
Click Save.
-
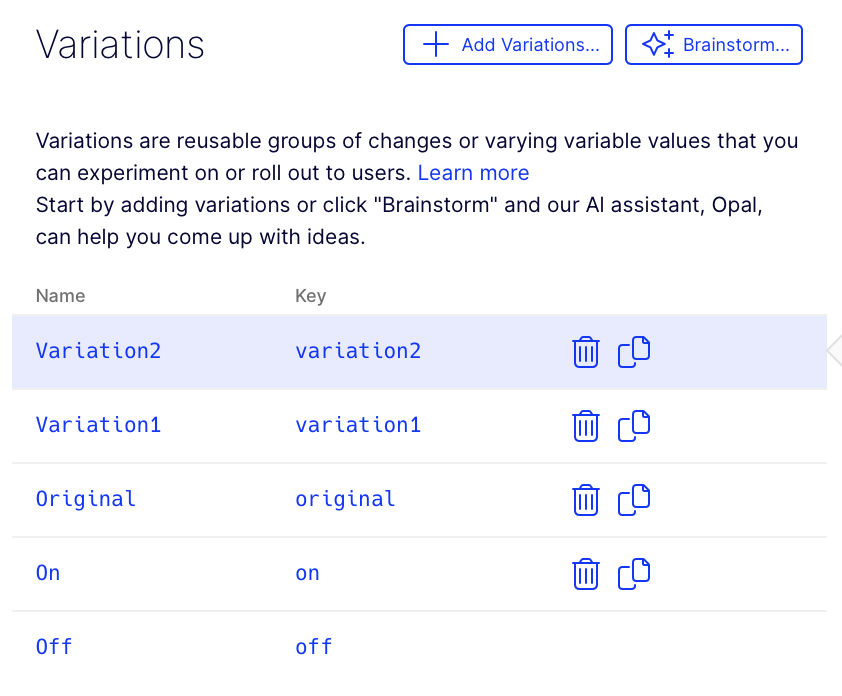
Go to Variations, click Add variations, and add the following three variations:
- Original
- Variation1
- Variation2
For each variation, enter the same value for the Name and cms-saas-content-variation fields. For example, the first variation has a Name of Original and cms-saas-content-variation value of Original. Also, keep the default Key, and optionally enter a Description.
The following image shows what your Variations page should look like:
ImportantIn Feature Experimentation, the variation names must begin with a letter and contain only alphanumeric characters. This is because CMS (SaaS) content variations have these naming convention requirements.
Create an A/B test rule
Use an existing A/B test rule, or create one using the following example steps:
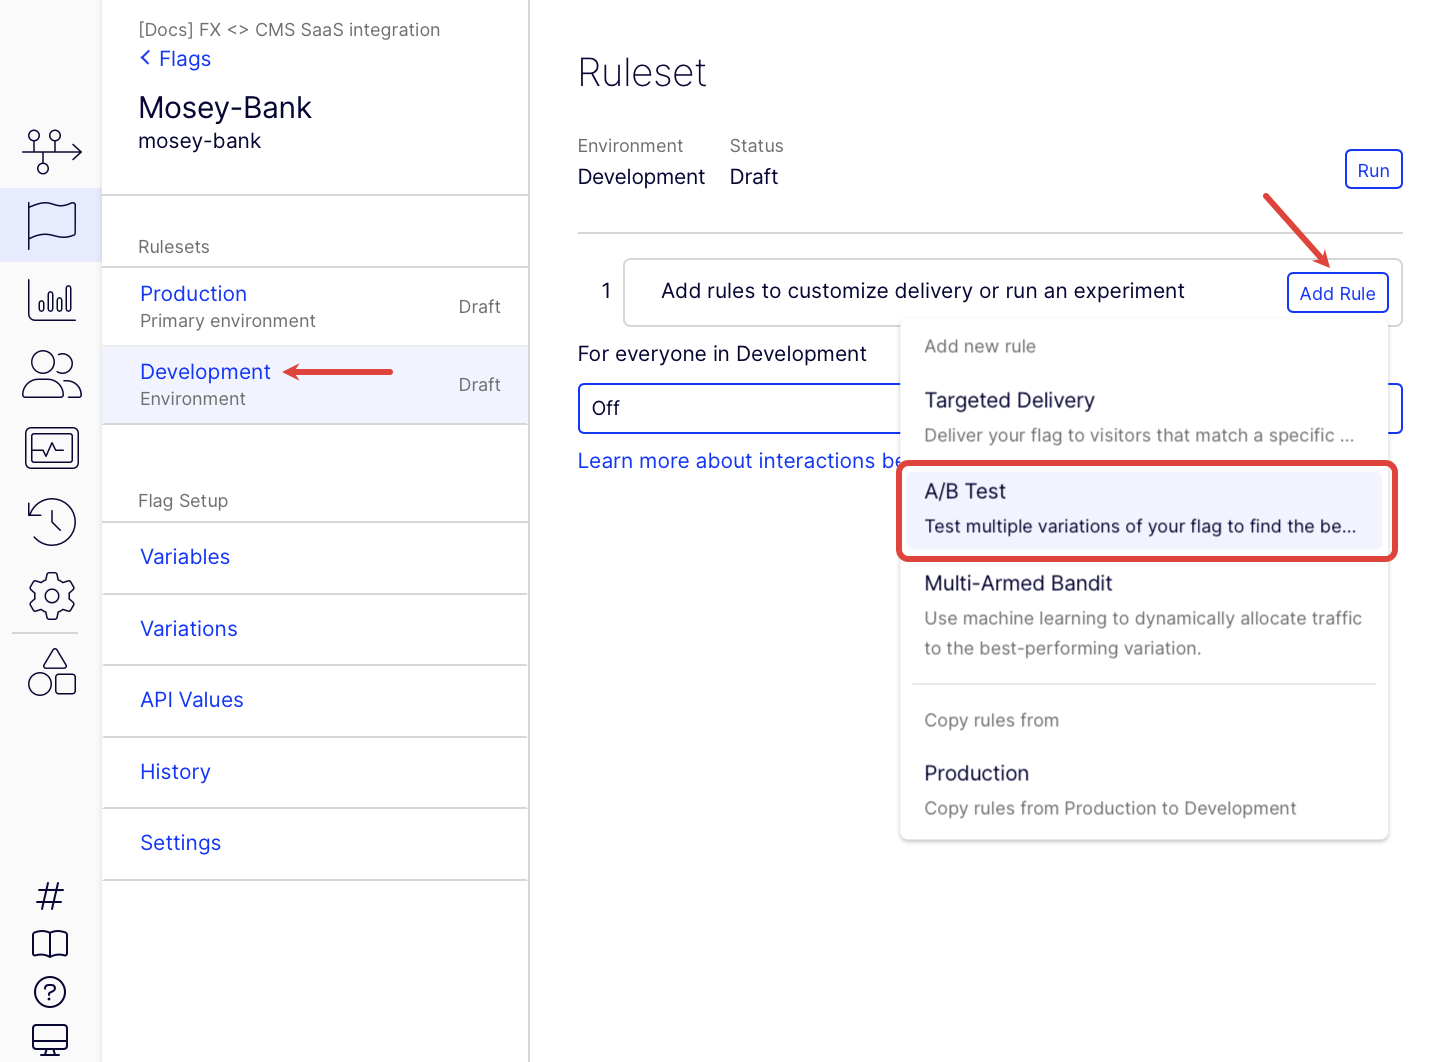
-
Click Add rule and select A/B Test in the Development environment.
-
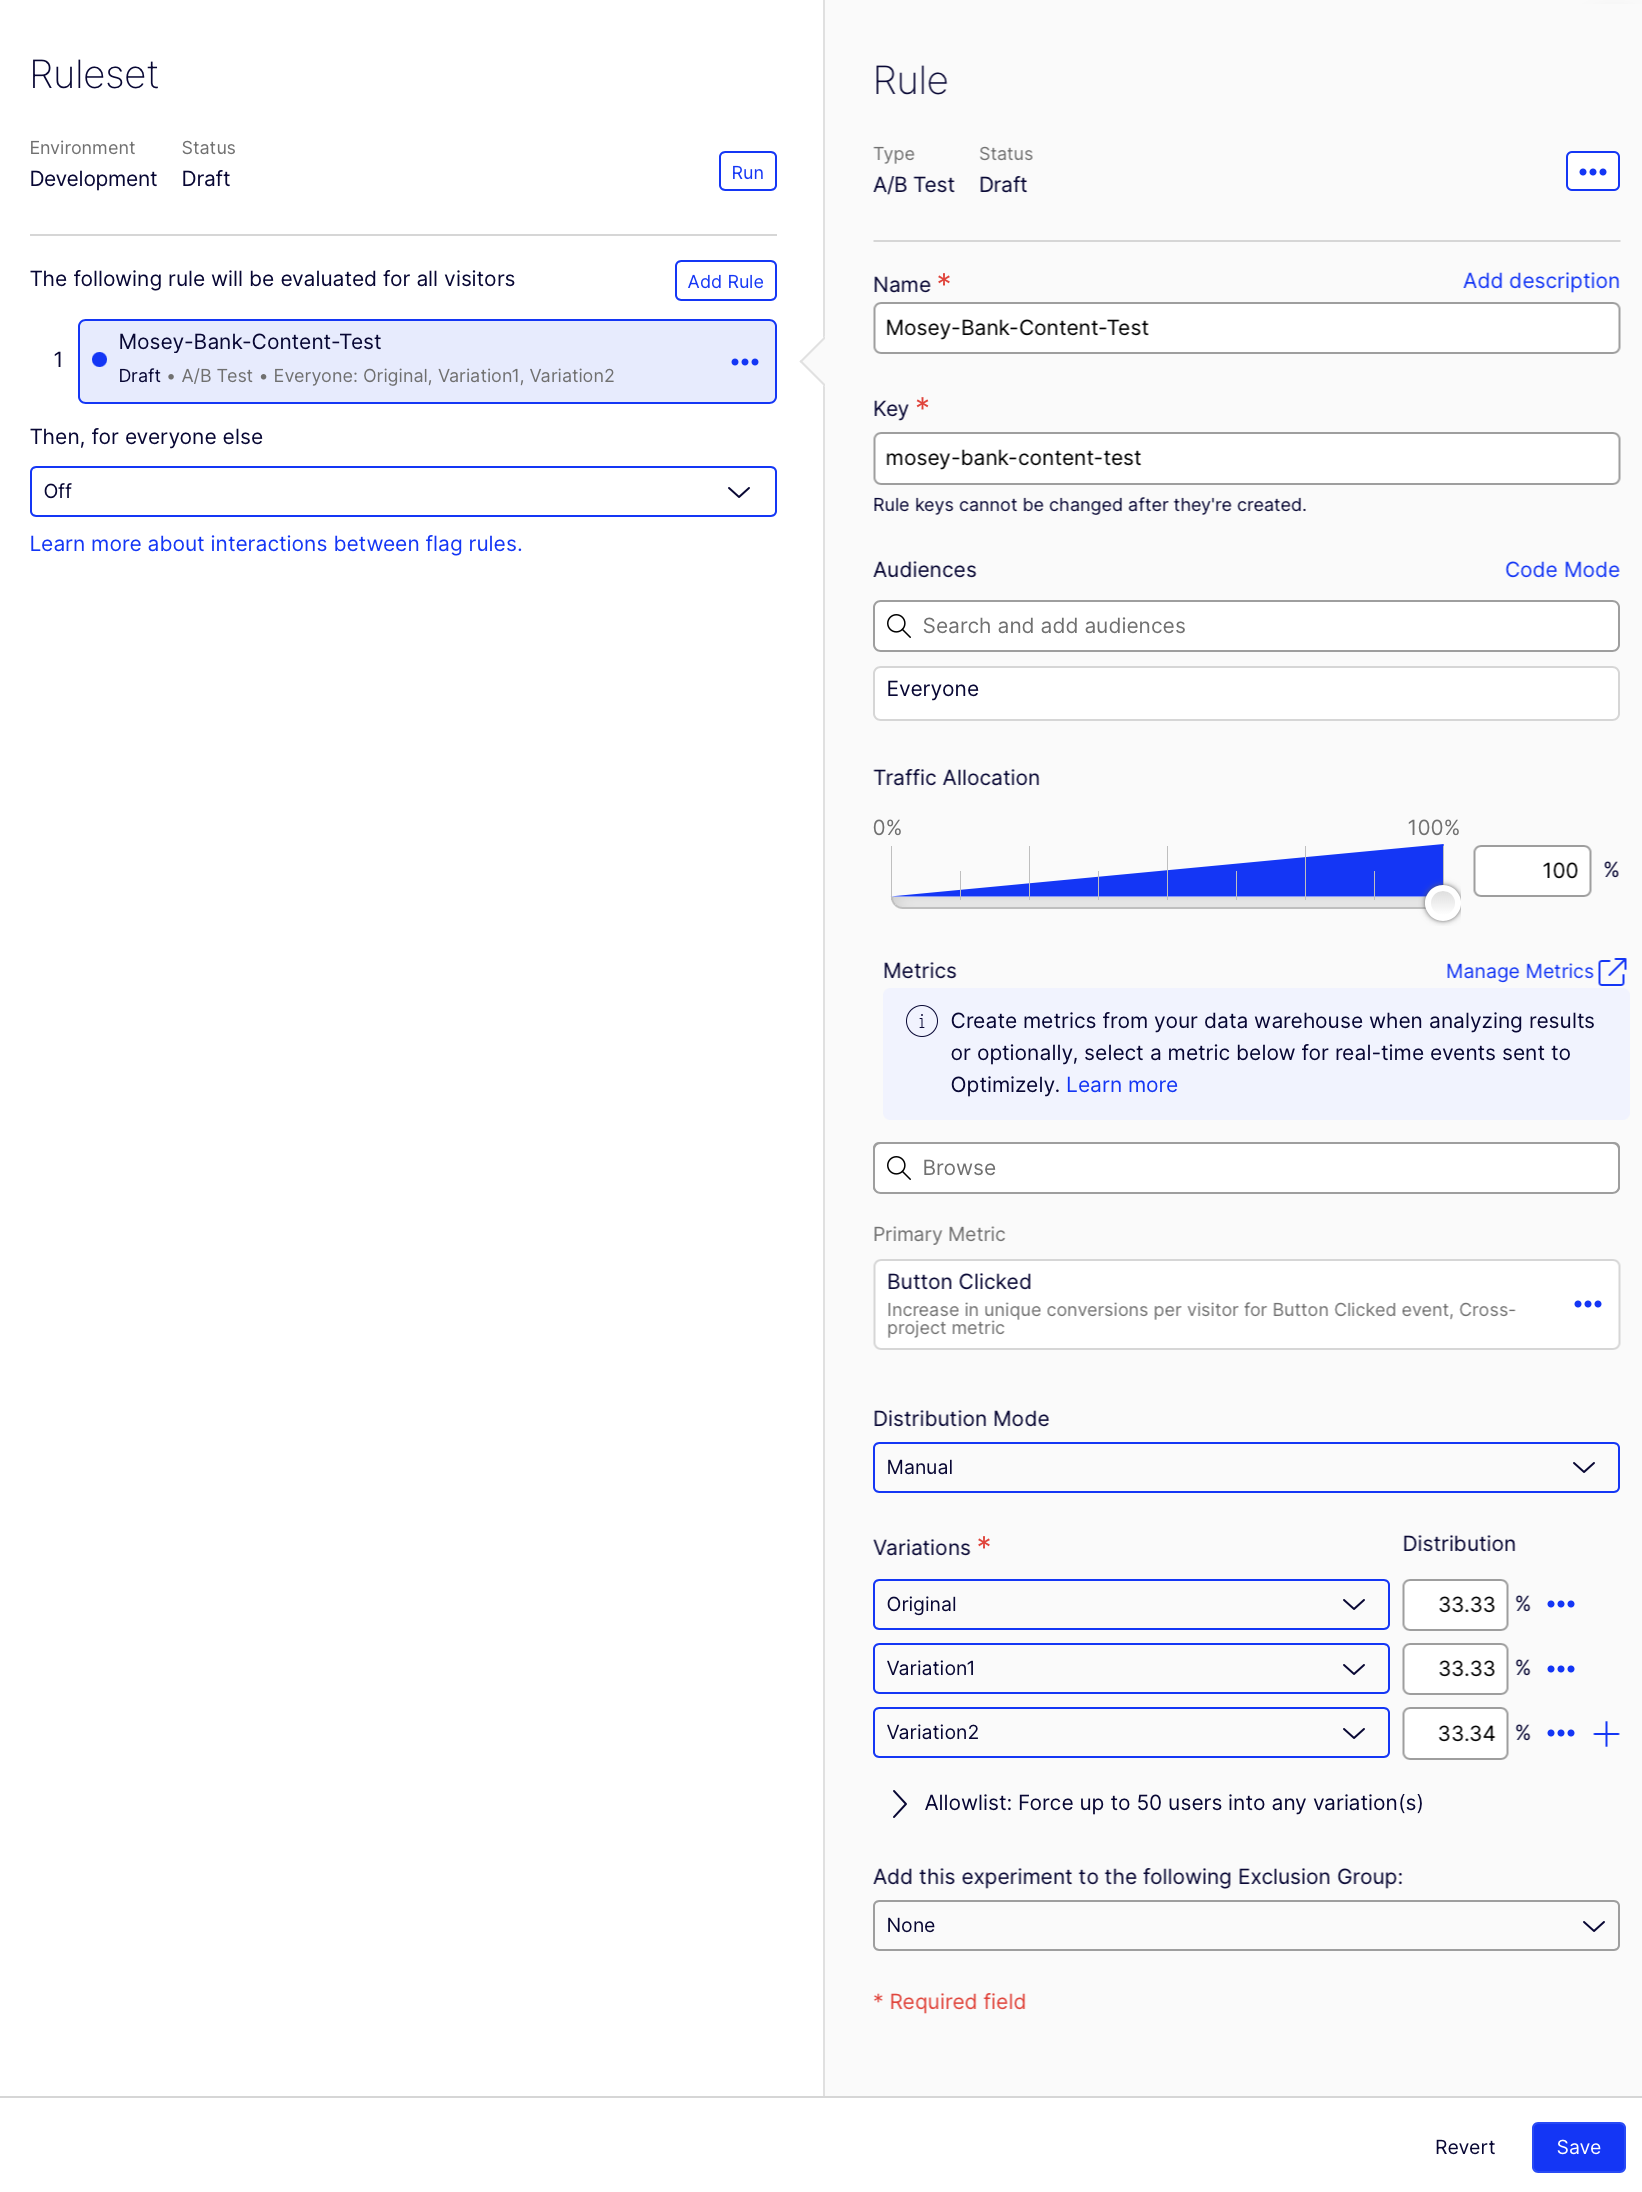
Configure your rule with the following information:
- Name – Enter Mosey-Bank-Content-Test
- Key – Keep the automatically created key.
- Audience – Keep Everyone.
- Traffic Allocation – Keep at 100%.
- Primary metric – Select a metric you already created or create one.
- Distribution Mode – Keep Manual.
- Variations – Add the Original, Variation1, Variation2 you created previously.
- Exclusion Group – Do not add an exclusion group.
-
Click Save.
Your Mosey-Bank-Content-Test rule should look similar to the following image:
Run your flag and rule
In the flag you created previously, start your rule and start your flag.
Install the Feature Experimentation React SDK
Install and instantiate the Feature Experimentation React SDK (version 3.2.4+) in your Next.js app.
npm install @optimizely/react-sdk@^3.2.4See Install the React SDK for instructions.
Create content in CMS (SaaS)
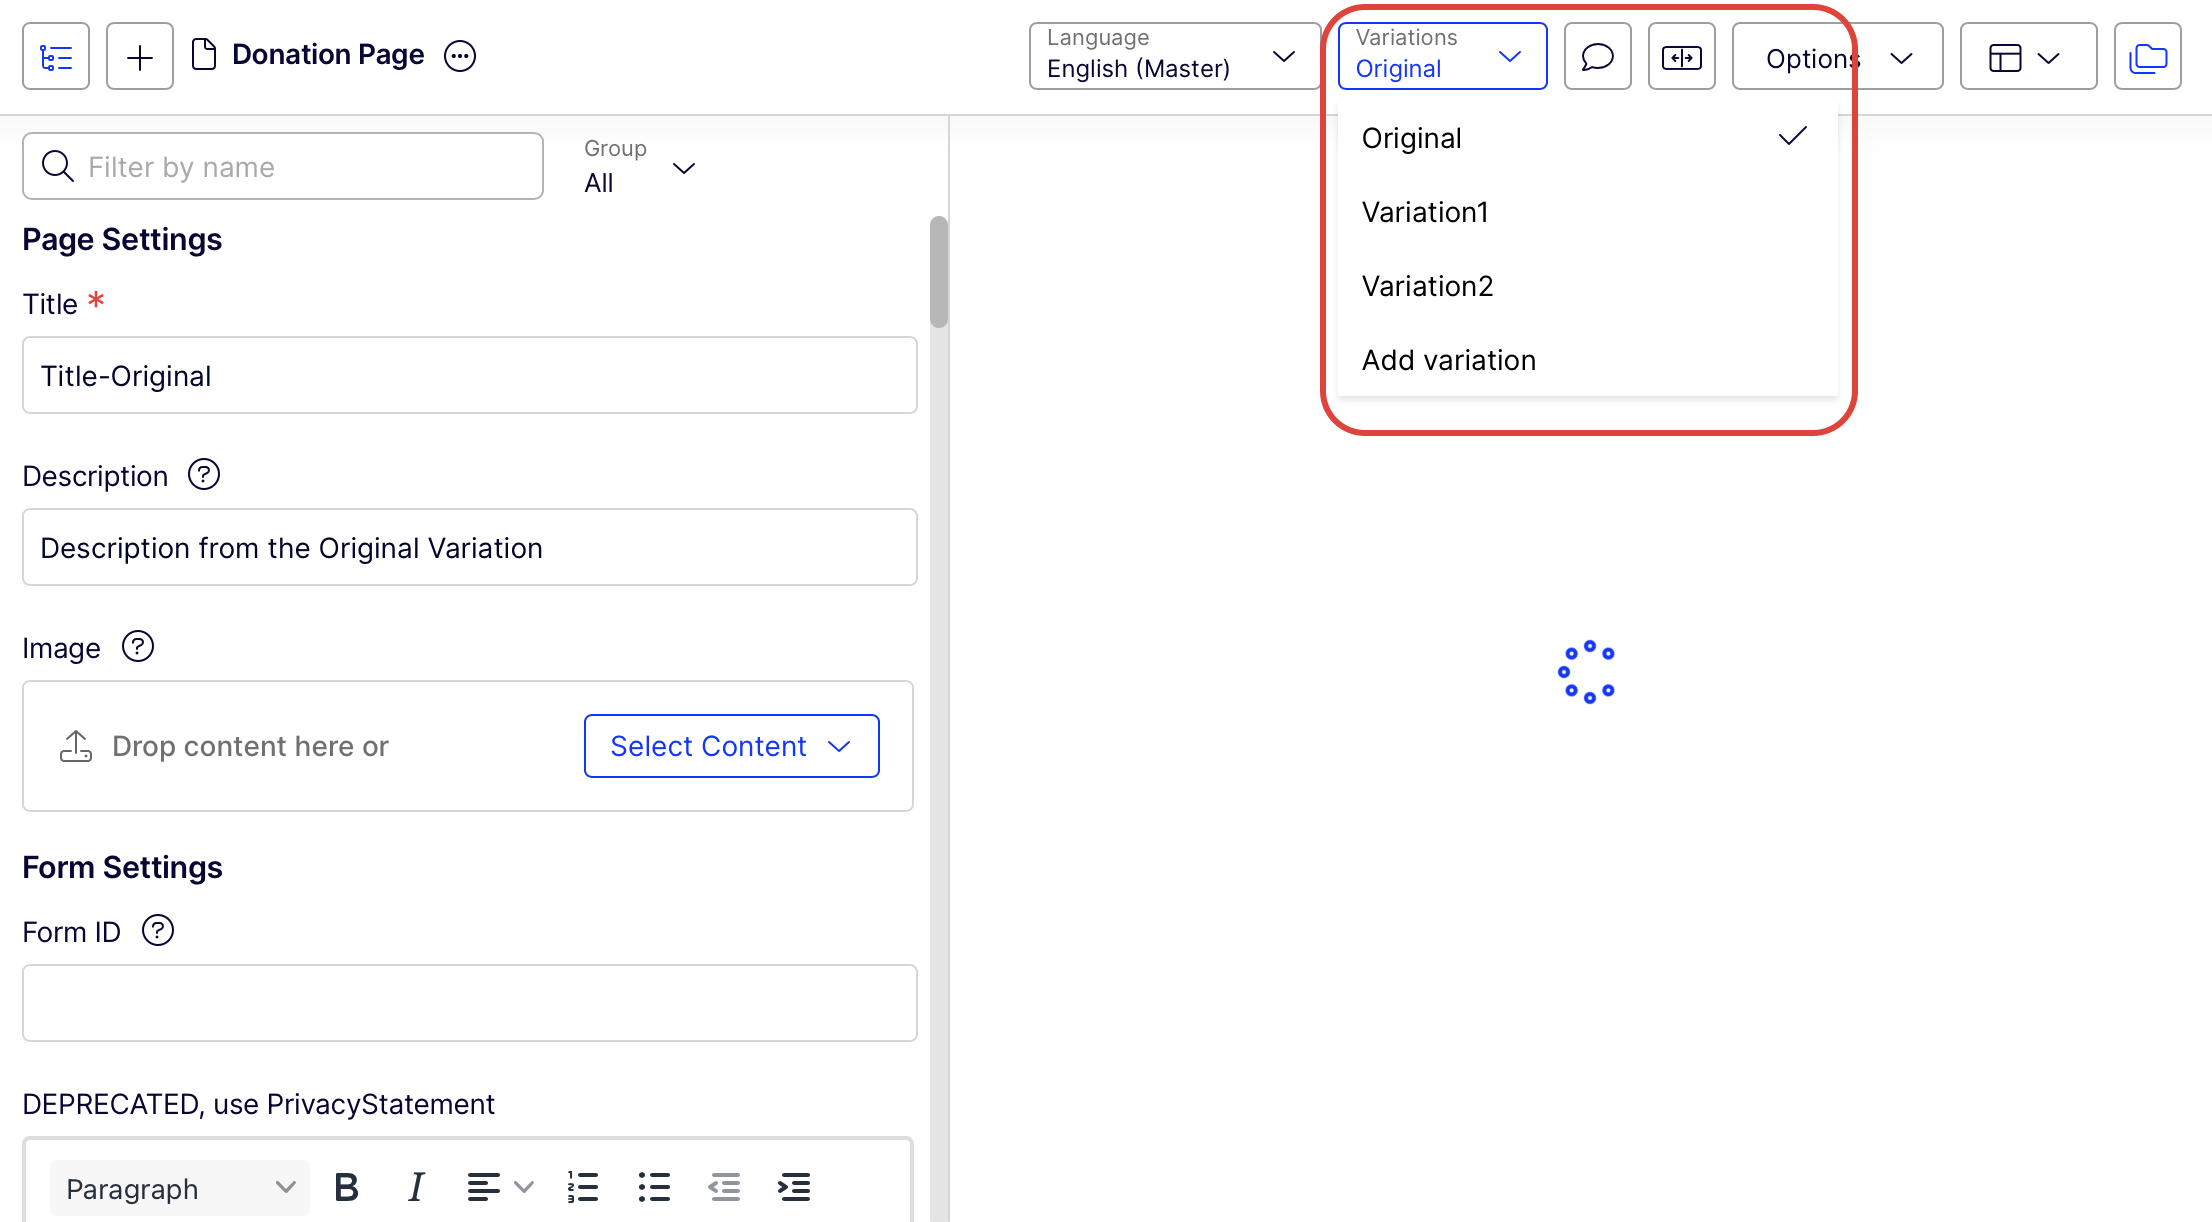
Create two content variations in CMS (SaaS) named Variation1 and Variation2. Each variation should differ in visible content, such as a heading or call-to-action (CTA) text. See Add a content variation.
ImportantEach content variation name must match the
cms-saas-content-variationvalue from Feature Experimentation exactly (case-sensitive).
Run or confirm that the Optimizely Graph sync succeeded. See Scheduled jobs in Optimizely Graph.
After creating your content variations, your CMS (SaaS) instance should look similar to the following image:
Configure Optimizely Graph routes and client
To retrieve the content variation for each feature flag decision, configure your frontend to connect to your Optimizely Graph instance.
This example uses @remkoj/optimizely-graph-client npm package to handle authentication and communication with Optimizely Graph from the server. Instead of calling Optimizely Graph directly from the browser (which exposes your delivery key and causes CORS issues), the route uses the @remkoj/optimizely-graph-client package to create a preconfigured client. This client automatically reads authentication credentials from environment variables and executes the GraphQL request on the server.
The package is only instantiated inside Optimizely's API route (for example, /pages/api/graphql.ts) so the Optimizely Graph delivery key stays server-side. The frontend never calls Optimizely Graph directly, which avoids CORS and authentication issues.
Install the Remko Optimizely Graph client
Run the following command to install the Remko Optimizely Graph client to your project:
npm install @remkoj/optimizely-graph-clientAdd environment variables
In your Next.js project, create a .env.local file and copy and paste the following code sample. Replace the placeholders with your Feature Experimentation SDK key and Optimizely Graph credentials.
# Browser-safe
NEXT_PUBLIC_OPTIMIZELY_SDK_KEY=YOUR_FX_SDK_KEY

# Server-only (never expose to the browser)
OPTIMIZELY_GRAPH_GATEWAY=YOUR_GRAPH_URL
OPTIMIZELY_GRAPH_SINGLE_KEY=YOUR_DELIVERY_KEY
NoteKeep server-only keys out of client code. Always use a server route. Anything starting with
NEXT_PUBLIC_is exposed to the client.
Create API route
Create pages/api/graphql.ts in your Next.js project.
Copy and paste the following code sample. It creates an API route that acts as a secure server-side proxy between your Next.js app and the Optimizely Graph API. Instead of calling Optimizely Graph directly from the browser (which exposes your delivery key and causes CORS issues), it uses the @remkoj/optimizely-graph-client npm package to create a preconfigured client that automatically reads authentication credentials from environment variables.
When the browser sends a POST request with a GraphQL query and optional variables to /api/graphql, the route executes the request on the server, returns the results as JSON, and keeps all sensitive keys hidden from the client. This approach ensures authentication, avoids cross-origin errors, and centralizes Optimizely Graph calls in one secure endpoint.
import type { NextApiRequest, NextApiResponse } from 'next';
import createClient from '@remkoj/optimizely-graph-client/client';

export default async function handler(req: NextApiRequest, res: NextApiResponse) {
  if (req.method !== 'POST') return res.status(405).json({ message: 'Only POST allowed' });

  try {
    const client = createClient(); // reads env automatically
    const { query, variables } = req.body || {};
    const data = await client.request(query, variables);
    return res.status(200).json({ data });
  } catch (err: any) {
    const message = err?.message ?? 'Unknown error';
    return res.status(500).json({ error: message, details: err?.response ?? null });
  }
}
Fetch content from Optimizely Graph
-
Create
lib/graph.tsand paste the following code in your Next.js project:export async function fetchContentFromGraph(variationKey: string) { const query = ` query ($variationKey: String!) { _Content( variation: { include: SOME, value: [$variationKey], includeOriginal: true } limit: 5 ) { total items { __typename _id _metadata { displayName variation locale url { default internal graph base type } } } } } `; const res = await fetch('/api/graphql', { method: 'POST', headers: { 'Content-Type': 'application/json', 'Accept': 'application/json' }, body: JSON.stringify({ query, variables: { variationKey } }), }); const json = await res.json(); if (json?.errors) throw new Error(JSON.stringify(json.errors)); const items = json?.data?._Content?.items ?? []; // normalize each url to a string for rendering for (const item of items) { const u = item?._metadata?.url; if (u) item._metadata.urlString = typeof u === 'string' ? u : (u.default || u.internal || u.graph || u.base || ''); } return items; }NoteYour Optimizely Graph schema may vary.
If the query errors, open the GraphiQL explorer and introspect
VariationInput,_ContentWhereInput, andIContentMetadatato confirm field names. -
Create
lib/OptimizelyClient.tsand copy and paste the following code sample:import { createInstance } from '@optimizely/react-sdk'; export const optimizelyClient = createInstance({ sdkKey: process.env.NEXT_PUBLIC_OPTIMIZELY_SDK_KEY!, // from .env.local }); -
Create
pages/_app.tsx(if it does not already exist). Copy and paste the following code sample. This file wraps all pages in the OptimizelyProvider for the React SDK so that you can use the SDK anywhere in your app.import type { AppProps } from 'next/app'; import { OptimizelyProvider } from '@optimizely/react-sdk'; import { optimizelyClient } from '../lib/OptimizelyClient'; export default function MyApp({ Component, pageProps }: AppProps) { return ( <OptimizelyProvider optimizely={optimizelyClient} user={{ id: 'user123' }} // Demo only. Replace with a unique user ID in production. > <Component {...pageProps} /> </OptimizelyProvider> ); }Noteuser123is used for demo purposes only.In production, replace it with a persistent, unique ID for each user or visitor so that experiments bucket users consistently and audience targeting works correctly. See Handle user IDs.
In your Next.js project, create pages/fx-cms-integration.tsx and copy and paste the following code. In the code, the frontend page calls fetchContentFromGraph with the variation key from the Feature Experimentation SDK.
import { useEffect, useState } from 'react';
import { useDecision } from '@optimizely/react-sdk';
import { fetchContentFromGraph } from '../lib/graph';

export default function FxTestPage() {
  // "mosey-bank" is your flag key; update if different
  const { decision, variables, isReady } = useDecision('mosey-bank', {
    autoUpdate: true,
    overrideUserId: 'user123', // Demo only. Replace with a unique user ID in production. See previous note.
  });

  const [items, setItems] = useState<any[]>([]);
  const [error, setError] = useState<string | null>(null);

  const variationKey = (variables?.['cms-saas-content-variation'] as string) ?? null;

  useEffect(() => {
    if (!isReady) return;
    if (!variationKey) {
      setError('No variation key returned from Feature Experimentation.');
      return;
    }
    fetchContentFromGraph(variationKey)
      .then((res) => setItems(res))
      .catch((e) => setError(`Failed to fetch content from Graph: ${e?.message ?? e}`));
  }, [isReady, variationKey]);

  if (!isReady) return <p>Loading experiment…</p>;
  if (error) return <p>{error}</p>;
  if (!items.length) return <p>No content found for variation: {variationKey}</p>;

  return (
    <div style={{ padding: '2rem' }}>
      <h1>CMS (SaaS) content for: {variationKey}</h1>
      {items.map((item, i) => (
        <div key={i} style={{ marginBottom: '1rem' }}>
          <h2>{item._metadata?.displayName ?? item.__typename}</h2>
          <p>Variation: {item._metadata?.variation}</p>
          <p>Locale: {item._metadata?.locale}</p>
          <p>URL: {item._metadata?.urlString}</p>
        </div>
      ))}
    </div>
  );
}
Run your site
Run your Next.js frontend application.
npm run devOpen your browser and go to http://localhost:3000/fx-cms-integration.
The Feature Experimentation SDK determines which variation a visitor sees based on the flag decision. Your frontend then passes the variation key to Optimizely Graph to fetch the correct content.
You can view your results on the Optimizely Experimentation Results page.
Troubleshoot
See the following list for common errors and their meanings:
- 304 on datafile – The SDK is using a cached datafile. Wait for the next poll. Confirm the SDK key matches the environment with the running rule.
- Decision undefined – Verify the flag key, that
OptimizelyProviderwraps the app, and that the A/B test rule's status is Running in the same environment as your SDK key. - /api/graphql 401 AUTHENTICATION_ERROR – Delivery key is missing or invalid. Set your environment variables and keep Optimizely Graph keys on the server only.
- HTML returned from Optimizely Graph – Gateway URL is wrong. Use your Optimizely Graph gateway, not a CMS (SaaS) endpoint.
- Cannot query field
pathonContentUrl– Your schema usesurl { default|internal|graph|base|type }. Update the query fields. - Unknown argument
filterorqueryon_Content– Use thevariation:argument, notfilter:.
Updated 7 days ago