Migrate to CMS 12 or Optimizely Commerce Connect 14
Describes how to migrate your project for use with Optimizely Content Management System (CMS) 12 and Optimizely Commerce Connect 14).
Complete other steps first!This is Step 3: Upgrade the Service Environment from the topic Upgrade to CMS 12.
You can use the Project Migration tab to move to a project that supports .NET 6 for CMS 12 and Commerce Connect 14. The migration can be done in a few steps, as explained below.
-
Click Start Migration in the Project Migration tab to provision project resources.
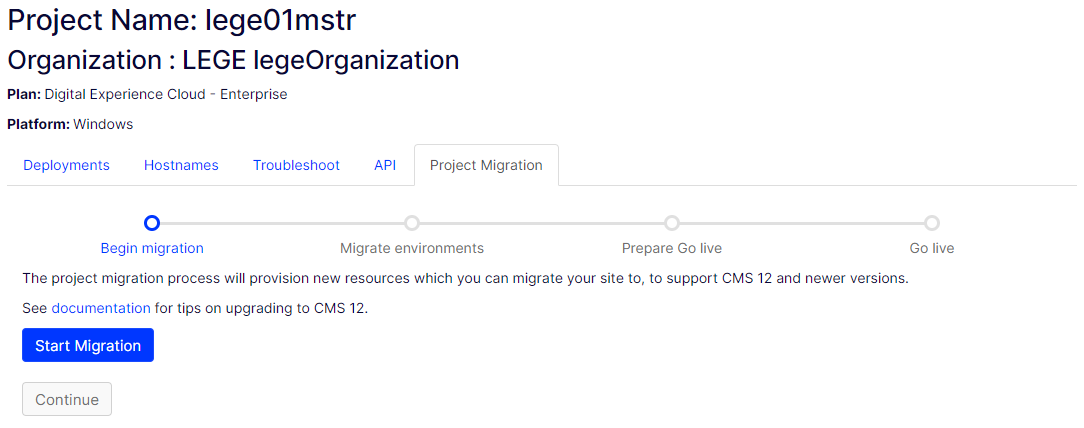
This creates a project that supports CMS 12 or Commerce Connect 14 and is immediately accessible.
NoteIt might take some time before the new project is visible in the Azure portal. Log out and log back in, or wait for a few minutes and it should show up automatically.
The system creates a new find index for the target project. Find data stored directly in Find's DB does not migrate: Connectors, Synonyms, Boosting (UnifiedWeights), Related Queries (DidYouMean), Autocomplete
A new Sendgrid service must be set up and linked to the CMS 12 project. Contact Support to proceed.
VPN, Certificates, and ADE environmentsIf you are prompted with a warning regarding certificates, Virtual Private Networks (VPN), or Advanced Delivery Environments (ADE) when you start a migration, contact Support to proceed.
If your current project has the ADE environment, it will not be visible in the Project Migration. Contact support to provision a new ADE environment in your CMS 12 project and migrate contents.
If a VPN is actively used in the current project, you must provision and configure a new VPN for the target project. The old VPN connection is deleted when the migration is completed.
If you no longer need the target project after provisioning it, you can delete it using Abort Migration.
-
Start by setting up access for your deployment tooling by generating API keys so you can deploy the code packages and start testing it in the new environment.
-
Deploy the updated code to the environment and validate that it works. Make sure you add and configure the
EPiServer.CloudPlatform.Cmspackage as described in Create a CMS site and deploy. Begin by setting up the Integration environment, then continue with Preproduction and Production to ensure it works there.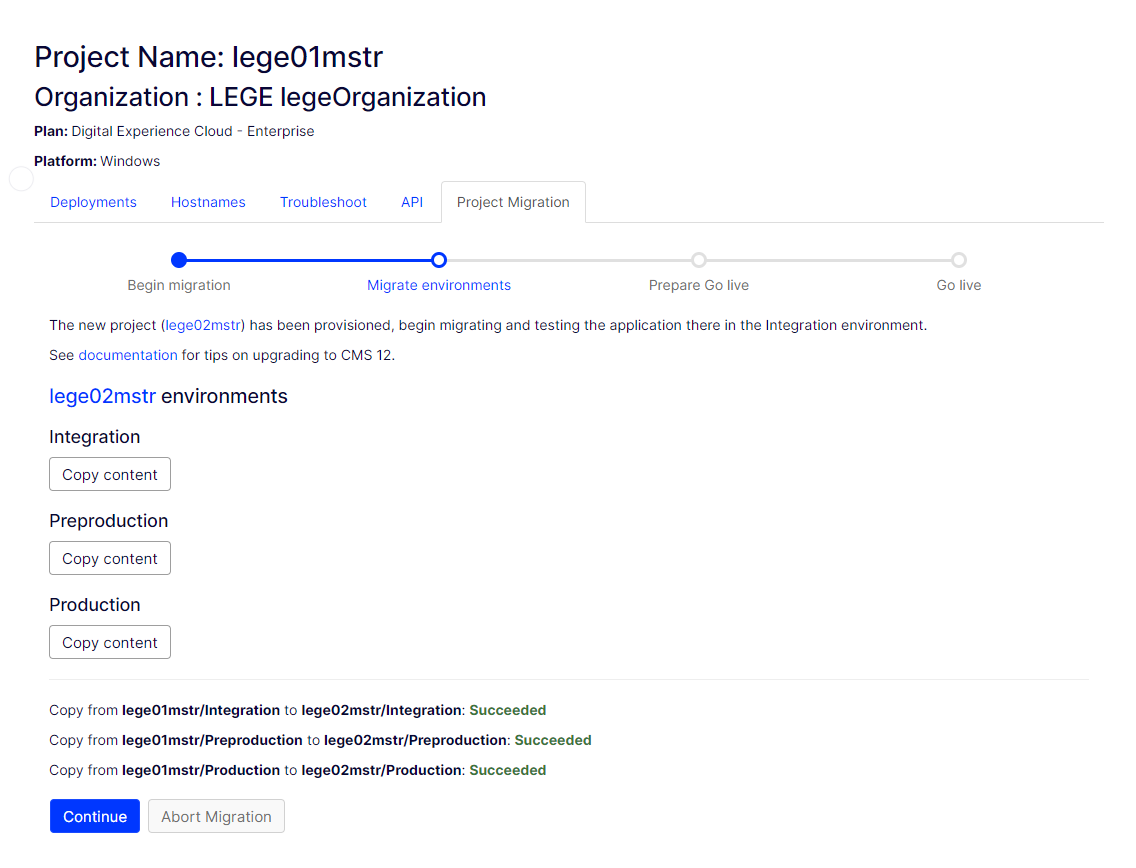
- You can copy content from the source to the target project to ensure compatibility with the same data.
- You can choose any environment as the source environment.
- You can also copy content during the
Go livestep to ensure you have the latest data when finalizing the migration to the new project. - You can access more tools or logs for troubleshooting in the Azure portal.
-
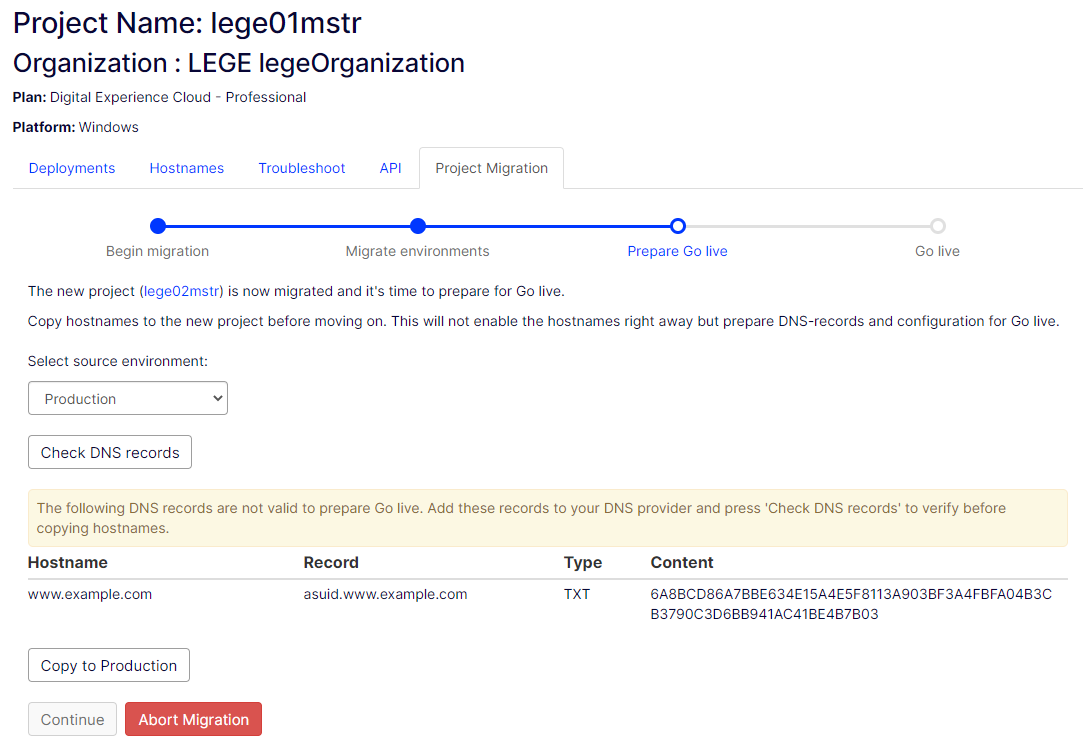
Prepare Go live by copying the hostnames to the target project. In this step, the hostnames are prepared but not active.
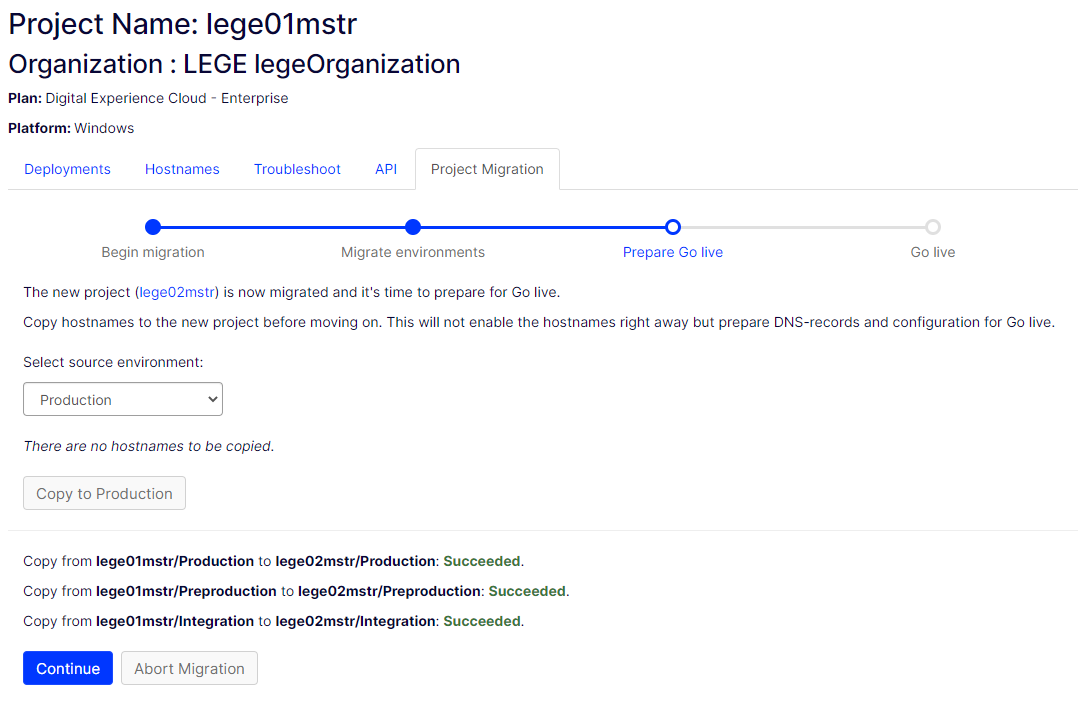
Some older hostnames may require new DNS verification records to work in the new project, which can be done during the following step.
-
Click Check DNS records to verify the DNS record status after the records are added.
Next, you can migrate the whole project or migrate hostnames individually.
Migrate the whole project
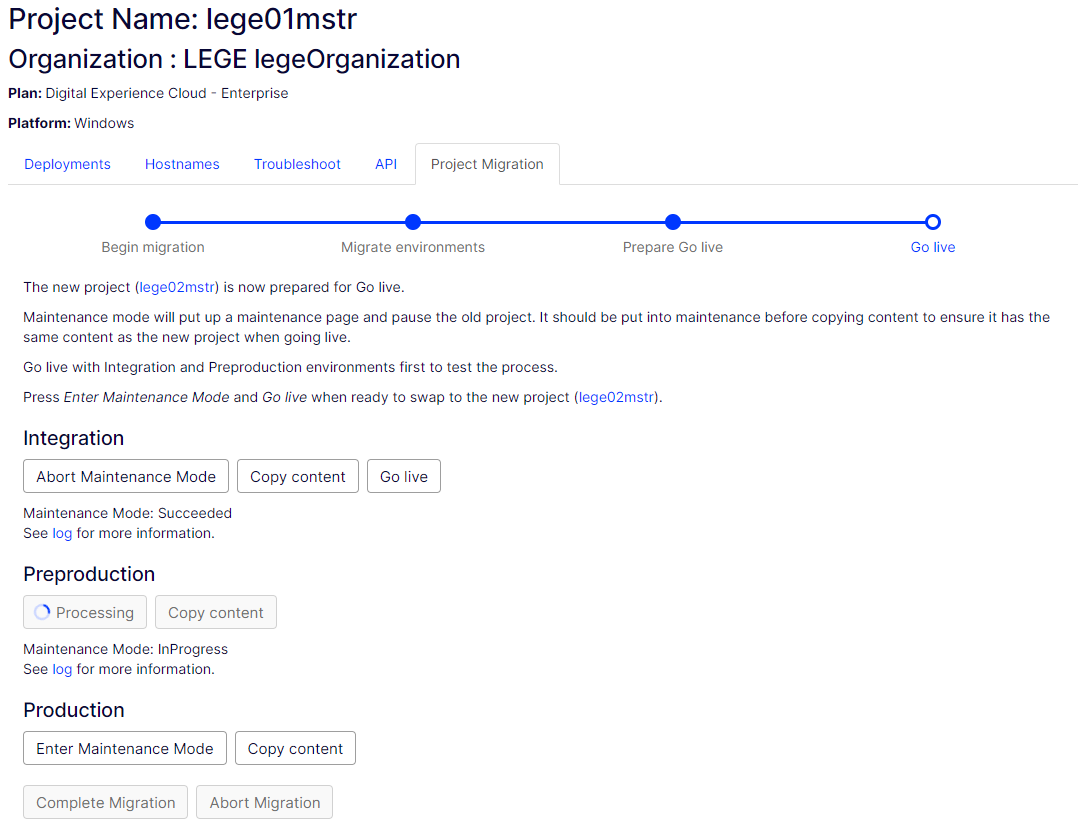
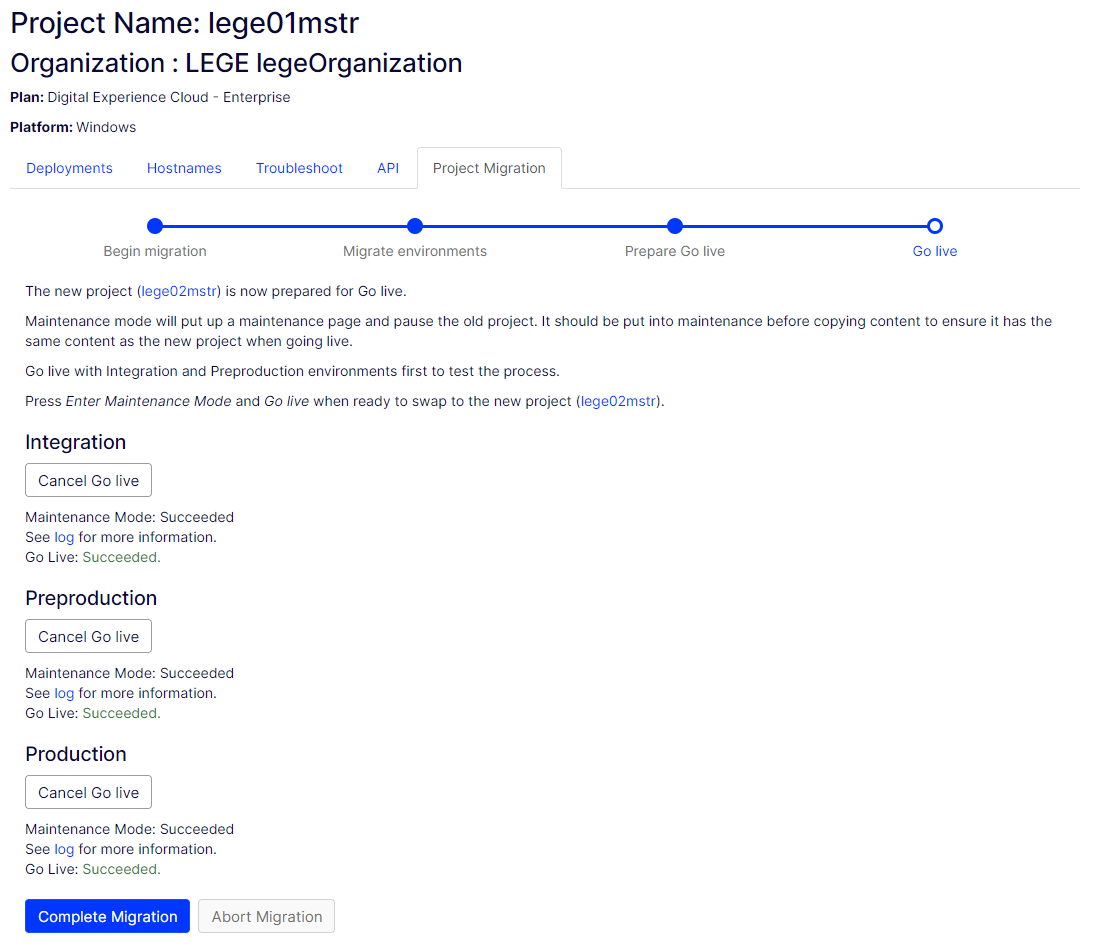
The final step is to Go live. You can first sync content from the source to the target project. Pause the environments in the source project during this final phase. Each environment should be put into maintenance mode to prevent changes to data during the swap. When you enter maintenance mode, you cannot abort the migration until it is canceled.
Completing the migrationWhen you finish migrating the last environment from CMS 11 and move all hostnames to the target project, CMS keeps the CMS 11 environment for 14 days after the last go-live. A notification lets you extend this time by clicking Need More Time?

-
Maintenance mode – You can activate maintenance mode with
Maintenance Pageor by putting the source environment intoRead Onlymode.Read Onlymode must be supported in the source project for use. See database-mode documentation for information on implementation. -
Click Abort Maintenance Mode if you encounter a problem after entering the mode. After you activate maintenance mode, the environment is ready for
Go live.Maintenance mode testingYou must test maintenance mode and
Go liveon Integration and Preproduction before proceeding to Production because it may cause some downtime. -
After entering maintenance mode, click Go Live to make the environment live in the project. You can click Cancel Go Live if needed.
Migrate hostnames individually
If data consistency between the two projects isn't needed, then migrating one hostname at a time is also possible. With this approach, both projects are live, but some hostnames will target the previous project while others live in the new one.
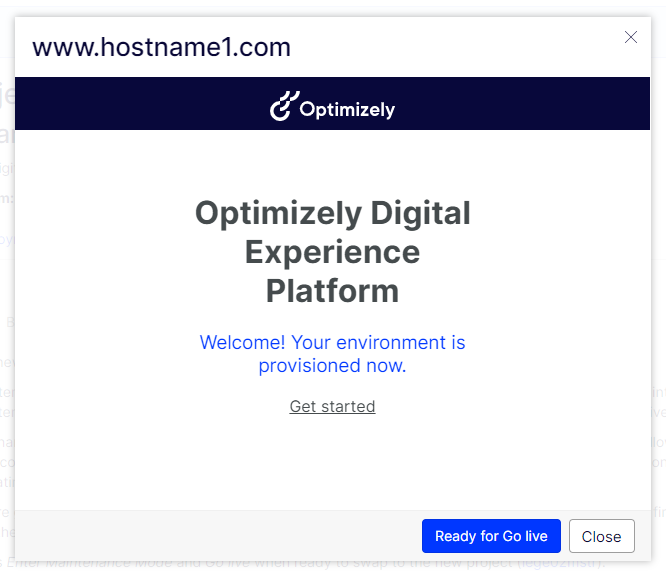
- Click a hostname to preview it.
- If the hostname renders as expected, click
Ready for Go live
- When the hostnames that should go live are
Ready for go live, clickGo live
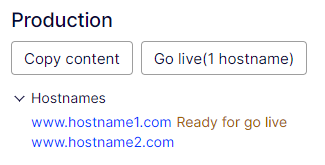
- Hostnames marked as
Ready for go livewill now be live in the new project. - After the Integration, Preproduction, and Production environments are live, click Complete Migration. The resources in the source project are no longer needed and will be scheduled for decommissioning.
When migrating hostnames, make sure you do either of the following steps:
- Migrated all hostnames from the previous project to your new CMS 12 project using the migration tool provided.
Note
You should not manually recreate hostnames you want to move from the old project to the new one.
- Deleted unused hostnames from your old project that you do NOT want to move over to the new one. To complete the migration, all hostnames must be migrated to the new CMS 12 project.
- To finish, click Complete Migration manually. The source project will be kept for 7 days before being removed; you cannot cancel the Complete Migration action.
Auto completing the migrationWhen you golive the last environment from CMS 11 and move all hostnames to the target project, CMS keeps the CMS 11 environment for 14 days after the last go-live. A notification lets you extend this time by clicking Need More Time?
Updated about 9 hours ago