Go live
Describes some typical actions, such as mapping host names in the DNS and restricting edit access, when going live with sites in Optimizely Digital Experience Platform (DXP).
Map domain hostnames (required)
Environments in DXP are accessed using a set of dxcloud-URLs that are set up and verified according to platform requirements. Examples:
http://appname123inte.dxcloud.episerver.net
http://appname123prod.dxcloud.episerver.net
Before going live, you must apply and verify the same DNS settings for the domains you intend to use with your DXP. This includes creating an _asuid_record used by Azure and a CDN-verify record to confirm that you own the domain.
To send visitors who enter your bare domain (for example domain.com) to the canonical www hostname, configure an apex domain redirect.
Usually, these DNS records are modified:
- CNAME – Creates an alias for a hostname.
- A-record – Maps a hostname to an IP address.
The following instructions show how to modify the DNS settings. You can use Microsoft DNS Manager if you host your name servers or the web interface of your DNS service provider. Or, contact your DNS service provider if you are unsure how to change these settings.
Modify the DNS settings
ImportantThe following steps must be done for each domain with which your application should be associated.
Before going live
-
Configure your Optimizely Content Management System (CMS) to respond to the incoming hostnames you plan to use, such as
www.domain.com. Also, configure some default URLs like hostname using "*" (preferred), or alternatively:appname123.dxcloud.episerver.net appname123-slot.dxcloud.episerver.net appname123.azurewebsites.net appname123-slot.azurewebsites.netThe appname123-slot.dxcloud.episerver.net address validates the site during deployments.
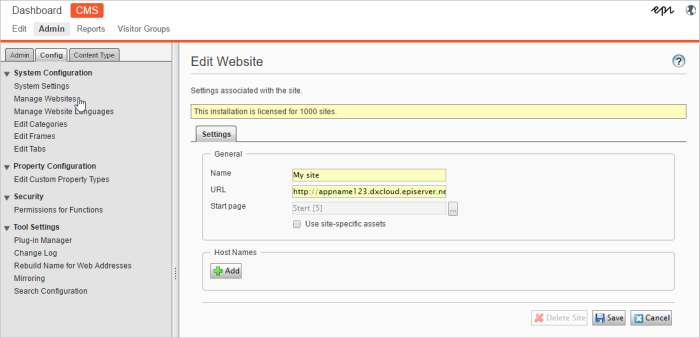
Go to CMS > Admin > Configuration > Manage Sitesto map hostnames and URLs.
-
After you map the hostnames, inform Support about which URLs you will use.
-
Optimizely sends you an email containing the following:
a. Verification information for CDN and Azure (cloudflare-verify and awverify, these are standard TXT DNS records).
b. The A-record pointer is to be used later when going live. -
Do the following to verify your ownership of the domain and subdomain for the CDN and in Azure:
a. CDN. Create a record in your DNS using this format:cloudflare-verify.DOMAIN.COM IN TXT XXXXXXXXX-XXXXXXXX
(Optimizely provided the unique numeric value for the TXT record.)b. Azure. Create a record in your DNS using this format:
awverify.SUBDOMAIN.DOMAIN.com IN TXT appname123.azurewebsites.netExample:
awverify.www.episerver.net IN TXT dxcwebapp.azurewebsites.netNoteVerify the settings for Azure and CDN for each domain and/or subdomain to which you want your DXC environment to respond.
-
When done with the DNS updates, contact Support again to finalize the verification procedure and add your verified domains to the production environment.
When going live
To send traffic from your custom URL to the DXP, you must create CNAME records in your DNS, pointing to the corresponding DXP endpoint.
-
Update the A-record at the apex domain (
domain.com) to point to the apex domain redirect IP address, which sends visitors to the canonicalwwwhostname. See Apex domain redirect for the address and DNS details. -
Add
dxcloud.episerver.netto the URL you want to target withCNAME. When this is done, the site is live. Examples:www.DOMAIN.com IN CNAME www.DOMAIN.com.dxcloud.episerver.net www.customer.com IN CNAME www.customer.com.dxcloud.episerver.net beta.client.net IN CNAME beta.client.net.dxcloud.episerver.net prod.company.com IN CNAME prod.company.com.dxcloud.episerver.net country.charity.org IN CNAME country.charity.org.dxcloud.episerver.net
Redirect to secure URLs
HTTPS is the secure version of HTTP, adding encryption to the communication between the browser and the editing environment. DXP follows industry-standard best practices and redirects requests from a non-secure www URL (http://www.domain.com) to the secure www URL (https://www.domain.com).
Requests to your bare domain (for example http://domain.com or https://domain.com) are handled by the apex domain redirect, which sends visitors to the canonical www hostname over HTTPS in a single hop. Optimizely manages the apex certificate automatically. See Apex domain redirect.
To force HTTPS within your application, add a redirect rule by modifying web.config in your Optimizely solution.
Example: HTTP to HTTPS redirect rule.
<rule name="Redirect to HTTPS"
      stopProcessing="true">
<match url=".*"
       negate="false"/>
<conditions>
  <add input="{HTTPS}"
       pattern="OFF" />
</conditions>
<action type="Redirect"
        url="https://{HTTP_HOST}{REQUEST_URI}"
        appendQueryString="false"
        redirectType="Permanent"/>
NoteThe apex domain redirect is not a general-purpose URL rewriter. It always sends the apex domain to the corresponding
wwwhostname and does not serve your site directly at the root domain. See Apex domain redirect for details and limitations.
Restrict log in access (optional)
To ensure that the editing environment is only accessed from approved locations, you can restrict the login to only apply to specified IP addresses on the allow list. See Restrict Environment Access.
Single Page Application considerations
You should set up usage tracking parameters correctly to ensure that the website traffic volume monitoring is correct. For websites using the Single Page Application (SPA) concept, specifically configure the page view tracking because pages on these websites will not reload during usage. See Consumption Metrics for information about configuring page view tracking for single-page applications.
Related topics
Updated 3 days ago